Table of Contents
Advertisement
MANUALE D'USO
SCHEDA-TELECOMANDO IRC
PER VENTILCONVETTORI
IRC bOARD-REMOTE CONTROL
fOR fAN COILS, USER MANUAL
NOTICE D'UTILISATION DE LA
CARTE- TéLéCOMMANDE IRC
POUR VENTILO- CONVECTEURS
E 10/05
Via Piave, 53 - 20011 Corbetta (Mi) ITALY
A 10/05
Tel. +39.02.97203.1 ric. autom.
Fax +39.02.9777282 - +39.02.9772820
Cod. 4050765
E-mail: info@sabiana.it - Internet: www.sabiana.it
Advertisement
Table of Contents

Related Manuals for Sabiana IRC board-remote c


Summary of Contents for Sabiana IRC board-remote c
- Page 1 COILS, USER MANUAL NOTICE D’UTILISATION DE LA CARTE- TéLéCOMMANDE IRC POUR VENTILO- CONVECTEURS E 10/05 Via Piave, 53 - 20011 Corbetta (Mi) ITALY A 10/05 Tel. +39.02.97203.1 ric. autom. Fax +39.02.9777282 - +39.02.9772820 Cod. 4050765 E-mail: info@sabiana.it - Internet: www.sabiana.it...
-
Page 2: Table Of Contents
INDICE CONTENTS SOMMAIRE Scopo Pag. 2 Scope Pag. 2 Pag. 2 Configurazione Pag. 3 Configuration Pag. 3 Configuration Pag. 3 Montaggio del ricevitore sulla plafoniera Pag. 4 Mounting the receiver Pag. 4 Montage du récepteur Pag. 4 Montaggio del gruppo di potenza Pag. -
Page 3: Configuration
CONfIgURAzIONE CONfIgURATION CONfIgURATION Il gruppo scheda-telecomando viene fornito con The board-remote control unit is supplied with Le groupe carte-télécommande est fourni avec un kit comprensivo dei materiali illustrati a lato. a kit that includes the materials illustrated to the un kit comprenant le matériel ci-contre. side. -
Page 4: Mounting The Receiver
MONTAggIO MOUNTINg MONTAgE DEL RICEVITORE ThE RECEIVER DU RECEPTEUR (versioni ad incasso) (versions for built-in assembly) (versions encaissées) Fissare il ricevitore come mostrato in figura “1”. Fasten the receiver as shown in figure “1”. Fixer le récepteur voir fig. “1”. - Posizionare la dima e forare (n°... -
Page 5: Montaggio Del Gruppo Di Potenza Pag
MONTAggIO MOUNTINg ThE POWER MONTAgE DU gROUPE DEL gRUPPO DI POTENzA ASSEMBLy DE PUISSANCE a) Dalla spalla destra del ventilconvettore occor- a) On the terminal block on the right shoulder of a) A partir du côté droit du ventilo-convecteur re, agendo sulla morsettiera, scollegare i con- the fan coil, disconnect the wires making up débrancher du bornier les conducteurs constituant duttori costituenti il cavo motore. -
Page 6: Scheda Elettronica Pag
SChEDA ELETTRONICA ELECTRONIC BOARD CARTE ELECTRONIqUE LEgENDA: KEy: LégENDE: D1 Dip Switch di configurazione D1 Configuration dipswitches D1 Dip Switch de configuration D2 Dip Switch di indirizzo D2 Address dipswitches D2 Dip Switch d’adresse J1 Jumper JMP3 J1 Jumper JMP3 J1 Jumper JMP3 M1 Morsettiera M1 Terminal block for connecting the line and... -
Page 7: Function Of The Auxiliary Contacts
fUNzIONE fUNCTION Of fONCTION DES CONTACTS DEI CONTATTI AUSILIARI ThE AUXILIARy CONTACTS AUXILIAIRES Contatto Cf (f2-f2): è un contatto pulito che può Contact Cf (f2-f2): voltage-free contact that Contact Cf (f2-f2): c’est un contact libre qui essere utilizzato per l’accensione/spegnimento can be used to switch the appliance On / Off in peut être utilisé... -
Page 8: Setting The Configuration Dipswitches
IMPOSTAzIONE SETTINg ThE CONfIgURATION PROgRAMMATION DIP DI CONfIgURAzIONE DIPSWITChES DES DIPSWITChES Posizione Switches Switch position CONfIgURAzIONE CONfIgURATION Impianto a 4 tubi 4-pipe system Impianto a 2 tubi 2-pipe system OFF * OFF * Esclusione T3 ON * Disable T3 ON * Sonda di minima T3 attiva Enable T3 cut-out thermostat Senza telecomando... -
Page 9: Funzione Autofan Pag
fUNzIONE AUTOfAN AUTOfAN fUNCTION fONCTION AUTOfAN Il funzionamento standard della macchina preve- In standard operation the fan is always on and Le fonctionnement standard de la machine pré- de che la ventilazione sia sempre attiva e che la control is performed on the water valves. voit que la ventilation soit toujours active et que le regolazione avvenga sulle valvole acqua. -
Page 10: Anti-Stratification Function
fUNzIONE ANTI-STRATIfICATION fONCTION ANTISTRATIfICAzIONE fUNCTION ANTI-STRATIfICATION (Jumper J5) (Jumper J5) (Jumper J5) Configuration recommended for MV-MVB-IV Configuration conseillée pour installations MV- Configurazione consigliata per installazioni MV-MVB-IV. installations. MVB-IV. Configurazione consigliata per installazioni Configuration recommended for MO-IO installations. Configuration conseillée pour installations MO-IO. MO-IO. -
Page 11: Funzionamento Master-Slave Pag
fUNzIONAMENTO MASTER-SLAVE fONCTIONNEMENT MASTER-SLAVE OPERATION MAÎTRE-ESCLAVE gestione di più apparecchi, in collegamento Managing a group of appliances, via serial gestion de plusieurs appareils, en raccorde- seriale, con un unico telecomando connection, with just one remote control ment série, avec une seule télécommande È... -
Page 12: Istruzioni Operative Operating Instructions
ISTRUzIONI OPERATIVE OPERATINg INSTRUCTIONS INSTRUCTIONS PER IL COLLEgAMENTO fOR CONNECTION POUR LE RACCORDEMENT CON LINEA SERIALE RS 485 VIA AN RS485 SERIAL LINE AVEC LIgNE SéRIE RS 485 Nell’effettuare il collegamento elettrico di una rete When making the electrical connections in a net- Lors du raccordement électrique d’un réseau de di Ventilconvettori utilizzanti la connessione in via work of fan coil units communicating via a serial... -
Page 13: Note Di Installazione Pag
NOTE DI INSTALLAzIONE INSTALLATION NOTES NOTES D’INSTALLATION - i cavi vanno tirati con una forza inferiore a 12 kg. - the cables should be tightened to a force of less - les câbles doivent être tirés avec une force infé- Una maggiore forza può... -
Page 14: Messa A Terra Della Rete Pag
MESSA A TERRA EARThINg MISE à LA TERRE DELLA RETE ThE NETWORK DU RéSEAU La rete deve essere messa a terra, in un solo pun- The network must be earthed at one point only, Le réseau doit être mis à la terre, à un seul endroit, to, collegando la schermatura ad una connessio- connecting the shielding to a clean and safe earth. -
Page 15: Accessories
ACCESSORI ACCESSORIES ACCESSOIRES Sonda T2 per Change-Over Change Over probe T2 Sonde T2 pour Change Over Solamente sui Ventilconvettori in esecuzione per Only on the fan coil units designed for two-pipe Seulement sur les ventilo-convecteurs pour impianti a due tubi, la commutazione estate/inver- systems, the heating/cooling changeover can be installations à... -
Page 16: Connection Diagram
SChEMA DI COLLEgAMENTO CONNECTION DIAgRAM SChEMA DE RACCORDEMENT LEgENDA: KEy: LégENDE: EV2 Elettrovalvola acqua calda e fredda EV2 Hot and cold water valve EV2 Électrovanne chaud et froid (impianto 2 tubi) (2-pipe system) (installation 2 tubes) EV1 Elettrovalvola acqua calda (impianto 4 tubi) EV1 Hot water valve (4-pipe system) EV1 Électrovanne chaud (installation 4 tubes) EV2 Elettrovalvola acqua fredda (impianto 4 tubi) -
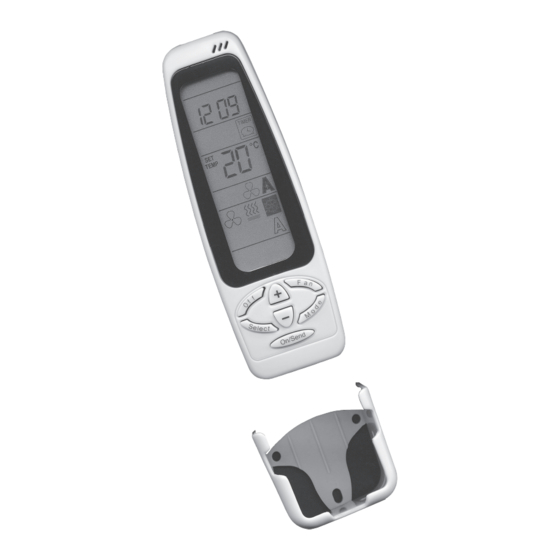
Page 17: Batteries
BATTERIE BATTERIES PILES Prima di effettuare Before performing Avant toute opération qualsiasi operazione con il telecomando, any operations with the remote control, avec la télécommande inserire le batterie a corredo. insert the batteries supplied. mettre les piles fournies. Le batterie Type AAA 1.5 Volt batteries Utiliser des piles che devono essere utilizzate... -
Page 18: Note Generali Pag
NOTE gENERALI gENERAL NOTES NOTES Questo telecomando è a raggi infrarossi. This remote control is infrared. Cette télécommande est infra-rouge. Questo significa che, per trasmettere i comandi This means that to transmit the signals to the Cela signifie que, pour transmettre les comman- all’apparecchio, occorre puntare con il telecoman- appliance, the remote control must be aimed at des à... - Page 19 Ogni volta che si vuole modificare i parametri di Whenever the Fan Coil operating parameter need Pour modifier les paramètres de fonctionnement funzionamento del Ventilconvettore occorre inviare to be modified, the instructions must be sent to the de l’appareil il faut envoyer les instructions en le istruzioni premendo il tasto “ON/SEND”.
-
Page 20: Impostazione Orologio Pag
IMPOSTAzIONE OROLOgIO SETTINg ThE CLOCK PROgRAMMATION hORLOgE Impostazione dell’orologio del telecomando e/o Setting the clock on the remote control and/or the Programmation de l’horloge de la télécommande dell’apparecchio. appliance. et/ou de l’appareil. 1 - Selezione modalità di funzionamento 1 - Selecting the operating mode 1 - Sélection mode de fonctionnement - Premere il tasto SELECT: CLOCK SET inizie- - Press the SELECT button: CLOCK SET will... -
Page 21: Impostazione Del Set Desiderato Pag
IMPOSTAzIONE SETTINg PROgRAMMATION DE LA TEMPE- DEL SET DESIDERATO ThE SET POINT RATURE CONSIgNE VOULUE Premendo i pulsanti (+) o (-) aumentare o dimi- Press the (+) or (-) button to increase or decrease À l’aide des touches (+) ou (-) augmenter ou nuire il valore della temperatura desiderata. -
Page 22: Impostazione Della Ventilazione Pag
IMPOSTAzIONE SETTINg PROgRAMMATION DELLA VENTILAzIONE ThE fAN MODE DE LA VENTILATION Premere il pulsante FAN per selezionare la mo- Press the FAN button to select the desired fan Appuyer sur la touche FAN pour sélectionner dalità di ventilazione prescelta: ventilazione bas- operating speed: low, medium, high or Automatic. -
Page 23: Operating Modes
MODALITà OPERATINg MODES MODE DI fUNzIONAMENTO DE fONCTIONNEMENT Premere il pulsante MODE per selezionare la mo- Press the Mode button to select the desired Appuyer sur la touche Mode pour sélectionner dalità di funzionamento desiderata: operating mode: le mode de fonctionnement voulu: - Ventilazione - Fan - Ventilation... -
Page 24: Timer
TIMER TIMER TIMER IMPORTANTE: se non vengono schiacciati tasti IMPORTANT: if no button is pressed for more IMPORTANT: si on n’appuie sur aucune touche, per un tempo superiore a 10 secondi, il coman- than 10 seconds, the remote control exits the au bout de 10 secondes la télécommande quitte do esce dal programma di impostazione e torna setting procedure and returns to standby status. - Page 25 Impostazione Ora di spegnimento: Setting the STOP time: Programmation heure d’arrêt: - Premere il tasto SELECT. - Press the SELECT button. - Appuyer sur la touche SELECT. La scritta PROgRAM & STOP lampeggiante The message PROgRAM & STOP will flash PROgRAM &...
- Page 26 DIMA DI fORATURA DRILLINg JIg gABARIT DE PERCAgE...
Need help?
Do you have a question about the IRC board-remote c and is the answer not in the manual?
Questions and answers