Table of Contents
Advertisement
Quick Links
Baby Safety Capsule
Series number: 2030/A/2010
FOR BABIES UP TO APPROXIMATELY
6 MONTHS OR WHO HAVE NOT YET
REACHED THE SHOULDER HEIGHT
MARKER.
THIS INFANT CARRIER MUST BE
INSTALLED SO THAT THE BABY IS
REARWARD-FACING AT ALL TIMES.
IMPORTANT:
KEEP THIS BOOKLET IN THE PLACE PROVIDED ON THE CHILD RESTRAINT.
- Series number: 2030/A/2010
Instructions for Installation & Use
Advertisement
Table of Contents

Related Manuals for Britax Baby Safety Capsule


Summary of Contents for Britax Baby Safety Capsule
- Page 1 Baby Safety Capsule Series number: 2030/A/2010 FOR BABIES UP TO APPROXIMATELY 6 MONTHS OR WHO HAVE NOT YET REACHED THE SHOULDER HEIGHT MARKER. THIS INFANT CARRIER MUST BE INSTALLED SO THAT THE BABY IS REARWARD-FACING AT ALL TIMES. IMPORTANT: KEEP THIS BOOKLET IN THE PLACE PROVIDED ON THE CHILD RESTRAINT.
- Page 2 Britax Childcare Pty. Ltd. continues to provide care for your children when travelling in motor cars with a range of child restraints suitable throughout their childhood. INSTALLATION OF CAR ANCHOR FITTING This instruction book can be stored under the cover of the Baby Safety Capsule for future reference. ALTERNATIVE INSTALLATION IF SEATBELT LOOSENS...
- Page 3 • Use the restraint exactly as shown in the instructions. • Straps may be damaged by unsecured cargo in a collision. Secure or remove hazardous cargo before using this strap. Hatch-back or wagon: Do not use the child • Fit the restraint firmly to the car seat. restraint where this strap may fall into a split in the seat back.
- Page 4 Capsule. It is now time to move to the next child restraint. See page 32. FRONT OF VEHICLE The Baby Safety Capsule is not suitable for your child when their shoulders are above the shoulder height marker. If the babies neck muscles are unable to support their head, then the child should remain rear-facing.
-
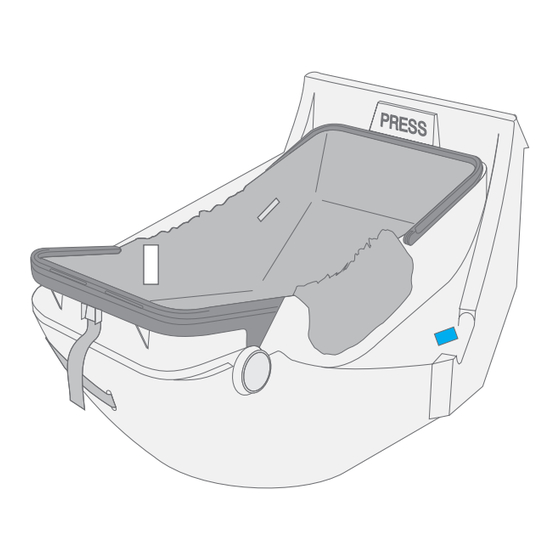
Page 5: Special Features
SPECIAL FEATURES SPECIAL FEATURES 18 19 20 21 1. Shoulder Slots 2. Carrier 3. Cover 9. Anchor Fitting 10. Press Catch 4. Harness Adjustment Buckle FRONT OF VEHICLE 11. Car Seat belt 5. Harness 16. Harness Adjuster REARWARD-FACING 6. Harness Crotch Slots 17. -
Page 6: Suitable For Use
If the baby’s neck muscles are unable to support their head, then the child should remain rear-facing in a restraint that is larger, possibly a Convertible child restraint. The Baby Safety Capsule must not touch the front seat, as the Base may be deformed in a warm car. -
Page 7: How To Set Up
Why can't you see your baby while travelling? Because having their back to you inside the Baby Safety Capsule is the safest way for your baby to travel in a motor vehicle. A. Fold the handles up and grasp with During an accident, the Baby Safety Capsule wants to continue moving forward. - Page 8 HOW TO SET-UP HOW TO SET-UP Press Harness SETTING UP THE HARNESS C. Place baby into Carrier lying on its back with head Boss Adjuster Strap Lock towards boss end. Ensure that baby's arms and legs The Baby Safety Capsule is fitted with and pull Lap Harness are free.
- Page 9 HOW TO SET-UP HOW TO SET-UP 1. Outer crotch strap slot. H. Unthread the strap from the strap Boss Boss connector and push through the lower slot 2. Middle crotch strap slot. as shown. 3. Inner crotch strap slot. Lower Slots 4.
- Page 10 Ensure the harness straps are not twisted and that all straps are secured by pulling each harness strap. CAUTION: Do not use the Baby Safety Capsule with harness shoulder straps set at different heights or fed through mis-matching slots. - Series number: 2030/A/2010 - Series number: 2030/A/2010 Instructions for Installation &...
-
Page 11: How To Install
HOW TO SET-UP HOW TO INSTALL ANGULAR ADJUSTMENT OF CAPSULE Consult the car owner’s handbook for location of anchor fittings or anchorage points. Most modern vehicle's already have an anchor fitting fitted in the car. Some vehicle seats have more rearward slope than others. If the angle of the seat causes An anchor fitting is required to attach the upper anchorage strap to fully install the Carrier to the baby to be too upright for comfort, the angle may be altered by placing a firm packing the car. The upper anchorage strap must be used with this infant carrier when used in the between the seat and the underside of the Base (packing can be a firmly rolled up towel or car. - Page 12 HOW TO INSTALL HOW TO INSTALL C. Grasp the seat belt tongue from inside the Base, pull INSTALLING UPPER ANCHORAGE STRAP through the Base and pass up through the slot on the A. Locate the child restraint anchor fitting in the other side. The seat belt may be over or under the Attachment Clip car that is directly behind the seat location in plastic strip at the centre inside the Base.
-
Page 13: How To Use
HOW TO USE HOW TO USE PLACING BABY IN CARRIER. A. Slacken Harness Straps by pressing Harness Press Harness Adjuster Strap Lock while grasping both Lap Adjuster Strap Lock BABY POSITION: Harness Straps and pulling out desired amount and pull Lap Harness When positioning baby into Carrier make of slack. - Page 14 HOW TO USE HOW TO USE D. Remove Harness Tongues from elastic side bands. Place each arm through each F. Ensure slack is removed from shoulder Pull Harness Adjustment shoulder strap of the harness. Position the buckle of the crotch strap as shown below. harness strap by pulling lap straps then pull Strap to remove slack.
- Page 15 HOW TO USE HOW TO USE PLACING BABY & CARRIER IN BASE D. Ensure the boss retention caps completely Boss cover the Carrier bosses. Engage Upper Anchorage Strap bracket to the upper A. Position the Carrier over the top of the Base and anchorage strap attachment clip.
- Page 16 HOW TO USE HOW TO USE REMOVING BABY & CARRIER REGULAR CARE OF THIS RESTRAINT: Upper Anchorage Please check the following items regularly to ensure the safety of your child: FROM BASE Strap Attachment Clip. A. Check the webbing for fraying. A.
-
Page 17: Care And Maintenance
Cleaning instructions are on the care label attached to the cover. CHOOSE FROM: Washing the cover prior to use will remove excess fluff. Use only mild soap and water to clean all plastic and metal parts of the Baby Safety Capsule. Ensure that the inside of the • Convertible Child Seat, If the convertible seat is harness buckle is free of foreign matter. Cleaning instructions are on page 35. - Page 18 E. Refit the harness buckle to the restraint with the red CAUTION: button facing out and feeding each 3-bar slide through Do not use the Baby Safety Capsule with harness shoulder straps set at different heights or appropriate slot (refer to page 19). fed through mis-matching slots. - Series number: 2030/A/2010 - Series number: 2030/A/2010 Instructions for Installation &...
-
Page 19: Travelling Tips
TRAVELLING TIPS TRAVELLING TIPS SAFETY FEEDING Never hold a baby in arms when riding in a motor vehicle. In this position the baby could Never breast feed a baby while car is in motion. Babies will require extra feeding if travelling be thrown against the dashboard, windscreen or other occupant and suffer serious injury or in the heat. -
Page 20: Installation Of Car Anchor Fitting
INSTALLATION OF CAR ANCHOR FITTING INSTALLATION OF CAR ANCHOR FITTING Consult the vehicle owner’s handbook for location of anchorage fittings or anchorage points Extension Strap distance to be measured. and the possible use of spacers. Some vehicles may have an anchor fitting fitted by the Length 300mm (Use Safe-n-Sound part 0035 or equivalent). vehicle manufacturer. If anchorage points cannot be found refer to car manufacturer or local Length 600mm (Use Safe-n-Sound part 0036 or equivalent). child restraint fitting station or traffic authority for optimum position of anchorage point and Available from all major child restraint retailers. the use of spacers. - Page 21 INSTALLATION OF CAR ANCHOR FITTING INSTALLATION OF CAR ANCHOR FITTING IF THE CAR IS FITTED WITH CHILD IF THE CAR IS NOT FITTED WITH UPPER ANCHORAGE UPPER ANCHORAGE FITTING RESTRAINT ANCHORAGE POINT CHILD RESTRAINT ANCHORAGE Fig.1. FITTINGS FOR SEDANS Attachment Bolt POINTS ONLY Locate the anchorage point behind the rear seating...
- Page 22 INSTALLATION OF CAR ANCHOR FITTING ALTERNATIVE INSTALLATION IF SEATBELT LOOSENS LAP-SASH SEAT BELT ONLY USE A 5/16 UNC GRADE 5 BOLT. IF THE Note: Marking on BOLT IS NOT THE CORRECT LENGTH THE CAR If a seat belt will not stay tight, then a the top of a Grade 5 MANUFACTURER’S HAND BOOK CAN PROVIDE Gated 3-Bar Slide may be used to prevent...
-
Page 23: In Case Of Accident
Please assist the owner of this restraint in their claim. portion IMPORTANT: AUSTRALIA NEW ZEALAND Britax Childcare Pty. Ltd. Remove the gated 3 bar Britax Childcare (NZ) Ltd. slide from the seat belt as A.B.N 55 006 773 600 Customer Service 0508 688 822... - Page 24 NOTES NOTES - Series number: 2030/A/2010 - Series number: 2030/A/2010 Instructions for Installation & Use Instructions for Installation & Use...
- Page 25 The Safe-n-Sound trademark is the property of Britax Childcare Pty. Ltd. (Australia). The Britax trademark is the property of Britax Excelsior Limited (UK). We reserve the right to alter this product without notice. © 1995-2011 Britax Childcare Pty. Ltd. Part No.2200651/A - Series number: 2030/A/2010 Instructions for Installation &...
Need help?
Do you have a question about the Baby Safety Capsule and is the answer not in the manual?
Questions and answers