Table of Contents
Advertisement
COMPACT COMPONENT SYSTEM
SYSTEME DE COMPOSANTS COMPACT
FS-G6
STEREO AMPLIFIER
AX-UXG6
COMPACT DISC/TUNER
XT-UXG6
CASSETTE DECK
TD-UXG6
SPEAKER SYSTEM
SP-UXG6
REMOTE CONTROL RM-SFSG6J
PANEL
OPEN/CLOSE
DIMMER
POWER
ACTIVE
BASS EX.
CLOCK/TIMER
SLEEP
BASS
TREBLE
FM MODE
PLAY MODE
AUTO PRESET
REPEAT
TITTLE/EDIT
ENTER
DISPLAY
/CHARA.
CANCEL
UP
<
>
SET
DOWN
MD
AUX
TAPE
CD
FM/AM
4
7
¢
+
VOLUME
–
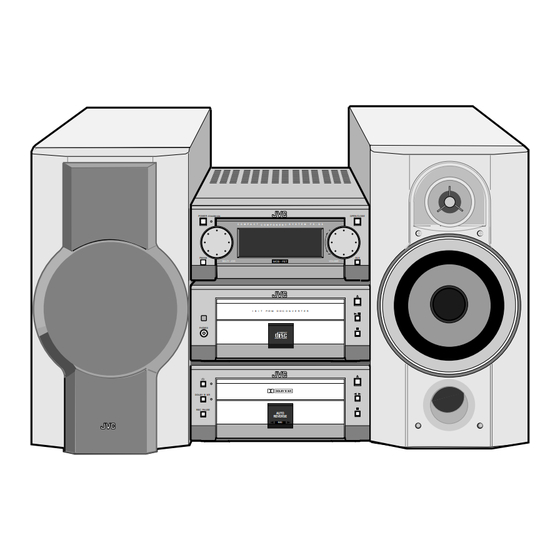
Consists of AX-UXG6, XT-UXG6, TD-UXG6,
and SP-UXG6.
Modéles AX-UXG6, XT-UXG6, TD-UXG6 et SP-UXG6.
POWER
STANDBY/ON
C O M P A C T
C O M P O N E N T
FM/AM
MULTI
JOG
MOS - FET
1 B I T
P • E • M
D • D • C O N V E R T E R
PHONES
COMPACT
DIGITAL AUDIO
DOLBY B NR
REC PAUSE
AUTO
REVERSE
REC
INSTRUCTIONS
MANUEL D'INSTRUCTIONS
OPEN/CLOSE
S Y S T E M
F S - G 6
AUX
VOLUME
For Customer Use:
Enter below the Model No. and Serial
No. which are located either on the rear,
bottom or side of the cabinet. Retain this
information for future reference.
Model No.
Serial No.
LVT0375-001A
[J]
Advertisement
Table of Contents

Related Manuals for JVC FS-G6


Summary of Contents for JVC FS-G6
- Page 1 COMPACT COMPONENT SYSTEM SYSTEME DE COMPOSANTS COMPACT FS-G6 Consists of AX-UXG6, XT-UXG6, TD-UXG6, and SP-UXG6. Modéles AX-UXG6, XT-UXG6, TD-UXG6 et SP-UXG6. STEREO AMPLIFIER AX-UXG6 COMPACT DISC/TUNER XT-UXG6 CASSETTE DECK TD-UXG6 SPEAKER SYSTEM SP-UXG6 OPEN/CLOSE POWER STANDBY/ON C O M P A C T...
- Page 2 Warnings, Cautions and Others Mises en garde, précautions et indications diverses CAUTION WARNING: TO REDUCE THE RISK OF FIRE RISK OF ELECTRIC SHOCK OR ELECTRIC SHOCK, DO NOT EXPOSE DO NOT OPEN THIS APPLIANCE TO RAIN OR MOISTURE. CAUTION: TO REDUCE THE RISK OF ELECTRIC SHOCK. DO NOT REMOVE COVER (OR BACK) NO USER SERVICEABLE PARTS INSIDE.
- Page 3 The STANDBY/ON lamp Caution ––POWER switch! Le témoin STANDBY/ON Disconnect the mains plug to shut the power off completely (the STANDBY/ON lamp goes off). The POWER switch in any position does not disconnect the mains line. • When the unit is on standby, the STANDBY/ON lamp lights red.
- Page 4 Caution: Proper Ventilation Attention: Aération correcte Pour prévenir tout risque de décharge électrique ou d’incendie To avoid risk of electric shock and fire, and to prevent damage, locate the apparatus as follows: et éviter toute détérioration, installez l’appareil de la manière 1 Front: suivante: No obstructions and open spacing.
-
Page 5: Class 1 Laser Product
IMPORTANT FOR LASER PRODUCTS/ IMPORTANT POUR LES PRODUITS LASER 2 WARNING LABEL, PLACED INSIDE THE UNIT 1 CLASSIFICATION LABEL, PLACED ON EXTERIOR SURFACE 2 ETIQUETTE D'AVERTISSEMENT PLACÉE À 1 ÉTIQUETTE DE CLASSIFICATION, PLACÉE SUR LA L'INTERIEUR DE L'APPAREIL SURFACE EXTÉRIEURE DANGER: Invisible laser VARNING: Osynlig laser- radiation when open and... -
Page 6: Introduction
Introduction We would like to thank you for purchasing one of our JVC products. Before operating this compact component system, read this manual carefully and thoroughly to obtain the best possible performance from your system, and retain this manual for future reference. -
Page 7: Table Of Contents
Contents Introduction ............1 Playing Back a Tape ........... 20 About This Manual ............... 1 Playing Back a Tape — Basic Operation ......20 Precautions ................1 Fast-Winding a Tape ............21 Searching and Skipping to Each Program Contents ..............2 —... -
Page 8: Location Of The Buttons And Controls
Location of the Buttons and Controls Become familiar with the buttons and controls on the units. Front Panels OPEN/CLOSE POWER STANDBY/ON AX-UXG6 C O M P A C T C O M P O N E N T S Y S T E M F S - G 6 Stereo Amplifier FM/AM... - Page 9 Continued Front Panels Buttons behind the sliding panel AX-UXG6 Stereo Amplifier 1 2 3 4 5 6 7 8 9 p 1 POWER button and STANDBY/ON lamp (11)* 2 MULTI JOG dial 3 FM/AM button (14)* DISPLAY PLAY TITLE CLOCK ¢...
-
Page 10: Remote Control
Continued Become familiar with the buttons on the remote control. Remote Control Remote Control 1 PANEL OPEN/CLOSE button (13) 2 CLOCK/TIMER button (10, 25) 3 ACTIVE BASS EX. (extension) button (12) 4 TREBLE button (12) REMOTE CONTROL RM-SFSG6J PANEL 5 BASS button (12) OPEN/CLOSE DIMMER POWER... -
Page 11: Getting Started
External Wire After unpacking, check to be sure that you have all the following items. FS-G6 compact component system consists of three units, The number in the parentheses indicates the quantity of the AX-UXG6 Stereo Amplifier, XT-UXG6 Compact Disc/ pieces supplied. -
Page 12: Connecting Md Recorder Xm-G6
Connecting Antennas Supplied FM antenna You can also connect the MD recorder XM-G6 (not supplied), specifically designed for FS-G6. This unit will complete FS-G6 compact component system. When you connect and use this unit, refer to the Instructions supplied with it for details. -
Page 13: Connecting Speakers
Continued Connecting Speakers AM antenna You can connect the speakers using the speaker cords. 2, 3 Vinyl-covered wire ANTENNA (not supplied) Speaker Cord LOOP Speaker Cord FM 75 COAXIAL SPEAKERS RIGHT LEFT Black AM loop antenna (supplied) Right speaker Left speaker Connect the AM loop antenna to the AM LOOP Open the speaker terminal. -
Page 14: Connecting Other Equipments
Continued Connecting Other Equipments To connect audio equipment with an optical digital input terminal You can connect the following equipments to the system: By using both an optical digital cable (not supplied) and an audio cable (not supplied), connect: • Audio equipment — used only as an analog playback •... -
Page 15: Basic Settings
Basic Settings DIMMER REMOTE CONTROL RM-SFSG6J PANEL DIMMER OPEN/CLOSE POWER CLOCK/TIMER ACTIVE POWER OPEN/CLOSE STANDBY/ON SLEEP BASS EX. CLOCK/TIMER C O M P A C T C O M P O N E N T S Y S T E M F S - G 6 BASS TREBLE... -
Page 16: Common Operations
VOLUME (+/–) Here are basic and common things that apply to all the A little power is always consumed even while the system is operations of FS-G6 system. in standby mode. • To save the power consumption, make use of Dimmer Turning On the Power and Selecting the feature (see page 10). -
Page 17: Reinforcing The Bass Sound
Continued • When using the remote control, press VOLUME + button Adjusting Bass and Treble Sounds to increase the volume level or press VOLUME – button to decrease it. You can adjust bass and treble sound effects with the remote control, conforming to your preference and acoustic The volume level (from 0 to 50) appears in the display surroundings. -
Page 18: Operating The Sliding Panel
You can use the sliding panel to enable advanced operations You can listen to an external equipment such as MD recorder, features provided for FS-G6 compact component system. VCR, and other auxiliaries. First make sure that the external equipment is properly connected to the system (see page 7 and 9). -
Page 19: Listening To Fm And Am Broadcasts
Listening to FM and AM Broadcasts Buttons behind the sliding panel REMOTE CONTROL RM-SFSG6J PANEL PANEL DIMMER OPEN/CLOSE POWER OPEN/CLOSE DISPLAY PLAY TITLE CLOCK ¢ /CHARA. CANCEL ENTER MODE MODE /EDIT /TIMER ACTIVE SLEEP BASS EX. CLOCK/TIMER BASS TREBLE FM MODE FM MODE PLAY MODE REPEAT... -
Page 20: Presetting Stations
Continued Presetting Stations To preset stations automatically — Auto Preset You can automatically preset 30 FM, 15 AM stations. Preset numbers will be allocated as stations are found, starting from You can preset up to 30 FM and 15 AM stations into memory the lowest frequency and moving up to the higher frequency. -
Page 21: Playing Back A Cd
Playing Back a CD Buttons behind the sliding panel BASS TREBLE FM MODE PLAY MODE DISPLAY PLAY TITLE CLOCK ¢ PLAY MODE REPEAT AUTO PRESET /CHARA. CANCEL ENTER MODE MODE /EDIT /TIMER REPEAT TITTLE/EDIT ENTER DISPLAY CANCEL /CHARA. CANCEL 4 ¢ CANCEL PLAY MODE <... -
Page 22: Searching And Skipping Tracks
Continued Press 6 (play/pause) button on the CD unit. To go to another track Before or during playback, press 4 / ¢ button Each track of the CD starts playing one after another, and stops when the final track has finished playing. repeatedly: Press ¢... - Page 23 Continued To modify the program Press SET button to program the track number. Before playing back the CD, you can erase the last programed track by pressing CANCEL button. Each time you press the button, the last programed track is erased from the end of program.
-
Page 24: Playing At Random - Random Play
Continued Playing at Random — Random Play Repeating Tracks — Repeat Play The tracks of the loaded CD will play in no special order You can have the entire disc, the programed tracks, or the (at random) when you select this mode. individual track repeat as many times as you like. -
Page 25: Playing Back A Tape
Playing Back a Tape DISPLAY CANCEL /CHARA. Buttons behind the sliding panel < > DISPLAY PLAY TITLE CLOCK ¢ /CHARA. CANCEL ENTER MODE MODE /EDIT /TIMER DOWN TAPE ` (playback) TAPE FM/AM 4 ¢ 7 (stop) π (auto reverse) 0 (open/close) 4 / ¢... -
Page 26: Fast-Winding A Tape
Continued Press 7 (stop) button to stop playback the tape. To skip forward to the next music Press the button same as the tape direction indicator as Press 0 (open/close) button directly to stop and follows: 3 ] Press ¢ button. remove the tape. -
Page 27: Recording Onto A Tape
Recording onto a Tape Buttons behind the sliding panel TITTLE/EDIT ENTER DISPLAY /CHARA. CANCEL DISPLAY PLAY TITLE CLOCK ¢ /CHARA. CANCEL ENTER MODE MODE /EDIT /TIMER < > DOWN REC MODE TAPE ` (playback) π (auto reverse) 0 (open/close) CD 6 (play/pause) TAPE FM/AM 7 (stop) -
Page 28: Recording In Auto Reverse
Continued Press 0 (open/close) button on the cassette deck REC indicator lights red to show the recording pause mode, and “TAPE REC” appears in the display window unit to remove the tape. • Pressing 0 (open/close) button directly during as follows, recording , the cassette deck unit stops recording and opens the tape tray. -
Page 29: Synchronized Recording From A Cd
Synchronized Recording from a CD When CD playback finished, the CD unit first, then the cassette deck stops recording automatically. CD application on FS-G6 system can be recorded with a Cassette deck unit will stop after leaving a non- simple, one-touch operation. -
Page 30: Using The Timers
TAPE Timer indicators FM/AM MULTI JOG On FS-G6 system, three timer features are available — • Each time you press the button, the timer mode changes as follows: Recording Timer, Daily Timer, and Sleep Timer. Before using these timers, you need to set the clock built in... -
Page 31: Using Daily Timer
Continued Rotate MULTI JOG dial ( < / > button on the remote Press SET button to call the previous settings for control also available) to select the minute of the next timer recording. timer-off time, then press SET button. The REC timer indicator lights, and the setting items appear one after another in the display window. - Page 32 Continued Rotate MULTI JOG dial ( < / > button on the remote If you have selected CD as the source in the above control also available) to select the hour of the timer- step, select a track. 1) Rotate MULTI JOG dial ( < / > button on the remote off time, then press SET button.
-
Page 33: Using Sleep Timer
Using Sleep Timer Timer Priority With Sleep Timer, you can fall asleep to your favorite music Since each timer can be set separately, you may wonder or radio program. what happens if the setting for these timers overlaps. Here are the priorities for each timer. How Sleep Timer actually works The system automatically turns off after the selected time •... -
Page 34: Maintenance And Additional Information
Maintenance and Additional Information General Notes In general, you will have the best performance by keeping your CDs, cassette tapes and the mechanism clean. • Store CDs and cassette tapes in their cases, and keep them in cabinets or on shelves. •... -
Page 35: Handling Cassette Tapes
Handling Cassette Tapes Types of Cassette Tapes Cautions regarding handling This cassette deck unit incorporates an Automatic Tape Detection function. This mechanism uses the tape-type • Do not touch the surface of the tape or pull the tape out detection holes to distinguishes which type of tape was of the cassette. -
Page 36: Troubleshooting
Troubleshooting If you are having a problem with your system, check this list for a possible solution before calling for service. If you cannot solve the problem from the hints given here, or the units has been physically damaged, call a qualified person, such as your dealer, for service. -
Page 37: Specifications
Specifications Stereo Amplifier AX-UXG6 Speaker System SP-UXG6 Output power Type: 2-way Bass-Reflex Type 25 W per channel, min. RMS at 6 Ω at 1 kHz, with Speaker unit: Woofer 11.5 cm (4 in.) no more than 10% total harmonic distortion (for Cone x 1 U.S.A.) Tweeter... -
Page 38: How To Locate Your Jvc Service Center
Sophisticated electronic products may require occasional service. Just as quality is a keyword in the engineering and production of the wide array of JVC products, service is the key to maintaining the high level of performance for which JVC is world famous. The JVC service and engineering organization stands behind our products. -
Page 39: Limited Warranty
WHAT WE WILL DO: If this product is found to be defective, JVC will repair or replace defective parts at no charge to the original owner. Such repair and replacement services shall be rendered by JVC during normal business hours at JVC authorized service centers. - Page 40 VICTOR COMPANY OF JAPAN, LIMITED EN, FR 0200JTMMDWJSC...
Need help?
Do you have a question about the FS-G6 and is the answer not in the manual?
Questions and answers