Table of Contents
Advertisement
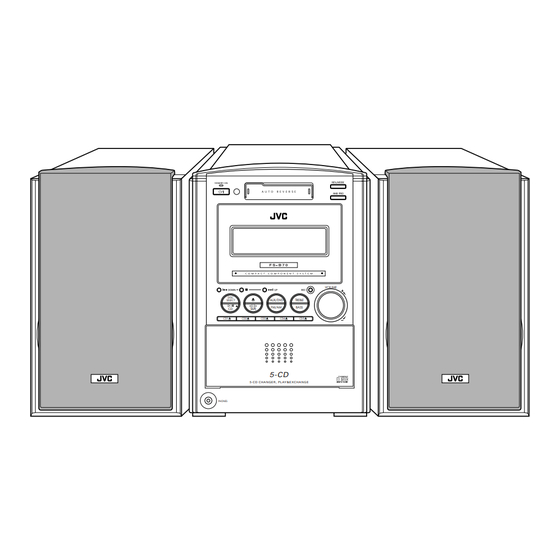
COMPACT COMPONENT SYSTEM
FS-B70
—Consists of CA-FSB70 and SP-UXB70
VOLUME
DISC
SELECT
AUX/DVD
TREBLE
FM/AM
BASS
CD
TAPE
CD1
CD2
CD3
CD4
CD5
5-CD CHANGER, PLAY&EXCHANGE
PHONES
INSTRUCTIONS
STANDBY/ON
1
2
3
4
5
6
DISPLAY
7
8
9
CLOCK/
TIMER
10
+10
SLEEP
BASS
UP
TREBLE
SET
DOWN
CANCEL
3/8
2 3
TAPE
FM/AM
AUX
CD
REV.
CD REC
CD 1
MODE
REC
MODE
PLAY
FM
CD 2
MODE
REPEAT
MODE
CD 3
A.STANDBY
DIMMER
AHB PRO
CD 4
CD 5
VOLUME
RM-SFSB70J REMOTE CONTROL
For Customer Use:
Enter below the Model No. and Serial
No. which are located either on the rear,
bottom or side of the cabinet. Retain this
information for future reference.
Model No.
Serial No.
GVT0103-001A
[J]
Advertisement
Chapters
Table of Contents
Troubleshooting

Related Manuals for JVC CA-FSB70


Summary of Contents for JVC CA-FSB70
- Page 1 COMPACT COMPONENT SYSTEM FS-B70 DISC SELECT PHONES INSTRUCTIONS —Consists of CA-FSB70 and SP-UXB70 VOLUME AUX/DVD TREBLE FM/AM BASS TAPE 5-CD CHANGER, PLAY&EXCHANGE STANDBY/ON DISPLAY CLOCK/ TIMER SLEEP BASS TREBLE DOWN CANCEL TAPE FM/AM REV. CD REC CD 1 MODE MODE...
- Page 2 Warnings, Cautions and Others Mises en garde, précautions et indications diverses For U.S.A. This equipment has been tested and found to comply with the limits for a Class B digital device, pursuant to part 15 of the FCC Rules. These limits are designed to provide reasonable protection against harmful interference in a residential installation.
- Page 3 CAUTION To reduce the risk of electrical shocks, fire, etc.: 1. Do not remove screws, covers or cabinet. 2. Do not expose this appliance to rain or moisture. ATTENTION Afin d’éviter tout risque d’électrocution, d’incendie, etc.: 1. Ne pas enlever les vis ni les panneaux et ne pas ouvrir le coffret de l’appareil.
-
Page 4: About This Manual
Introduction We would like to thank you for purchasing one of our JVC products. Before operating this unit, read this manual carefully and thoroughly to obtain the best possible performance from your unit, and retain this manual About This Manual This manual is organized as follows: •... -
Page 5: Table Of Contents
Contents Location of the Buttons and Controls ... 3 Front Panel ... 3 Remote Control ... 5 Getting Started ... 6 Unpacking ... 6 Connecting Antennas ... 6 Connecting Speakers ... 7 Connecting Other Equipment ... 8 Putting the Batteries into the Remote Control ... 8 Basic and Common Operations ... -
Page 6: Location Of The Buttons And Controls
Location of the Buttons and Controls Become familiar with the buttons and controls on your unit. Front Panel Front panel See pages in parentheses for details. (standby/on) button and STANDBY/ON lamp (10, 19, 20, 26) 2 Remote sensor (5) 3 Cassette compartment (20) 4 Display window (4) 5 AUX/DVD button (10) •... - Page 7 Display window on the front panel PRGM RANDOM Display window See pages in parentheses for details. 1 CD indicator (15) 2 Disc indicators (15) 3 Disc play mode indicators (17 – 19) • PRGM (program), RANDOM, and Repeat mode ( , 4 TAPE indicator (20) indicator (20) 5 Tape operation indicators (20, 21)
-
Page 8: Remote Control
Remote Control See pages in parentheses for details. STANDBY/ON BASS DOWN FM/AM TAPE REV. CD 1 MODE PLAY CD 2 MODE REPEAT A.STANDBY DIMMER AHB PRO CD 3 CD 4 CD 5 VOLUME RM-SFSB70J REMOTE CONTROL When using the remote control, point it at the remote sensor on the front panel. -
Page 9: Getting Started
Getting Started Unpacking After unpacking, check to be sure that you have all the following items. The number in parentheses indicates the quantity of each piece supplied. • FM antenna (1) • AM loop antenna (1) • Remote control (1) •... -
Page 10: Connecting Speakers
AM antenna ANTENNA Vinyl-covered wire (not supplied) AM loop antenna (supplied) 1 Connect the AM loop antenna to the AM LOOP terminals as illustrated. 2 Turn the AM loop antenna until you have the best reception. To connect an outdoor AM antenna When reception is poor, connect a single vinyl-covered wire to the AM EXT terminal and extend it horizontally. -
Page 11: Connecting Other Equipment
To remove the speaker grilles The speaker grilles are removable as illustrated below: Holes To remove the speaker grille, insert your fingers at the top of the speaker grille, then pull towards you. Also pull the bottom towards you. To attach the speaker grille, follow the illustration above. Connecting Other Equipment You can connect audio equipment—used only as a playback device. -
Page 12: Basic And Common Operations
Basic and Common Operations Setting the Clock Before operating the unit any further, first set the unit’s clock. When you plug in the power cord, “AM 12:00” starts flashing on the display. You can set the clock when the unit is either turned on or in standby mode. -
Page 13: Turning On The Power
Turning On the Power To turn on the unit, press STANDBY/ON on the unit). The STANDBY/ON lamp on the unit lights green. • When you press the source button—3/8 CD, 2 3 TAPE, FM/AM and AUX (or AUX/DVD on the unit), the unit automatically turns on and starts playback if the source is ready. -
Page 14: Adjusting The Volume
Adjusting the Volume You can adjust the volume level only while the unit is turned on. The volume level can be adjusted between “VOLUME MIN” and “VOLUME 1” – “VOLUME 40 (VOLUME MAX).” • The volume level has no effect on recording. On the remote control: To increase the volume, press VOLUME +. -
Page 15: Adjusting The Tone
Adjusting the Tone You can adjust the bass level (low frequency range) and the treble level (high frequency range) within a range of “–5” to “+5.” When shipped, each level is set to “+2.” • This function also affects the sound from headphones. •... -
Page 16: Listening To Fm And Am Broadcasts
Listening to FM and AM Broadcasts Tuning in to a Station Press FM/AM to select either “FM” or “AM.” The unit automatically turns on and tunes in to the previously received station—either FM or • Each time you press the button, the band alternates between FM and AM. -
Page 17: Tuning In To A Preset Station
Press SET again. “STORED” appears on the display for a while. The tuned station in step 1 is stored in the preset number selected in step 3 . • Storing a new station on an already assigned number erases the previously stored one. When you unplug the AC power cord or if a power failure occurs The FM and AM preset stations will be erased in a day. -
Page 18: Playing Back Discs On The 5-Cd Changer
Playing Back Discs on the 5-CD Changer This unit has been designed to play back the following discs—CD, CD-R, and CD-RW. When playing a CD-R or CD-RW User-edited CD-Rs (CD-Recordable) and CD-RWs (CD- ReWritable) can be played only if they are already “finalized.”... -
Page 19: Playing Back All The Discs-Continuous Play
Playing Back All the Entire Discs —Continuous Play You can play discs continuously. Load discs into the 5-CD Changer. Select a disc and start playback. On the remote control: Press one of the disc number buttons (CD 1 – CD 5). On the unit: 1 Press DISC SELECT repeatedly to select the disc you want. -
Page 20: Programing The Track Playing Order -Program Play
To start playing a disc during playback of another disc On the remote control: Press one of the disc number buttons (CD 1 – CD 5). The selected disc starts to play. On the unit: Press DISC SELECT repeatedly. Each time you press the button, the next disc is selected. -
Page 21: Playing At Random-Random Play
Press the number buttons to select a track from the disc selected in the above step. • For how to use the number buttons, see “To go to another track directly using the number buttons” on the previous page. Track number Total playing time PRGM Program other tracks you want. -
Page 22: Repeating Tracks Or Discs-Repeat Play
To exit from the Random Play mode, before or after play, press PLAY MODE once or twice so that the unit enters another disc playback mode (Continuous Play or Program Play). The RANDOM indicator goes off. • Turning off the unit also cancels Random Play and changes the disc playback mode to Continuous Play. -
Page 23: Playing Back Tapes
Playing Back Tapes Playing Back a Tape You can play back type I tapes. Insert a cassette into the cassette compartment with the exposed part of the tape facing left. • When the unit is turned on, the indicators appear on the display. Press 2 3 TAPE. -
Page 24: Recording
Recording IMPORTANT: • It should be noted that it may be unlawful to re-record pre-recorded tapes, records, or discs without the consent of the owner of copyright in the sound or video recording, broadcast or cable program and in any literary, dramatic, musical, or artistic embodied therein. -
Page 25: Recording Discs-Disc Synchronized Recording
Recording Discs —Disc Synchronized Recording You have three methods to record from discs onto a tape. Using the synchronized recording methods, you can start and stop disc play and recording at the same time. • One Disc Synchronized Recording—Records the entire disc. - Page 26 All Discs Synchronized Recording Insert a recordable cassette into the cassette compartment with the exposed part of the tape facing left. Load discs into the 5-CD Changer. • You can make a program (see page 17) or select the Random Play mode (see page 18) if you want. In this case, you cannot select the starting disc = go to step 5 .
- Page 27 First Track Recording First Track Recording allows you to record the first track of each loaded disc. Insert a recordable cassette into the cassette compartment with the exposed part of the tape facing left. Load discs into the 5-CD Changer. Press one of the disc number buttons (CD 1 –...
-
Page 28: Using The Timers
Using the Timers Three timers are available—Recording Timer, Daily Timer and Sleep Timer. • Before using these timers, make sure the built-in clock is set correctly (see page 9). Using the Daily Timer and the Recording Timer You can set the timer when the unit is either turned on or in standby mode. - Page 29 Press UP or DOWN to select the timer mode (the Daily Timer or the Recording Timer) and the source to play, then press CLOCK/TIMER. • Each time you press UP or the timer mode and the source to play change as follows: DAILY TIMER DAILY TIMER TAPE...
-
Page 30: Using The Sleep Timer
Using the Sleep Timer With the Sleep Timer, you can fall asleep to your favorite music or radio program. • You can set the Sleep Timer only when the unit is turned How the Sleep Timer actually works The unit automatically turns off after the specified length of time passes. -
Page 31: Maintenance
Maintenance To get the best performance of the unit, keep your discs, tapes and mechanism clean. General Notes In general, you will have the best performance by keeping your discs, tapes and the mechanism clean. • Store discs and tapes in their cases, and keep them in cabinets or on shelves. -
Page 32: Troubleshooting
Troubleshooting If you are having a problem with your unit, check this list for a possible solution before calling for service. If you cannot solve the problem from the hints given here, or the unit has been physically damaged, call a qualified person, such as your dealer, for service. -
Page 33: Specifications
Specifications Amplifier Section—CA-FSB70 Output Power: 74 W per channel, min. RMS, driven into 6 Ω at 1 kHz with no more than 10% total harmonic distortion. Analog input sensitivity/Impedance (at 1 kHz) AUX/DVD: 400 mV/48 kΩ 6 Ω – 16 Ω... -
Page 34: Limited Warranty
If service is not available locally, box the product carefully, preferably in the original carton, and ship, insured, with a copy of your bill of sale plus a letter of explanation of the problem to the nearest JVC Factory Service Center, the name and location of which will be given to you by the toll-free number. -
Page 35: Authorized Service Centers
To prevent electrical shock,do not open the cabinet.There are no user serviceable parts inside.Please refer to qualified service personnel for repairs. Accessories To purchase accessories for your JVC product,please call toll free:1 (800)882-2345 or on the web at www.JVC.com BT-51001-5 (0301) ®... - Page 36 VICTOR COMPANY OF JAPAN, LIMITED 0303MWMMDWJEM © 2003 VICTOR COMPANY OF JAPAN, LIMITED...
- Page 37 COMPACT COMPONENT SYSTEM SYSTEME DE COMPOSANTS COMPACT FS-B70 DISC SELECT PHONES INSTRUCTIONS MANUEL D’INSTRUCTIONS —Consists of CA-FSB70 and SP-UXB70 —Composé du CA-FSB70 et SP-UXB70 VOLUME AUX/DVD TREBLE FM/AM BASS TAPE 5-CD CHANGER, PLAY&EXCHANGE STANDBY/ON DISPLAY CLOCK/ TIMER SLEEP BASS TREBLE...
- Page 38 Warnings, Cautions and Others Mises en garde, précautions et indications diverses For U.S.A. This equipment has been tested and found to comply with the limits for a Class B digital device, pursuant to part 15 of the FCC Rules. These limits are designed to provide reasonable protection against harmful interference in a residential installation.
- Page 39 CAUTION To reduce the risk of electrical shocks, fire, etc.: 1. Do not remove screws, covers or cabinet. 2. Do not expose this appliance to rain or moisture. ATTENTION Afin d’éviter tout risque d’électrocution, d’incendie, etc.: 1. Ne pas enlever les vis ni les panneaux et ne pas ouvrir le coffret de l’appareil.
- Page 40 Introduction We would like to thank you for purchasing one of our JVC products. Before operating this unit, read this manual carefully and thoroughly to obtain the best possible performance from your unit, and retain this manual About This Manual This manual is organized as follows: •...
- Page 41 Contents Location of the Buttons and Controls ... 3 Front Panel ... 3 Remote Control ... 5 Getting Started ... 6 Unpacking ... 6 Connecting Antennas ... 6 Connecting Speakers ... 7 Connecting Other Equipment ... 8 Putting the Batteries into the Remote Control ... 8 Basic and Common Operations ...
-
Page 42: Location Of The Buttons And Controls
Location of the Buttons and Controls Become familiar with the buttons and controls on your unit. Front Panel Front panel See pages in parentheses for details. (standby/on) button and STANDBY/ON lamp (10, 19, 20, 26) 2 Remote sensor (5) 3 Cassette compartment (20) 4 Display window (4) 5 AUX/DVD button (10) •... - Page 43 Display window on the front panel PRGM RANDOM Display window See pages in parentheses for details. 1 CD indicator (15) 2 Disc indicators (15) 3 Disc play mode indicators (17 – 19) • PRGM (program), RANDOM, and Repeat mode ( , 4 TAPE indicator (20) indicator (20) 5 Tape operation indicators (20, 21)
-
Page 44: Remote Control
Remote Control See pages in parentheses for details. STANDBY/ON DISPLAY CLOCK/ TIMER SLEEP BASS TREBLE DOWN CANCEL TAPE FM/AM REV. CD REC CD 1 MODE MODE PLAY CD 2 REPEAT MODE A.STANDBY DIMMER AHB PRO CD 3 CD 4 CD 5 VOLUME RM-SFSB70J REMOTE CONTROL When using the remote control, point it at the... -
Page 45: Getting Started
Getting Started Unpacking After unpacking, check to be sure that you have all the following items. The number in parentheses indicates the quantity of each piece supplied. • FM antenna (1) • AM loop antenna (1) • Remote control (1) •... -
Page 46: Connecting Speakers
AM antenna ANTENNA Vinyl-covered wire (not supplied) AM loop antenna (supplied) 1 Connect the AM loop antenna to the AM LOOP terminals as illustrated. 2 Turn the AM loop antenna until you have the best reception. To connect an outdoor AM antenna When reception is poor, connect a single vinyl-covered wire to the AM EXT terminal and extend it horizontally. -
Page 47: Connecting Other Equipment
To remove the speaker grilles The speaker grilles are removable as illustrated below: Holes Projections To remove the speaker grille, insert your fingers at the top of the speaker grille, then pull towards you. Also pull the bottom towards you. To attach the speaker grille, follow the illustration above. -
Page 48: Basic And Common Operations
Basic and Common Operations Setting the Clock Before operating the unit any further, first set the unit’s clock. When you plug in the power cord, “AM 12:00” starts flashing on the display. You can set the clock when the unit is either turned on or in standby mode. -
Page 49: Turning On The Power
Turning On the Power To turn on the unit, press STANDBY/ON on the unit). The STANDBY/ON lamp on the unit lights green. • When you press the source button—3/8 CD, 2 3 TAPE, FM/AM and AUX (or AUX/DVD on the unit), the unit automatically turns on and starts playback if the source is ready. -
Page 50: Adjusting The Volume
Adjusting the Volume You can adjust the volume level only while the unit is turned on. The volume level can be adjusted between “VOLUME MIN” and “VOLUME 1” – “VOLUME 40 (VOLUME MAX).” • The volume level has no effect on recording. On the remote control: To increase the volume, press VOLUME +. -
Page 51: Adjusting The Tone
Adjusting the Tone You can adjust the bass level (low frequency range) and the treble level (high frequency range) within a range of “–5” to “+5.” When shipped, each level is set to “+2.” • This function also affects the sound from headphones. •... -
Page 52: Listening To Fm And Am Broadcasts
Listening to FM and AM Broadcasts Tuning in to a Station Press FM/AM to select either “FM” or “AM.” The unit automatically turns on and tunes in to the previously received station—either FM or • Each time you press the button, the band alternates between FM and AM. -
Page 53: Tuning In To A Preset Station
Press SET again. “STORED” appears on the display for a while. The tuned station in step 1 is stored in the preset number selected in step 3 . • Storing a new station on an already assigned number erases the previously stored one. When you unplug the AC power cord or if a power failure occurs The FM and AM preset stations will be erased in a day. -
Page 54: Playing Back Discs On The 5-Cd Changer
Playing Back Discs on the 5-CD Changer This unit has been designed to play back the following discs—CD, CD-R, and CD-RW. When playing a CD-R or CD-RW User-edited CD-Rs (CD-Recordable) and CD-RWs (CD- ReWritable) can be played only if they are already “finalized.”... -
Page 55: Continuous Play
Playing Back All the Entire Discs —Continuous Play You can play discs continuously. Load discs into the 5-CD Changer. Select a disc and start playback. On the remote control: Press one of the disc number buttons (CD 1 – CD 5). On the unit: 1 Press DISC SELECT repeatedly to select the disc you want. -
Page 56: Programing The Track Playing Order -Program Play
To start playing a disc during playback of another disc On the remote control: Press one of the disc number buttons (CD 1 – CD 5). The selected disc starts to play. On the unit: Press DISC SELECT repeatedly. Each time you press the button, the next disc is selected. -
Page 57: Playing At Random-Random Play
Press the number buttons to select a track from the disc selected in the above step. • For how to use the number buttons, see “To go to another track directly using the number buttons” on the previous page. Track number Total playing time PRGM Program other tracks you want. -
Page 58: Repeating Tracks Or Discs-Repeat Play
To exit from the Random Play mode, before or after play, press PLAY MODE once or twice so that the unit enters another disc playback mode (Continuous Play or Program Play). The RANDOM indicator goes off. • Turning off the unit also cancels Random Play and changes the disc playback mode to Continuous Play. -
Page 59: Playing Back Tapes
Playing Back Tapes Playing Back a Tape You can play back type I tapes. Insert a cassette into the cassette compartment with the exposed part of the tape facing left. • When the unit is turned on, the indicators appear on the display. Press 2 3 TAPE. -
Page 60: Recording
Recording IMPORTANT: • It may be unlawful to record or play back copyrighted material without the consent of the copyright owner. • The recording level is automatically set correctly, so it is not affected by the other sound settings. Thus, during recording you can adjust the sound you are actually listening to without affecting the recording level. -
Page 61: Recording Discs-Disc Synchronized Recording
Recording Discs —Disc Synchronized Recording You have three methods to record from discs onto a tape. Using the synchronized recording methods, you can start and stop disc play and recording at the same time. • One Disc Synchronized Recording—Records the entire disc. - Page 62 All Discs Synchronized Recording Insert a recordable cassette into the cassette compartment with the exposed part of the tape facing left. Load discs into the 5-CD Changer. • You can make a program (see page 17) or select the Random Play mode (see page 18) if you want. In this case, you cannot select the starting disc = go to step 5 .
- Page 63 First Track Recording First Track Recording allows you to record the first track of each loaded disc. Insert a recordable cassette into the cassette compartment with the exposed part of the tape facing left. Load discs into the 5-CD Changer. Press one of the disc number buttons (CD 1 –...
-
Page 64: Using The Timers
Using the Timers Three timers are available—Recording Timer, Daily Timer and Sleep Timer. • Before using these timers, make sure the built-in clock is set correctly (see page 9). Using the Daily Timer and the Recording Timer You can set the timer when the unit is either turned on or in standby mode. - Page 65 Press UP or DOWN to select the timer mode (the Daily Timer or the Recording Timer) and the source to play, then press CLOCK/TIMER. • Each time you press UP or the timer mode and the source to play change as follows: DAILY TIMER DAILY TIMER TAPE...
-
Page 66: Using The Sleep Timer
Using the Sleep Timer With the Sleep Timer, you can fall asleep to your favorite music or radio program. • You can set the Sleep Timer only when the unit is turned How the Sleep Timer actually works The unit automatically turns off after the specified length of time passes. -
Page 67: Maintenance
Maintenance To get the best performance of the unit, keep your discs, tapes and mechanism clean. General Notes In general, you will have the best performance by keeping your discs, tapes and the mechanism clean. • Store discs and tapes in their cases, and keep them in cabinets or on shelves. -
Page 68: Troubleshooting
Troubleshooting If you are having a problem with your unit, check this list for a possible solution before calling for service. If you cannot solve the problem from the hints given here, or the unit has been physically damaged, call a qualified person, such as your dealer, for service. -
Page 69: Specifications
Specifications Amplifier Section—CA-FSB70 Output Power: 74 W per channel, min. RMS, driven into 6 Ω at 1 kHz with no more than 10% total harmonic distortion. Analog input sensitivity/Impedance (at 1 kHz) AUX/DVD: 400 mV/48 kΩ 6 Ω – 16 Ω... - Page 70 VICTOR COMPANY OF JAPAN, LIMITED EN, FR 0303MWMMDWJEM © 2003 VICTOR COMPANY OF JAPAN, LIMITED...
Need help?
Do you have a question about the CA-FSB70 and is the answer not in the manual?
Questions and answers