Table of Contents
Advertisement
Quick Links
Advertisement
Table of Contents

Subscribe to Our Youtube Channel
Related Manuals for Vision Marathon +


Summary of Contents for Vision Marathon +
- Page 1 Uninterruptible Power Supply VISION MARATHON + User Manual...
-
Page 2: Table Of Contents
Table of Contents Chapter 1. Important Safety Instruction ..........3 1.1. An Important Notice ............3 1.2. Storage Instruction ............4 Chapter 2. Product Introduction ............5 2.1. The General Characteristics ..........5 2.2. The Advanced Technical Characteristics ........ 6 2.3. -
Page 3: Chapter 1. Important Safety Instruction
Chapter 1. Important Safety Instruction 1.1. An Important Notice To ensure safety in all applications where a UPS is hard wired to the Electrical Supply, ensure that the system is installed by a Qualified Electrical Contractor. The UPS has its own internal energy source (battery). Should the battery be switched on when no AC power is available, there could be voltage at the output terminals. -
Page 4: Storage Instruction
a. Medical equipment directly related to human life b. Elevator, Metro (Subway) system or any other equipment related to Human safety. c. Public system or critical computer systems. Do not install the UPS in an environment with sparks, smoke or gas. ... -
Page 5: Chapter 2. Product Introduction
Chapter 2. Product Introduction 2.1. The General Characteristics True online architecture continuously supplies in your critical device with a stable, regulated, transient-free pure sine wave AC Power. 20KHz PWM sine-wave topology yields an excellent overall performance. The high crest factor of the inverter handles all high-inrush current loads without a need to upgrade the power rating. -
Page 6: The Advanced Technical Characteristics
2.2. The Advanced Technical Characteristics Powerful CPU integrates all power stages, control, and communication functions necessary for maximized UPS protection and functionality, including power management status monitoring, configuration setting, operation scheduling, remote control, and self-diagnosis. Slick multi-protocol CPU communication design allows full function remote control from any computer environment via standard RS232 interface using any of MegaTec Protocol, and basic dry-contact signal pattern (optional relay contact board required). -
Page 7: The Symbols On The Lcd Display Panel
2.3. The Symbols on the LCD Display Panel Item Symbol Description LINE Utility Normal Battery Low Battery Abnormal UPS Overloading UPS Working in Abnormal Mode Wrong Phase in input cable Grounding Fault UPS Shutoff UPS Flow Chart 4 Digits Measurement Display Indicate the item desired to be tested UPS Inverter Switch Page Up... - Page 8 Self-test Er02 Output Short Circuit Er04 Inverter Overheat Er05 Bad or Dead Battery Er06 Charger abnormal Er12 Inverter Over-current Er13 Wrong Procedure to Enter Maintenance Mode Er** Other Error code...
-
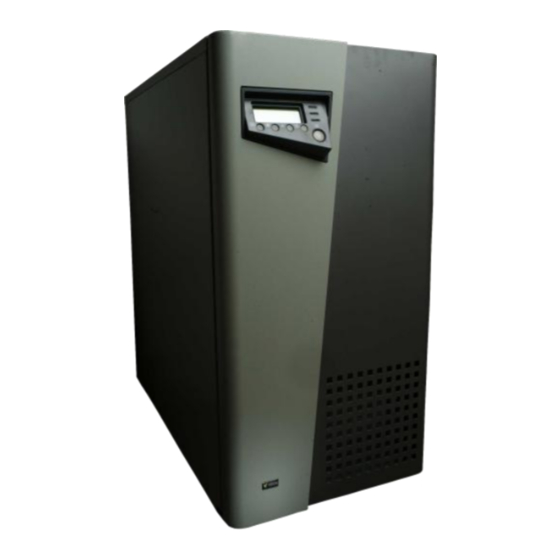
Page 9: The Front Panel Explanation
2.4. The front panel explanation 3-PHASE SINGLE PHASE... - Page 10 1. Cold Start Switch This is to awake the CPU of the UPS without the presence of utility power. 2. Utility LED Green LED lights up to indicate Utility is normal. 3. Inverter LED Amber LED lights up to indicate the UPS inverter is 4.
- Page 11 for battery protection. 15. Maintenance It is Make Before Breaker type. Only an Qualified Bypass Switch technician is permitted to use it. 16. Input Breaker It is a 100A/300Vac No Fuse Breaker. This terminal to be connected with input, output and 17.
-
Page 12: Communication Port Explanation
2.5. Communication Port Explanation Communication port on the UPS provides true RS232 type to communicate with UPS software to remote monitoring the power and UPS status. The UPS software also can save files and shut down the computer automatically during unattended power failure. -
Page 13: Dry Contact Type
2.5.2. Dry Contact Type An optional true Relay Contact board can be inserted into the SNMP slot on the front of the UPS to provide dry contact signals to remote alarm system and many other industrial devices. 2.5.2.1. The pin assignments of the dry contact type Pin 1: UPS on Bypass mode. -
Page 14: Chapter 3. Installation And Operation
Chapter 3. Installation and Operation The packing condition and the external outlook of the unit should be inspected carefully before installation. Retain the packing material for future use. 3.1. Unpacking 1. Take the UPS out of the PE foam. 2. Unwrap the UPS. a. - Page 15 Do not place the UPS in an environment near dust, corruptive or salty material or flammable objects. Do not expose the UPS to outdoors. Relative humidly (non condensation) 30% ~ 90%...
-
Page 16: Operation Test And Installation Instruction
3.3. Operation Test and Installation Instruction 3.3.1. Start Up in Normal Mode 1. Open the front panel shown as picture on the right. Before start the installation, please make sure the grounding is connected properly. 2. Make sure the Power Breaker of the distribution panel and the Input Breaker of the UPS are in “OFF”... - Page 17 7. Press the Inverter Switch of the UPS for approx. 3~5 seconds, then the Amber LED Lights up and the LCD display changes from drawing B to drawing C. 8. Press Scroll down( ) Key, the LCD display shows as drawing D, it means the inverter works normally.
-
Page 18: Start-Up In Battery Mode (Cold Start)
3.3.2. Start-up in Battery Mode (Cold Start) 1. Unpack the front panel of the UPS. If there are no batteries inside the UPS, you are required to connect at least 16 pcs of the batteries with the UPS first. You are recommended to use at least 16pcs 12Vdc/9AH (or 12Vdc/12AH) for 8Kva and 16pcs 12Vdc/12AH for 10Kva. -
Page 19: Shut Off The Ups
3. To cancel the Self-test, press key for 3~5 seconds, the UPS will switch back to Normal mode and the LCD display will shows as drawing C. 3.3.4. Shut Off the UPS 1. Press the Inverter switch of the UPS for about 3~5 seconds, the UPS will switch the output from inverter to bypass, and the LCD display shows as drawing B. -
Page 20: Output Terminal Block Explanation
3.4. Output Terminal Block Explanation 3.4.1. SINGLE PHASE Pin 1 & Pin 2: the terminals of External Battery Banks Pin 3 & Pin 4 & Pin 5: The terminals of UPS Output. Pin 6 & Pin 7 & Pin 8: The terminals of UPS Input. ... -
Page 21: 3-Phase
3.4.2. 3-PHASE Pin 1 & Pin 2: the terminals of External Battery Banks Pin 3 & Pin 4 & Pin 5: The terminals of UPS Output. Pin 6 & Pin 7 & Pin 8 & Pin 9 & Pin 10: The terminals of UPS Input. ... -
Page 22: Chapter 4. Troubleshooting Guide
Chapter 4. Troubleshooting Guide 4.1. Trouble Shooting When the UPS malfunctions during operation, you may check the followings: a. Are the wirings of input and output correct? b. If the input voltage of the Utility is within the input window of the UPS? In case problems or symptoms still exist, please proceed the following for proper adjustment. -
Page 23: Chapter 5. Bundled Software Installation Guide
Chapter 5. Bundled Software Installation Guide 5.1. Hardware Installation 1. Connect the male connector of UPSilon2000 cable to the UPS communication port. 2. Connect the female connector of UPSilion 2000 cable to a dedicated RS232 port. If there is only a DB25 connector of the RS232 port available, you may use a DB9-DB25 adapter to convert it. -
Page 24: Important Note
E. UPSilon2000 for FreeBSD and Linux 1. Log in as a super-user. 2. Use the 'ftp' utility in MS-DOS to copy files into the system directory “/tmp”. 3. Follow the instructions below to make the filename conversion after the 'ftp' File transfer: #cd/tmp #mv linux.z linux.Z, or... -
Page 25: Chapter 6. Appendix
Chapter 6. Appendix Specifications MODEL 8kVA 10kVA SINGLE PHASE 3-PHASE INPUT Voltage (Vac) 160Vac~280Vac 277Vac~485Vac 50 / 60 ±10% Frequency (Hz) Phase Single 3-PHASE Input Power Factor > 0.95 OUTPUT Voltage (Vac) 208/220/230/240 Capacity 8Kva/6.4Kw 10Kva/8Kw Wave Form Sine Wave ±2% Voltage Regulation ±0.5Hz (Free Running) -
Page 26: Computer Interface
MODEL SINGLE PHASE 3-PHASE PROTECTION Overload AC Mode: 1) <120% delay 15 minutes before switching to bypass. 2) 120%~150% delay 30 seconds before switching to bypass. 3) >150% 10 ms. before switch to bypass Backup Mode: 1) <120% delay 30 seconds before shut down. 2) 120%~150% delay 10 seconds before shut down.
Need help?
Do you have a question about the Marathon + and is the answer not in the manual?
Questions and answers