Chapters
Table of Contents
Troubleshooting

Related Manuals for JVC KS-F185


Summary of Contents for JVC KS-F185
- Page 1 For installation and connections, refer to the separate manual. °√ÿ ≥ “¥Ÿ § Ÿ Ë ¡ ◊ Õ ∑’ Ë · ¬°µË “ ßÀ“° „π°“√µ‘ ¥ µ— È ß ·≈–°“√‡™◊ Ë Õ ¡µË Õ INSTRUCTIONS §”·π–π” KS-F185 KS-F185 GET0225-001A [U/UH]...
-
Page 2: Table Of Contents
• Do not raise the volume level too much, as this will block outside sounds, making driving dangerous. • Stop the car before performing any complicated operations. Thank you for purchasing a JVC product. TAPE OPERATIONS ... 9 Listening to a cassette ... SOUND ADJUSTMENTS ... 10 Adjusting the sound ... -
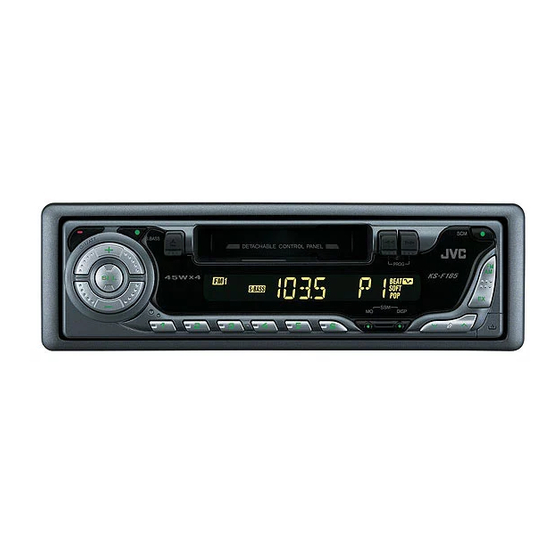
Page 3: Location Of The Buttons
LOCATION OF THE BUTTONS Control panel Display window (standby/on/attenuator) button 2 S BASS (super bass) button 3 0 (eject) button 4 Display window 5 Cassette compartment 6 1/¡ PROG (program) button 7 SCM (sound control memory) button 8 FM AM button 9 +/–... -
Page 4: Basic Operations
BASIC OPERATIONS Turning on the power Turn on the power. Note on One-Touch Operation: When you select a source in step 2 below, the power automatically comes on. You do not have to press this button to turn on the power. Select the source. -
Page 5: Setting The Clock
Setting the clock Press and hold SEL (select) for more than 2 seconds. “CLOCK H” or “CLOCK M” appears on the display. Set the hour. 1 Select “CLOCK H” (hour) if not shown on the display. 2 Adjust the hour. Set the minute. -
Page 6: Radio Operations
RADIO OPERATIONS Listening to the radio You can use either automatic searching or manual searching to tune in to a particular station. Note: When a cassette is in the cassette compartment, you cannot select the tuner. Be sure to eject the cassette from the cassette compartment to listen to the radio. -
Page 7: Manual Preset
When an FM stereo broadcast is hard to receive: Press MO (monaural), while listening to an FM stereo broadcast. Each time you press the button, the MO indicator lights up and goes off alternately. MO (monaural) indicator When the MO indicator is lit on the display, the sound you hear becomes monaural but the reception will be improved. -
Page 8: Tuning In To A Preset Station
Repeat the above procedure to store other stations into other preset numbers. Notes: • A previously preset station is erased when a new station is stored in the same preset number. • Preset stations are erased when the power supply to the memory circuit is interrupted (for example, during battery replacement). -
Page 9: Tape Operations
Listening to a cassette You can play back type I (normal) tapes. Turn on the power. Note on One-Touch Operation: When a cassette is already in the cassette compartment, tape play starts automatically. However, it is not recommended to leave the cassette in the compartment when turning off the power. -
Page 10: Sound Adjustments
SOUND ADJUSTMENTS Adjusting the sound You can adjust the sound characteristics to your preference. Select the item you want to adjust. Each time you press the button, the adjustable items change as follows: (bass) (treble) (volume) Indication To do: Adjust the bass. (Bass) Adjust the treble. -
Page 11: Selecting Preset Sound Modes
Selecting preset sound modes You can select a preset sound adjustment suitable to the music genre. Select the sound mode you want. Each time you press the button, the sound mode changes as follows: SCM OFF BEAT SOFT Ex.: When you select “BEAT” Indication For: Preset values... -
Page 12: Detaching The C0Ntrol Panel
DETACHING THE C0NTROL PANEL You can detach the control panel when leaving the car. When detaching or attaching the control panel, be careful not to damage the connectors on the back of the control panel and on the panel holder. Detaching the control panel Before detaching the control panel, be sure to turn off the power. -
Page 13: Troubleshooting
What appears to be trouble is not always serious. Check the following points before calling a service center. Symptoms • Sound cannot be heard from the speakers. • This unit does not work at all. • SSM (Strong-station Sequential Memory) automatic preset does not work. -
Page 14: Maintenance
MAINTENANCE This unit requires very little attention, but you will be able to extend the life of the unit if you follow the instructions below. To clean the head • Clean the heads after every 10 hours of use using a wet-type head cleaning tape (available at an audio store). -
Page 15: Specifications
AUDIO AMPLIFIER SECTION Maximum Power Output: Front: 45 W per channel Rear: 45 W per channel Continuous Power Output (RMS): 17 W per channel into 4 Ω, 40 Hz Front: to 20 000 Hz at no more than 0.8% total harmonic distortion. 17 W per channel into 4 Ω, 40 Hz Rear: to 20 000 Hz at no more than... - Page 16 EN, TH 0604DTSMDTJEIN © 2004 VICTOR COMPANY OF JAPAN, LIMITED...
- Page 17 CASSETTE RECEIVER RADIO KASET For installation and connections, refer to the separate manual. Untuk instalasi dan penyambungan, lihat buku pedoman terpisah. INSTRUCTIONS BUKU PETUNJUK KS-F185/KS-F185S/KS-F185G KS-F185/KS-F185S/KS-F185G GET0225-003A [UN]...
- Page 18 • Do not raise the volume level too much, as this will block outside sounds, making driving dangerous. • Stop the car before performing any complicated operations. Thank you for purchasing a JVC product. TAPE OPERATIONS ... 9 Listening to a cassette ... SOUND ADJUSTMENTS ... 10 Adjusting the sound ...
-
Page 19: Location Of The Buttons
LOCATION OF THE BUTTONS Control panel Display window (standby/on/attenuator) button 2 S BASS (super bass) button 3 0 (eject) button 4 Display window 5 Cassette compartment 6 1/¡ PROG (program) button 7 SCM (sound control memory) button 8 FM AM button 9 +/–... -
Page 20: Basic Operations
BASIC OPERATIONS Turning on the power Turn on the power. Note on One-Touch Operation: When you select a source in step 2 below, the power automatically comes on. You do not have to press this button to turn on the power. Select the source. -
Page 21: Setting The Clock
Setting the clock Press and hold SEL (select) for more than 2 seconds. “CLOCK H” or “CLOCK M” appears on the display. Set the hour. 1 Select “CLOCK H” (hour) if not shown on the display. 2 Adjust the hour. Set the minute. -
Page 22: Radio Operations
RADIO OPERATIONS Listening to the radio You can use either automatic searching or manual searching to tune in to a particular station. Note: When a cassette is in the cassette compartment, you cannot select the tuner. Be sure to eject the cassette from the cassette compartment to listen to the radio. -
Page 23: Storing Stations In Memory
When an FM stereo broadcast is hard to receive: Press MO (monaural), while listening to an FM stereo broadcast. Each time you press the button, the MO indicator lights up and goes off alternately. MO (monaural) indicator When the MO indicator is lit on the display, the sound you hear becomes monaural but the reception will be improved. -
Page 24: Tuning In To A Preset Station
Repeat the above procedure to store other stations into other preset numbers. Notes: • A previously preset station is erased when a new station is stored in the same preset number. • Preset stations are erased when the power supply to the memory circuit is interrupted (for example, during battery replacement). -
Page 25: Tape Operations
Listening to a cassette You can play back type I (normal) tapes. Turn on the power. Note on One-Touch Operation: When a cassette is already in the cassette compartment, tape play starts automatically. However, it is not recommended to leave the cassette in the compartment when turning off the power. -
Page 26: Sound Adjustments
SOUND ADJUSTMENTS Adjusting the sound You can adjust the sound characteristics to your preference. Select the item you want to adjust. Each time you press the button, the adjustable items change as follows: (bass) (treble) (volume) Indication To do: Adjust the bass. (Bass) Adjust the treble. -
Page 27: Selecting Preset Sound Modes
Selecting preset sound modes You can select a preset sound adjustment suitable to the music genre. Select the sound mode you want. Each time you press the button, the sound mode changes as follows: SCM OFF BEAT SOFT Ex.: When you select “BEAT” Indication For: Preset values... -
Page 28: Detaching The C0Ntrol Panel
DETACHING THE C0NTROL PANEL You can detach the control panel when leaving the car. When detaching or attaching the control panel, be careful not to damage the connectors on the back of the control panel and on the panel holder. Detaching the control panel Before detaching the control panel, be sure to turn off the power. -
Page 29: Troubleshooting
What appears to be trouble is not always serious. Check the following points before calling a service center. Symptoms • Sound cannot be heard from the speakers. • This unit does not work at all. • SSM (Strong-station Sequential Memory) automatic preset does not work. -
Page 30: Maintenance
MAINTENANCE This unit requires very little attention, but you will be able to extend the life of the unit if you follow the instructions below. To clean the head • Clean the heads after every 10 hours of use using a wet-type head cleaning tape (available at an audio store). -
Page 31: Specifications
AUDIO AMPLIFIER SECTION Maximum Power Output: Front: 45 W per channel Rear: 45 W per channel Continuous Power Output (RMS): 17 W per channel into 4 Ω, 40 Hz Front: to 20 000 Hz at no more than 0.8% total harmonic distortion. 17 W per channel into 4 Ω, 40 Hz Rear: to 20 000 Hz at no more than... - Page 32 EN, IN 0604DTSMDTJEIN © 2004 VICTOR COMPANY OF JAPAN, LIMITED...
- Page 33 INSTALLATION (IN-DASH MOUNTING) The following illustration shows a typical installation. If you have any questions or require information regarding installation kits, consult your JVC car audio dealer or a company supplying kits. • If you are not sure how to install this unit correctly, have it installed by a qualified technician.
- Page 34 Removing the unit Before removing the unit, release the rear section. When using the optional stay / Fire wall Dashboard Install the unit at an angle of less than 30°. TROUBLESHOOTING • The fuse blows. * Are the red and black leads connected correctly? •...
-
Page 35: Electrical Connections
• Replace the fuse with one of the specified rating. If the fuse blows frequently, consult your JVC car audio dealer. • Maximum input of the speakers should be more than 45 W at the rear and 45 W at the front, with an impedance of 4 Ω... - Page 36 LINE OUT KS-FX KS-F REAR FRONT JVC CD changer ‡§√◊ Ë Õ ß‡≈Ë π ´’ ¥ ’ ¢È Õ §«√√–«— ß ”À√— ∫ °“√µË Õ ·À≈Ë ß ®Ë “ ¬°”≈— ß ·≈–≈”‚æß: • Õ¬Ë “ µË Õ “¬µ–°— Ë « ‡§‡∫‘ ≈ °”≈— ß ¢Õß≈”‚æ߇¢È “ °— ∫ ·∫µ‡µÕ√’ Ë √ ∂¬πµÏ ¡‘ © –π— È π ™ÿ ¥ ª√–°Õ∫®–‰¥È √ — ∫ §«“¡‡ ’ ¬ À“¬¡“°...
- Page 37 INSTALLATION (IN-DASH MOUNTING) The following illustration shows a typical installation. If you have any questions or require information regarding installation kits, consult your JVC car audio dealer or a company supplying kits. • If you are not sure how to install this unit correctly, have it installed by a qualified technician.
-
Page 38: Pemecahan Masalah
Removing the unit Before removing the unit, release the rear section. When using the optional stay/Pemasangan pilihan Fire wall Fire wall Dashboard Dasboard Install the unit at an angle of less than 30˚. Pasang unit tersebut pada sudut kurang dari 30˚. TROUBLESHOOTING •... -
Page 39: Penyambungan Listrik
Catatan: • Ganti sekering dengan sekering lain yang sesuai dengan syarat spesifikasi. Jika sekering sering terbakar, tanyakan pada dealer audio mobil JVC. • Input maksimum speaker sebaiknya lebih dari 45 W pada bagian belakang dan 45 W pada bagian depan dengan impedansi antara 4 Ω sampai 8 Ω . -
Page 40: Amplifier/Cd Changer Connections
Pasanglah dengan ketat kabel ground ke bagian logam atau rangka kendaraan—dengan bagian yang tidak tertutupi oleh cat (apabila tertutup oleh cat, buanglah cat sebelum memasang kabel). Bila tidak dibuang, dapat mengakibatkan kerusakan serius. JVC CD changer CD changer JVC PENCEGAHAN pada power supply dan sambungan speaker: •...
Need help?
Do you have a question about the KS-F185 and is the answer not in the manual?
Questions and answers