Table of Contents
Advertisement
Quick Links
OWNER'S MANUAL
Before using this unit, carefully read the sections entitled: "IMPORTANT SAFETY
INSTRUCTIONS" (p. 2), "USING THE UNIT SAFELY" (p. 3, 4), and "IMPORTANT
NOTES" (p. 5, 6). These sections provide important information concerning the proper
operation of the unit. Additionally, in order to feel assured that you have gained a good
grasp of every feature provided by your new unit, OWNER'S MANUAL should be read
in its entirety. The manual should be saved and kept on hand as a convenient reference.
Copyright © 2001 ROLAND CORPORATION
All rights reserved. No part of this publication may be reproduced in any form without the written permission of
ROLAND CORPORATION.
Advertisement
Table of Contents

Related Manuals for Roland AR-3000


Summary of Contents for Roland AR-3000
- Page 1 The manual should be saved and kept on hand as a convenient reference. Copyright © 2001 ROLAND CORPORATION All rights reserved. No part of this publication may be reproduced in any form without the written permission of...
-
Page 2: Important Safety Instructions
The lightning flash with arrowhead symbol, within an CAUTION equilateral triangle, is intended to alert the user to the RISK OF ELECTRIC SHOCK presence of uninsulated “dangerous voltage” within the DO NOT OPEN product’s enclosure that may be of sufficient magnitude to ATTENTION : RISQUE DE CHOC ELECTRIQUE NE PAS OUVRIR constitute a risk of electric shock to persons. -
Page 3: Using The Unit Safely
• When using the unit with a rack or stand recom- • Before using this unit, make sure to read the mended by Roland, the rack or stand must be instructions below, and the Owner’s Manual. carefully placed so it is level and sure to remain ...................... - Page 4 ......................• Never climb on top of, nor place heavy objects on • Before using the unit in a foreign country, consult the unit. with your retailer, the nearest Roland Service ......................Center, or an authorized Roland distributor, as 107b listed on the "Information"...
-
Page 5: Important Notes
• To avoid possible breakdown, do not use the unit in a wet area, such as an area exposed to rain or other moisture. • Use a cable from Roland to make the connection. If using some other make of connection cable, please note the Maintenance following precautions. - Page 6 • Do not use this unit for purposes that could infringe on a copyright held by a third party. Roland assumes no responsibility whatsoever with regard to any infringe- ments of third-party copyrights arising through your use...
-
Page 7: Table Of Contents
Installation .....................17 Attaching the Rubber Feet........................17 Rack Mounting (Important Notes on Heat Radiation) ............... 17 Examples of Usage and Connection for the AR-3000 .......18 Together with Other Equipment (System Examples) ................. 18 Using the Control Input and Output Terminals............... 18 Using the MIDI Connectors...................... - Page 8 Protecting a Card (Card Protect)....................77 Changing the Name of a Card (Card Name) ................78 Making Cards for Legacy Models Usable on the AR-3000 (Card Convert) ......78 Card Conversion Chart/Conversion Error Chart ..............80 Recording and Playing MIDI Data (MIDI Phrases)......82 What Are MIDI Phrases? ......................
- Page 9 Contents Controlling the AR-3000 from an External Device (Control Input Terminals)....................85 What Is No-voltage/Make-contact? ................... 85 Types of Control Input Playback ....................85 Type of Control Input Recording ....................86 Assigning a Phrase to a Port and Playing It Back (Direct Playback) ..........86 What Is Direct Playback?/Uses and Applications ..............
- Page 10 Playing Two Units’s Worth of Data on the Left and Right (Dual Mono Mode) ....................119 What Is the Dual Mono Mode?/Equipment Connections ............ 119 AR-3000 Settings ......................... 119 Operation Procedures......................... 120 Synchronized Recording and Playback with Multiple AR Units (AR- LINK) ....................122...
-
Page 11: Main Features
You’ll appreciate the impressive power this provides when Multi-track Operation–AR-LINK you’re using the AR-3000 for the first time, or when you need Feature to change the settings in a hurry during play. The AR-LINK feature lets you link the unit to up to 32 other A Full Array of Editing Features for units to create a completely synchronized multi-track system. -
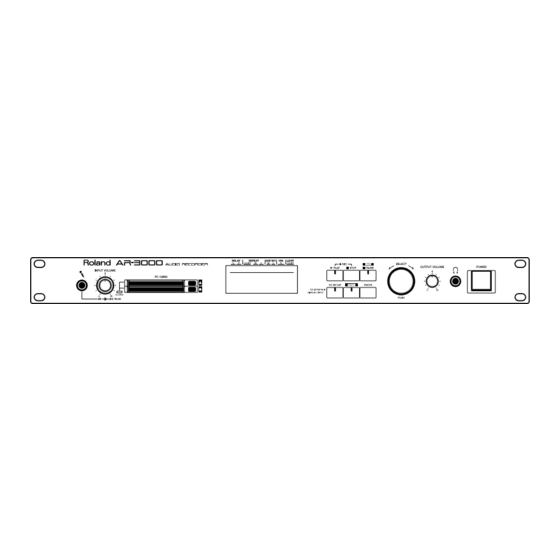
Page 12: Panel Descriptions
Panel Descriptions Front Panel fig.2-01e 12 13 14 1. Mic In Jack 5. Card Eject Buttons This is for connecting a microphone during audio recording. 6. Display → “Recording Audio” (p. 40) →“Viewing the Basic Screen” (p. 35) 2. INPUT VOLUME Knobs 7. -
Page 13: Headphones Jack
Insert this cap when cards are settings interactively. not in use. Use this feature if you’re using the AR-3000 for the first time, or when you need to change the settings in a hurry during play. The indicator lights up when EZ Setup is active. -
Page 14: Rear Panel
(Refer to p. 147 – for power requirements) 5. RS-232C Connector 2. AR-LINK Connectors (OUT and IN) This is used when connecting the AR-3000 to a computer or These are for connecting the AR units to each other when the like for exchanging signals. -
Page 15: Installing An Option Board
After installation, if the unit fails to power up when you switch on the power, contact your Roland Service Station. To avoid the risk of damage to internal components that can be caused by static electricity, please carefully observe the following whenever you handle the board. -
Page 16: Installation De La Carte Facultative (French Language For Canadian Safety Standard)
When circuit board installation is complete, double-check lorsque vous la rallumez, communiquez avec le centre de your work. service Roland. Always turn the unit off and unplug the power cord Veuillez suivre attentivement les instructions suivantes before attempting installation of the circuit board (model quand vous manipulez la carte afin d’eviter tout risque... -
Page 17: Installation
Installation Attaching the Rubber Feet Attach these as required, such as when you’re using the AR-3000 without mounting it on a rack or the like. Peel off the double-sided tape from the rubber feet and affix the rubber feet at the locations shown in the following figure. -
Page 18: Examples Of Usage And Connection For The Ar-3000
Examples of Usage and Connection for the AR-3000 You can use the AR-3000 alone or in combination with other AR-3000 units or other equipment to play audio in a wide variety of scenes. This section shows some examples of these. You can use these examples as a starting point for making changes to match your own usage circumstances. -
Page 19: Using The Midi Connectors
Spatial Expression Control) → p. 105 With the AR-3000 serving as the master, the MIDI signals it sends out can be used to get a sound module to play background music. Or, you can have sound-effect phrases be played by a slaved AR-3000. This lets you create sonic fields with six-channel multi-playback. -
Page 20: Using The Rs-232C Connector
Examples of Usage and Connection for the AR-3000 Using the RS-232C Connector Controlling the AR Using By connecting an RS-232C cable, you can control the AR-3000 from an the RS-232C Connector → external control device, such as a computer or touch panel. -
Page 21: Connections (Connection Methods)
Power Amp. Control signal Audio signal AR-LINK Connecting with the AR-LINK Cable Synchronized Recording You can operate four AR-3000 units completely in sync as an eight-channel and Playback with Multiple multi-player. AR Units (AR-LINK) → p. fig.5-07e Power Amp. Control input... -
Page 22: What You Can Do (Usage Tips)
* With some settings, playback doesn’t repeat even when you continuously input a make-contact signal. For information, refer to “Controlling the AR-3000 from an External Device (Control Input Terminals)” (p. 85). Playing a Variety of Phrases in Succession There are several methods for doing this. Choose a playback method that matches your usage conditions. -
Page 23: Turning The Power On And Off
A brief interval (a few seconds) after power up is required Confirm the volume levels on the AR-3000 and any amp or before the unit will operate mixer that is connected turned down to the lowest settings. -
Page 24: Easy Setting Operations!-Ez Setup
Use this feature if you’re using the AR-3000 for the first time, if you don’t know what items need to be set, or when you need to change the settings in a hurry during play. - Page 25 Easy Setting Operations!—EZ SETUP • Joining Phrases • Expanding and Compressing Playback Times (Time Stretch) • Copying Phrases D. Control from an External Device 1. Playback Using the Screw-on Connectors (p. 85) • Selected Playback of Stored Phrases • Sequential Playback of Stored Phrases •...
-
Page 26: Examples Of Ez Setup Use
Easy Setting Operations!—EZ SETUP Examples of EZ Setup Use This section describes “recording audio” as an example of operations using EZ Setup. Recording Audio Refer to “Connecting Equipment” (p. 40) and connect the external equipment. Press the EZ SETUP button. The EZ SETUP indicator lights up. - Page 27 Easy Setting Operations!—EZ SETUP Turn the SELECT dial to choose the phrase number to record, then press the dial. Turn the SELECT dial to choose the recording type (Stereo or Mono), then press the dial. fig.EZ-04 Turn the SELECT dial to choose the RDAC grade (High- quality, Normal, or Extended-time).
- Page 28 Easy Setting Operations!—EZ SETUP Turn the SELECT dial to choose “Finish,” then press the dial to In the provided EZ Setup return to the initial EZ Setup screen. menus, depending on the selected item, the settings * Selecting “Confirmation of recorded data” and pressing the ENTER button plays may be made using the back what you recorded.
-
Page 29: Cards Compatible With The Ar-3000
AR unit itself, so be sure to This means that you can change the settings simply by swapping cards. purchase cards separately. Cards that are assured of working on the AR-3000 are Roland PC There are several types of Cards (PM Series), sold separately. -
Page 30: Formatting A Card
Example: Card name: MESSAGE → Phrase name: MESSAGE 1 minute. * If you don’t give the card a name, the name “AR-3000” is used. In order to demonstrate the Important Note About Formatting full performance of the AR- 3000, we recommend •... - Page 31 Cards Compatible with the AR-3000 Turn the SELECT dial to choose the card you want to format (A or B), then press the dial. fig.07-g01e Turn the SELECT dial to choose the maximum number of phrases that can be recorded on the card (250, 500, or 1,000), then press the dial.
-
Page 32: Important Notes On Handling Cards
Cards Compatible with the AR-3000 To quit saving, in step 8, turn the SELECT dial to choose “END,” then press the dial. fig.07-g03e When the prompt appears on the screen, press the ENTER button to enable the settings. To quit without making the settings, use the SELECT dial to choose “NO,”... -
Page 33: Card Compatibility With Other Models In The Ar Series
If You’re Using a Legacy Model If you take a card used on a legacy model (AR-2000/1000/1) and use it on the AR-3000, or if you use an AR-3000 card on a legacy model, the following operational limitations will apply. -
Page 34: Conversion To New Features On The Ar-3000
* Please be aware that a card in AR-3000 format for which the maximum number of phrases is set at 1,000 cannot be converted to AR-2000 format. -
Page 35: The Display
The Display Viewing the Basic Screen Screen During Audio Phrase Playback During normal audio phrase playback, the display shows the following information. Stereo phrase You can the Elapsed Time/ fig.08-g01e Remaining Time display by Icon indicating a stereo phrase Phrase Name pressing the ENTER button during playback or while Phrase Number... -
Page 36: Viewing The 7-Segment Display
The Display Viewing the 7-segment Display The 7-segment portion in the upper area of the display shows the following information. fig.8-01e For items that do not function with AR-LINK, “---” is displayed. DELAY REPEAT VOL LOOP CONT OUT DELAY (Delay Time) When the “Delay Time”... -
Page 37: Display-Related Settings
The Display Display-related Settings Adjusting the Contrast You can adjust the contrast of the display. Adjust it to match your usage conditions. Procedure for Adjusting the Display Contrast Press the MODE button. The MODE indicator lights up. Use the SELECT dial to choose “10.1 Contrast,” then press the dial. -
Page 38: Making The Display Go Dark
The Display Making the Display Go Dark You can make the display go dark automatically after a certain period of time has elapsed following the last operation in the phrase playback screen. You can set the time until the display goes dark (Sleep Time) to anything from 30 seconds to 59 minutes 59 seconds. - Page 39 The Display Press the MODE button. This ends the setting process and returns you to the usual screen. * While making the settings, you can go back to the previous entry position (highlighted) by using the PAUSE (BACK) button. * Pressing the MODE button while making the setting displays a prompt asking you whether you want to quit making the setting.
-
Page 40: Recording Audio
Phrase Name Connecting Equipment The AR-3000 has a Mic jack on the front and an Analog Line In jack(LINE IN) and a Digital In jack(DIGITAL IN) on the back. Make the connections as appropriate for the equipment being used for recording. -
Page 41: Procedure For Recording
Recording Audio Monitor Output During Recording and Recording Standby Audio input from the Mic jack and the Digital In jack is output from the Balanced Output jacks, Headphone jack, and Mono Out port only during recording or recording standby, and you can monitor the recording state. Audio input from the Line In jacks can be output from the Balanced Output jacks, Headphone jack, and Mono Out port during recording or recording standby, or even during ordinary playback. -
Page 42: Required Settings For Recording Audio Signals (Recording Settings)
Recording Audio Hold down the STOP button and press the PLAY button to go into recording standby. During recording standby, the PLAY indicator and the PAUSE indicator flash in red. fig.09-g02e When you have created a new phrase by re- recording, the following phrase information remains If you try to re-record a phrase that’s already been recorded, a prompt... - Page 43 Recording Audio What’s RDAC? RDAC (Roland Digital Audio Coding) is a proprietary audio recording standard from Roland. It achieves high sound quality and also makes it possible to record for long times. Selecting the Recording Connector (LINE-IN/LINE+MIC-IN/ DIGITAL-IN/MIDI-IN) Set the input connector to record from. Make the selection to match the connected device.
- Page 44 RDAC-Grade (Sampling Frequency) The RDAC-Grade is the type of sampling frequency for digital recording. The setting for the RDAC- On the AR-3000, you can select from among six grades. Grade is made only for analog audio recording (selected connector: LINE- fig.09-02e (RDAC Grade)
- Page 45 2 of the procedure for setting the RDAC-Mode. RDAC-Mode (Signal Processing System) The RDAC-Mode is a type of digital data processing system for recording. On the AR-3000, you can choose from among five types of modes. fig.09-03e (RDAC Mode) Sound...
- Page 46 Recording Audio * 1 Important Notes When Recording with MODE2 or MODE3 Recording times available when in MODE2 are about the same as in MODE3, or slightly longer. However, note that for phrases recorded in MODE2, you cannot make settings for some of the items in the phrase settings (Phrase Information (p.
- Page 47 Recording Audio • The display of remaining time on the card available for recording changes according to the selected RDAC-Mode. • Next, if you’re making the setting for “Recording Type”, proceed to step 2 of the procedure for setting the recording type. If You’re Not Sure About Which Grade and Mode to Choose The optimal grade and mode vary according to the usage conditions, including the connected equipment, recording source, sound quality, time,...
- Page 48 Recording Audio • Next, if you’re making the setting for the “Trigger Recording Settings”, proceed to step 2 of the procedure for making the trigger recording setting. Trigger Recording Settings (OFF/LOW/MID/HIGH) A method for starting recording automatically when audio higher than the trigger level (the volume level for starting recording) is input is called trigger recording.
-
Page 49: Starting And Ending Recording
Recording Audio Adjusting the Recording Level Input audio from the connected device and adjust the recording level. If the input volume level is too high, a symbol(OVER) like the one shown below appears on the display. If this happens, adjust the recording level by lowering the volume on the connected device or turning the Input Volume Knob on the unit so that the symbol does not appear. -
Page 50: Checking What You Recorded
RDAC-Mode Recording time Information Recorded on the Card The AR-3000 stores recorded audio and MIDI signals on the card. It also stores all the setting information (such as MIDI settings) other than the unit’s setting (Contrast) on the card. This means you can switch all settings to the settings stored on a card simply by swapping cards. -
Page 51: Playback Using The Panel On The Unit (Manual Playback)
Playback Using the Panel on the Unit (Manual Playback) fig.10-01e Insert a card containing recorded information into a slot. Turn the SELECT dial to choose the phrase number to play. To switch between card slots A and B, press the SELECT dial. Press the PLAY button to play the phrase. - Page 52 Playback Using the Panel on the Unit Time Shown on the Display During playback or while playback is paused, you switch the time shown on the display between “Remaining Time (REMAIN)” and “Elapsed Time” by pressing the ENTER button. Elapsed Time Remaining Time This shows that it is the remaining time.
- Page 53 Applications...
-
Page 54: Modifying Recorded Phrases (Phrase Settings)
SELECT dial. If a card in AR-2000 format is inserted in either slot A or B (or both), the AR-3000 can be used only for playback, and it is Approximate guide to the location of the points for not possible to record phrases or make any settings (except the entire phrase. -
Page 55: Delay Time (00S 00F To 59S 29F)
Modifying Recorded Phrases (Phrase Settings) (highlighted) moves to the phrase selection, so turn the SELECT dial to reselect card A or B and the phrase number, If you’re using Busy Out signals to start an amp or the like, then press the dial. inserting a delay time into the phrase that corresponds to the 4. -
Page 56: Playback Point (Start And End)
Modifying Recorded Phrases (Phrase Settings) Playback Point (Start and End) Turn the SELECT dial to set the end position (time), then press the dial. These determine where phrase playback is to start and end. fig.11-02e Playback passage While setting the points, you can set the points while listening to the audio by using the SCRUB playback mode (p. -
Page 57: Repeat Play (Repeat, Repeat Interval)
Modifying Recorded Phrases (Phrase Settings) 9. Press the MODE button. fig.11-g04e This ends the setting process and returns you to the usual screen. * While making the settings, you can go back to the previous entry location (highlighted) by pressing the PAUSE (BACK) button. -
Page 58: Fade (Fade In And Fade Out)
Modifying Recorded Phrases (Phrase Settings) 6. Press the MODE button. This ends the setting process and returns you to the usual Loop Play is not possible when in the Dual Mono mode. screen. Procedure for Making Loop Play Settings * While making the settings, you can go back to the previous entry location (highlighted) by pressing the PAUSE (BACK) 1. -
Page 59: Control Out
The MODE indicator lights up. For detailed information on how to use Control Out, refer to 3. Use the SELECT dial to choose “1.6 Fade,” then press the “Controlling Another Device with the AR-3000 (Control dial. Output Terminal)” (p. 102). -
Page 60: Changing The Playback Tempo For Midi Phrases (Midi Playback Tempo)
Modifying Recorded Phrases (Phrase Settings) selected. fig.11-g08e 5. When the prompt appears on the screen, press the ENTER button to enable the settings. To quit without making the settings, use the SELECT dial to choose “NO,” then press the ENTER button. You can play back the selected phrase by pressing the PLAY Once the settings have been successfully modified, you’re button. -
Page 61: Creating Combinations Of Phrases (Phrase Combination)
If a card in AR-2000 format is inserted in either slot A or B (or BACK: This moves back the location for entering a character. both), the AR-3000 can be used only for playback, and it is Pressing the dial moves back the entry location by one. - Page 62 Modifying Recorded Phrases (Phrase Settings) fig.11-09e You can assign a phrase any number of times to a single Actual phrase A0001 pattern phrase, or to more than one pattern phrase. Thank you for coming You can assign pattern phrases that have already been created to other pattern phrases.
- Page 63 Modifying Recorded Phrases (Phrase Settings) About Pattern Phrase Playback Methods 3. Turn the SELECT dial to choose the card containing an (Pattern Phrase Modes) empty phrase for creating a new pattern phrase or the pattern phrase whose settings you want to change, then There are four types of pattern-phrase playback methods press the dial.
-
Page 64: Time-Based Combinations (Song Phrases)
Modifying Recorded Phrases (Phrase Settings) * If phrases are assigned in the playback order you selected in step 7, then selecting “-----” cancels the phrase assignment. When Playing Back Narration with Pattern Phrases 10. Turn the SELECT dial to set the playback volume for the With narrations that use pattern phrases, the proper assigned phrase (from 10% to 100%), then press the dial. - Page 65 Modifying Recorded Phrases (Phrase Settings) • You can assign up to 100 phrases to a single song phrase. fig.11-g18e • You can assign a phrase any number of times to a single song phrase, or to more than one song phrase. END:To finish making settings.
-
Page 66: Modifying Phrases Themselves (Phrase Edit)
• If a card in AR-2000 format is inserted in either slot A or Once the settings have been successfully modified, you’re B (or both), the AR-3000 can be used only for playback, returned to the setting item selection screen. -
Page 67: Deleting Audio Outside The Playback Points (Phrase Truncate)
Modifying Recorded Phrases (Phrase Settings) Deleting Audio Outside the screen. Playback Points (Phrase * While making the settings, you can go back to the previous Truncate) entry location (highlighted) by pressing the PAUSE (BACK) button. This deletes data outside the points set with the Playback * If you press the MODE button while making settings, a Point phrase information (p. -
Page 68: Deviding A Phrase (Phrase Divide)
Modifying Recorded Phrases (Phrase Settings) fig.11-15e * To copy a single phrase, choose the same phrase for the Pattern Phrase beginning phrase and the final phrase. Song Phrase 4. Turn the SELECT dial to choose the write-destination card, then press the dial. A0012 A0015 fig.11-g25e... -
Page 69: Joining Phrases (Phrase Combine)
Modifying Recorded Phrases (Phrase Settings) 2. Use the SELECT dial to choose “3.4 Phrase Devide,” then 7. When the prompt appears on the screen, press the press the dial. ENTER button to enable the settings. To quit without making the settings, use the SELECT dial to 3. - Page 70 Modifying Recorded Phrases (Phrase Settings) then press the dial. * Only phrases that can be executed are displayed. 4. Turn the SELECT dial to choose the card containing the second phrase to join (Src2), then press the dial. fig.11-g33e * If a card is inserted into either slot A or slot B, the entry location (highlighted) advances to the phrase number.
-
Page 71: Expanding Or Compressing The Playback Time Without Changing The Pitch (Time Stretch)
Modifying Recorded Phrases (Phrase Settings) Expanding or Compressing the * Only phrases that can be executed are displayed. Playback Time Without Changing 6. When the prompt appears on the screen, press the the Pitch (Time Stretch) ENTER button to enable the settings. To quit without making the settings, use the SELECT dial to This expands or compresses a phrase’s playback time choose “NO,”... -
Page 72: Converting A Phrase's Recording Settings (Phrase Convert)
RDAC-Mode.) • When phrases recorded with H-LINEAR or MODE3 on Converting the RDAC-Mode the AR-3000 are used on the AR-2000 or the like (H- 1. Press the MODE button. LINEAR and MODE3 phrases cannot be used unchanged on the AR-2000.) The MODE indicator lights up. - Page 73 Modifying Recorded Phrases (Phrase Settings) 5. Turn the SELECT dial to choose the card containing the and all setting changes you’ve made up to that point will be beginning phrase you want to convert, then press the discarded. dial. fig.11-g45e Even if there are phrases in "Phrase range"...
- Page 74 Modifying Recorded Phrases (Phrase Settings) 6. Turn the SELECT dial to choose the write-destination 7. Turn the SELECT dial to choose the card for write card, then press the dial. destination 2 (MONO2), then press the dial. fig.11-g50e fig.11-g54e * If a card is inserted into either slot A or slot B, the entry * If a card is inserted into either slot A or slot B, the entry location (highlighted) advances to the phrase number.
-
Page 75: Phrase Information/Phrase Setting Correspondence Table
Modifying Recorded Phrases (Phrase Settings) 7. Turn the SELECT dial to choose the write-destination Once the settings have been successfully modified, you’re card, then press the dial. returned to the setting item selection screen. fig.11-g57e 9. Press the MODE button. This ends the setting process and returns you to the usual screen. -
Page 76: Making Settings And Edits For Individual Cards
If a card in AR-2000 format is inserted in either slot A or B (or both), the AR-3000 can be used only for playback, and it is not possible to record phrases or make any settings (except 4. When the prompt appears on the screen, press the for card conversion). -
Page 77: Copying Just The Settings (Setting Copy)
(that is, you cannot copy settings from a card in AR-2000 To quit without making the settings, use the SELECT dial to format to a card in AR-3000 format, or vice versa). choose “NO,” then press the ENTER button. Setting Copy Procedure When you’re finished making the setting, the display returns... -
Page 78: Changing The Name Of A Card (Card Name)
• DEL: This deletes a character. Pressing the dial deletes a Conversion of New Functions on the AR-3000 single character. When you convert a card in AR-3000 format to a card in AR- • END: This finishes the setting process. 2000 format, the AR-3000 setting items are converted as... - Page 79 4. Turn the SELECT dial to choose the Card you want to (p. 80).) convert, then press the dial. • If you are using the AR-3000 to perform recording or fig.12-g06e editing on a card used on an AR-2000, we recommend...
-
Page 80: Card Conversion Chart/Conversion Error Chart
Making Settings and Edits for Individual Cards Card Conversion Chart/Conversion Error Chart fig.12-01e Card Conversion (AR-3000→AR-2000)Chart * This chart shows compatibility for converted cards used on the AR-2000. When you're using on the AR-100 or AR-1, refer to the owner's manual for the respective device. - Page 81 Action 2: Reduce the space used on the copy-source card, such as by 6.4 MIDI Channel deleting unneeded phrases. 6.5 Note Trigger When you convert a card in AR-2000 format to AR-3000 format, the Trigger amount of space used after conversion may increase somewhat. Conversion Gate may not be possible if space is used up or there is little remaining space, 6.6 MIDI Rx Message...
-
Page 82: Recording And Playing Midi Data (Midi Phrases)
Recording and Playing MIDI Data (MIDI Phrases) What Are MIDI Phrases? During recording or recording standby, this automatically You can record and play back MIDI data with the AR-3000. becomes MIDI THRU. Sets of MIDI data recorded using the AR are called “MIDI phrases.”... -
Page 83: Starting And Ending Recording
MIDI device. When the time base of the connected MIDI device is: 24, 48, 96, 192, or 384 → Set the AR-3000 time base to 192 Starting and Stopping Recording Through MIDI Playback 30, 60, 120, 240, or 480 →... -
Page 84: Playback Of Midi Phrases
(a tempo of from 5 to 260). The setting is made for individual phrases. * In MIDI recording on the AR-3000, the tempo when recorded is assumed to be 120. (Tempo information is not stored.) The setting for the MIDI playback tempo is made with a phrase setting. -
Page 85: Controlling The Ar-3000 From An External Device (Control Input Terminals)
• Program Playback variety of applications. • Binary Playback (Level: OFF; Edge: OFF) You can control recording and playback on the AR-3000 by on and off signals input from an external device through the • Binary Playback (Level: ON; Edge: OFF) no-voltage/make-contact or open collector circuit. -
Page 86: Type Of Control Input Recording
Controlling the AR-3000 from an External Device Type of Control Input Recording Operational Specifications for Direct Playback There is one type of control input recording: Terminal Recording (p. 98). Basic Operation of Direct Playback fig.14-04e Assigning a Phrase to a Port Port NO. -
Page 87: Ar-3000 Settings
If a card in AR-2000 format is inserted in either slot A or B (or A0002 AUDIO OUTPUT both), the AR-3000 can be used only for playback, and it is Playback is repeated while the control signal is continuously not possible to record phrases or make any settings (except input. - Page 88 Controlling the AR-3000 from an External Device 4. When the prompt appears on the screen, press the * If you press the MODE button while making settings, a ENTER button to enable the settings. message asking you to confirm that you want to exit the setting process appears.
-
Page 89: Playing Back Phrases In The Order They Are Selected (Program Playback)
Controlling the AR-3000 from an External Device Procedure for Assigning Phrases * While making the settings, you can go back to the previous entry position (highlighted) by using the PAUSE (BACK) 1. Press the MODE button. button. The MODE indicator lights up. -
Page 90: Connecting External Equipment
Controlling the AR-3000 from an External Device Connecting External Equipment fig.14-17e START Port Ports Used in Program Playback STOP Port “START”: Plays back phrases in the order set in program No. 001 No. 002 playback. AUDIO OUTPUT “STOP”: This stops phrase playback. -
Page 91: Display Indications During Program Playback
No. 001 No. 001 AUDIO OUTPUT both), the AR-3000 can be used only for playback, and it is However, if no settings are made for Programs 2 through 5 not possible to record phrases or make any settings (except when a control signal is input to the “EXCHANGE” port, for card conversion). -
Page 92: Specifying Phrase Numbers In Binary Notation (Binary Playback)
Controlling the AR-3000 from an External Device Registering Phrases 7. Repeat steps 4 and 5 to store more phrases. 8. To cancel the save process, then in step 4, turn the Register the phrases in the program playback order. Up to a maximum of 100 phrases can be registered in each of the five SELECT dial to choose “END,”... -
Page 93: Connecting External Equipment
Controlling the AR-3000 from an External Device Operational Specifications of * Input of binary specifications should be completed in no more than 50 milliseconds. Binary Playback Basic Operation of Binary Playback Connecting External Equipment fig.14-25e A0001 Terminals Used in Binary Playback Binary Specification Port 1–11... -
Page 94: Ar-3000 Settings
If a card in AR-2000 format is inserted in either slot A or B (or When the Start port control signal is changed to OFF, both), the AR-3000 can be used only for playback, and it is playback tops after completion of the phrase currently being not possible to record phrases or make any settings (except played. -
Page 95: To Specify Phrases With Binary Signals
Controlling the AR-3000 from an External Device 5. Press the MODE button. setting process appears. Note that if you choose “YES,” then press the ENTER button, you are returned to the usual screen, This ends the setting process and returns you to the usual and all setting changes you’ve made up to that point will be... -
Page 96: Phrase Number/Binary Signal Correspondence Table
Controlling the AR-3000 from an External Device Phrase Number/Binary Signal Correspondence Table fig.14-31e Phrase Port No. Phrase Port No. Phrase Port No. Phrase Port No. Phrase Port No. 10987654321 10987654321 10987654321 10987654321 10987654321 0001 0000000001 0101 0001100101 0201 0011001001 0301... - Page 97 Controlling the AR-3000 from an External Device fig.14-32e Phrase Port No. Phrase Port No. Phrase Port No. Phrase Port No. Phrase Port No. 10987654321 10987654321 10987654321 10987654321 10987654321 0501 0111110101 0601 1001011001 0701 1010111101 0801 1100100001 0901 1110000101 0502 0111110110...
-
Page 98: Controlling Recording With The Control Terminals (Terminal Recording)
Controlling the AR-3000 from an External Device Controlling Recording with fig.14-34e Card select the Control Terminals Phrase select (Terminal Recording) ..12: not use What is Terminal Recording/Uses and Applications You can specify phrases by inputting binary (base 2) signals to Port Nos. - Page 99 Controlling the AR-3000 from an External Device Recording Playback 13: 0 (OFF) 13: 1 (ON) 14: 1 (ON) 14: 0 (OFF) → While control signals are being input, the specified phrase → The specified phrase is played back. Even when control is recorded.
-
Page 100: Ar-3000 Settings
(BINARY 1/BINARY 2) If a card in AR-2000 format is inserted in either slot A or B (or both), the AR-3000 can be used only for playback, and it is Select the method (BINARY 1 or BINARY 2) used for not possible to record phrases or make any settings (except specifying the phrase. -
Page 101: To Specify Phrases With Binary Signals
Controlling the AR-3000 from an External Device Procedure for Setting the Phrase Specification With the above steps, Phrase No. A0015 is converted to: fig.14-39e 1. Press the MODE button. → 1 Port No. Input signal → 1 The MODE indicator lights up. -
Page 102: Controlling Another Device With The Ar-3000 (Control Output Terminal)
Controlling Another Device with the AR-3000 (Control Output Terminal) Starting Another Device You can control an external device from the AR-3000 by using the output connectors among the screw-on control (Busy Out) terminals on the unit’s rear panel. The AR-3000 outputs two types of control signals: BUSY OUT and CONTROL OUT. -
Page 103: Ar-3000 Settings
Controlling Another Device with the AR-3000 AR-3000 Settings 3. Turn the SELECT dial to choose “in Delay Time (OFF or ON),” then press the dial. The setting for the Busy Out signal is a system-wide setting fig.15-g01e (that is, it is not made separately for individual phrases). -
Page 104: Controlling Another Device (Control Out)
Controlling Another Device with the AR-3000 Controlling Another Device AR-3000 Settings (Control Out) The setting for the Control Out signal is made separately for individual phrases. When you make the Control Out setting, in addition to What Is a Control Out Signal?/... -
Page 105: Controlling The Ar-3000 Using Midi Signals (Midi Control)
60 and the numbers from 0 to 127 indicating the MIDI stands for “Musical Instrument Digital Interface,” and positions of the keys on the keyboard. On the AR-3000 these is a unified worldwide standard allowing the exchange of are used to specify phrases. -
Page 106: Connecting External Equipment
Controlling the AR-3000 Using MIDI Signals (MIDI Control) Connecting External Equipment Turning the Power On and Off → p. 23 When Playing Back Audio Phrases Using MIDI Signals AR-3000 Settings fig.16-01e (for MIDI Sequencer) Selection of MIDI Output (MIDI OUT or MIDI THRU) This changes the function of the MIDI output port. - Page 107 Controlling the AR-3000 Using MIDI Signals (MIDI Control) Note Number Phrase Assignments MIDI Note Map (Phrase Assignments from Program Changes and Note Numbers) (MIDI Note Map) fig.16-04e A Note On message causes the phrase with the Program Phrase No. Note No.
- Page 108 “1,” then unless the MIDI channel fig.16-g02e of the receiving device (here, the AR-3000) is also set to “1,” the MIDI message is not transmitted. OFF: There is no phrase playback using MIDI signals.
- Page 109 Controlling the AR-3000 Using MIDI Signals (MIDI Control) press the ENTER button, you are returned to the usual screen, Expression (CC11): Change in master volume and all setting changes you’ve made up to that point will be discarded. MIDI Implementation and MIDI Implementation Chart → p.
-
Page 110: Synchronizing Operation To An External Midi Instrument - 1 (Mmc)
MIDI Note Map (p. 107) are output from the MIDI OUT connector. Synchronizing Operation to It's possible to use this signal to control a number of AR-3000 an External MIDI Instrument units. – 1 (MMC) * If multiple note numbers are selected for the playback phrase, only the on or off signal for the lowest note number is output. -
Page 111: Ar-3000 Settings
In situations such as when you carry out recording and Settings editing with a hard-disk recorder and record the finished results on the AR-3000, you can control AR-3000 from the This sets the MIDI device ID (from 1 through 32). hard-disk recorder. -
Page 112: Synchronizing Operation To An External Midi Instrument - 2 (Mmc And Mtc)
Controlling the AR-3000 Using MIDI Signals (MIDI Control) 2. Use the SELECT dial to choose “6.8 MMC Mode,” then • If you are continuing by making the setting for “Sync press the dial. Out,” proceed to step 4 of the procedure for setting sync out (p. -
Page 113: Connecting External Equipment
Connecting External Equipment 29D: This is 29.97 frames per second, drop format. It is used You can the AR-3000 as an MTC master or as an MTC slave. for NTSC-format color video for broadcast use. In this connection example, the unit is used as a slave. -
Page 114: Ar-3000 Settings (When The Ar-3000 Is The Slave)
(SysEx) messages. THRU: This takes MIDI information from MIDI IN and sends it out unchanged. MIDI information from the AR-3000 itself is not output. 4. When the prompt appears on the screen, press the ENTER button to enable the settings. - Page 115 Controlling the AR-3000 Using MIDI Signals (MIDI Control) 5. Press the MODE button. To quit without making the settings, use the SELECT dial to choose “NO,” then press the ENTER button. This ends the setting process and returns you to the usual Once the settings have been successfully modified, you’re...
-
Page 116: Operation Procedures
Once the settings have been successfully modified, you’re when you want to play back MIDI phrases, send Exclusive returned to the setting item selection screen. (SysEx) messages, or make the AR-3000 the master during synchronization using MIDI signals. 6. Press the MODE button. - Page 117 Controlling the AR-3000 Using MIDI Signals (MIDI Control) 3. Press the SELECT dial to advance the input location are controlling an external MIDI instrument using MMC and MTC, you need to set both devices to matching device ID (highlighted) to “Sync Out.”...
-
Page 118: Controlling The Ar Using The Rs-232C Connector
D-sub 9-pin type RS-232C connector. With 2. Use the SELECT dial to choose “7.1 Baud Rate,” then the AR-3000, you can control the AR-3000 from an external press the dial. control device such as a computer or touch panel by means 3. -
Page 119: Playing Two Units's Worth Of Data On The Left And Right (Dual Mono Mode)
* Note that no Control Out signal is output (because the Control Out setting (p. 59) is not valid). On the AR-2000/100 (legacy models), this Dual Mono mode AR-3000 Settings is named the “Channel Playback mode.” As you use it, keep in mind that it is the same feature. -
Page 120: Operation Procedures
The settings for control-input playback basically act played back even during playback of A0001. independently for each channel. For more information about the operation of playback with control input terminals, see also “Controlling the AR-3000 from an External Device (Control Input)” (p. 85). - Page 121 Playing Two Units's Worth of Data on the Left and Right Last-In Playback When you send a Stop input signal, playback stops simultaneously for the L and R channels. Port 1 When Level is set to “ON” and Edge is set to “OFF” Port 2 A0001 A0002...
-
Page 122: Synchronized Recording And Playback With Multiple Ar Units (Ar-Link)
Video playback device clock, allowing synchronization with sampling frequency precision. With one AR-3000 as the master, you can link up to 31 other AR-3000 or AR-200 units (for a total of 32 devices) to get 64- MMC Mode: MASTER channel multitrack recording and playback. -
Page 123: Unit Settings
* During playback, you can stop the slave AR units fig.19-g02e individually, by operating their respective panels. * If independent playback is carried out on the slave AR-3000, the indication for the fact that it is an AR-LINK slave 4. When the prompt appears on the screen, press the disappears. -
Page 124: Other Useful Functions During Phrase Playback
When On (0%) Handy Uses of Line Thru When On (50%) With the AR-3000, you can take audio from LINE IN, mix it during phrase playback, and mixed it from Line Out (or Line When On Sound input to LINE IN Thru). -
Page 125: Adjusting The Sound Quality During Audio Phrase Playback (Equalizer)
Other Useful Functions During Phrase Playback * You can make the setting for Fade Out or Fade In only when This ends the setting process and returns you to the usual Line Thru is set to “ON.” screen. * While making the settings, you can go back to the previous entry position (highlighted) by using the PAUSE (BACK) While making the Line Thru settings, you can play the button. -
Page 126: Keeping The Output Volume Unchanged (Output Volume Thru)
Other Useful Functions During Phrase Playback Keeping the Output Volume Procedure for Making the Equalizer Settings Unchanged (Output Volume 1. Press the MODE button. The MODE indicator lights up. Thru) 2. Use the SELECT dial to choose “9.3 Equalizer,” then This deactivates the OUTPUT VOLUME knob and keeps the press the dial. -
Page 127: Appendices
Appendices... -
Page 128: Troubleshooting
In Program Playback, phrases cannot be When not synchronizing playback with MTC and using the selected as intended. AR-3000 as a slave, set “Sync Source” on the AR-3000 to The assignments of phrases in the Program Playback “INTERNAL.” sequence are made with settings on the unit. - Page 129 Map)” (p. 107) The displayed tempo for a MIDI phrase remains at 120. The initial tempo of the AR-3000 is 120, so even if you record MIDI data having variable tempo to a MIDI phrase, tempo information is not recorded.
- Page 130 “Selecting the MTC Type (30/29N/29D/25/24)” (p. 115) 3. Press the ENTER button to confirm the setting. • Check the AR-3000 to confirm that the MIDI device ID 4. When “Turn Power Off” is displayed, switch off the settings are correct.
-
Page 131: Error Messages
Error messages If there has been a mistake in operation, or if the AR-3000 is Display: Write-protected unable to continue processing as you directed, an error Cannot write card message will appear in the display. Note the message that Situation: The card's write-protect switch is on. - Page 132 Buffer overflow after No. 501. Modify trans. Situation: More MIDI data was received in a short time Regarding AR-LINK than the AR-3000 was able to process. Display: PhraseTypesDiffer Action: Change the way in which MIDI data is being Can't sync play transmitted.
-
Page 133: Cards
Cards Card-specific Audio Recording Time Chart When Using a Single PM Series Roland PC Card with Recording Type at “Mono.” fig. 21-01-j RDAC-Mode RDAC-Mode PM-004 PM-040 (4MB) (40MB) H-LINEAR LINEAR MODE3 MODE2* MODE1 H-LINEAR LINEAR MODE3 MODE2* MODE1 S-HIGH 00:27... -
Page 134: Settings When A Card Is Formatted
1.7 Control Out: OFF • Programs 1 played back in order 1.8 MIDI Tempo: 120 No.1: Phrase A0001 or B0001 1.9 Phrase Name: AR-3000 1 (Card Name + Phrase No.) ↓ No.100: Phrase A0100 or B0100 Card editing • Programs 2 through 5 played back in order 4.5 Card Protect: OFF... -
Page 135: Recorded Phrase Data
• Panpot: OFF Recorded Phrase Data • Expression: OFF 6.7 MIDI Device ID: 1 When a piece of Phrase data recorded by the AR-3000, the settings of data on the card will be as follows. 6.8 MMC Mode: OFF 6.9 MTC Phrase Settings •... -
Page 136: Terminals
AR series devices. Doing so may result in unstable operation. 2. Control Output Windows98, Windows95 compatible CPU Signal system: No-voltage make-contact AR-3000 Computer Contact capacity: DC 30 V, 5 A 1 : NC 1 : DCD 2 : RXD... -
Page 137: Ar-Link Connectors Specifications
In addition to the owner’s manual, the separate publication “RS-232C Reference Notes” is also available for those Specifications needing detailed documentation regarding RS-232C connector control. Order from your vendor or Roland Service fig.arcon Center. 8 7 6 The RS-232C Reference Notes cover the following topics: •... -
Page 138: Midi Implementation
* With Program Changes 2-6 and 7-11, only Note Numbers 00H-63H (0-99) are received. dddd = 4 bit nibble data : 0h - FH (0 - 15) The phrase numbers correspond to 1-500 on Card A and 1-500 on Card B (AR-3000 only) Bit Field is assigned as follws. -
Page 139: Midi Time Code
MIDI Implementation MIDI Time Code * Playback is started immediately when this command is received if the device ID Full Messages matches, or if 7FH is received. * Data is received when Sync Source is set to "MTC." When the Quarter Frame message is received, operation proceeds with the start of the song synchronized to RECORD STROBE (MCS) "00h00m00s00f00"... -
Page 140: Timing Clock
* When "STOP" is pressed, a Device ID of 7FH is transmitted. * There is no transmission when the Note Send setting is set to "OFF" (Note Send settings DEFERRED PLAY (MCS) are available only with the AR-3000). Status Data Bytes Status * Data is not output if the MIDI Receive channel setting is "OFF."... -
Page 141: Polyphonic Key Pressure
: an ID number (manufacturer ID) to indicate the manufacturer whose Status Second Third Exclusive message this is. Roland's manufacturer ID is 41H. ID numbers 7EH and 7FH are extensions of the MIDI standard; Universal Non-real time Messages (7EH) and Universal Real time n = MIDI Channel No. -
Page 142: Active Sensing
1:LOW 5. Exclusive Communication 2:MID 3:HIGH Exclusive message model IDs that can be used on the AR-200 and AR-3000 are OOH, 38H 00 - 03 REC Source 0:LINE-IN (AR-200), 00H, and 37H (AR-3000). The Device Id can be set to 00H to 1FH. - Page 143 However, if a phrase has already been saved, the AR-3000 deletes that phrase and goes 1:LONG2 into REC PAUSE mode. 2:LONG1 * REC Source 1 and 2 can be set only on the AR-3000, and cannot be set on the AR-200. 3:STANDARD 4:HIGH (AR-100/2000 compatible)
-
Page 144: Midi Implementation Chart
AUDIO RECORDER Date : Dec. 1, 2000 MIDI Implementation Chart Model AR-3000 Version : 1.00 Media Player Section Remarks Transmitted Recognized Function ... Memorized Basic Default All channels Channel Changed 1–16 Default Mode Message Altered **************** Note 0 –127 Number :... - Page 145 AUDIO RECORDER Date : Dec. 1, 2000 MIDI Implementation Chart Model AR-3000 Version : 1.00 MIDI Recording Section Remarks Transmitted Recognized Function ... Not Basic Channel Basic Default all channels Channel Changed Default Mode Message Altered **************** Note 0 –127...
-
Page 146: Specification
PC card (PC Card Standard (1995) compatible, TYPE1.2) Parity: none Recommended PC cards Data length: 8 bit Roland PC Cards PM series (PCMCIA2.0/2.1, JEDA Ver.4.1/ Stop bit length: 1 bit 4.2 Spec Standard) Code set: ASCII * In order to recording/playback of audio signal and MIDI data, * The setting "38400"... - Page 147 LINE IN jacks (MONO/L,R, RCA phono type) detailed documentation regarding RS-232C connector control. DIGITAL IN connector (RCA phono type, Coaxial type, S/P Order from your vendor or Roland Service Center. DIF, EIAJ CP-1201-compliant) The RS-232C Reference Notes cover the following topics: Control I/O Terminal (25 pin Terminal Block with M3 bolts) •...
-
Page 148: Input/Output Standard
Specification Input/Output Standard fig.spec Input Standard (Volume: center) Non Clip Input Recommended Input Input Sense Rated Input Level Max Input Level Impedance Source Impedance 1 kohms MIC Input Jack -55 dBu -40 dBu -42 dBu 2 kohms or less 20 kohms 2 kohms Line Input Jack -15 dBu... -
Page 149: Index
Index AR-LINK ..............21, 122 Note Trigger ..............109 AR-LINK Connectors ..........137 No-voltage/Make-contact ..........85 Attenuation ..............125 Baud Rate ..............118 Output Volume Thru ...........126 Binary Playback ..............92 Busy Out ................102 Pattern Phrases ...............61 Phrase Combine ..............69 Card Audio Recording Time Chart ......133 Phrase Convert ...............72 Card Conversion Chart ..........80 Phrase Copy ..............67 Card Convert ..............78... -
Page 150: North America
Information When you need repair service, call your nearest Roland Service Center or authorized Roland distributor in your country as shown below. CRISTOFORI MUSIC PTE PANAMA ITALY ISRAEL AFRICA AFRICA SUPRO MUNDIAL, S.A. Roland Italy S. p. A. Halilit P. Greenspoon &... - Page 151 For EU Countries This product complies with the requirements of European Directives EMC 89/336/EEC and LVD 73/23/EEC. For the USA FEDERAL COMMUNICATIONS COMMISSION RADIO FREQUENCY INTERFERENCE STATEMENT This equipment has been tested and found to comply with the limits for a Class B digital device, pursuant to Part 15 of the FCC Rules.
- Page 152 02235201 ’01-4-C2-21N...
Need help?
Do you have a question about the AR-3000 and is the answer not in the manual?
Questions and answers