Denon DRA-F102 Operating Instructions Manual
Hide thumbs
Also See for DRA-F102:
- Operating instructions manual (28 pages) ,
- Service manual (40 pages)

Related Manuals for Denon DRA-F102


Summary of Contents for Denon DRA-F102
- Page 1 AM-FM STEREO RECEIVER DRA-F102 OPERATING INSTRUCTIONS BEDIENUNGSANLEITUNG MODE D’EMPLOI ISTRUZIONI PER L’USO INSTRUCCIONES DE FUNCIONAMIENTO GEBRUIKSAANWIJZING BRUKSANVISNING...
- Page 2 ENGLISH DEUTSCH FRANCAIS ITALIANO ESPAÑOL NEDERLANDS SVENSKA 2 SAFETY PRECAUTIONS CAUTION: • DECLARATION OF CONFORMITY To completely disconnect this product from the mains, disconnect We declare under our sole responsibility that this product, to which this declaration relates, is in conformity with the following standards: the plug from the wall socket outlet.
- Page 3 SVENSKA NEDERLANDS ESPAÑOL ITALIANO FRANCAIS DEUTSCH ENGLISH NOTE ON USE / HINWEISE ZUM GEBRAUCH / OBSERVATIONS RELATIVES A L’UTILISATION / NOTE SULL’USO / NOTAS SOBRE EL USO / ALVORENS TE GEBRUIKEN / OBSERVERA CAUTION: • The ventilation should not be impeded by covering the ventilation openings with items, such as newspapers, tablecloths, curtains, etc.
- Page 4 ENGLISH DEUTSCH FRANCAIS ITALIANO ESPAÑOL NEDERLANDS SVENSKA A NOTE ABOUT RECYCLING: This product’s packaging materials are recyclable and can be reused. Please dispose of any materials in accordance with the local recycling regulations. When discarding the unit, comply with local rules or regulations. Batteries should never be thrown away or incinerated but disposed of in accordance with the local regulations concerning chemical waste.
-
Page 5: Table Of Contents
Check that the following parts are attached in addition to the main RDS search ·················································································14 unit: PTY search ··················································································14 Thank you for purchasing this DENON Receiver. TP search ····················································································14 Please read the operation instructions thoroughly in order to Operating instructions .............1 RT (Radio Text) ············································································14... -
Page 6: Cautions On Installation
• It may be difficult to operate the remote control unit if the remote The included remote control unit (RC-1034) can be used to operate sensor is exposed to direct sunlight or strong artificial light. not only the DRA-F102 but also other components in the F102 series page 4). Inserting the batteries... -
Page 7: Part Names And Functions
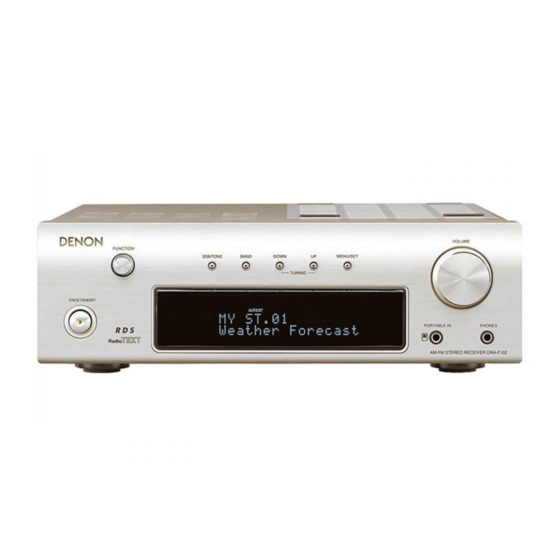
ENGLISH Getting Started Getting Started Part names and functions Rear panel For details on the functions of these parts, refer to the pages given in parentheses ( ). Front panel ANTENNA terminals ··································(9) AC outlet ·····················································(7) MONO OUT terminal ·································(8) Power supply cord ·····································(7) SYSTEM CONNECTOR jack·······················(7) Analog input terminals ······························(7) -
Page 8: Remote Control Unit [System Remote Control Unit]
Remote control unit [System remote control unit] For detailed descriptions of the functions, etc., refer to the operating instructions included with the • The operation of the remote control unit differs according to the function to which the DRA-F102 is set. component. - Page 9 1/3: Play / Pause 8, 9: Play / Pause CD 2: Search / Fast-rewind / Fast- Stop forward TIME/DISPLAY: Time/display switching • Use the separately sold Control Dock for iPod (ASD-1R) to connect an iPod to the DRA-F102. ENGLISH...
-
Page 10: Recommended System Layout
• Plug the power cords of devices that are used connected to the DRA-F102 into the DRA-F102’s AC outlets. Do not use the outlets for hairdryers or other non-audio devices. -
Page 11: Connections [System Connections]
NOTE: • The maximum total power consumption of devices connected to the DRA-F102’s AC outlets is 100 W (0.43 A). Do not connect devices with power consumptions greater than 100 W (0.43 A). • The power supply to the devices connected to the DRA-F102’s AC outlets turns on and off together with the DRA-F102’s power... -
Page 12: Speaker Connections
If the protection circuit is activated again even • When using an SC-F102/F103 (sold separately), we recommend using the DRA-F102’s optimised filter though there are no problems with the wiring page 21). -
Page 13: Connecting An Outdoor Antenna
• Fasten the tip of the antenna using tape, etc. AM outdoor antenna Ground NOTE: • The DRA-F102’s ground terminal ( ) is the ground for the AM loop antenna. It is not a ¢ Connecting ¢ Where to install the outdoor outdoor safety ground. -
Page 14: Connections To Devices Other Than Those In The F102 Series
Control Dock for iPod • Use the separately sold Control Dock for iPod (ASD-1R) to connect an iPod to the DRA-F102. • When connecting an exclusive Control Dock for iPod (sold separately), use the system cable included with the exclusive Control Dock for iPod. -
Page 15: Operation
ENGLISH Operation Operation Turning the power on NOTE: • Be sure to set to the proper function for the connected device. FUNCTION SDB/TONE < ON/STANDBY > [POWER ON] Press When the power is turned on, the function that was being used Adjusting the tone when the power was last turned off is selected (selector function). -
Page 16: Recording
ENGLISH Operation Operation Recording Selecting a radio station BAND MENU/SET FUNCTION to select the function for the source to FUNCTION to select “TUNER”. TUNING FUNCTION be recorded. • The reception frequency is displayed. CD/HDD TUNER PORTABLE IN BAND to select the reception band. TAPE AUX (iPod) PHONO... -
Page 17: Giving A Name To The Currently Tuned In
ENGLISH Operation Operation Giving a name to the currently tuned in RDS (Radio Data System) NOTE: broadcast station and presetting it • If a station is preset at a number where a station has already RDS (works only on the FM band) is a broadcasting service which been preset, the old setting is deleted and replaced with the allows station to send additional information along with the regular •... -
Page 18: Rds Search
ENGLISH Operation Operation RDS search RT (Radio Text) BAND MENU/SET BAND [ TIME/DISPLAY ] to select “FM AUTO”. Press until “Radio Text” scrolls on the FUNCTION TUNING display. [ RDS ] When the station currently tuned in is offering a radio text Press message service, the message scrolls on the display. -
Page 19: Setting The Current Time
Setting the everyday or once timer • Be sure to set the current time first. The DRA-F102’s clock displays the time in the 24-hour mode Before setting the timer • To use the timer function to listen to AM or FM broadcasts, be sure Example: To set the current time to “19:30”... -
Page 20: Operation Of The Everyday And Once Timers
ENGLISH Operation Operation Operation of the everyday and once timers to select “1_off / E_on”, then BAND MENU/SET MENU/SET press TUNING After setting the timer at “Setting the everyday or once timer” ( • The timer standby indicator “ ” lights. The time is now set. page 15, 16), select the timer(s) you want to operate. -
Page 21: Setting The Sleep Timer
“iPod”, see page 5. NOTE: • DENON will accept no responsibility whatsoever for loss of iPod data when using an iPod connected to the DRA-F102. • Depending on the type of iPod or the software version, some functions may not operate. -
Page 22: System Operations
Press while any device other than the DRA-F102 is playing. [POWER OFF] • Playback stops. • The DRA-F102’s function switches automatically and playback starts. <ON/STANDBY> MENU/SET Timer function • Sources can be played or recorded at set times using the DRA- <DIRECTION>... -
Page 23: Conducting Timer Recording
[POWER OFF] Press once. Press • “TIMER” flashes. • The power is set to the standby mode and the DRA-F102’s power indicator lights orange. to select “EVERYDAY” or When the timer start time is reached, playback starts from the MENU/SET “ONCE”, then press... -
Page 24: Edit Function
System Operations System remote control unit [RC-1034] Edit function This unit [DRA-F102] • This function lets you record onto cassette tapes with automatic editing according to the length of the tape. • Load the CD and cassette tape before starting. -
Page 25: Using The Optimised Filter
ENGLISH System Operations NOTE: Others • The editing function does not work with discs containing 26 tracks or more. • When using the edited recording function, be sure to load the Troubleshooting cassette tape with side A facing upwards. The beginning of the cassette tape is found automatically before recording starts. -
Page 26: Specifications
ENGLISH Others Others Specifications ¢ Remote control unit (RC-1034) ¢ Receiver section Remote control method: IR pulse method Rated output: 2-channel driving (CD / SP OUT) Power supply: Two R03/AAA batteries 35 W + 35 W (4 Ω/ohms, DIN, 1 kHz, T.H.D. 0.7%) Maximum external Output terminals: 4 to 16 Ω/ohms... - Page 27 TOKYO, JAPAN www.denon.com Denon Brand Company, D&M Holdings Inc. Printed in China 00D 511 4460 007...
Need help?
Do you have a question about the DRA-F102 and is the answer not in the manual?
Questions and answers