
Related Manuals for Simmons SDMP1


Summary of Contents for Simmons SDMP1
- Page 1 SDMP1 Electronic Multipad & Drum Machine Electronic Multi-Pad & Drum Machine Advanced owner’s manual www.simmonsdrums.net www.simmonsdrums.net 9185 SDMP1 Multipad Manual.indd 1 9/24/10 2:18 PM...
- Page 2 Simmons products. This guarantee ®...
-
Page 3: Taking Care Of Your Multi-Pad & Drum Machine
Power Supply • Turn the power switch OFF when the SDMP1 is not in use. • The AC adapter should be unplugged if the SDMP1 is not to be used for an extended period of time. • Avoid plugging the AC adapter into an outlet that is also powering high-consumption appliances such as electric heaters or televisions. -
Page 4: Table Of Contents
Editing a Song in Standby Mode __________________________28 Editing a Song During Recording __________________________29 Metronome _______________________________________________ 31 Drum Instrument List _________________________________________32 Drum Kit List _______________________________________________35 Preset Pattern List ___________________________________________35 General MIDI Voice List ______________________________________36 MIDI Implementation Chart ___________________________________ 37 9185 SDMP1 Multipad Manual.indd 2 9/24/10 2:18 PM... -
Page 5: General Features
• SONG mode allows you to create and play songs using pre-set or user patterns. Playing Options Besides playing your new SDMP1 on a tabletop, you can also easily mount it to the Simmons SDESS Electronic Support Stand (sold separately). Visit simmonsdrums.net for more info. -
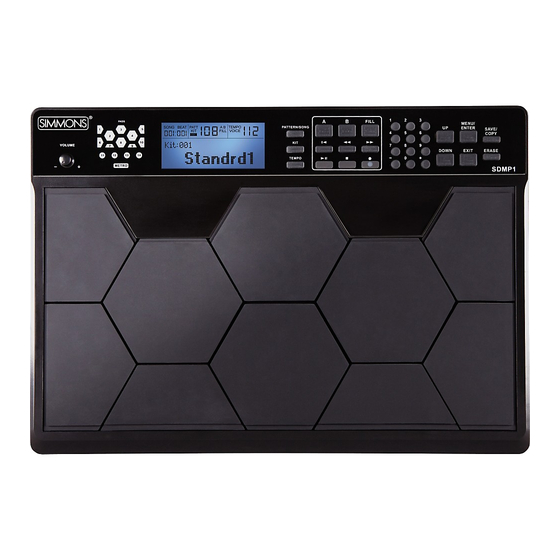
Page 6: Navigation
PATTERN and SONG. Playing Surface The [kIT] button allows you to change kits. There are 10 pads on the SDMP1. When a pad is struck it triggers a voice. The [TEMPO] button allows you to change the tempo of a pattern or song. -
Page 7: Rear Panel
Attach the Hi-Hat and Kick Bass Drum pedals here. (Sold separately) ext. triggers The SDMP1 has two additional auxiliary trigger input jacks, which let you expand the kit with optional pads. Each AUX input can be configured individually for use with a dual-zone pad (head/rim), or two single-zone pads. -
Page 8: Headphones
A set of stereo headphones can be connected to the PHONES jack. Master out When using an amplifier such as the Simmons DA50 or DA200S, connect the Output L/MONO and R jacks to the input of the amplifier. For mono playback, use the L/MONO jack; for stereo playback, connect both L/MONO and R jacks. -
Page 9: Lcd Screen
In all menus, the current selected field is highlighted (inverted, on black background). The bottom part of the screen is for LCD navigation in conjunction with the [UP] and [DOWn] or [MEnU/EnTEr] buttons that are located on the control panel. 9185 SDMP1 Multipad Manual.indd 7 9/24/10 2:18 PM... -
Page 10: Menu Tree
SDMP1 Advanced owner’s manual Menu tree The SDMP1 Menu consists of a two-level tree structure. Each Function has a Level-1 main menu with corresponding Level-2 configuration pages. To access the Level-1 menu pages, press the [MEnU/EnTEr] button: Then press the [UP] / [DOWn] buttons to scroll through the 7 menu pages:... -
Page 11: Naming
• Uppercase (A, B,…, Z) • Lowercase (a, b,…, z) When you have finished inputting the name, press the [MEnU/EnTEr] button, then press Yes [+] to confirm or No [-] to cancel. 9185 SDMP1 Multipad Manual.indd 9 9/24/10 2:18 PM... -
Page 12: Getting Started
- 100 The current beats-per-minute will be displayed. Default=100. Use [+] / [-] buttons to adjust the tempo. The value entered will take effect immediately and be retained until changed or the SDMP1 is powered on again. Instrument SetUp Press [MEnU/EnTEr] to enter Level-1 menus. - Page 13 Group 1 “Off,” “Group 1” or “Group 2” using the [+] / [-] buttons. Default=Off Group 1 The Level-2 menus may be navigated at any time using the [UP] / [DOWn] buttons. 9185 SDMP1 Multipad Manual.indd 11 9/24/10 2:18 PM...
-
Page 14: Adjusting Trigger Parameters
Note: If the pedal functions as play/pause control or fill control (marked as Trigger 13), the pedal will have the same function as the corresponding key on the panel. Note: After adjusting trigger parameters, press [SAvE / COPY] to save your settings. 9185 SDMP1 Multipad Manual.indd 12 9/24/10 2:18 PM... -
Page 15: Midi Setup
MIDI Set Up To set up your SDMP1 for MIDI operation, the following configuration pages are available: MIDI channel [Channel] Pattern Output [Ptn Out] [Pad Out] Pad Output Sync Mode [Sync] Note Map [PAD #][MIDI note] Soft Through [Soft Throu] Press [MEnU/EnTEr] to access the Level-1 menu pages. -
Page 16: Factory Reset
Advanced owner’s manual Sync With Midi Clock If Master (internal sync mode) is selected, the SDMP1 will send MIDI clock (F8) via MIDI output or USB port according to the current tempo setting. If external sync mode is selected, the SDMP1 will accept MIDI clock from host device via MIDI input or USB port and adjust the current tempo setting. -
Page 17: Recording Setup
Recording Set Up To setup your SDMP1 for recording, do the following: Press [PATTErn/SOng] to select the desired song or user pattern. Press [MEnU/EnTEr] to access the Level-1 menu pages. Press [MEnU/EnTEr] again or use the [UP] / [DOWn] buttons to select “Rec Setup.”... -
Page 18: Drum Kits
Press the [DOWn] button to get to the Pan page. Use the [+] / [-] buttons or the data entry buttons to change the value. Press the [DOWn] button to get to the Reverb Level page. 9185 SDMP1 Multipad Manual.indd 16 9/24/10 2:18 PM... -
Page 19: Preset Kit Parameters
6 – PERC 13 – KICK 2 7 – KICK 1 14 – HIGH HAT CTRL PEDAL 8 – SNARE HEAD 14 – HIGH HAT CTRL SPLASH 9 – HIGH HAT CLOSED 9185 SDMP1 Multipad Manual.indd 17 9/24/10 2:18 PM... -
Page 20: Editing User Kits
Press [DOWn] to display the Mode screen. Select Ptn or Manual. Mode Mode USER If Ptn is selected, the Kit will change with the pattern. If Manual is selected, the Kit selection Mode Mode must be changed manually. Mode 9185 SDMP1 Multipad Manual.indd 18 9/24/10 2:18 PM... -
Page 21: Saving Kits
Use [+] / [-] buttons to select the characters and the [UP] / [DOWn] buttons to move the cursor. Press [MEnU/EnTEr] and the Save Confirmation screen will be displayed. Press Yes [+] to confirm or press No [-] to cancel. 9185 SDMP1 Multipad Manual.indd 19 9/24/10 2:18 PM... -
Page 22: Patterns
Advanced owner’s manual Patterns Pattern Structure The SDMP1 includes 50 preset patterns (1 - 50) and 50 user pattern sets (51 - 100). Patttern Set N A “pattern” is the smallest rhythm unit in the SDMP1. Patterns contain several parts and... -
Page 23: Playing Patterns
P051AF P051A P051AF P051A Press Release Press Release U-Rock1 U-Rock1 FILL FILL FILL FILL A Main A Fill A Main A Fill Press Release Press Release Press Release 9185 SDMP1 Multipad Manual.indd 21 9/24/10 2:18 PM Press Release Press Release... - Page 24 Length A Length A Press Press FILL FILL Playing Back Playing Back A Fill A Fill Note: The general pedal may be set up to duplicate the function of the [FILL] button. 9185 SDMP1 Multipad Manual.indd 22 9/24/10 2:18 PM...
-
Page 25: Recording Patterns
Press [PATTErn/SOng] to enter the pattern page. Press [rECOrD] to enter a record-ready state. The LCD will display “Rec Mode: Normal”. Press [+] to choose “RecMode: Step”. 9185 SDMP1 Multipad Manual.indd 23 9/24/10 2:18 PM... -
Page 26: Naming And Saving User Patterns
The LCD will display “Ptn Sel/Ptn/Part”. Use [+] / [-] to select the destination User pattern number. Press [MEnU/SAvE] to continue. The LCD will display “No-/Yes+”. Press Yes [+] to confirm or press No [-] to cancel. 9185 SDMP1 Multipad Manual.indd 24 9/24/10 2:18 PM... -
Page 27: Editing Patterns In Standby Mode
( No - / Yes +) ( No - / Yes +) ( No - / Yes +) Then press [+] to process or [-] to cancel At any time you may press [EXIT] to cancel. 9185 SDMP1 Multipad Manual.indd 25 9/24/10 2:18 PM... -
Page 28: Editing Patterns During Recording
To erase several beats of a drum part do the following: Press and hold the [ErASE] button. Trigger a drum part to start erasing (the part cannot be changed during erasing). Release the [ErASE] button. 9185 SDMP1 Multipad Manual.indd 26 9/24/10 2:19 PM... -
Page 29: Song Mode
Song Mode Basics The SDMP1 allows for 100 songs that may be recorded, edited and played back. There are no pre-set songs so they may all be considered User. A song has a maximum of 128 “steps” which are linked together to create the whole song. -
Page 30: Recording Songs In Step Mode
The Process confirmation screen will be shown. Press [+] / [-] to confirm or cancel. Copy Song To S057 Or press [EXIT] to cancel. Step Offset Song Step Rec Step003 001A Erase Current Song Step? 9185 SDMP1 Multipad Manual.indd 28 9/24/10 2:19 PM... -
Page 31: Editing A Song During Recording
Erase Current Song Step? No additional confirmation will be required. Song Step? Song Step Rec Song Step Rec Step003 051A Or press [EXIT] to cancel. Song Step Rec Step003 051A Step003 051A 9185 SDMP1 Multipad Manual.indd 29 9/24/10 2:19 PM... - Page 32 Song Step Rec Press [SAvE/COPY] and the confirmation screen will appear. Step003 051A Press the [MEnU/EnTEr] button to insert the step. Press [STOP] to return to standby mode. Or press [EXIT] to cancel. 9185 SDMP1 Multipad Manual.indd 30 9/24/10 2:19 PM...
-
Page 33: Metronome
Metronome volume. Volume range: 0–32. Press [DOWn] to enter the interval menu, and press [+] / [-] buttons to select the Metronome interval. Interval selections: 1/4, 1/8, 1/12, 1/16, and 1/24. 9185 SDMP1 Multipad Manual.indd 31 9/24/10 2:19 PM... -
Page 34: Drum Instrument List
Low Fi Bass Drum 124 Splatch 187 Poison Snare 2 250 Resonant Tom 3 Disco Bass Drum 125 Piccolo Snare 1 188 Buzz Snare 1 251 Resonant Tom 4 808 Bass Drum 9185 SDMP1 Multipad Manual.indd 32 9/24/10 2:19 PM... - Page 35 Open Brush Tom 2 378 Simmons SD5 Tom A-1 502 606 HH Close 439 Rock Crashe Open Brush Tom 3 379 Simmons SD5 Tom A-2 503 808 HH Close 440 Small Crash 9185 SDMP1 Multipad Manual.indd 33 9/24/10 2:19 PM...
- Page 36 563 Conga Low 689 Gun shot 2 564 Electronic Conga 627 Glockenspiel 690 Rifle Shot 565 808 Conga High 628 Music Box 691 A-K 566 808 Conga Mid 629 Vibraphone 692 Laser Ray 9185 SDMP1 Multipad Manual.indd 34 9/24/10 2:19 PM...
-
Page 37: Drum Kit List
Dance3 Dance4 Dance5 Funk1 Funk2 Fusion1 Fusion2 Swing Bigband Jazz1 Jazz2 Bossa Samba Rhumba Mambo Latin1 Reggae Country1 Country2 Country3 Ballad1 Ballad2 Ballad2 Garage Punk Arabic Arabic Dangdut Latin2 Latin3 Newage1 Newage2 9185 SDMP1 Multipad Manual.indd 35 9/24/10 2:19 PM... -
Page 38: General Midi Voice List
044 Contrabass 092 Pad 4 (choir) 045 Tremolo Strings 093 Pad 5 (bowed) 046 Pizzicato Strings 094 Pad 6 (metallic) 047 Orchestral Harp 095 Pad 7 (halo) 048 Timpani 096 Pad 8 (sweep) 9185 SDMP1 Multipad Manual.indd 36 9/24/10 2:19 PM... -
Page 39: Midi Implementation Chart
Common : Song Select : Tune System : Clock Real Time : Commands START /STOP/CONTINUE : Local ON/OFF : All Notes OFF Messages : Active Sense : Reset 0: YES X: NO 9185 SDMP1 Multipad Manual.indd 37 9/24/10 2:19 PM... - Page 40 The ideal tool for build- dimpled knobs with your drumstick! ing your speed, accuracy and timing. Meet The Family www.simmonsdrums.net All products from our Fall 2010 line. 9185 SDMP1 Multipad Manual.indd 38 9/24/10 2:19 PM...
Need help?
Do you have a question about the SDMP1 and is the answer not in the manual?
Questions and answers