Table of Contents
Advertisement
Advertisement
Table of Contents

Related Manuals for Emerson Comverge IntelliTEMP 900


Summary of Contents for Emerson Comverge IntelliTEMP 900
- Page 1 Homeowners Guide Comverge IntelliTEMP ™...
- Page 2 Version Number: Release Date: July 2012 Copyright © 2012 by Comverge, Inc. and Emerson, Inc. All rights reserved. IntelliTEMP is a registered trademark of Comverge, Inc. ™ All other brand and product names are trademarks or registered trademarks of their respective companies.
- Page 3 Table of Contents Introduction ..............2 Step 1: Getting started Guide ........3 Step 2 : Homeowner Main Menu ........ 8 Step 3: Thermostat Settings Menu ......11 Description of Homeowner Menu Options ....13 Troubleshooting Assistance Guide ......16...
- Page 4 Introduction Congratulations, you are now in possession of the most advanced demand response thermostat available. About this Guide This guide describes how to set up and use the various features of the Comverge IntelliTEMP 900. ™ Thermostat Models Covered by this Guide This guide covers the IntelliTEMP 900 thermostat, firmware ™...
- Page 5 Getting Started • Homeowner Manual Step 1 Getting Started Guide Before using your thermostat, you should familiarize yourself with its features and user interface. Your thermostat consists of two parts: the thermostat chassis and the mounting base. To detach the two parts gently pull on the thermostat chassis until it releases from the mounting base.
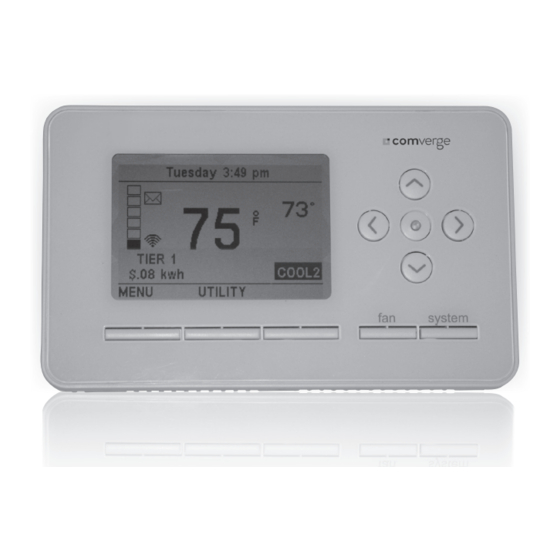
- Page 6 Getting Started • Homeowner Manual A. The Thermostat Buttons and Indicators “Left Arrow” – navigates menu items “Up Arrow” – raises temperature setpoint/changes selected item “Action Button” – selects action of selected menu item “LED” – indicates occurrence of curtailment event “Right Arrow”...
- Page 7 Getting Started • Homeowner Manual B. The Thermostat Display “Messaging Area” – displays day/time, thermostat and utility related messages “Temperature” – displays current room temperature “Setpoint Temperature” – displays current desired temperature • Blank when system is in OFF mode •...
- Page 8 Getting Started • Homeowner Manual “System Status” – displays current operation mode according to system configuration OFF – system is OFF COOL – system is in COOL mode but no call for cool COOL1 – call for 1 ...
- Page 9 Getting Started • Homeowner Manual C. Temporary versus Permanent Hold A temporary hold can be set when operating in any mode except for OFF. A temporary hold is set by pressing the on the thermostat to adjust the desired temperature. The SET AT indication of the temperature setpoint will change to HOLD AT and a message will be cycled in the thermostat messaging display area to confirm that a temporary hold is set.
- Page 10 Main Menu • Homeowner Manual Step 2 Homeowner Main Menu The homeowner programming menu table summarizes the configuration items that the homeowner has access to set. For more details on each homeowner programming menu option, see “Description of Homeowner Menu Options” on page 13. To enter the Homeowner Programming menu: Ensure the thermostat is at the idle screen (display with the room temperature displaying).
- Page 11 Main Menu • Homeowner Manual Press Select Other Options Menu Name Submenu (Defaults in BOLD) Comments Clock NOTE: You should set Daylight Saving and Time Zone before (Time Date) setting the time on the clock Set Clock Time Use the scroll through items am/pm to change...
- Page 12 Main Menu • Homeowner Manual Press Select Other Options Menu Name Submenu (Defaults in BOLD) Comments Programming Time-Based Programming: Off button to toggle between Off to On Cool Heat Highlight setpoint to Setpoint Setpoint adjust using 78°F 68°F Adjust temperature setting using When complete, press DONE to save...
- Page 13 Homeowner Manual • Main Menu Press Select Other Options Menu Name Submenu (Defaults in BOLD) Comments Cooling Weekdays/ Defaults settings: Use the Schedule Weekends scroll through items Morning 6:00am 78° Individual to change 8:00am 85° days Evening 5:00pm 78° 10:00pm 82° Night increment/decrement values...
- Page 14 Thermostat Settings Menu • Homeowner Manual Step 3 Thermostat Settings Menu Press Select Other Options Menu Name Submenu (Defaults in BOLD) Comments Auto Backlight: to change (Auto/On) underlined value Temperature Min Cool Set Point: Use the 45°F Limits to select setpoint to change Max Heat Set Point: 99°F...
- Page 15 Thermostat Settings Menu • Homeowner Manual Press Select Other Options Menu Name Submenu (Defaults in BOLD) Comments Energy Mgmt to change Recovery underlined value Press DONE to save settings or HOME to exit without saving °F °F / °C to change °C underlined value Press DONE to save...
-
Page 16: Menu Options
Menu Options Description • Homeowner Manual Description of Homeowner Menu Options The following are detailed descriptions of your IntelliTEMP™ configuration menu options. Clock – Set Clock/Select Time Zone/Daylight Savings You can set the clock on the thermostat from the user interface unless the utility has inhibited you from changing the clock. - Page 17 Menu Options Description • Homeowner Manual The Weekdays/Weekends programming selection will provide a separate heat cool profile for the five consecutive weekdays and a different profile for the two weekend days. Thermostat Settings – Backlight This menu item controls the display backlight, you can choose either: AUTO –...
- Page 18 Menu Options Description • Homeowner Manual 0 – (Default) Displays the measured room temperature. -1° through -5° – Adjusts the displayed temperature the specified number of degrees lower than the measured room temperature. Thermostat Settings – Energy Mgmt Recovery Options for this menu item include: ...
- Page 19 Menu Options Description • Homeowner Manual Thermostat Lock The IntelliTEMP™ 900 thermostat can be locked to prevent unwanted users from changing the thermostat settings. In the Thermostat Settings menu simply choose the thermostat lock option and enter your 4 digit combination that will be required to unlock the thermostat.
- Page 20 Troubleshooting Guide • Homeowner Manual Troubleshooting Assistance Guide No Heat/No Cool/No Fan (common problems) Possible Cause Corrective Action Blown fuse or tripped Replace fuse or reset breaker. circuit breaker. Furnace power switch Turn switch to ON. set to OFF. Furnace blower Replace door panel in proper position to engage compartment door or safety interlock or door switch.
- Page 21 Troubleshooting Guide • Homeowner Manual No Heat Possible Cause Corrective Action Diagnostic: Press SYSTEM button to select HEAT Heating system requires service or thermostat and press to raise the temperature setpoint requires replacement. above room temperature. Within a few seconds the thermostat should make a soft click sound.
- Page 22 Troubleshooting Guide • Homeowner Manual No Cool Possible Cause Corrective Action Cooling system requires Diagnostic: Press SYSTEM button to select COOL and press to lower the temperature service or thermostat setpoint below room temperature. Within a few requires replacement. seconds the thermostat should make a soft click sound.
- Page 23 Troubleshooting Guide • Homeowner Manual Blank Display and/or Keypad Not Responding Possible Cause Corrective Action Voltage spike or static Use the Reset Operation described on page 17. discharge. Furnace (air conditioner) cycles too fast or too slow (narrow or wide temperature swing) Possible Cause Corrective Action...
- Page 24 Troubleshooting Guide • Homeowner Manual Second, Third and/or Fourth Stage Won’t Come On Possible Cause Corrective Action Your thermostat is Wait for the second, third and/or fourth stage to designed to determine come on. the optimum time to activate the second stage.
Need help?
Do you have a question about the Comverge IntelliTEMP 900 and is the answer not in the manual?
Questions and answers
My Emerson Converge thermostat control is turning off and back on several times an hour. It was initially installed as part of a program with local utility company to control electricity consumption during peak use periods. The utility (Wadsworth, Ohio) abandoned the program. Can I fix this thermostat or do I need to find a replacement?
The Emerson Comverge IntelliTEMP 900 thermostat can often be fixed by troubleshooting common issues. If the display is blank or the keypad is not responding, a reset operation (described on page 17 of the manual) may resolve the issue. If the thermostat causes the HVAC system to cycle too fast or too slow, adjusting its location or settings may help. However, if the HVAC system operates correctly and the problem persists, replacing the thermostat may be necessary.
This answer is automatically generated