Table of Contents
Advertisement
Quick Links
Advertisement
Table of Contents

Related Manuals for Legacy Silhouette


Summary of Contents for Legacy Silhouette
- Page 1 Owners Manual For The S ilhouette Loudspeaker System...
-
Page 2: Table Of Contents
Table of Contents Page Registration Owners Record The Cabinetry / Our Commitment Warranty Setup Speaker Installation Silhouette On Wall Installation Silhouette Pro On Wall Installation Silhouette Pro In Wall Installation Hooking Up Cables 10-11 12- 1 4 Amplification Speaker Connections Technology Specifications... -
Page 3: Owners Record
Owners Record Thank you for selecting a Legacy Loudspeaker System. These hand- crafted instruments will provide you with many years of listening en- joyment. Share your Legacy speakers with the Legacy community. Post your Legacy experience and system photos at facebook.com/LegacyAudio... -
Page 4: The Cabinetry / Our Commitment
Our Commitment A great deal of forethought, love and satisfaction is instilled in each piece of Legacy workmanship. We take pride in getting to know many of our customers on a first name basis. Your purchase of this product is backed by the renowned “Legacy... -
Page 5: Warranty
Warranty Legacy Audio supports its customers and products with pride. We cheerfully warrant our loud- speaker products we manufacture from defects in materials and workmanship for a period of seven (7) years. Electronic components such as internal amplifiers and digital processors are covered for three (3)years. -
Page 6: Speaker Installation
Speaker Installation Select the wall locations for the Silhouette system. Try to create a 60 degree angle hori zo ntally between the speaker pair, relative to the listening position. This usually results in a 10 foot horizontal spread between the speakers, center to center. -
Page 7: Silhouette On Wall Installation
Silhouette On Wall Installation When mounting Silhouette flat on the wall, use the included pair of Z- Clips as shown with the longer bar clip anchored to wall studs. Silhouette Rear... -
Page 8: Silhouette Pro On Wall Installation
Silhouette Pro On Wall Installation When mounting Silhouette Pro flat on the wall, use the included pair of Z- Clips as shown with the longer bar clip anchored to wall studs. Silhouette Pro Rear... -
Page 9: Silhouette Pro In Wall Installation
Silhouette Pro In Wall Installation Wall Substrate/ Drywall After positioning the speakers, use a drywall saw to cut an opening slightly larger than the 12.15" x 35.5" cabinet body. The outer baffle is 37" long and 17.5" wide. Six mounting screws are to be installed through the center of the grille cups into the wall framing. -
Page 10: Hooking Up Cables
Hooking Up Cables The ideal conductor would have negligible resistance, inductance and capacitance. The table below shows how a few actual speaker cables measure up. Cable s/ft pF/ft µH/ft 12 ga. 0.0033 0.21 14 ga. 0.0048 0.13 16 ga. 0.0079 0.18 18 ga. -
Page 11: Hooking Up Cables
Hooking Up Cables What about phase shift due to frequency dependent travel times down the speaker cable? Measurements show that 100 Hz waves will be delayed about 20 billionths of a second behind 10 kHz waves when traveling to the end of a 10 foot speaker cable. Since the cilia of the ear requires 25,000 times longer than this just to transmit phase information, phase shifting is obviously not the primary concern when considering speaker cables. - Page 12 For this reason, extensive measures have been taken to ensure that each Legacy speaker system represents a smooth, non-reactive load to virtually any amplifier. Often there is much confusion regarding amplification and loudness levels. It should be under- stood that the role of the amplifier goes beyond that of driving loudspeakers to a given sound pressure level.
- Page 13 Some audiophiles feel that 200 watts per channel is the bare minimum to avoid audible clipping distortion when reproducing music at “live” playback levels. Your Legacy speakers are designed to take advan- tage of “high-powered” amplifiers, so don’t be afraid to put them through their paces.
- Page 14 Amplification When an amplifier is unable to fulfill your loudspeakers demands, a damaging harmonic spike may be leaked to the high frequency drivers. Another important point regarding loudness is that the dB scale is a logarithmic one. This means that a 150 Watt amplifier will potentially sound only twice as loud as a 15 Watt amplifier.
-
Page 15: Speaker Connections
The Terminal Plate At the rear of each of your Silhouette loudspeakers you will find a terminal plate housing one pair of binding posts. Hook the high level speaker inputs from the main amplifier to the pair of binding post. Be sure that you observe polarity when making the connections. -
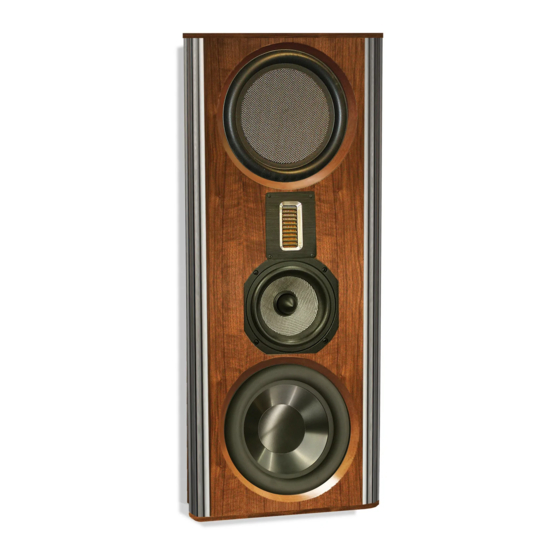
Page 16: Specifications
Specifications Three-way, passive radiator System Type: Mounting: Wall mount with bracket System Directivity: 60 degrees horizontally, 45 degrees vertically 4” AMT Tweeter Midwoofer: 7" Silver/Graphite Bass: 10" long throw low profile motor Low frequency alignment: 10" passive radiator 42Hz – 28kHz Frequency Response: Sensitivity (Room dB@2.83V): 92 dB... - Page 17 Legacy Audio Distributor in Low Voltage Directive 2006/95/EC your country. A listing of Legacy EMC Directive 2004/108/EC Audio Distributors can be found on the Legacy Audio website www.legacyaudio.com or by contacting Legacy Audio at: 3023 E.
- Page 18 Notes:...
- Page 19 ©201 4 Legacy Audio 3023 E Sangamon Ave. Springfield, IL 62702 Phone: 800-283-4644 Fax: 217-544-1483...
Need help?
Do you have a question about the Silhouette and is the answer not in the manual?
Questions and answers