Reiner jetStamp 790 Operating Instructions Manual
Mobile electronic hand stamp with changeable accumulators and flexible impression selection
Hide thumbs
Also See for jetStamp 790:
- Operating manual (282 pages) ,
- Short instructions (88 pages) ,
- Operating manual (50 pages)

Related Manuals for Reiner jetStamp 790


Summary of Contents for Reiner jetStamp 790
-
Page 1: Operating Instructions
Operating Instructions jetStamp 790 Mobile electronic hand stamp with changeable accumulators and flexible impression selection Version 2.0... - Page 2 © 2003 Ernst Reiner GmbH & Co. KG All rights reserved. Translations, reprints, or any other form of reproduction of this manual, even in part and regardless of form, require prior written permission. This manual is subject to change without prior notice.
-
Page 3: Table Of Contents
Table of contents Control elements ..................Commissioning ..................... Display zones and button functions ............Impression selection ................... Stored impressions ..................Customer-specific impressions ..............Setting time and date ................... Setting numbering device or figures ............Setting pre-texts ..................Stamping ....................... Changing the ink cartridge ................Setup module .................... -
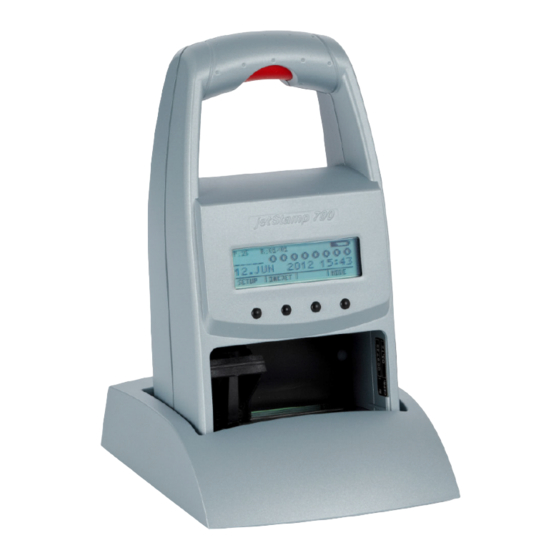
Page 4: Control Elements
Control elements Charging station with mains unit Socket for power supply (reverse side) Green charge-indicator lamp Trigger Display Buttons Locking rail Ink cartridge Notch 10 = Accumulator case (reverse side) -
Page 5: Commissioning
Unpack equipment Connect plug power adaptor provided to base station and connect to mains voltage Note: Only use original REINER components! Insert accumulators Remove cover on back: To do this push locking latch (1) up and remove cover Insert accumulators, according to correct polarity markings! - Page 6 Place jetStamp in the charging station and load accumulators Observe the following guidelines: • Hook jetStamp to the notch (9) and place in the charging station • Fully charge the accumulators to begin with. We recommend charging the accumulators for around 16 hours continuously, e.g.
- Page 7 Insert ink cartridge When necessary press repeatedly [ MODE ] until menu item "INKJET" is displayed on the lower display line Press [ INKJET ] : The print carriage now automatically moves to the middle of the equipment for easier handling Remove ink cartridge from packaging and remove protective film from the ink cartridge Hold the small felt plate provided with...
-
Page 8: Display Zones And Button Functions
Display zones and button funcitons The display is divided into three zones: The top line is the status line. On the left is the number of the impression selected (P:01 ... P:29) . To the right of that, if the impression includes numbering, is the repetition setting (e.g. -
Page 9: Impression Selection
Impression selection A total of 25 different standard impressions are stored (see pages 10 / 11). These contain the individual printing fields 'Pre-text' 'Numbering device' 'Date' 'Time . A 'pre-text' can be selected from 12 standard texts, or switched off (see page 16). -
Page 10: Stored Impressions
Stored impressions Impressions P : 01 ... P : 04 = pre-text + date P : 01 P : 02 SENT 10. APR 2007 SENT 10. 04. 2007 CLOCK NO/TXT NEXT MODE CLOCK NO/TXT NEXT MODE P : 03 P : 04 SENT 2007 - 04 - 24 SENT... - Page 11 Impressions P : 11 ... P : 14 = numbering device pre-text + date P : 12 R : 01 / 01 P : 11 R : 01 / 01 00000000 00000000 SENT 10. 05. 2007 SENT 10. MAY 2007 CLOCK NO/TXT NEXT...
-
Page 12: Customer-Specific Impressions
Customer-specific impressions Impressions P : 26 ... P : 29 = customer-specific P : 26 ... P : 29 ------------------- ------------------- NO/TXT NEXT MODE P:26 ... P:29 are intended for individual, customer-specific impressions. Each impression can have two lines with up to 20 characters in each. Characters can be entered as follows: Select impression required (P:26 ... -
Page 13: Setting Time And Date
Setting time and date To set the time and date, an impression must first be selected that contains the date, or date and time as appropriate. First select an impression that contains the date, or date and time as appropriate (see also pages 10 and 11) Press [ MODE ] if necessary repeatedly, until the menu item “CLOCK”... -
Page 14: Setting Numbering Device Or Figures
Setting numbering device or figures The numbering device is used for the successive numbering of forms. Numbering can be increasing or decreasing. Further, various functions of the numbering device can be coupled together, e.g. repetition, zeroing, counting, activation of a minimum or maximum value, advance step, etc. Before the numbering device can be set, an impression, which uses the numbering device or figures, must be selected (see pages 10 / 11). - Page 15 Numbering device - setting starting point or figures : Press [ NEXT ] if necessary repeatedly, until the display shows “INPUT - NUMBERER 1” “INPUT - NUMBER 1” INPUT - NUMBERER 2 INPUT - NUMBER 2 Only available with a customer-specific impression (P:26 ... P:29), which has been prepared using PC-Set Press [ VARY ] to select the first position of the entry Set this digit by using [ INC ] to increase, or [ DEC ] to decrease it...
-
Page 16: Setting Pre-Texts
Setting pre-texts There are 12 different standard pre-texts stored in the stamp for each language. The set pre-text (or blanks if pre-text is switched off) is printed with all standard impressions which include a pre-text. The following standard pre-texts are stored : RECUD INU. -
Page 17: Stamping
Stamping Stamping will be triggered by pressing the red trigger, which is located in the grip. Depending on the impression selected, the impression will have one or two lines. The position of the two lines, relative to the base of the stamp, can be seen in the illustration below. -
Page 18: Changing The Ink Cartridge
• Replacement ink cartridges are available with the order number 801 307 - 000 on REINER stock The ink in the ink cartridge is harmful. Never swallow it! Always keep the ink cartridge out of the reach of children! - Page 19 Dirt and dried up ink at the holder of the ink cartridge can be removed with a soft cleaning cloth moistened in spirit (see figure1) Insert the new ink cartridge: Take the ink cartridge from the packaging and remove the coloured protection film from the ink cartridge (see figure 2) Take the small felt plate and put...
-
Page 20: Setup Module
Setup module The Setup module contains the following two main menus: SETTINGS: Enables comprehensive, extensive changes to settings to be carried out, which, among other things, influence the impression and the handling of the stamp. UPDATE: In combination with the optional PC - Set, the program in jetStamp can be updated. -
Page 21: Description Of The Setup Module
Description of the Setup module Press, repeatedly if necessary MODE (Enter password if required) SETUP SETTINGS UPDATE NEXT CALL CALL FIRMWARE ALL START Update firmware, NEXT see next page standard impressions and standard pre-texts FIRMWARE PART START Update Firmware NEXT without impressions and without pre-texts... - Page 22 SETTINGS UPDATE NEXT CALL Activate impression (01 ... 29) STAMP PICTURE VARY NEXT Add impression(s) to favourites list SET STAMP PICT CALL Only impressions marked 'ON' are shown NEXT when [ NEXT ] is pressed (see also page 9, Impression selection) all impressions selectable SEL ST PICT ALL no impressions selectable...
- Page 23 CHANGE LINE Exchange lines (OFF / ON) VARY ON = top and bottom lines of impression NEXT exchanged Leading zeros on numbering device PRE CHAR 0 VARY ON = leading zeros displayed and printed NEXT OFF = leading zeros suppressed Mode setting for numbering device 1 MODE NUM 1 VARY...
- Page 24 Ink cartridge settings PRT CARTRIDGE VARY 1 = standard ink cartridge NEXT 2 = Rinse outside of the charging station Attention! Danger of an impurification BLOCK IMPRINT Print blockade setting VARY 0 = no print blockade NEXT 1 = printing blocked after 60 seconds 2 = printing blocked after 30 seconds 3 = printing blocked after 15 seconds Password for Setup...
-
Page 25: Troubleshooting
Troubleshooting Display Cause Recommendation IMPRINT Time allowed by ‘Block Imprint’ Press [ QUIT ] : BLOCKED has expired, disappears trigger jetStamp is then ready has been pressed for use again WRONG Wrong base station, Press [ QUIT ] : STATION jetStamp needs an intelligent Error message base station... -
Page 26: Safety Guidelines For Accumulators
Safety guidelines for accumulators Batteries are likely to deteriorate. For this reason a life-time of more than 6 months cannot be guaranteed. Note • Only use rechargeable batteries (accumulators) such as the AAA type Nickel Metal hydride (NiMH) provided! • The following products are recommended if replacements are required: Panasonic AAA NiMH 800 mAh and... -
Page 27: Guidelines On Commissioning And Operating Accumulators
Guidelines on commissing and operating accumulators • The charging of accumulators is electronically controlled. This ensures that the accumulator cells are charged in an optimal and sparing way. • Fully charge the accumulators to begin with. We recommend charging the accumulators for around 16 hours continuously, e.g. overnight, for the first time. -
Page 28: Technical Data
Stand by time per accum. charge 6 days or 500 stampings Time to charge accumulators approx. 3 hours Dimensions, jetStamp 790 only (B x D x H in mm) 95 x 70 x 170 Dimensions, charging station only (B x D x H in mm) 102 x 135 x 32 Height of jetStamp in charg. -
Page 29: Certifications
Certifications Tested safety jetStamp is manufactured to the safety standards IEC 950, EN 60950 and VDE 0805 Kennzeichnung jetStamp complies with EC directive 89 / 336 / EEC ‘Electromagnetic compatibility’ Electro- and electronic appliances are off the point of domestic waste or residual waste... - Page 32 Ernst Reiner GmbH & Co. KG Baumannstr. 16 D - 78120 Furtwangen Telephone + 49 7723 6570 + 49 7723 657200 E - Mail reiner@reiner.de Internet www.reiner.de 790 103 - 001 d 03 / 2008...
Need help?
Do you have a question about the jetStamp 790 and is the answer not in the manual?
Questions and answers