Table of Contents
Advertisement
Advertisement
Table of Contents
Troubleshooting

Related Manuals for Bosch Power Max Level 2


Summary of Contents for Bosch Power Max Level 2
- Page 1 Power Max Level 2 Charging Station en Installation and Operating Instructions...
- Page 2 This equipment has been tested and found to comply with the limits for a Class B digital device, pursuant to part 15 of the FCC Rules. These limits are designed to provide reasonable protection against harmful interference in a resi- dential installation.
-
Page 3: Table Of Contents
Installation and Operating Instructions | Power Max Level 2 Charging Station | 1 | en Table of Contents Introduction Applications Important Safety Warnings and Instructions Features and Specifications Front View Package Contents 3.3 Specifications Installation 4.1 Important SAFETY WARNINGS and Instructions 4.2 Grounding Instructions 4.3 Recommended Tools 4.4... -
Page 4: Introduction
Important Safety Warnings and Instructions IMPORTANT SAFETY INSTRUCTIONS. SAVE THESE INSTRUCTIONS. WARNING Disconnect electrical power to the Power Max Level 2 Charging Station before installation. Failure to do so may cause physical injury or damage to the electrical system and charging unit. CAUTION... -
Page 5: Features And Specifications
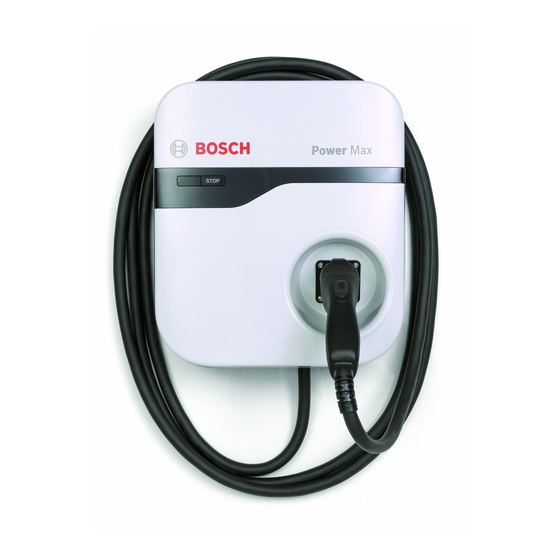
Installation and Operating Instructions | Power Max Level 2 Charging Station | 3 | en Features and Specifications Front View STOP button Charging plug and cable SAE J1772 compliant Status indicator Ready (green LED on) Charging (green LED flashing) Fault (red LED on) Warning (red LED flashing) ON/OFF switch... -
Page 6: Specifications
| 4 | Installation and Operating Instructions | Power Max Level 2 Charging Station 3.3 Specifications Model EL-51245 EL-51253 EL-51254 Input Rating 208-240 Vac, 16 A 208-240 Vac, 30 A 208-240 Vac, 30 A Power Input Connections & Wiring L1, L2, and Ground, hardwired w/ terminal block Standby Power < 5 W Output Rating 208-240 Vac, 16 A 208-240 Vac, 30 A 208-240 Vac, 30 A Power Output... -
Page 7: Installation
Installation and Operating Instructions | Power Max Level 2 Charging Station | 5 | en Installation Important SAFETY WARNINGS and Instructions IMPORTANT SAFETY INSTRUCTIONS. SAVE THESE INSTRUCTIONS. WARNING Danger of electrical shock or injury. Turn OFF power at the panelboard or load center before working inside the equipment or removing any component. -
Page 8: Installing The Power Max Level 2 Charging Station
| 6 | Installation and Operating Instructions | Power Max Level 2 Charging Station Installing the Power Max Level 2 Charging Station See Figure 4-1. Secure the Level 2 Charging Station mounting bracket to the wall using appropriate screws and bracket holes, as shown in Figure 4-1. Thread 1/4-in. expansion bolts through bracket offset holes into masonry walls as shown and torque to 78 lb·in (8.8 N·m). Thread 2-in., or longer, No. 8 wood screws through bracket inline holes into finished walls supported by wood studs and torque to 26 lb·in (3 N·m). Note: The Level 2 Charging Station must be mounted at a sufficient height from grade such that the height of the plug dock is located between 24–48 in. (0.6–1.2 m) from grade per NEC Article 625. Figure 4-1. Mounting bracket use on masonry wall (left) and finished wall (right) See Figure 4-2. Choose appropriate conduit in accordance with all applicable state, local, and national electrical codes and standards. Use flexible conduit when connecting to the rear of the Level 2 Charging station to faciliate rotation and installation on mounting bracket (Figure 4-4). Flexible conduit Rigid conduit Figure 4-2. Conduit use 569217 | REV. A | 05.22.2013... - Page 9 Installation and Operating Instructions | Power Max Level 2 Charging Station | 7 | en See Figure 4-3. Drill a hole of an appropriate size to accommodate the conduit system fitting in the bottom of the plastic housing as shown. CAUTION Drill the hole carefully to avoid punching through the housing and damaging internal components Place the Level 2 Charging Station on a soft surface during drilling to avoid damage.
- Page 10 | 8 | Installation and Operating Instructions | Power Max Level 2 Charging Station See Figure 4-5. Align the screw holes of the mounting bracket with the Level 2 Charging Station. Figure 4-5. Alignment of charging station on mounting bracket See Figure 4-6. Install and secure the charging station to the mounting bracket with the three (3) screws supplied. Figure 4-6. Installation screw locations 569217 | REV. A | 05.22.2013 Bosch Automotive Service Solutions...
- Page 11 Installation and Operating Instructions | Power Max Level 2 Charging Station | 9 | en See Figure 4-7. Secure the charging plug to the Level 2 Charging Station. Figure 4-7. Plug attachment with detail of plug dock 569217 | REV. A | 05.22.2013 Bosch Automotive Service Solutions...
-
Page 12: Maintenance
| 1 0 | Installation and Operating Instructions | Power Max Level 2 Charging Station Maintenance The exterior of the Power Max Level 2 Charging Station is designed to be waterproof and dust proof with an ingress protection rating of Type 3R. To ensure proper maintenance of the Level 2 Charging Station, follow these guidelines: } Keep the exterior clean at all times. -
Page 13: Operations And Troubleshooting
Installation and Operating Instructions | Power Max Level 2 Charging Station | 11 | en Operations and Troubleshooting Charging See Figure 6-1. Turn the Power Max Level 2 Charging Station power switch to ON. Wait 3 seconds for the green indicator light. Figure 6-1. Powering on the Power Max Level 2 Charging Station and removing the charging plug See Figure 6-2. Release the charging plug from the plug dock and connect it to the EV to start the charging process. - Page 14 | 1 2 | Installation and Operating Instructions | Power Max Level 2 Charging Station See Figure 6-3. To stop charging before charging is complete, disconnect the charging plug from the EV or press the “Stop” button. Remove and reconnect the charging plug with the EV to start charging again.
-
Page 15: Charging Status Indicators
Installation and Operating Instructions | Power Max Level 2 Charging Station | 13 | en Charging Status Indicators LED Status Description Definition Power is off. Use the ON/OFF switch on the side of the Level 2 Charging Station to turn on the power. Level 2 Charging Station is ON; charging not in process. Solid green Connect the charging cable to begin charging. -
Page 16: Troubleshooting
| 1 4 | Installation and Operating Instructions | Power Max Level 2 Charging Station Troubleshooting Situation Action Make sure the AC power input is connected correctly. Status indicator is not green Turn OFF the Level 2 Charging Station and then back ON using the after the Level 2 Charging ON/OFF switch. Station is powered on If the problem persists, contact Technical Support. -
Page 17: Important Notices
This warranty does not cover the cost of freight to return the unit to Bosch. The sole and exclusive remedy for any unit found to be defective is repair or replacement, at the option of Bosch. The existence of a defect shall be determined by Bosch in accordance with procedures established by Bosch. No one is authorized to make any statement or representation altering the terms of this warranty. -
Page 18: Technical Support
| 1 6 | Installation and Operating Instructions | Power Max Level 2 Charging Station Technical Support If technical support is required, contact Bosch at: 1-877-805-EVSE (3873) www.pluginnow.com 569217 | REV. A | 05.22.2013 Bosch Automotive Service Solutions... - Page 20 Bosch Automotive Service Solutions 28635 Mound Road Warren, MI 48092 USA Phone: (877) 805-EVSE (3873) www.pluginnow.com...
Need help?
Do you have a question about the Power Max Level 2 and is the answer not in the manual?
Questions and answers