Table of Contents
Advertisement
Quick Links
Advertisement
Table of Contents

Related Manuals for JVC HR-XVS20AA


Summary of Contents for JVC HR-XVS20AA
- Page 1 DVD PLAYER & VIDEO CASSETTE RECORDER HR-XVS20AA INSTRUCTIONS LPT0762-001B...
-
Page 2: Safety First
Safety Precautions The rating plate and the safety caution are on the rear of the unit. WARNING: DANGEROUS VOLTAGE INSIDE WARNING: TO PREVENT FIRE OR SHOCK HAZARD, DO NOT EXPOSE THIS UNIT TO RAIN OR MOISTURE. CAUTION 8 When you are not using the unit for a long period of time, it is recommended that you disconnect the power cord from the mains outlet. -
Page 3: Moisture Condensation
POWER SYSTEM: This unit operates on voltage of AC110 – 240 Vd (Rating), AC90 – 260 Vd (Operating), 50/60 Hz with automatic switching. The STANDBY/ON 1 button does not completely shut off mains power from the unit, but switches operating current on and off. “`” shows electrical power standby and “... -
Page 4: Table Of Contents
SAFETY FIRST Safety Precautions ... 2 DISC INFORMATION About Discs ... 5 INDEX INSTALLING YOUR NEW UNIT Basic Connections ... 12 S-VIDEO Connection ... 13 Component Video Connection (DVD deck only) ... 14 INITIAL SETTINGS Video Channel Set ... 15 Auto Set Up ... -
Page 5: Disc Information
DISC INFORMATION About Discs Playable Discs You can use the discs with the following logos for playback only. DVD VIDEO Video CD/Super Video CD Music CD CD-DA files CD-RW JPEG/ CD-DA/ MP3 files ● Discs other than the above cannot be played back. ●... -
Page 6: Dvd Video Marks
DVD VIDEO Marks Sometimes marks are printed on a DVD disc and/or on its packaging to indicate information regarding the contents and functions of a disc. Check marks indicating the contents and functions of a disc. Note, however, that in some cases a disc may not include a mark even for a function it supports. -
Page 7: Care And Handling Of Discs
Placing a Disc Open the disc tray. Press x on the DVD deck to open the disc tray. Pressing the button again closes the disc tray. Do not block the disc tray with your hand while it is opening or closing as this may result in hardware failure. Do not place unplayable discs or any object other than a disc in the disc tray. -
Page 8: Front View
FRONT VIEW A S-VHS Eject Button (x) B S-VHS Cassette Loading Slot C S-VHS Indicator pg. 23, 27 D DVD Indicator pg. 40 Scan Mode Indicator* pg. 19 * You can switch the scan mode by pressing and hold DVD PICTURE for more than 5 seconds. -
Page 9: Rear View
REAR VIEW A Mains Power Cord pg. 12 B Region Number Label pg. 5 C S-video/Video/Audio Input Connectors (S-VIDEO/VIDEO/AUDIO IN) D S-video/Video/Audio Output Connectors (S-VIDEO/VIDEO/AUDIO OUT) 14, 69 E Antenna Input Connector (ANTENNA IN) pg. 12 FRONT DISPLAY PANEL A Start Time Indicator ( V) (S-VHS deck only) pg. -
Page 10: On-Screen Display (S-Vhs Deck)
ON-SCREEN DISPLAY (S-VHS deck) When “O.S.D.” is set to “ON” ( For On-screen display for DVD deck, refer to “Using the on-screen bar” ( A Operation Mode Indicators B Tape Speed (SP/LP/EP*) * EP is for NTSC only. C Colour System Indicator D Tape Direction E Tape Position Indicator The tape position indicator... -
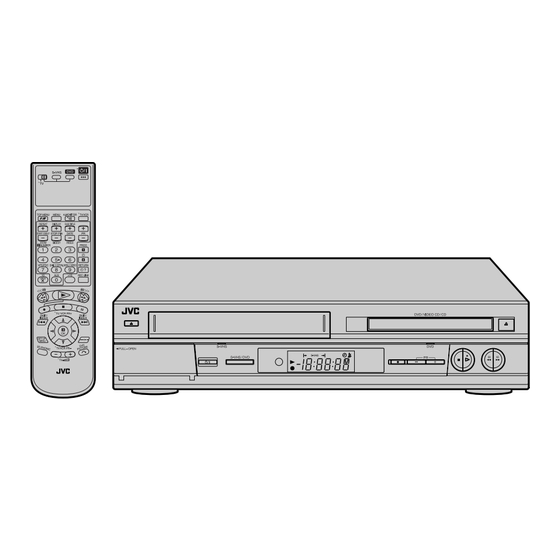
Page 11: Remote Control
How To Use The remote control can operate most of your unit’s functions, as well as basic functions of TV sets of JVC and other brands. Point the remote control toward the receiving window. The maximum operating distance of the remote control is about 8 m. -
Page 12: Installing Your New Unit
Basic Connections Aerial connector Back of TV (provided) Audio/video input connectors Audio/video cable (not provided) Mains power cord Back of unit AUDIO/VIDEO OUT Mains outlet Make AV connection if your TV has audio/video input connectors in order to reduce the possibility of interference. -
Page 13: S-Video Connection
S-VIDEO Connection AUDIO IN connectors Back of TV S-VIDEO IN connector Aerial connector Mains outlet Mains power cord Back of unit 8 To connect to a TV with S-VIDEO/AUDIO IN connectors . . . Connect the unit to TV. A Connect the aerial, unit and TV as per “RF Connection”. -
Page 14: Component Video Connection
Component Video Connection (DVD deck only) ATTENTION Be sure to connect the unit’s VIDEO OUT or S VIDEO OUT connector to the TV’s VIDEO IN or S-VIDEO IN connector. AUDIO IN connectors Back of TV Aerial connector Mains outlet Mains power cord Back of unit 8 To connect to a TV with COMPONENT VIDEO IN... -
Page 15: Initial Settings
If you cannot obtain the two vertical white bars clearly with any channel between 28 and 60, consult your JVC dealer. Exit the Video Channel Set mode. Press OK on the remote control. -
Page 16: Auto Set Up
Auto Set Up The Auto Set Up simplifies installation by guiding you through the procedures of setting the clock and tuner channels — simply follow the on-screen menus that appear. INITIAL SETTINGS (cont.) Before starting, make sure of the following: The TV aerial cable should be connected to the unit. - Page 17 Select the TV system. Press rt to place the pointer next to the appropriate TV system (refer to the table below). Major Countries/Areas Australia, New Zealand, Kuwait, U.A.E., Indonesia, Singapore, Thailand, Malaysia, Iran, Saudi Arabia, Egypt, Morocco, Lebanon, Iraq China, Mongolia, Russia Hong Kong Start Auto Channel Set Press OK or e.
-
Page 18: Monitor Set (Dvd Deck)
Monitor Set (DVD deck) You can select the monitor type depending the TV used when you play back DVD VIDEO discs recorded for wide-screen TVs. For the multi colour system TV When you use a multi colour system TV, you can change the colour system of this unit automatically by selecting “MULTI”... -
Page 19: Scan Mode Set (Dvd Deck)
Scan Mode Set (DVD deck) This unit supports the progressive scan system (eg. 480p*) as well as the conventional interlaced scan system (eg. 480i*). If your TV equipped with component video connectors supports the progressive video input, you can enjoy a high quality picture by setting the progressive scan mode to active. -
Page 20: Language
Language ● Turn on the TV and select the video channel (or AV mode). ● Slide the TV/S-VHS/DVD switch to the right. INITIAL SETTINGS (cont.) On-screen Language Set (DVD deck) This DVD deck offers you the choice to view on-screen messages in 3 different languages. -
Page 21: Menu/Audio/Subtitle Language Set (Dvd Deck Only)
Menu/Audio/Subtitle Language Set (DVD deck only) Some DVD discs contain the DVD menu display, audio, subtitle in the multiple languages. With these discs, you can set the default language as you like. The procedure shows how to set “MENU LANGUAGE” on the DVD Set Up menu screen as an example. -
Page 22: Language Code List
Language Code List Afar Abkhazian Afrikaans Ameharic Arabic Assamese Aymara Azerbaijani Bashkir Byelorussian Bulgarian Bihari Bislama Bengali, Bangla Tibetan Breton Catalan Corsican Czech Welsh Danish Bhutani Greek Esperanto Estonian Basque Persian Finnish Fiji Faroese Frisian Irish Scots Gaelic Galician Guarani Gujarati Hausa Hindi... -
Page 23: Operations On S-Vhs Deck
OPERATIONS ON S-VHS DECK Basic Playback Turn on the TV and select the video channel (or AV mode). Slide the TV/S-VHS/DVD switch to the right. Clean the video heads using a dry cleaning cassette — ECL-3F — when: Rough, poor picture appears while a tape is played back. The picture is unclear or no picture appears. -
Page 24: Playback Features
Playback Features ● Turn on the TV and select the video channel (or AV mode). ● Slide the TV/S-VHS/DVD switch to the right. ATTENTION In the search, still, slow-motion or frame-by-frame playback mode, ● the picture will be distorted. ● the noise bars will appear. ●... -
Page 25: Index Search
Skip Search During playback, press 1 to 4 times to skip over unwanted sections. Each press initiates a 30-second period of fast-motion playback. Normal playback resumes automatically. To resume normal playback during a Skip Search, press 4. Index Search Your unit automatically marks index codes at the beginning of each recording. -
Page 26: Manual Tracking
Next Function Memory The Next Function Memory “tells” the unit what to do after rewinding. Before continuing, make sure the unit is in the Stop mode. a- For Automatic Start Of Playback Press 3, then press 4 within 2 seconds. b- For Automatic Power Off Press 3, then press 1 within 2 seconds. -
Page 27: Basic Recording
Basic Recording Turn on the TV and select the video channel (or AV mode). Slide the TV/S-VHS/DVD switch to the right. Load a cassette. Insert a cassette with the record safety tab intact. The unit’s power comes on automatically and the counter is reset to 0:00:00. -
Page 28: Recording Features
Recording Features Turn on the TV and select the video channel (or AV mode). Slide the TV/S-VHS/DVD switch to the right. OPERATIONS ON S-VHS DECK (cont.) Record One Programme While Watching Another Once recording is in progress, all you need to do is to set the channel controls on the TV for the station you wish to view. -
Page 29: Tape Remaining Time
Elapsed Recording Time Indication Set the counter display. Press – –:– – until a counter reading appears on the front display panel. The front display panel shows the counter reading with “:” lit. Reset the counter. Press 0000 before starting recording or playback. The counter is reset to “0:00:00”... -
Page 30: Picture System
B.E.S.T. Picture System The B.E.S.T. (Biconditional Equalised Signal Tracking) system checks the condition of the tape in use during playback and recording, and compensates to provide the highest-possible playback and recording pictures. You can set “B.E.S.T.” to “ON” or “OFF” to your preference. pg. - Page 31 ™/S CODE The G- timer programming system eliminates the need to input channel, date, start and stop time data when setting the timer CODE record function. Simply key in the G- timer is automatically programmed. You have to set Guide Program numbers, which are assigned to each station for purposes of S stations stored in your unit’s memory to get proper results.
-
Page 32: Code Show View ™ Timer Programming
™/ CODE ™ Timer Programming With the G- system, timer programming is CODE greatly simplified because each TV programme has a corresponding code number which your unit is able to recognize. INFORMATION and S are different trademarks used to CODE represent the same easy recording feature, but only the term system will be used in the instructions. - Page 33 Access the G- Program screen. CODE Press OK, then the G- CODE Program screen appears (if you’re just starting out, “P1” appears). IMPORTANT Make sure the channel position number you wish to record is displayed; if not, see “G- ™/S CODE on page 31 and set the Guide Program number correctly.
-
Page 34: Express Timer Programming
Express Timer Programming If you do not know the G- number for the programme you CODE wish to record, use the following procedure to set your unit to timer-record the programme. Before performing Express Timer Programming: Make sure that the unit’s built-in clock is set properly. Insert a cassette with the safety tab in place. - Page 35 Enter the channel position. Press PR +/–. Set the tape speed. Press SP/LP/EP (p). Select the appropriate colour system with “PAL/MESECAM” and “NTSC”. ( pg. 77, 78) Return to the normal screen. Press PROG or OK. “PROGRAM COMPLETED” appears on the TV screen for about 5 seconds, then the normal screen appears.
-
Page 36: Check, Cancel And Change Programmes
OPERATIONS ON S-VHS DECK (cont.) Check, cancel and change programmes Disengage the timer mode. Press # (TIMER), then press 1. Access the Programme Check screen. Press ". Access the Programme screen. Press " again to check more information. Each time you press ", the next programme’s information appears. -
Page 37: To Cancel Or Change A Programme
To cancel or change a programme Cancel or change a programme. Press & to cancel a programme. To change programme settings, press the appropriate button: START +/–, STOP +/–, DATE +/–, PR +/–, DAILY (number key “8”), WEEKLY (number key “9”) and/or SP/LP/EP (p). Return to the normal screen. -
Page 38: When Programmes Overlap Each Other
OPERATIONS ON S-VHS DECK (cont.) When programmes overlap each other If “PROGRAM OVERLAPPED” appears, you have another programme overlapping the programme you have just made. The Programme Check screen appears and conflicting programmes will start blinking. PROGRAM OVERLAPPED Example: Programme 1 (you have just made) and Programme 4 overlap each other. -
Page 39: Automatic Satellite Programme Recording
Automatic Satellite Programme Recording This function allows you to automatically record a satellite programme which is timer-programmed on your external satellite receiver. Connect a satellite receiver to the unit’s AUDIO/VIDEO IN (L-1) connector and programme the timer on the satellite receiver. The unit starts or stops recording by the signals input from the satellite receiver. -
Page 40: Basic Playback
Basic Playback Turn on the TV and select the video channel (or AV mode). Slide the TV/S-VHS/DVD switch to the right. ATTENTION You can not use the DVD deck when the S-VHS deck is in the Automatic Satellite Programme standby and recording mode. -
Page 41: Playback Features
Playback Features Turn on the TV and select the video channel (or AV mode). Slide the TV/S-VHS/DVD switch to the right. Playback Control (PBC) Function — Locating a desired scene using the menu of the Video CD with PBC Some Video CD discs supports the PBC function. PBC is an abbreviation of “PlayBack Control.”... -
Page 42: Locating A Desired Scene Using The Dvd Menu
OPERATIONS ON DVD DECK (cont.) Locating a desired scene using the DVD menu DVD VIDEO discs may have two types of the menus; top menu and disc menu. Top menu DVD discs generally have their own menus which show the disc contents. -
Page 43: Resume Function
Locating the start point of the item or skip the item Press 2 or 6 during playback. Example: To locate the beginning of item B from the current position, press 2 twice. To locate the beginning of item D from the current position, press 6 once. - Page 44 OPERATIONS ON DVD DECK (cont.) Digest The unit can display the opening scene of each title or chapter (DVD VIDEO) or each track (Video CD). You can select a desired scene from those displayed on the TV screen. For DVD VIDEO In stop mode or during playback For Video CD In stop mode or during playback without PBC function...
- Page 45 Strobe Playback — To display continuous still pictures During playback, press and hold 9 for more than 2 seconds at the point you want to view as continuous photographs. 9 continuous still pictures appear on the TV screen. While the 9 still pictures are shown, pressing 9 will pause the Strobe playback.
- Page 46 3D Phonic 3D Phonic function allows you to get a simulated surround effect from your stereo system. You can enjoy the vertical surround sound with your 2-channel stereo system. Access the selection menu. Press 3D-PHONIC during playback. The current setting appears on the right bottom corner of the TV screen.
-
Page 47: Adjusting The Picture Quality
VFP function — Adjusting the picture quality The VFP (Video Fine Processor) function enables you to adjust the picture character according to the type of programming, picture tone or personal preference. NOTE: Before you start operation; The VFP setting screen disappears if no operations are done for more than about 10 seconds. -
Page 48: Using The On-Screen Bar
Using the on- screen bar You can check disc information while the disc is loaded and you can use some functions using the on-screen bar. The on-screen bar allows you the various playback operations. OPERATIONS ON DVD DECK (cont.) How to Access the on-screen bar Press DISPLAY twice whenever a disc is loaded. -
Page 49: Basic Operation On The On-Screen Bar
Basic operation on the on-screen bar Example: When selecting the Repeat mode of DVD During playback or while stopped Access the on-screen bar. Press DISPLAY twice. The on-screen bar appears on the TV screen. The currently selected item is highlighted. Select menu item. -
Page 50: Repeat Playback
Repeat Playback You can repeat playback as you like according to the type of disc. When using the on-screen bar Access the on-screen bar. Press DISPLAY twice. The on-screen bar appears on the TV screen. Select menu item. Press w e to move 0 to The following pop-up window appears under the selected item. -
Page 51: A-B Repeat Playback
A-B Repeat Playback You can repeat the desired part. When using the on-screen bar Access the on-screen bar. Press DISPLAY twice. The on-screen bar appears on the TV screen. Select menu item. Press w e to move 0 to The following pop-up window appears under the selected item. -
Page 52: Time Search
OPERATIONS ON DVD DECK (cont.) Time Search You can play back a disc from the desired point by specifying the elapsed time from the beginning of the current title (for DVD VIDEO) or the disc (for Audio CD/Video CD) using the Time Search. -
Page 53: Programme Playback
Programme Playback You can play back up to 99 tracks in the desired order. Access the on-screen bar. Press DISPLAY twice in stop mode. Select the menu item. Press w e to move 0 to “PROG.”, then press OK. The programme table appears under the on-screen bar. Select the tracks in the desired order. -
Page 54: Subtitle Selection
Subtitle Selection You can select subtitle language. During playback When using the SUB TITLE button: Access the menu. Press SUB TITLE. The following pop-up window appears on the TV screen. Example (DVD): “ENGLISH” is selected out of 3 subtitle languages recorded. ENGLISH ENGLISH OPERATIONS ON DVD DECK (cont.) -
Page 55: Angle Selection
Angle Selection You can enjoy a variety of scene angles if the DVD VIDEO disc contains “multi-angle” parts, where multiple cameras were used to shoot the same scene from different angles. If the disc contains “multi-angle” parts, “ screen at the beginning of the “multi-angle” part when “ON SCREEN GUIDE”... -
Page 56: Audio Language Selection
Audio Language Selection Some DVD discs contain the multiple audio. You can select the audio language of movies (DVD VIDEO). During playback When using the A.MONITOR button: Access the menu. Press A.MONITOR. The following pop-up window appears on the TV screen. Example: “ENGLISH”... -
Page 57: Audio Channel Selection
Audio Channel Selection When you play certain karaoke (DVD/Video CD/SVCD), you can enjoy karaoke by selecting the audio channel to play. The sound of each audio channel depends on the contents of the disc. During playback When using the AUDIO button: Access the menu. -
Page 58: Parental Lock
Parental Lock This function restricts playback of DVD VIDEO discs which contain violent (and other) scenes according to the level set by the user. For example, if a movie which includes violent scenes supports the parental lock feature, such scenes which you do not want to let children view can be cut or replaced with other scenes. -
Page 59: To Change The Settings
Enter the password. Press the number keys to enter a four-digit number as your password, then press OK. The 0 moves to “EXIT”. Return to the OTHERS menu screen. Press OK. The “ OTHERS” menu resumes. To return to the normal screen Press SETUP MENU. -
Page 60: Country/Area Code List For Parental Lock
Country/Area Code List for Parental Lock Andorra United Arab Emirates Afghanistan Antigua and Barbuda Anguilla Albania Armenia Netherlands Antilles Angola Antarctica Argentina American Samoa Austria Australia Aruba Azerbaijan Bosnia and Herzegovina Barbados Bangladesh Belgium Burkina Faso Bulgaria Bahrain Burundi Benin Bermuda Brunei Darussalam Bolivia... - Page 61 Saint Lucia Liechtenstein Sri Lanka Liberia Lesotho Lithuania Luxembourg Latvia Libyan Arab Jamahiriya Morocco Monaco Moldova, Republic of Madagascar Marshall Islands Mali Myanmar Mongolia Macau Northern Mariana Islands Martinique Mauritania Montserrat Malta Mauritius Maldives Malawi Mexico Malaysia Mozambique Namibia New Caledonia Niger Norfolk Island Nigeria...
-
Page 62: About Mp3 Disc
About MP3 Disc This unit can playback CD discs recorded by the MP3 format (we refer to those discs as MP3 discs in this manual). Operations for MP3 discs are similar to those for Audio CD discs, though there are some restrictions and differences. What is MP3? MP3 is the abbreviation of “MPEG1 Audio Layer 3.”... -
Page 63: Mp3 Playback
MP3 Playback You can search and play back desired groups and tracks using the MP3 control display. Using the MP3 control display Turn on the unit. Press 1. Select the DVD deck. On the unit Press S-VHS/DVD repeatedly so that the DVD indicator lights up. - Page 64 Track/group selection To skip groups/tracks during playback Press t repeatedly for forward-skip. Press r repeatedly for reverse-skip. To start playback by specifying the track number Press number keys (0-10, +10) to enter the track number. Example: To select 3: Press 3. To select 14: Press +10, then 4.
-
Page 65: About Jpeg Disc
About JPEG Disc This unit can playback CD discs recorded by the JPEG format (we refer to those discs as JPEG discs in this manual). Operations for JPEG discs are similar to those for Audio CD discs, though there are some restrictions and differences. What is JPEG? JPEG is the abbreviation of “Joint Photographic Expert Group.”... -
Page 66: Jpeg Playback
JPEG Playback You can search and play back desired groups and files using the JPEG control display. OPERATIONS ON DVD DECK (cont.) Using the JPEG control display Turn on the unit. Press 1. Select the DVD deck. On the unit Press S-VHS/DVD repeatedly so that the DVD indicator lights up. - Page 67 File/group selection To start slide-show playback by specifying the file number Press number keys (0-10, +10) to enter the file number. Example: To select 3: Press 3. To select 14: Press +10, then 4. To select 20: Press +10, then 10. Or press +10 twice, then 0.
-
Page 68: Editing (S-Vhs Deck)
When using a monaural camcorder, connect its AUDIO OUT connector to the AUDIO L input connector on your unit. When a Master Edit Control-equipped JVC camcorder is used, the To PAUSE camcorder is capable of controlling the unit. Refer to the camcorder’s connector instruction manual for operating procedure. -
Page 69: Edit To Or From Another Video Recorder
Edit To Or From Another Video Recorder TV receiver Player S-video cable Audio/video cable Video channel or AV mode Another recorder Recorder TV receiver Recorder S-video cable Audio/video cable Video channel or Another recorder AV mode Player Advantages of S-VHS video recorders You can edit from VHS to S-VHS, S-VHS to VHS, or, from S-VHS to S-VHS. -
Page 70: Dubbing (From Dvd To S-Vhs)
Dubbing (from DVD to S-VHS) Turn on the TV and select the video channel (or AV mode). Slide the TV/S-VHS/DVD switch to the right. EDITING (S-VHS DECK) (cont.) You can dub selected scenes from the DVD disc to a cassette, starting and stopping wherever you wish. -
Page 71: Editing (Dvd Deck)
EDITING (DVD DECK) Digital Audio Dubbing Turn on the TV and select the video channel (or AV mode). Slide the TV/S-VHS/DVD switch to the right. Recorder Digital audio device (MD deck etc.) Optical cable (not provided) Rear of unit DIGITAL AUDIO OUT Note for connection: Remove the connector cover from the unit and remove the... -
Page 72: Remote Control Functions
Functions Remote A/B/C/D Code Switching The remote control is capable of controlling four JVC video units independently. Each of units can respond to one of four codes (A, B, C or D). The remote control is preset to send A code signals because your unit is initially set to respond to A code signals. -
Page 73: Tv Multi-Brand Remote Control
TV Multi-Brand Remote Control Your remote control can operate the basic functions of your TV set. In addition to JVC TVs, other manufacturer’s TVs can also be controlled. Before performing the following steps: Turn off the TV using its remote control. -
Page 74: System Connections
Connecting To A Satellite Receiver Connect the satellite receiver to the AUDIO/VIDEO IN or S VIDEO IN connectors, then connect the AUDIO/ VIDEO OUT or S VIDEO OUT connectors to the TV’s connectors. Outdoor unit Satellite cable S-Video output connector Satellite receiver AUDIO/VIDEO output connectors... -
Page 75: Connecting To A Dolby Digital Decoder Or An Amplifier With A Built-In Dts (Dvd Deck Only)
Connecting To A Dolby Digital Decoder or An Amplifier With A Built-in DTS (DVD deck only) These instructions enable you to connect your unit to dolby digital decoder or amplifier with a built-in DTS. Dolby Digital decoder or To DIGITAL AUDIO amplifier with a built-in DTS input Make connections. -
Page 76: Subsidiary Settings
Mode Set (S-VHS deck) ● Turn on the TV and select the video channel (or AV mode). ● Slide the TV/S-VHS/DVD switch to the right. SUBSIDIARY SETTINGS You can change various mode settings on the Function Set screen by following the procedure described below. ●... - Page 77 8 S-VHS ET 8 B.E.S.T. 8 PICTURE CONTROL AUTO EDIT SOFT 8 PAL/MESECAM AUTO MESECAM You can record in SP mode on VHS cassettes with S-VHS picture quality. You can play back a tape recorded using the S-VHS ET function on most of S-VHS recorders and of VHS recorders equipped with SQPB (S-VHS QUASI PLAYBACK) function.
- Page 78 8 NTSC NTSC 3.58 NTSC 4.43 NTSC]PAL 8 O.S.D. 8 AUTO SP]LP TIMER To record NTSC signals or playback a NTSC tape, it will be necessary to select the appropriate mode. NTSC 3.58: To record NTSC signals or playback a NTSC tape. NTSC 4.43: To record NTSC4.43 signals or playback a NTSC4.43 tape.
- Page 79 8 VIDEO STABILIZER 8 S-VHS 8 AUTO POWER OFF When this function is set to “ON”, you can automatically correct vertical vibration in the picture when playing back unstable recordings made on another recorder. NOTES: When you finish viewing a tape, be sure to set this function to “OFF”. Regardless of the setting, this function has no effect during recording and during special effects playback.
-
Page 80: Mode Set (Dvd Deck)
Mode Set (DVD deck) Turn on the TV and select the video channel (or AV mode). Slide the TV/S-VHS/DVD switch to the right. You can change various mode settings on the Mode Set screen by following the procedure described below. For each mode setting, see pages 81 to 82. -
Page 81: Picture Settings
Picture Settings 8 SCREEN SAVER 8 MP3/JPEG JPEG Audio Settings 8 DIGITAL AUDIO OUTPUT PCM ONLY DOLBY DIGITAL/PCM STREAM/PCM 8 ANALOG DOWN MIX DOLBY SURROUND STEREO The TV screen may be burned out if a static picture is displayed for a long time. -
Page 82: Others Settings
8 D. RANGE COMPRESSION AUTO Playback discs DVD VIDEO with 48/44.1 kHz, 16/20/24 bit linear PCM DVD VIDEO with 96/88.2 kHz linear PCM DVD VIDEO with DTS DVD VIDEO with Dolby Digital Audio CD/Video CD Audio CD with DTS NOTES: The unit is not equipped with the DTS decoding function. -
Page 83: Tuner Set
Tuner Set Turn on the TV and select the video channel (or AV mode). Slide the TV/S-VHS/DVD switch to the right. IMPORTANT Perform the following steps only if — — Auto Channel Set has not been set correctly by Auto Set Up. - Page 84 IMPORTANT When programming the timer using the G- system, be sure to check the desired channel is selected correctly. ( pg. 32, “G- Timer Programming”) (S-VHS deck only) Your unit memorizes all detected stations even if reception of some of them is poor. You can delete those stations with an unacceptable picture.
-
Page 85: Manual Channel Set
Manual Channel Set Store channels that were not stored during Auto Set Up pg. 16) or Auto Channel Set ( pg. 83). Access the Main Menu screen. Press SET UP MENU. Access the Tuner Set screen. Press rt to move the highlight bar (pointer) to “TUNER SET”, then press OK or e. -
Page 86: Delete A Channel
Delete A Channel Perform steps A to C of “Manual Channel Set” on page 85 to access the channel list screen before continuing. Select the channel. Press rt until the channel you want to delete begins blinking. Delete a channel. Press &. -
Page 87: Clock Set
Clock Set Turn on the TV and select the video channel (or AV mode). Slide the TV/S-VHS/DVD switch to the right. Turn on the unit. Press 1. Select the S-VHS deck. On the unit Press S-VHS/DVD repeatedly so that the S-VHS indicator lights up. -
Page 88: Information On Multi-System Compatibility (S-Vhs Deck Only)
Information on Multi-System Compatibility (S-VHS deck only) Off-Air Recording The built-in multi-system tuner is capable of receiving PAL B/G, I and D/K, and SECAM B/G and D/K and NTSC* broadcasts. TV system NOTE: This model does not operate in BRAZIL (PAL-M) or ARGENTINA (PAL-N). Playback This unit can play back all 3 types of recorded tape. - Page 89 NOTE: When viewing NTSC tapes on a PAL TV set: The picture may shrink vertically with black bars appearing at the top and bottom of the screen. This is not a malfunction on the part of the unit nor the TV. The picture may roll up or down.
-
Page 90: Troubleshooting
If you are using the AV or S-VIDEO connection, set the TV to its AV mode. Try manual tracking. ( pg. 26) Use a dry cleaning cassette ECL-3F, or consult your JVC dealer. Try manual tracking. ( pg. 26) Select the correct colour system. pg. 77, 78) Once recorded, the signal cannot be corrected. -
Page 91: Playback (Dvd Deck)
PLAYBACK (DVD deck) SYMPTOM 1. The button do not work. 2. The DVD deck can not be operated. 3. “X” appears on the TV screen. 4. “REGION CODE ERROR!” appears on the TV screen. 5. The disc cannot be played back. 6. - Page 92 MP3 Playback (DVD deck) SYMPTOM 1. A disc cannot be played. 2. Not MP3 files but JPEG files are played. 3. The MP3 control display appears on the TV screen, but no operation can be performed. JPEG Playback (DVD deck) SYMPTOM 1.
- Page 93 TIMER RECORDING (S-VHS deck) SYMPTOM 1. Timer recording won’t work. 2. Timer programming is not possible. 3. “#” on the front display panel won’t stop blinking. 4. “#”, “ ” and “$” on the front display panel won’t stop blinking. 5.
-
Page 94: Other Problems
OTHER PROBLEMS SYMPTOM 1. The image of TV broadcast appears distorted on the TV screen. 2. Whistling or howling is heard from the TV during camcorder recording. 3. When scanning channels, some of them are skipped over. 4. The channel cannot be changed. 5. -
Page 95: Questions And Answers
QUESTIONS AND ANSWERS PLAYBACK Q. What happens if the end of the tape is reached during playback or search? A. The tape is automatically rewound to the beginning. Q. During search, slow, still and frame-by-frame playback, I can’t hear any audio. What’s the problem? A. -
Page 96: Specifications
GENERAL Power requirement : AC 110 V – 240 V Power consumption Power on : 28 W Power off : 5.0 W Temperature Operating : 5°C to 40°C Storage : –20°C to 60°C Operating position : Horizontal only Dimensions (WxHxD) : 435 mm x 98 mm x 357 mm Weight : 4.8 kg... -
Page 97: List Of Terms
LIST OF TERMS ... 51 A-B Repeat Playback About Discs ... 65 JPEG ... 62 ... 7 Placing a Disc ... 5 Playable Discs ... 5 Region Number ... 5 Unplayable Discs ... 55 Angle Selection ... 57 Audio Channel Selection ... - Page 98 ... 26 Next Function Memory ... 40 OPERATIONS ON DVD DECK OPERATIONS ON S-VHS DECK ... 18 Pan&Scan Parental Lock ... 60 Country/Area Code List ... 59 To change the settings To set Parental Lock for the first time To temporarily release the Parental Lock ...
- Page 99 MEMO...
- Page 100 Printed in Malaysia 0403MNV...
Need help?
Do you have a question about the HR-XVS20AA and is the answer not in the manual?
Questions and answers