Raymarine p70 User Reference
Pilot controller
Hide thumbs
Also See for p70:
- Installation & operation instructions (122 pages) ,
- Installation and operation instructions manual (104 pages) ,
- Operation instructions manual (84 pages)

Related Manuals for Raymarine p70


Summary of Contents for Raymarine p70
- Page 1 p 7 0 / p 7 0 r P ilo t c o n t r o lle r Us e r re fe re nce Docume nt numbe r: 81331-1 Da te : 02-2011...
- Page 3 , SeaTalk and Sportpilot are registered trademarks of Raymarine UK Limited. RayTalk, Seahawk, Smartpilot, Pathfinder and Raymarine are registered trademarks of Raymarine Holdings Limited. FLIR is a registered trademark of FLIR Systems, Inc. and/or its subsidiaries. All other trademarks, trade names, or company names referenced herein are used for identification only and are the property of their respective owners.
-
Page 5: Table Of Contents
Chapter 6 Pilot controller alarms ......43 Chapter 3 Getting started ........13 6.1 Alarms..............44 3.1 p70 and p70r system integration ........ 14 Chapter 7 Multiple data sources (MDS)....49 3.2 Pilot functions ............16 7.1 Multiple data source (MDS) overview ......50 3.3 Pilot controls ............. - Page 6 9.1 Service and maintenance .......... 64 9.2 Routine equipment checks......... 64 9.3 Cleaning..............65 9.4 Cleaning the display screen ........65 Chapter 10 Technical support ......... 67 10.1 Raymarine customer support ........68 p70 / p70r Pilot controller User reference...
-
Page 7: Chapter 1 Important Information
• Do NOT use abrasive, or acid or ammonia based an Authorized Raymarine Service Representative fits products. this product. You will only receive full warranty benefits if you can show that an Authorized Raymarine Service • Do NOT use a jet wash. Representative has installed and commissioned this product. -
Page 8: Tft Lcd Displays
(as applicable). The colors of the display may seem to vary when viewed against Raymarine does not warrant that this product is error-free or that it a colored background or in colored light. This is a perfectly normal is compatible with products manufactured by any person or entity effect that can be seen with all color Liquid Crystal Displays (LCDs). -
Page 9: Suppression Ferrites
Directive requires the recycling of waste electrical and electronic authorized dealers. equipment. Whilst the WEEE Directive does not apply to some Raymarine products, we support its policy and ask you to be aware of how to dispose of this product. Connections to other equipment... -
Page 10: Technical Accuracy
Technical accuracy To the best of our knowledge, the information in this document was correct at the time it was produced. However, Raymarine cannot accept liability for any inaccuracies or omissions it may contain. In addition, our policy of continuous product improvement may change specifications without notice. -
Page 11: Chapter 2 Handbook Information
Chapter 2: Handbook information Chapter contents • 2.1 Handbook information on page 12 Handbook information... -
Page 12: Handbook Information
Installation and commissioning 87132 instructions If a pilot controller already exists on your system then this procedure may be skipped and the p70 / p70r will adopt the same settings as Operating instructions (quick 86142 the already installed pilot controller. -
Page 13: Chapter 3 Getting Started
Chapter 3: Getting started Chapter contents • 3.1 p70 and p70r system integration on page 14 • 3.2 Pilot functions on page 16 • 3.3 Pilot controls on page 16 • 3.4 Instrument power on page 18 • 3.5 Display settings on page 19 •... -
Page 14: P70 And P70R System Integration
3.1 p70 and p70r system integration The p70 and p70r pilot controller is used to control your autopilot system. It can be used with Raymarine SPX, S1, S2 and S3 SmartPilot systems. The diagram below illustrates some of the various external devices that can be connected to your pilot controller. - Page 15 Item Device type MOB (connectivity via SeaTalk to SeaTalk converter.) SeaTalk GPS receiver p70r SeaTalk Pilot controller Raymarine Multifunction displays SPX Course computer Fluxgate compass Rudder reference Drive unit Transducer pods Analogue wind transducers Analogue speed transducers Analogue depth transducers Other devices not shown: Smart transducers (e.g.
-
Page 16: Pilot Functions
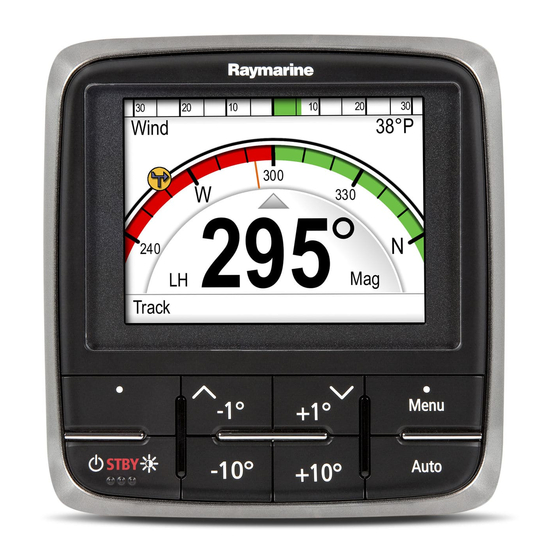
Autopilot disengaged in jog steer mode (tiller drives and SeaTalk only), activated whilst in Standby mode. D12108-1 Item Description LEFT SOFT BUTTON Cancel, Back, mode selection. UP BUTTON / -1 Up navigation, Adjust Up, Decrease angle. p70 / p70r Pilot controller User reference... - Page 17 p70r rotary pilot controller Item Description DOWN BUTTON / +1 Down navigation, Adjust Down, Increase angle. RIGHT SOFT BUTTON Menu, Select, OK, Save. STANDBY BUTTON Disengage pilot, Manual control, Power, Brightness. –10 BUTTON Decrease angle. +10 BUTTON Increase angle. AUTO BUTTON Engage Auto pilot.
-
Page 18: Instrument Power
Note: The pilot controller cannot be turned off whilst in AUTO mode. Combination button press Buttons Action Puts pilot in to Wind Vane mode. STANDBY and AUTO. –1 and –10 AutoTack (in wind vane mode), AutoTurn +1 and +10. p70 / p70r Pilot controller User reference... -
Page 19: Display Settings
A list of network groups will be displayed: Display and shared color • None (default) The p70 / p70r can set a color scheme for the individual display or • Helm 1 for the system (if color is available on the network displays). - Page 20 1. From the color menu highlight a color scheme. Once highlighted the display will preview the selected color scheme. 2. Press SELECT to confirm the color scheme and return to the color settings menu. p70 / p70r Pilot controller User reference...
-
Page 21: Pilot Response
3.6 Pilot response The response level controls the relationship between course keeping accuracy and the amount of helm/ drive activity. Range is from 1 to 9. Making temporary changes to pilot response Pilot response is set up during commissioning of the SmartPilot system however you can make temporary changes to the pilot response at any time by accessing the Pilot response menu from;Main menu >... - Page 22 / p70r Pilot controller User reference...
-
Page 23: Chapter 4 Pilot Views
Chapter 4: Pilot views Chapter contents • 4.1 Available pilot views on page 24 • 4.2 Available data on page 25 • 4.3 Setting up data boxes on page 27 Pilot views... -
Page 24: Available Pilot Views
Pilot views are used whilst in pilot modes to present course and system data on the pilot controller display. There are 5 pilot views to choose from: Description Example Graphical (default) Multiple Large p70 / p70r Pilot controller User reference... -
Page 25: Available Data
4.2 Available data Setting the pilot view To set the pilot view to your desired layout: The following data is available for each pilot mode but is dependent 1. Go to the Pilot view menu: Main menu > Pilot view. on the view chosen: 2. - Page 26 • Data boxes • Wind compass bearing Pattern • Mode name • Data boxes • Pattern icon • Current heading • Compass north • North vector line • Wind compass bearing • Data boxes p70 / p70r Pilot controller User reference...
-
Page 27: Setting Up Data Boxes
4.3 Setting up data boxes 2. Highlight and select Data boxes. 3. Highlight the data box you wish to set up: You can choose what data to display in the available data boxes. • up to 3 available in all views 3 data boxes •... - Page 28 Sea temperature Time Date Rate of turn Heading p70 / p70r Pilot controller User reference...
-
Page 29: Chapter 5 Pilot Modes
Chapter 5: Pilot modes Chapter contents • 5.1 Standby mode on page 30 • 5.2 Auto mode on page 30 • 5.3 Mode page on page 31 • 5.4 Patterns on page 32 • 5.5 Track mode on page 33 •... -
Page 30: Standby Mode
Pressing +1 button will increment the course to starboard by 1º and +10 will increment by 10º. Turning the rotary controller 1 click clockwise will increment the course to Starboard by 1º . p70 / p70r Pilot controller User reference... -
Page 31: Mode Page
5.3 Mode page e.g. pressing the -1 button four times, or turning the rotary 4 clicks anticlockwise will result in a 4° course change to port. The mode page is the initial screen displayed after set up of the device. If the device is being switched on for the first time, the user is taken to the initial Set up wizard. -
Page 32: Patterns
5. The pattern settings screen shall be displayed, showing the Radius parameters currently set for the selected pattern. If you want to change any of the parameters: i. Select the parameter you want to change, then press EDIT. p70 / p70r Pilot controller User reference... -
Page 33: Track Mode
5.5 Track mode ii. Use the UP and DOWN buttons to set the value you want, then press SAVE to save the setting and return to the Pattern settings screen. You can use track mode to automatically steer your vessel along a route plotted on your chartplotter. - Page 34 (Pt) or starboard (Stb) of the planned track. Example 1 D12112-1 Item Description Waypoint arrival circle Target waypoint Next target waypoint Previous waypoint Next waypoint arrival circlet Next target waypoint D12113-1 p70 / p70r Pilot controller User reference...
- Page 35 Example 1 shows the course correction which will be a turn away Waypoint arrival circle from the actual waypoint in order to reacquire the track line. Example: Cross track error (XTE) due to waypoint arrival circle Item Description Cross track error Target waypoint Track line Note: The cross track error alarm will continue to display and...
- Page 36 Note: If you do not press TRACK to accept the Waypoint accept the new heading and proceed to the next waypoint. Advance, the SmartPilot will maintain the current heading and continue sounding the warning. p70 / p70r Pilot controller User reference...
-
Page 37: Wind Vane Mode (Sailing Boats Only)
5.6 Wind vane mode (Sailing boats only) Route completion The SmartPilot displays the ROUTE COMPLETED warning when When the SmartPilot is in Wind Vane mode it uses the wind angle as you have reached the last waypoint on a route in Track mode. the primary heading reference. - Page 38 STANDBY mode, steer onto the new required heading, and press CANCEL to return to Wind Vane heading, then reselect Wind Vane mode. Refer to the p70 pilot mode with the new wind angle. controller installation instruction for the procedure for changing the wind reference between True and Apparent.
- Page 39 Using AutoTack in wind vane mode When you AutoTack in wind vane mode, the boat turns through the AutoTack angle. The SmartPilot will then trim the heading to mirror The SmartPilot has a built in automatic tack facility (AutoTack) that the locked wind angle from the previous tack.
-
Page 40: Power Steer
Main menu > Set up > Auto pilot calibration > Drive settings > Power steer. Note: In order to use Bang Bang mode a connected joystick is required, the p70r rotary will only perform in Proportional mode. p70 / p70r Pilot controller User reference... -
Page 41: Jog Steer (Tiller Pilots Only)
5.8 Jog steer (tiller pilots only) 5.9 Shortcut key If you have a tiller drive installed on a SeaTalk network, your vessel When in pilot view you can assign pilot modes to the LEFT SOFT you can use the pilot controller to operate the ram in Jog steer mode. button as a shortcut depending on which vessel type has been set Jog steer mode enables you to use the pilot controllers –1, +1, –10, +10 buttons, or the ROTARY controller to move the ram in and out... - Page 42 / p70r Pilot controller User reference...
-
Page 43: Chapter 6 Pilot Controller Alarms
Chapter 6: Pilot controller alarms Chapter contents • 6.1 Alarms on page 44 Pilot controller alarms... -
Page 44: Alarms
• Silence the alarm and edit the alarm settings. Note: With the exception of alarm clock, speed and sea temp SeaTalk systems will only be able to switch alarms on/off, SeaTalk systems will be able to adjust settings. p70 / p70r Pilot controller User reference... - Page 45 Alarm name Alarm type Description Action Alarm name Alarm type Description Action Large Cross Indicates cross • Steer back Auto release Safety Alarm Appears when • Pilot drops to track error (XTE) the user has standby and Track Error manually and is greater than enter track taken back...
- Page 46 Angle powered up. is more than No Compass Safety Alarm Compass is not • Check 50 degrees or connected. connections connection to and compass rudder reference transducer. is lost p70 / p70r Pilot controller User reference...
- Page 47 Alarm name Alarm type Description Action Alarm name Alarm type Description Action AutoLearn fail 1 Safety Alarm Autolearn has not • Restart Power & Motor Safety Alarm If the motor pair • Swap motor been carried out AutoLearn. (not carried out) Cables are and the power and power...
- Page 48 No speed data Alarm Speed data has • Check Seatalk solenoid • User to fix stopped . connections short circuit for short or open circuit. • Check system for Seatalk device fault. p70 / p70r Pilot controller User reference...
-
Page 49: Chapter 7 Multiple Data Sources (Mds)
Chapter 7: Multiple data sources (MDS) Chapter contents • 7.1 Multiple data source (MDS) overview on page 50 • 7.2 Viewing vessel data sources on page 50 • 7.3 Selecting a preferred data source on page 51 Multiple data sources (MDS) -
Page 50: Multiple Data Source (Mds) Overview
• Speed which will include: • Wind • Device Note: The presence of some non-MDS compliant devices on • Serial number your system may prevent MDS from working. • Port ID • Status p70 / p70r Pilot controller User reference... -
Page 51: Selecting A Preferred Data Source
7.3 Selecting a preferred data source To select a preferred data source for your system: 1. Go to the MDS menu: Main menu > Setup > System setup > Multiple data source. 2. Press OPTIONS. 3. Highlight Selection and press SELECT. 4. - Page 52 / p70r Pilot controller User reference...
-
Page 53: Chapter 8 Set Up Menu Options
Chapter 8: Set up menu options Chapter contents • 8.1 Set up menu on page 54 • 8.2 System setup menu on page 55 • 8.3 User preferences menu on page 57 • 8.4 Simulator on page 59 • 8.5 Factory reset on page 60 •... -
Page 54: Set Up Menu
Units of measurement, Language, Vessel type, Vessel details, and Variation. System set up Set system grouping, System set up menu. display and system color and brightness, Multiple data sources and about system set up. p70 / p70r Pilot controller User reference... -
Page 55: System Setup Menu
8.2 System setup menu The System setup menu enables users to customize user settings as detailed in the table below: Menu item Description Options Network group This allows you to add multiple units together in a Pre-defined groups group so that when the color scheme or brightness is •... - Page 56 Multiple Data source allows you to view & manage which Data source is used on your pilot head. Data types include: GPS Position, Heading, Depth, Speed & Wind. p70 / p70r Pilot controller User reference...
-
Page 57: User Preferences Menu
8.3 User preferences menu Menu item Description Options The User preference menu enables users to customize user • Barometric • m— Metres settings as detailed in the table below: Wind speed: Menu item Description Options • kts — knots. Time & date These options enable Date format: you to customize the... - Page 58 • German • Bar — bar. • Greek • kpa — Kilo pascals. • Italian • Japanese • Korean • Norwegian • Polish • Portuguese (Brazilian) • Russian • Spanish • Swedish • Turkish p70 / p70r Pilot controller User reference...
-
Page 59: Simulator
The simulator mode is switched on/off in the Simulator option from • On the Setup Menu. Adjust radius Note: Raymarine recommends that you do NOT use the simulator mode whilst navigating. • 0 nm — 10 nm • 3 nm (default) Note: The simulator will NOT display any real data, including any •... -
Page 60: Factory Reset
Your product can be reset to factory default settings from the Setup > Factory reset menu. Performing a factory reset will reset your product back to factory default settings and erase any saved data and user settings. p70 / p70r Pilot controller User reference... -
Page 61: Diagnostics
8.6 Diagnostics You can access diagnostics details from the Setup > Diagnostics menu option and can view information relating to: Menu item Description Options About display Allows you to view information about the instrument • Software version display you are using: •... - Page 62 • Off Self test The product has a built in self test which can help • Memory test to diagnose faults. • Button test • Display test • Buzzer test • Illumination test p70 / p70r Pilot controller User reference...
-
Page 63: Chapter 9 Maintaining Your Display
Chapter 9: Maintaining your display Chapter contents • 9.1 Service and maintenance on page 64 • 9.2 Routine equipment checks on page 64 • 9.3 Cleaning on page 65 • 9.4 Cleaning the display screen on page 65 Maintaining your display... -
Page 64: Service And Maintenance
9.1 Service and maintenance This product contains no user serviceable components. Please Raymarine strongly recommends that you complete a number of refer all maintenance and repair to authorized Raymarine dealers. routine checks to ensure the correct and reliable operation of your Unauthorized repair may affect your warranty. -
Page 65: Cleaning
9.3 Cleaning 9.4 Cleaning the display screen Best cleaning practices. A coating is applied to the display screen. This makes it water repellent, and prevents glare. To avoid damaging this coating, follow When cleaning this product: this procedure: • Do NOT wipe the display screen with a dry cloth, as this could 1. - Page 66 / p70r Pilot controller User reference...
-
Page 67: Chapter 10 Technical Support
Chapter 10: Technical support Chapter contents • 10.1 Raymarine customer support on page 68 Technical support... -
Page 68: Raymarine Customer Support
1. From the main menu scroll to Set Up and press the SELECT key. Raymarine provides a comprehensive customer support service. You can contact customer support through the Raymarine website, 2. From the Set Up menu scroll to Diagnostics and press the SELECT key. - Page 70 www.ra ym a rin e .c o m...
Need help?
Do you have a question about the p70 and is the answer not in the manual?
Questions and answers