Table of Contents
Advertisement
Quick Links
Motorola Keynote
Decimal Digital Radio Pager
Tone and Voice
Operation Instructions
Page 1
Introduction
Congratulations on your choice of the Motorola KeyNote Decimal Digital Tone-and-
Voice Pager. This state-of-the-art receiver has been designed for ease of use, as
well as high performance and reliability that pager users have come to expect from
Motorola. Setting the pace with its unique compact design and conformance to the
most stringent quality standards, KeyNote is the ultimate tone-and-voice pager.
Before attempting to operate your pager, please read this operating instruction
manual carefully so that you may get the full benefit from your pager.
Step 1. Remove Pager from Carton and Inspect
Remove the pager from the shipping carton and inspect for any shipping damage.
Page 2
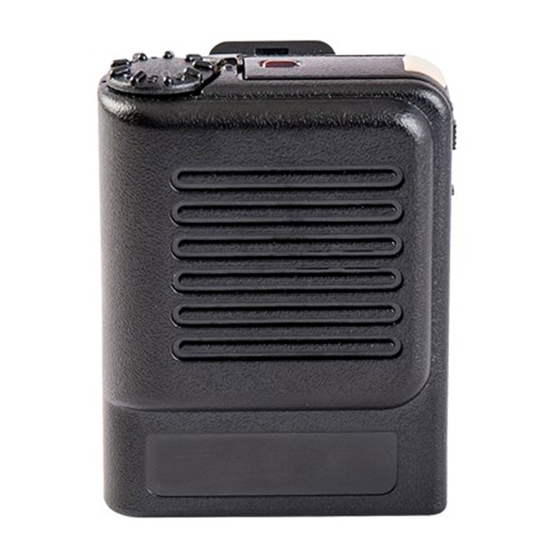
Step 2. Battery Installation
(Refer to Figure 1)
A. Slide the battery door locking switch on the bottom of the pager fully in the
direction of the arrow to unlock the battery compartment.
B. Next, using the triangular arrow located on the square textured area on the
battery door, slide the door in the direction of the arrow to fully expose the
bottom of the battery compartment.
C. Align the battery so that the battery's polarity markings (+ and -) match the
polarity markings on the back cover near the battery door and insert the battery.
D. Close the battery door by pressing slightly on the battery while sliding the
door until it is fully closed and a positive click is heard. The battery door is self-
locking. No further action to lock the door is necessary.
Page 3
(image)
Figure 1
Page 4
Note: If a nickel-cadmium battery is installed, you may need to recharge the battery
first to ensure optimum battery capacity and performance. Use either the Motorola
NLN3305 120 Vac Battery Charger or the Motorola NLN3306 220 Vac Battery
Charger, as applicable. For additional information on battery charging, refer to the
applicable charger manual.
Step 3. Turning the Pager On
Turn the pager on by sliding the power switch to the ON position (refer to Figure 2
for location of the power switch.) Sliding the switch is an upward direction will place
the pager in the ON mode.
Advertisement
Table of Contents

Related Manuals for Motorola Keynote


Summary of Contents for Motorola Keynote
- Page 1 Voice Pager. This state-of-the-art receiver has been designed for ease of use, as well as high performance and reliability that pager users have come to expect from Motorola. Setting the pace with its unique compact design and conformance to the most stringent quality standards, KeyNote is the ultimate tone-and-voice pager.
- Page 2 Step 4. Battery Condition Check Immediately after the pager is placed in the ON mode, the pager will automatically test the condition of the battery. Page 5 (image) Figure 2 Page 6 A good battery is indicated by a power-up alert (double-interrupted 4-beep tone) followed by channel noise or audio., A lamp on top of the pager will flash along with any alert tones as an additional page indicator.
- Page 3 (Motorola type NLN7975.) Either of these batteries provides for optimum pager performance. AA-size alkaline or nickel-cadmium batteries from other manufacturers may give comparable performance, but have not been tested by Motorola. Substitution of a battery other than those recommended by Motorola could reduce operating life. Replacing the Battery...
- Page 4 Page 13 Repair and Maintenance The KeyNote pager, properly handled, is capable of many years of trouble-free service. However, should it eve require service, Motorola’s National Service Organization, staffed with specially trained technicians, offers strategically located repair and maintenance facilities. Consult your Motorola sales representative for...
Need help?
Do you have a question about the Keynote and is the answer not in the manual?
Questions and answers