Table of Contents
Advertisement
Quick Links
Advertisement
Table of Contents

Related Manuals for Manley Stingray iTube


Summary of Contents for Manley Stingray iTube
-
Page 2: Table Of Contents
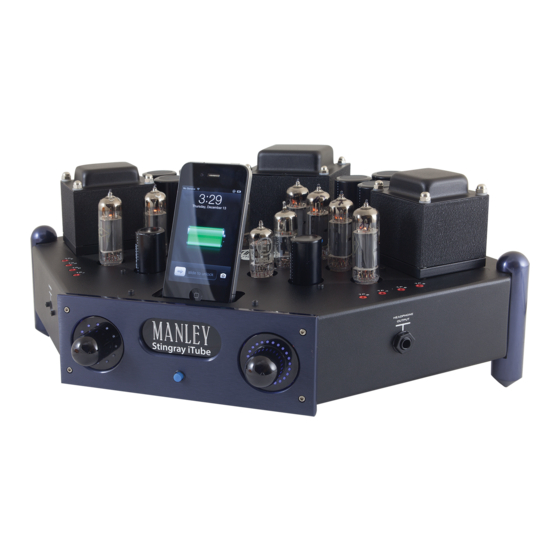
CONTENTS INTRODUCTION........................3 MAINS CONNECTIONS......................4 CONNECTING YOUR STINGRAY..................5 FRONT & BACK PANELS.......................6 INPUTS, OUTPUTS, & THE STUFF ON THE SIDES............7-8 DETAILED FRONT PANEL FUNCTIONS................9 DISPLAY MODES........................10 OPTIMIZING YOUR SOUND SYSTEM................11-12 TUBE F.A.Q........................13-14 ALL YOU NEED TO KNOW ABOUT BIAS..............14-15 REMOTE CONTROL......................16 iPod &... -
Page 3: Introduction
You will probably need occasional access to the sides and back so placing this unit inside a 3-sided cabinet may be not practical. If the Stingray iTube is placed on top of other equipment, we suggest that rubber feet or pads be placed under the Stingray iTube’s feet to prevent scratching the surface of the other gear. -
Page 4: Mains Connections
Collecting electrical and electronic equipment and waste prevents the potential contamination of nature with the hazardous substances which may be present in electrical and electronic products and equipment. Your MANLEY or LANGEVIN retailer will assist with and advise you of the correct method of disposal in your country. -
Page 5: Connecting Your Stingray
3. On a rectangular chassis it is easy to specify front, back, sides etc - but on the 6 sided Stingray iTube we should adopt a convention and refer to the sides that have the RCA inputs as Left-Back and Right-Back. We pro- vide 3 left inputs on the Left-Back, 3 right inputs on the Right-Back, and an iPod interface on the top of the unit. -
Page 6: Front Panel
A) Input Selection & Menu Control: This knob displays and allows the selection of any one of the 4 inputs available on your Stingray iTube. The LEDs show which input is selected, starting at the 9:00 position for Input 1 and ending at the 12:00 position for Input 4 (iPod interface). -
Page 7: Inputs, Outputs, & The Stuff On The Sides
You can also use this output to drive another preamplifier in an- other room, for instance. Or if you wish to use another preamplifier instead of the one built into the Stingray iTube, you can drive it here and run its outputs back into the Loop return. - Page 8 3 sources with the Input Select knob and the LOOP RETURN will be unmuted. SUB OUT: This is a line level output after the Stingray iTube’s volume control. Use this output to feed the input of your sub- woofer amplifier.
-
Page 9: Detailed Front Panel Functions
You can also use this button to RESTORE DEFAULT SET- TINGS if you get lost in menus or just feel the need to reset your Stingray iTube to factory settings. To do this, just turn off power to the unit with the back-panel power switch. - Page 10 Display Menu Functions The Display Menu is the second of the two Menus on the Stingray iTube. To access the Display Menu, press both the Input Selection and Volume/Balance knobs at the same time. When all three red LEDs (Insert, RF, & IR) on the Input Selection knob illuminate, release the knobs.
-
Page 11: Optimizing Your Sound System
If you are getting this amazing imaging and soundstage, you may be interested to know why you suddenly have it now that you have the Stingray iTube. These are very audible effects that seem to be beyond normal mea- surement technique or textbook electronic theory. This effect is directly related to the amount of negative feedback used in a design. - Page 12 You may have bought a great system but there is a good chance that you are only getting a fraction of its po- tential. Very frequently we have experienced top quality electronics sounding unimpressive simply because acous- tics were ignored. Even amongst studio engineers, few can really tell the difference between good speakers in a bad room and bad speakers in a good room - but they all know good speakers in a good room and very likely so do you.
-
Page 13: Tube F.a.q
We will test and select a tube set for you that will be optimized for your Manley piece of gear and in most cases, your tube set will actually be tested in another one of what you have. -
Page 14: All You Need To Know About Bias
What tools do I need? Just two. A small flat screwdriver (insulated handle) to adjust the trimmers. You also need a voltmeter or multi-meter, one of which we’ve provided with your new Stingray iTube. How convenient! Any mul- timeter will do; it doesn’t have to be a good one. RadioShack sells them as well, if you want to purchase a different... - Page 15 What do I do? The amp should be well warmed up (30 min.) and no music playing. Set the meter to read DC volts. The meter has two test leads, red and black. Put the black lead in the black terminal on the top marked TPG (ground) or touch the metal point to the steel chassis (but not a painted or anodized part).
-
Page 16: Remote Control
Your Stingray iTube is equipped with a Remote Control that communicates with the amplifier via RF (radio frequency) and/ or IR (infrared) signals. In the Stingray iTube’s Menu Mode, you can alter these transmission settings (to learn how to do that, see page 9). -
Page 17: Ipod & S-Video, Omy
(Serial # MIST086 and higher) We’d like to think that the sonic attributes of our Stingray iTube are exciting and immersive enough to prevent you from ever falling asleep while listening, but we do understand that occasionally such circumstances arise. Perhaps your iTube is the cen- ter of your home entertainment system and you want to fall asleep while watching a movie, or perhaps you are in the habit of lulling yourself to sleep with the soothing sounds of birds, city street noise, rain, or Metallica before bedtime..in that case, this... -
Page 18: Troubleshooting
HISS - Usually one of the sources. This source may have a volume control that is turned down and forcing you to turn up the volume of the Stingray iTube. Adjust the source so that it is a similar volume as your other sources. If it seems to be the one channel of the Stingray iTube, then it is probably an input tube (12AT7WA). -
Page 19: Credits
It all began at the HI-FI ‘97 show. We find the protagonists of this tale seated comfortably at the bar, of course - J. Gordon Holt with his traditional martini, and EveAnna Manley with her stimulant of choice, a cup of coffee. She was describing a new integrated amplifier she wanted to build, and proceeded to make one of those legendary “bar-napkin drawings”. -
Page 20: Specifications
SPECIFICATIONS - 4 x Stereo Line RCA Inputs - TRIODE - UL Switching - RECORDING OUT - SUBWOOFER OUT - TAPE LOOP (Insert) with Bypass switch - Logic controlled Volume and Balance functions - All-Vacuum Tube Lo-feedback Stereo Integrated Design - Output Tubes: 8 x EL84 - Ships with Russian NOS EL84M (aka 6Pi14Pi-EB) - Driver Tubes: 2 x 6414 - Ships with GE or RAYTHEON JAN NOS USA or 6414W - Input Tubes: 2 x 12AT7EH - Ships with: 12AT7EH large plate Electro-Harmonix Russian...
Need help?
Do you have a question about the Stingray iTube and is the answer not in the manual?
Questions and answers