Panasonic SC-HT855 Operation Manual
Dvd home theater sound system
Hide thumbs
Also See for SC-HT855:
- Operating instructions manual (44 pages) ,
- Operating instructions manual (12 pages)
Table of Contents
Advertisement
Operations Guide
Operating Instructions
DVD Home Theater Sound System
SC-HT855
Model No.
Region number
The player plays DVD-Video marked with labels
containing the region number "2" or "ALL".
Example:
2
EB
2
3
ALL
5
High-quality
picture
HDMI capability, Advanced
progressive scan and more.
Compatible with a variety
of media formats
DVD-RAM, DVD-Audio,
DVD-Video, DivX and more.
High-performance
sound effects
Sound quality enhancement,
Bass enhancement and more.
Before connecting, operating or adjusting this
product, please read the instructions completely.
Please keep this manual for future reference.
[Note[
"EB" on the packaging indicates the United Kingdom.
11
page
18
page
36
page
RQT8724-B
Advertisement
Table of Contents

Related Manuals for Panasonic SC-HT855


Summary of Contents for Panasonic SC-HT855
-
Page 1: Operating Instructions
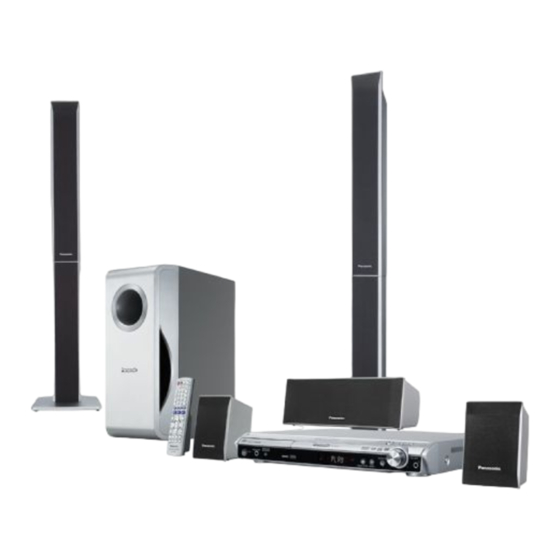
Operations Guide Operating Instructions High-quality DVD Home Theater Sound System picture page SC-HT855 Model No. HDMI capability, Advanced progressive scan and more. Compatible with a variety of media formats page DVD-RAM, DVD-Audio, Region number DVD-Video, DivX and more. The player plays DVD-Video marked with labels containing the region number “2”... -
Page 2: Accessories
≥ Most major credit and debit cards accepted. ≥ All enquiries transactions and distribution facilities are provided directly by Panasonic UK Ltd. ≥ It couldn’t be simpler! ≥ Also available through our Internet is direct shopping for a wide range of finished products, take a browse on our website for further details. -
Page 3: Table Of Contents
TABLE OF CONTENTS Accessories ......2 Connecting to a television with Caution for AC Mains Lead ... . 4 AUDIO/VIDEO terminals . -
Page 4: Caution For Ac Mains Lead
Caution for AC Mains Lead (For United Kingdom) WARNING: DO NOT CONNECT EITHER WIRE TO THE EARTH TERMINAL WHICH IS MARKED WITH THE LETTER (“EB” area code model only) E, BY THE EARTH SYMBOL Ó OR COLOURED GREEN OR For your safety, please read the following text carefully. GREEN/YELLOW. -
Page 5: Safety Precautions
Safety precautions Placement Foreign matter Set the unit up on an even surface away from direct Do not let metal objects fall inside the unit. This can sunlight, high temperatures, high humidity, and excessive cause electric shock or malfunction. vibration. These conditions can damage the cabinet and Do not let liquids get into the unit. -
Page 6: Step 1 Assembling The Front Speakers
The supplied stands are specially Assembling the front speakers STEP designed for attachment to Panasonic SB-FS540 front speakers. Use only as indicated in this setup. Preparation ≥ To prevent damage or scratches, lay down a soft cloth and perform assembly on it. - Page 7 Secure the speaker to the stand. Assembled! Speaker Screw Tighten securely. Ensure the speaker cable is centered in the groove. Stand Connect the speaker cable. Insert the wire fully. _: White `: Blue Push! Press the speaker cable into the groove. ∫...
-
Page 8: Positioning The Speakers
Positioning the speakers STEP How you set up your speakers can affect the bass and the sound field. Note the following points: ≥ Place speakers on flat secure bases. ≥ Placing speakers too close to floors, walls, and corners can result in excessive bass. Cover walls and windows with thick curtains. -
Page 9: Step 3 Speaker Connections
Speaker connections STEP Speaker cables 2 sheets of speaker cable stickers ≥ 1kshort cable: For center speaker ≥ Attach the speaker-cable stickers to make connection easier. ≥ 2klong cables: For surround speakers Be careful not to cross Speaker cable sticker (short-circuit) or reverse the polarity of CENTER... -
Page 10: Audio, Video And Radio Connections
Audio, video and radio connections STEP ≥ Do not connect through the video cassette recorder. Due to copy guard protection, the picture may not be displayed properly. ≥ Turn the television off before connecting, and refer to the television’s operating instructions. Ex.1 Connecting with your television and Set Top Box To improve picture quality, you can change the video signal output from the SCART (AV) terminal. -
Page 11: Ex.2 Connecting With Your Hdmi-Compatible Television And Set Top Box
≥ Optical input settings (➜ page 39) ∫ HDAVI Control function If your Panasonic television is an HDMI control compatible television, you can operate your television synchronizing with home-theater operations or vice versa (➜ page 40). ≥ It is recommended that you use Panasonic’s HDMI cable. -
Page 12: Connecting To A Television With Audio/Video Terminals
Connecting to a television with AUDIO/VIDEO terminals Back of this unit COMPONENT VIDEO OUT AV OUT TV TV VIDEO VIDEO S-VIDEO S-VIDEO OPTICAL IN AUDIO AUDIO IN IN Television (not included) § Audio cable AUDIO AUDIO (not included) VIDEO OUT VIDEO IN Video cable (not included) - Page 13 2 Set “Video Output Mode” to “480p” or “576p”, and then follow the instructions on the menu screen (➜ page 28, Picture Menu). ≥ Panasonic televisions with 625 (576)/50i·50p, 525 (480)/60i·60p input terminals are progressive compatible. Consult the manufacturer if you have another brand of television.
-
Page 14: Connecting The Fm And Am Antennas
Connecting the FM and AM antennas AM loop antenna FM indoor antenna ≥ Using an outdoor antenna (optional) (➜ page 35). FM indoor antenna Affix this end of the antenna where Click! reception is best. Adhesive tape AM loop antenna Stand the antenna up on its base. -
Page 15: Step 6 Preparing The Remote Control
Preparing the remote control STEP Do not: ≥ mix old and new batteries. Remote control Batteries ≥ use different types at the same time. ≥ heat or expose to flame. ≥ take apart or short circuit. Insert so the poles (i and j) match those in the remote ≥... -
Page 16: Step 8 Performing Quick Setup
Performing QUICK SETUP STEP The QUICK SETUP screen assists you to make necessary settings. To display the picture from this unit, turn on your television and change the television’s video input mode which is connected to this unit (e.g. VIDEO 1, AV 1, etc.). To change your television’s video input mode, refer to its operating instructions. -
Page 17: Control Reference Guide
Control reference guide See page references in parentheses. Television operations (39) Adjust the television volume (39) Select the source Turn the unit on/off (16) DVD: DVD/CD (16) Change the television’s video TUNER/BAND: FM/AM (15) input mode (39) EXT-IN: MUSIC P. (38), TV (39), AUX (39), D-IN (39) ONE TOUCH PLAY Start up and play a disc automatically/ Select disc’s title numbers etc./... -
Page 18: Discs That Can Be Played
DVD video recorders, DVD video cameras, personal computers, etc. ≥ [JPEG] Recorded with Panasonic SD multi cameras or DVD video recorders using the DCF (Design rule for Camera File system) Standard Version 1.0. ≥ [MPEG4] Recorded with Panasonic SD multi cameras or DVD video recorders [conforming to SD VIDEO specifications (ASF standard)/MPEG4 (Simple Profile) video system/G.726... -
Page 19: Disc Caution
Disc caution Maintenance ∫ To clean discs Clean this unit with a soft, dry cloth. ≥ Never use alcohol, paint thinner or benzine to clean Wipe with a damp cloth this unit. and then wipe dry. ≥ Before using chemically treated cloth, carefully read the instructions that came with the cloth. -
Page 20: Basic Play
Basic play To display the picture from this unit, turn on your television and change its video input mode (e.g. VIDEO 1, AV 1, etc.). To change your television’s video input mode, refer to its operating instructions. Using this unit Turn the unit on. -
Page 21: Using The Remote Control
If you are experiencing problems, refer to troubleshooting (➜ page 43 to 46). Using the remote control Select On-screen — item select Numbered ONE TOUCH PLAY buttons Register CANCEL [DVD-VR] [DVD-A] [DVD-V] SKIP SLOW/SEARCH [VCD] [CD] STOP e.g. To select 12: PAUSE [S10] ➜... -
Page 22: Convenient Functions
Convenient functions All group play [DVD-A] Press [1 PLAY]. All Group Playback Numbered ONE TOUCH PLAY Press PLAY to start buttons CANCEL Program play (up to 32 items) Press the numbered buttons to select the item. ([WMA] [MP3] [JPEG] [MPEG4] [DivX] Press [ENTER] to PLAY register the selection.) e.g. -
Page 23: Playing Data Discs Using Navigation Menus
Playing data discs using navigation menus ∫ Using the submenu 1 While Navigation Menu is displayed Press [FUNCTIONS]. 2 Press [3, 4] to select an item and press Numbered ONE TOUCH PLAY [ENTER]. buttons Items shown differ depending on the type of disc. Multi Groups and contents are displayed. -
Page 24: Selecting A Track Using Cd Text
Playing data discs using navigation menus Playing RAM and DVD-R/-RW Selecting a track using CD text (DVD-VR) discs [CD] [DVD-VR] Titles appear with CD Text disc playback. ≥ Titles appear only if the titles are recorded on the disc. Press [TOP MENU] or [MENU]. ≥... - Page 25 ≥ You can play MPEG4 data [conforming to SD VIDEO specifications (ASF standard)/MPEG4 (Simple Profile) video system/G.726 audio system] recorded with Panasonic SD multi cameras or DVD video recorders with this unit. ≥ The recording date may differ from that of the actual date.
-
Page 26: Using On-Screen Menus
Playlist Program 2/16 Program Search Subtitle ≥ [DVD-VR] “On” or “Off” appears only with Time 0:34:15 Content Audio discs that contain subtitle on/off Subtitle information (Subtitle on/off information cannot be recorded using Panasonic DVD Recorders). -
Page 27: Other Settings
[DVD-VR] Except [DVD-VR] Marker To recall a marker recorded on DVD- To mark up to 5 positions to play again (VR) Video recorders Press [ENTER] (The unit is now ready to Press [3, 4] ➜ Press [ENTER]. accept markers.) (with multiple angles) To mark a position: Angle To select a video angle... -
Page 28: Audio Menu
Using on-screen menus Other Settings Items shown differ depending on the type of disc. ∫ Picture Menu (Continued) To select suitable picture quality with When you select “Auto” the constructing method of the DivX contents is your television automatically distinguished and output. If (Video recordings will be converted to, and Source the picture is distorted, select “I (Interlace)”... -
Page 29: Display Menu
Other Settings Items shown differ depending on the type of disc. ∫ Display Menu [JPEG] On ,------. Off Information To zoom in and out manually – in 0.01-unit steps from “k1.00” to Subtitle Position 0 to s60 (in 2 unit steps) “k1.60”... -
Page 30: Changing The Player Settings
Changing the player settings Press and hold to show the Setup menu. If you have not performed QUICK SETUP (➜ page 16), Numbered the QUICK SETUP screen ONE TOUCH PLAY buttons appears. Select the menu. Select ≥Press [1] to access the item. - Page 31 QUICK SETUP enables successive settings of the items in the shaded area. ∫ “Video” menu ≥ 4:3 Pan&Scan : Regular aspect television (4:3) TV Aspect Choose the setting to suit The sides of the widescreen picture are cut off so it fills the your television and screen (unless prohibited by the disc).
- Page 32 Changing the player settings QUICK SETUP enables successive settings of the items in the shaded area. ∫ “HDMI” menu ≥ Standard RGB Range ≥ Enhanced: When the black and white images are not distinct. Set “HDMI Colour Space” to “RGB” (➜ page 28, Picture Menu).
-
Page 33: Changing The Delay Time Of The Speakers
Changing the delay time of the speakers 1 Press [3, 4] to select the delay time box and (Effective when playing multi-channel audio) (Center and surround speakers only) press [ENTER]. 2 Press [3, 4] to adjust the delay time and press For optimum listening with 5.1-channel sound, all the speakers, except for the subwoofer, should be the same [ENTER]. -
Page 34: Using The Radio
Using the radio Press [X TUNING W] to tune to the preferred frequency and press [ENTER]. While the frequency and “PGM” are flashing on the display TUNER/BAND Press the numbered buttons to select a channel. Numbered ≥To select a 2-digit number ONE TOUCH PLAY e.g. -
Page 35: Rds Broadcasting
RDS broadcasting The unit can display the text data transmitted by the radio data system (RDS) available in some areas. If the station you are listening to is transmitting RDS signals, “RDS” will light up on the display. When “FM” is selected Press [FUNCTIONS] to display the text data. -
Page 36: Using Sound Effects
Using sound effects Enhancing the sound from the center speaker: Center Focus This applies to discs where the dialogue is recorded in the center channel. ONE TOUCH PLAY You can make the sound of the center speaker seem like it is coming from within the television. VOLUME Press and hold [—C.FOCUS]. -
Page 37: Enhancing The Bass Sound: H.bass
Enhancing the bass sound: Adjusting the volume of each H.BASS speaker: Speaker level adjustments You can enhance low-frequency sound so that heavy This is one of the ways to get appropriate surround effects. bass sound can be heard clearly, even if the acoustics of Preparation your room are not optimal. -
Page 38: Using Other Useful Functions
Using other useful functions Using headphones This unit only EXT-IN ONE TOUCH PLAY Reduce the volume and connect the headphones (not included). Headphone plug type: ‰3.5 mm stereo mini plug VOLUME VOLUME SLEEP MUTING Adjust headphone volume with [VOLUME]. ≥ Audio is automatically switched to 2-channel stereo. -
Page 39: Operating Other Equipment
(These functions only work with Dolby Digital or PCM, Operating the television excluding Audio Mode, which only works with Dolby You can use the remote control to operate a Panasonic Digital Dual Mono.) television. PCM FIX Mode [Note] Press and hold [FUNCTIONS]. -
Page 40: Operating Both The Television And The Home Theater System: Control With Hdmi (Hdavi Control)
FL display.) ≥ If you turn off the home theater system, speakers operation of this unit and Panasonic TV (VIERA) with HDAVI Control. You can use this function by connecting automatically switch to the television. -
Page 41: Speaker Installation Options
Speaker installation options ∫ Attaching to a wall You can attach all of the speakers (except subwoofer) to a wall. ≥ The wall or pillar on which the speakers are to be attached should be capable of supporting over 10 kg per screw. - Page 42 Speaker installation options Reattaching the speaker cable to the stand 1 Remove the eight screws from the stand, and remove the speaker net. Screw 2 Position the cable. Approx. 15 cm Press the cable into the groove. Cable 3 Attach the speaker net with the screws. ∫...
-
Page 43: Troubleshooting Guide
Troubleshooting guide Before requesting service, make the following checks. If you are in doubt about some of the check points, or if the solutions indicated in the chart do not solve the problem, consult your dealer for instructions. Power Page ≥... - Page 44 Troubleshooting guide Subtitle Page ≥ Adjust the position. (“Subtitle Position” in Display Menu) Subtitle position is wrong. ≥ Display the subtitles. (“Subtitle” in Main menu) No subtitles. ≥ Subtitles may not be displayed depending on the disc. [DivX] — Marker ≥...
- Page 45 Picture abnormal or unviewable Page ≥ The unit and television are using different video systems. Use a multi- The picture on the — television is not displayed system or PAL television. ≥ The system used on the disc does not match your television. correctly or disappears.
- Page 46 Troubleshooting guide Listening to the radio Page ≥ Adjust the position of the FM or AM antenna. Distorted sound or noise — ≥ Use an outdoor antenna. is heard. “ST” flickers or does not light. ≥ Turn the television off or move it away from the unit. A beat sound is heard.
-
Page 47: Glossary
Glossary CPPM (Content Protection for Prerecorded Media) I/P/B A copy protection system used for DVD-Audio files. This MPEG 2, the video compression standard adopted for unit supports CPPM. use with DVD-Video, codes frames using these 3 picture types. Decoder I: Intra coded picture A decoder restores the coded audio signals on DVDs to This picture has the best quality and is the best to use normal. -
Page 48: Specifications
S/N 26 dB 1.4 µV may not be displayed. 75 ≠ (unbalanced) Antenna terminals §4 MPEG4 data recorded with Panasonic SD multi Amplitude Modulation (AM/MW) cameras or DVD video recorders Frequency range 522–1629 kHz (9-kHz step) Conforming to SD VIDEO specifications (ASF AM Sensitivity S/N 20 dB at 999 kHz 560 µV/m... - Page 49 [Subwoofer\SB-W540] VIDEO SECTION Type 1 way, 1 speaker system (Bass reflex) Video system PAL625/50, PAL525/60, NTSC Impedance 6 ≠ Speaker unit(s) Composite video output Woofer 16 cm Cone type 1 Vp-p (75 ≠) Output level Input power (IEC) 250 W (Max) Terminal Pin jack (1 system) Output sound pressure...
- Page 50 Manufactured under license from Dolby Laboratories. , HDCD ® , High Definition Compatible “Dolby”, “Pro Logic” and the double-D symbol are Digital ® and Pacific Microsonics™ are either trademarks of Dolby Laboratories. registered trademarks or trademarks of Pacific Microsonics, Inc. in the United States and/or other “DTS”...
- Page 51 Memo:...
- Page 52 If you wish to discard this product, please contact your local authorities or dealer and ask for the correct method of disposal. THIS UNIT IS INTENDED FOR USE IN MODERATE CLIMATES. Matsushita Electric Industrial Co., Ltd. Web Site: http://www.panasonic.co.jp/global/ RQT8724-B F0306UM0...
Need help?
Do you have a question about the SC-HT855 and is the answer not in the manual?
Questions and answers