Olivetti Nettun@3000 User Manual
Hide thumbs
Also See for Nettun@3000:
- Quick manual (108 pages) ,
- User manual (49 pages) ,
- Troubleshooting manual (16 pages)
Table of Contents
Advertisement
Quick Links
Download this manual
See also:
Troubleshooting Manual
Advertisement
Table of Contents

Related Manuals for Olivetti Nettun@3000


Summary of Contents for Olivetti Nettun@3000
- Page 1 3000 int'l H REGISTER USER'S GUIDE...
- Page 2 For more detailed information on how to use the cash register functions, a Programming manual can be downloaded from the Olivetti site (www.olivetti.com) that contains detailed information on programming the settings. The manufacturer reserves the right to carry out modifications to the product described in this manual at any time without any notice.
-
Page 3: Table Of Contents
CONTENTS 1. INSTALLING THE CASH REGISTER........... 1-1 PACKAGE CONTENTS ..................1-1 INSTALLATION ....................1-2 CONNECTING THE CASH REGISTER TO THE POWER SUPPLY....1-2 POWERING ON THE CASH REGISTER ............1-4 INSERTING PAPER ..................1-5 Safety Precautions and General Standards of Use ......... 1-5 Loading the Paper Roll .................. - Page 4 Touch screen Calibration................2-16 Keypad Use Config..................2-17 Function Keys Programming ................. 2-18 SET SETUP ..................... 2-19 Sets List......................2-20 OPERATOR MANAGEMENT ................2-21 Selecting operators..................2-23 3. THE SALES ENVIRONMENT (MAIN ENVIRONMENT)....... 3-1 SALES FUNCTIONS (MAIN ENVIRONMENT) ..........3-3 USING THE MAIN SALES ENVIRONMENT ............
- Page 5 6. CATERING ENVIRONMENT – TABLE OPERATIONS......6-1 Key Description ....................6-2 Table Management Functions - Proforma ............6-2 Table Management Functions - Move Table ........... 6-3 Functions Related to Table Management - Sharing Division ......6-5 Recall Separate Account ................. 6-6 Table Closure Functions..................
- Page 6 10. THE ELECTRONIC JOURNAL ............10-1 INITIALISING THE ELECTRONIC JOURNAL..........10-2 EJ LABEL......................10-3 REPLACING THE EJ ..................10-5 PRINTING THE EJ INFORMATION - CODE 460..........10-6 DELETING THE EJ – CODE 459..............10-7 11. TECHNICAL SPECIFICATIONS ............11-1 Case ......................11-1 Touch Screen ....................
-
Page 7: Installing The Cash Register
1. INSTALLING THE CASH REGISTER PACKAGE CONTENTS The cash register is supplied in a single package containing the following components: • Cash register • External power unit with power cord • Manual providing operating instructions • Electronic journal inside the cash register •... -
Page 8: Installation
INSTALLATION The steps to install the cash register are as follows: Connect the cash register to an electricity supply Powering on the cash register Insert the paper roll Connect the drawer (not indispensable for general use) Connect the external peripherals (not indispensable for general use). WARNING: For the cash register to be operational, the paper roll and electronic journal must be inserted correctly. - Page 9 General Warnings: • Do not insert foreign bodies into the cash register. • If the cash register is to remain unused for a long period, disconnect it from the mains power. • To disconnect the appliance from the electrical supply, remove the plug from the mains electrical socket;...
-
Page 10: Powering On The Cash Register
POWERING ON THE CASH REGISTER The cash register is equipped with an ON/OFF (I/O) switch to the rear and an ON/OFF button on the front panel: 1. Press the ON/OFF switch turning this to the (I) position. ON/OFF switch 2. Press the ON/OFF button for approx. -
Page 11: Inserting Paper
INSERTING PAPER WARNING: Only Mitsubishi F5041 thermal paper should be on the cash register. Different types of thermal paper, especially paper that is too thin, could result in incorrect advancement of the ticket. The writing and logos on the back of the ticket also must not be visible on the front due to the transparency of the paper. - Page 12 • Do not open the cover of the cash register during printing. • Do not carry out any operations on the cash register except for the troubleshooting procedures. • Do not try to disassemble or modify the product. • Do not insert foreign objects in the cash register. •...
-
Page 13: Loading The Paper Roll
LOADING THE PAPER ROLL Open the cover of the printer exerting leverage in indent A and lifting it up. Remove the protective tape (only for first time installation. Holding paper roll indicated in the figure, unwind approximately 25 cm of paper and then insert the roll in its housing in the printer taking care to hold the part of the paper... - Page 14 Insert the paper unwound in the specific slot. The paper is loaded automatically. It is advisable to hold the end of the paper roll during the loading phase. Insert part paper unwound in the slot of the upper cover of the printer. Close the upper cover of the printer.
-
Page 15: Replacement Of The Paper Roll / Removal Of Paper Jam
REPLACEMENT OF THE PAPER ROLL / REMOVAL OF PAPER JAM After raising the upper cover, lift the cutter unit. Press button (C) to retract the printhead from the print unit. Remove paper residue or extract finished jammed ticket roll. 3. Close the cutter unit. To replace the paper roll, follow the insertion procedure and then read the “Paper roll insertion”... -
Page 16: Printer Warnings
PRINTER WARNINGS Out of paper (ticket) Notifies that the roll of thermal paper is completely finished. When this condition occurs, printer operation halts. Cover open The cash register indicates that the cover of the printer compartment is open or not closed correctly. Note: Certain types of paper roll warn of the approaching end with a coloured band (normally red) appearing on one side of the paper. -
Page 17: Inserting The Electronic Journal
INSERTING THE ELECTRONIC JOURNAL The electronic journal must be inserted and removed with the cash register powered off. To avoid the risk of damage to the electronic journal or machine malfunctions, some of which can be resolved only with the assistance of the Technical Services, the electronic journal must be used according to the indications provided in this manual. -
Page 18: Removing The Electronic Journal
REMOVING THE ELECTRONIC JOURNAL Open the hatch (1) and push the card until it is ejected (2). Cards must be filed and preserved according to current filing regulations. NOTE: Cards must be preserved in an area in which ambient temperature range is between –40°C and 85°C, and humidity between 8% and 95%. -
Page 19: Connecting External Peripherals
The devices most frequently connected are: Personal Computer, Barcode reader able to handle the following codes: UPC A / UPC-E, EAN 13 / EAN 8, Code 39 (length 5-32), “Olivetti PR4 SL” Slip Printer, “Epson TM 290/295”, “Star SP 298”, “Olivetti PRT100 Marker”, Drawer, Management data acquisition/processing devices. -
Page 20: Connecting An External Printer (Optional)
CONNECTING AN EXTERNAL PRINTER (OPTIONAL) If you want to use an external printer purchased separately (such as an “Olivetti PR4 SL” or “Olivetti PRT100 Marker” model), ensure that the printer connector is of serial type. According to your model, connect the printer to the serial connector A. -
Page 21: Cash Register Main Components
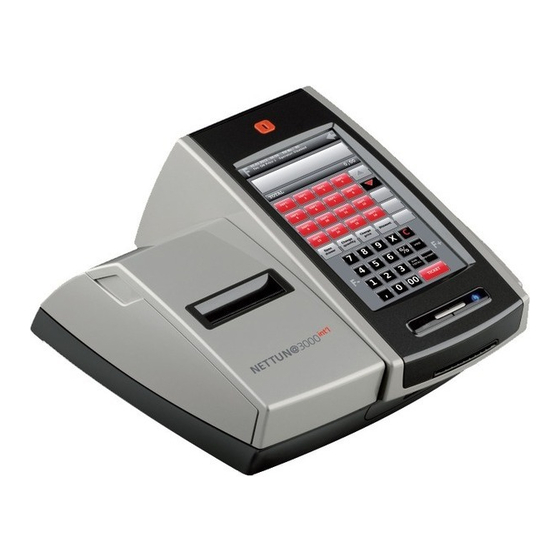
2. CASH REGISTER MAIN COMPONENTS MAIN COMPONENTS Touch screen ON button Ticket outfeed slot Chipcard housing Electronic journal slot USB connector (master) Paper feed button LCD alphanumeric customer display ON/OFF switch... -
Page 22: Connections
Customer display CONNECTIONS External power Serial Ethernet Serial supply DC IN interface 1 connector interface 2 USB connector USB connectors Connector connector (master) (master) for drawer (slave) -
Page 23: Using The Touch Screen
USING THE TOUCH SCREEN Using the touch screen you can interact with the cash register and use all its functionalities. 03.03.2012 18.10 Till No.: 1 Vch: ON Pr.list 1 Operator: Disabled TOTAL 7,50 Ref. Description Functions key: to access functions not available on the main screen. : to return to the previous screen page. - Page 24 Ref. Description Numeric keys from 0 to 9: used for entering amounts and codes. [X] key confirms the characters entered in the field reserved for the ticket total. [C] key: deletes erroneous data entered and can be used to recover from an error condition.
-
Page 25: Ticket Area On The Screen
TICKET AREA ON THE SCREEN The virtual ticket allows the operator to configure a ticket on the display prior to confirmation and printing. The list of articles on sale and all other information inserted on the ticket (alphanumeric description, VAT No. of the customer, etc.) can be shown on the display. -
Page 26: Using The Alphanumeric Keypad
USING THE ALPHANUMERIC KEYPAD 03.03.2012 18.10 Till No.: 1 03.03.2012 18.10 Till No.: 1 Vch: ON Pr.list 1 Operator: Disabled Vch: ON Pr.list 1 Operator: Disabled Rif. Descrizione Sensitive field activated by touching the screen area delimited by the rectangle. Symbol keys. -
Page 27: Entering Special Characters
ENTERING SPECIAL CHARACTERS Press the [Symb. lock] key to select a keyboard layout in which special characters are displayed. 03.03.2012 18.10 Till No.: 1 03.03.2012 18.10 Till No.: 1 Vch: ON Pr.list 1 Operator: Disabled Vch: ON Pr.list 1 Operator: Disabled Press the [Caps Lock] key to select a keyboard with upper/lowercase letters, as on standard keyboards. -
Page 28: Customising The Cash Register
CUSTOMISING THE CASH REGISTER The user interface of the cash register can be fully customised and adapted to meet customer requirements. 03.03.2012 18.10 Till No.: 1 Vch: ON Pr.list 1 Operator: Disabled 03.03.2012 18.10 Till No.: 1 Vch: ON Pr.list 1 Operator: Disabled TOTAL 0,00 TOTAL... - Page 29 A dedicated environment, called “SET setup”, is provided for programming and therefore configuring the cash register. The register is programmed using the numeric keypad. The SET command is simple and intuitive to use. A 3-digit code is associated with each function. When you enter this code into the SET field and confirm using the key, a list of the alternatives is displayed and you can change the programming.
-
Page 30: Selecting The Language
SELECTING THE LANGUAGE To select the language for the interface, proceed as follows: 1. Select [F] > GENERAL FUNCTIONS environment, by pressing [Config] > [Set setup]. The following screen appears: 03.03.2012 18.10 Till No.: 1 Vch: ON Pr.list 1 Operator: Disabled 2. -
Page 31: Setting The Date And Time
SETTING THE DATE AND TIME To set the date and time, proceed as follows: 1. Select [F] > GENERAL FUNCTIONS environment, by pressing [Config] > [Set setup] keys. The following screen appears: 03.03.2012 18.10 Till No.: 1 Vch: ON Pr.list 1 Operator: Disabled 2. -
Page 32: Configuring The Machine
CONFIGURING THE MACHINE This function can be accessed from the [F] > GENERAL FUNCTIONS environment, by pressing [Config] > [Machine Configuration] keys. 03.03.2012 18.10 Till No.: 1 Vch: ON Pr.list 1 Operator: Disabled 2-12... -
Page 33: Application Type
APPLICATION TYPE In this environment, you can select the type of application you want to use: Retail (Default) Catering (For more information, refer to the chapter “Catering Environment – Table Operations”). 03.03.2012 18.10 Till No.: 1 03.03.2012 18.10 Till No.: 1 Vch: ON Pr.list 1 Operator: Disabled Vch: ON Pr.list 1 Operator: Disabled Counterauto... -
Page 34: Keypad Use Mode
KEYPAD USE MODE In the Sales screen, the keypad area related to sales items (Dept/PLU keys) can be programmed for either Dept/PLU or Generic mode. After programming, PLUs and Departments that can be used in sales operations are displayed in the main Sales screen. Programming consists of creating links to the DEPT keys in the main screen: •... -
Page 35: User Interface Configuration
USER INTERFACE CONFIGURATION This function can be accessed from the [F] > GENERAL FUNCTIONS environment, by pressing [Config] > [User Interface Configuration] keys. 03.03.2012 18.10 Till No.: 1 Vch: ON Pr.list 1 Operator: Disabled SELECTION THEMES In this environment, you can select the colours of the interface displayed on the touch screen, choosing these from those available. -
Page 36: Touch Screen Calibration
TOUCH SCREEN CALIBRATION With this selection, the background of the screen becomes black and a guided procedure highlighted by a cross-shaped pointer is activated; follow the instructions provide on the screen to complete the procedure correctly. When this key is selected, the procedure for calibrating the touch screen is displayed. -
Page 37: Keypad Use Config
KEYPAD USE CONFIG In this environment, it is possible to program the keypad and keys displayed on the touch screen. According to whether the Generic or PLU/Dept keypad has been selected in the “Keypad use mode” environment, pressing the [F] > GENERAL FUNCTIONS environment, on pressing [Config] >... -
Page 38: Function Keys Programming
FUNCTION KEYS PROGRAMMING From this environment you can change the functions – preconfigured in the factory – associated with each key in the main Sales screen. Select the key you want from those available (1), then select the new function to associate with it by touching one of the items listed in the area under the programmable keys (2) and press CONFIRM button. -
Page 39: Set Setup
SET SETUP This function can be accessed from the [F] > GENERAL FUNCTIONS environment, by pressing [Config] > [Set setup] keys. 03.03.2012 18.10 Till No.: 1 Vch: ON Pr.list 1 Operator: Disabled For this environment, you must use the numeric programming codes displayed by pressing the [Sets List] key. -
Page 40: Sets List
SETS LIST Using this key, you can display a list of all programmable functions on the cash register, and the code to be attributed in the SET environment to enable the function. 03.03.2012 18.10 Till No.: 1 Vch: ON Pr.list 1 Operator: Disabled 2-20... -
Page 41: Operator Management
OPERATOR MANAGEMENT The cash register can handle different operators using the machine on the basis of workshifts. Operator management can follow one of the following schemes: • Cashier-only operation: at the start of every ticket entry of the cashier or supervisor is required. - Page 42 1. Using the numeric keyboard, enter the code .3. .7. .0. followed by 2. 0 = Disabled (default setting) 1 followed by = for cashiers 2 followed by = for waiters 3 followed by = for waiters/cashiers (mixed) 3. Enable or disable shift closure report printing 0 followed by = to disable 1 followed by...
-
Page 43: Selecting Operators
SELECTING OPERATORS The screen shows the list of operators saved on the cash register together with their operator status. A scroll bar is provided allowing you to scroll through the list of operators programmed. Note: If the (*) character is present it indicates that a personal code is programmed for the user. - Page 45 3. THE SALES ENVIRONMENT (MAIN ENVIRONMENT) The Sales environment is organised as shown here: 03.03.2012 18.10 Till No.: 1 03.03.2012 18.10 Till No.: 1 Vch: ON Pr.list 1 Operator: Disabled Vch: ON Pr.list 1 Operator: Disabled 03.03.2012 18.10 Till No.: 1 Vch: ON Pr.list 1 Operator: Disabled TOTAL TOTAL...
- Page 46 This environment activated on the cash register on powering on allows you to perform sales transactions with the items purchased shown in the ticket displayed on the screen. The sale is closed and related ticket printed when payment is tendered using one of the supported methods.
-
Page 47: Sales Functions (Main Environment)
SALES FUNCTIONS (MAIN ENVIRONMENT) 03.03.2012 18.10 Till No.: 1 Vch: ON Pr.list 1 Operator: Disabled TOTAL 0,00 Description Displays a screen with the FUNCTIONS that are available but not F (Functions) displayed in the main Sales screen. Open drawer Open the drawer. Allows you to change the quantity associated with an item selected in the ticket on the screen: Select the item in the ticket on the screen. - Page 48 Description Allows you to apply a discount to the price of the item selected in the ticket on the screen. Different modes are possible, for example: - To perform an absolute discount of €5 on the item selected: Select the item in the ticket on the screen (if it is not the last item). Press the key [5] on the numeric keypad.
-
Page 49: Using The Main Sales Environment
USING THE MAIN SALES ENVIRONMENT Sales are effected by selecting the items associated with the keys (DEPT/PLU), according to the keypad mode (Generic or Dept/PLU) selected and subsequently programmed. In Dept/PLU programming mode, you can choose: • Sale by department In the case of a sale by department, the key is programmed and associated with a single item and can be used directly to perform the sales transactions. -
Page 50: Payment Methods
PAYMENT METHODS This function can be selected from the main environment using the [Payment] key, and displays the permitted methods for payment. The main environment is organised as shown in this figure: 03.03.2012 18.10 Till No.: 1 Vch: ON Pr.list 1 Operator: Disabled TOTAL 0,00 0,00... -
Page 51: Payments
PAYMENTS When you select one of the payment methods, other types of payment associated with it are also displayed. The amount paid is entered on the numeric keypad followed by the type of payment chosen. If change is due or an amount remains still to be paid, the amount is displayed. -
Page 52: Currencies
CURRENCIES The cash register can be programmed to handle payment in a foreign currency. When you select [Currencies], a screen is displayed listing the various currencies programmed. 03.03.2012 18.10 Till No.: 1 Vch: ON Pr.list 1 Operator: Disabled TOTAL 0,00 To perform a payment with a foreign currency: •... -
Page 53: Credit
CREDIT For the CREDIT payment type, a ticket can be issued without collection of the related amount due (VAT is payable the moment the goods sold are transferred). The amount of the sale increments the totaliser related to “credits”. 03.03.2012 18.10 Till No.: 1 Vch: ON Pr.list 1 Operator: Disabled TOTAL... -
Page 54: Voucher - Luncheon
VOUCHER - LUNCHEON If the amount due is higher than the voucher value, the difference can be settled using one of the other forms of payment available on the cash register, and will be recorded in its own totaliser. The cash register is able to handle up to a maximum of 15 companies, with 16 denominations for each company. - Page 55 Alternatively, if programmed in SET 304 function: 03.03.2012 18.10 Till No.: 1 Vch: ON Pr.list 1 Operator: Disabled TOTAL 0,00 • Perform the sales operations. • Select [Payment]. • Select [Vouchers] • A list of keys is displayed with the list of companies saved. •...
-
Page 56: Chipcard Payments And Operations
CHIPCARD PAYMENTS AND OPERATIONS The chipcard is used for management-type functions. Once a chipcard is formatted, and programmed with the information required for its use and identification of the customer, it can be used as an: − Electronic Wallet to record deposits and withdrawals, and to make payments during a sale. -
Page 57: Displaying The Contents Of The Chipcard
To make a payment with a chipcard: • Insert the chipcard. • Perform the sales operations. • Select [Credit]. • Select the [CHIPCARD] payment type. • The chipcard details with its contents are displayed. • Select [Yes] to enable this type of payment. •... -
Page 58: Chipcard Withdrawals
CHIPCARD WITHDRAWALS This function allows you to make a withdrawal from the till registering the amount on the chipcard inserted in the cash register. The debit level is controlled by means of the maximum credit limit programmed. To make withdrawals from the chipcard: •... -
Page 59: Retail Environment - Plu/Departments
4. RETAIL ENVIRONMENT – PLU/DEPARTMENTS This environment is recommended for the sale of items programmed as DEPARTMENT/PLU. To set up the cash register for using PLUs/Departments, select [F] > GENERAL FUNCTIONS environment > [Config] > [Machine Configuration]. In this window, select [Retail] (for Application Type) and then [Dept/PLU] (for Keypad Programming). -
Page 60: Selling Items Belonging To A Department
SELLING ITEMS BELONGING TO A DEPARTMENT For sales of an item belonging to a department, an item (PLU) must be linked to the department. The item can then be accessed after selecting first the department. Note: If more than 15 PLUs are programmed, the remainder are displayed in the following pages viewable using the keys: [Previous] and [Next]. - Page 61 LINK PROGRAMMING Program the link of the Departments (PLU) to a TO KEY key on the Sales keyboard. Select the “PLU Management” Select the department you require by touching it in the “Dept List” (such as CAFETERIA). Select the PLU you require by touching it in the “Item List”...
-
Page 62: Programming Vat Rates - Code 308
PROGRAMMING VAT RATES - CODE 308 PROGRAMMABLE PARAMETERS For each VAT rate a number of parameters can be programmed, as indicated in the following table: FUNCTION PROGRAMMABLE FIELDS FACTORY SETTING Rate description Max. 29 characters, alphanumeric VAT_1 Rate value (as 4 figures max. -
Page 63: Programming Departments - Code 401
PROGRAMMING DEPARTMENTS - CODE 401 Programmable Parameters For each department a number of parameters can be programmed, as indicated below: FUNCTION PROGRAMMABLE FIELDS IMP. OF FAB. Department description Max. 29 characters, alphanumeric DEPT_nn Sale Price for Price list 1 Max. 8 figures (6+2 dec.) 0,00 Sale Price for Price list 2 Max. - Page 64 FUNCTION RESULT Enable Discount If enabled, discount operations can be performed for the department Enable Goods Refund ** If enabled, goods refund operations can be performed for the department If enabled, the sales ticket can be closed by pressing a department Enable Single item key (if it is the first operation for the ticket).
-
Page 65: Programming An Item (Plu) - Code 802
PROGRAMMING AN ITEM (PLU) – CODE 802 Operating Procedure .8. .0. 2. .X. When using a barcode reader, pass the optical reader over the barcode of the item so that it is read. The code is displayed on the operator display and an acoustic signal is emitted indicating that reading has terminated. -
Page 66: Associating Programming To A Key
ASSOCIATING PROGRAMMING TO A KEY To access this environment, from the main Sales screen, select the key [F] (Functions) > GENERAL CONFIGURATION environment > [Config] > [User Interface configuration]> Depts/PLU Config. After the selection is made, a window appears on the screen that allows you to assign a PLU to a key (in the window below some PLUs have already been programmed onto some keys). -
Page 67: Plu Details
Operating Procedure Select the department you want by touching it in the “Dept List” (for example, CAFETERIA). Select the PLU you want by touching it in the “Item List” (for example, COFFEE). Create the link, touching the key required from the 15 keys present in the window. -
Page 68: Change Plu Details
CHANGE PLU DETAILS You can access this environment when the PLU Details window is displayed on the screen by pressing the [Modify item] key. In this environment you can modify only the fields Description, Price 1, 2, 3 and 4 by touching the field of interest. -
Page 69: Retail Environment - Generic Mode
5. RETAIL ENVIRONMENT – GENERIC MODE This environment is recommended for non-specific use of the cash register in that you can reprogram the main window to meet your own personal needs. All the functions and programming of DEPARTMENT/PLU environment are still available in Generic mode (for more information on the Retail –... -
Page 70: How To Associate And Customise Keys
Description Lists the departments and, if present, the items linked with the PLU_BCR department, to associate them with a key. Lists the departments available that can be associated with a Depts key. Lists the functions available that can be associated with a Functions key. - Page 71 2. Select the key to associate with it and select the page, if necessary using (previous page) and (next page) keys: = Depts: in the “Item list” column the departments are displayed. = Functions: in the “Functions” column the functions are displayed. = Paymt: in the “Payment Types”...
- Page 72 3. You can customise the dimensions of the key by selecting the key that displays: 03.03.2012 18.10 Till No.: 1 Vch: ON Pr.list 1 Operator: Disabled 4. Select one of the colours available. If required, you can use the keys on the left to select double size for the key (width and/or height).
-
Page 73: Deleting The Association To A Key
5. Exit from the environment using the key. The configuration with the keys you have created is shown on the display. 03.03.2012 18.10 Till No.: 1 Vch: ON Pr.list 1 Operator: Disabled DELETING THE ASSOCIATION TO A KEY With reference to the previous window: Select the [Delete assignment] key. -
Page 75: Catering Environment - Table Operations
6. CATERING ENVIRONMENT – TABLE OPERATIONS This environment is recommended when the cash register is to be used in a catering environment. To set up the cash register for use in a catering environment, select [F] (Functions) > GENERAL FUNCTIONS environment > [Config] > [Machine Configuration]. -
Page 76: Key Description
KEY DESCRIPTION Description Activates the main Sales screen and allows sales transactions to be Counter not attributed to a table if one is selected. When the ticket is closed, , returns auto to the Table screen. Activates the main Sales screen and allows sales transactions to be Counter auto attributed to a table if one is selected. -
Page 77: Table Management Functions - Move Table
TABLE MANAGEMENT FUNCTIONS - MOVE TABLE This function allows you to select the table for which you want to make movements. 03.03.2012 18.10 Till No.: 1 Vch: ON Pr.list 1 Operator: Disabled Counterauto Description Closes the window, moves the table and returns to the Functions window. - Page 78 This function moves all or some transactions charged to one table to another table. 03.03.2012 18.10 Till No.: 1 Vch: ON Pr.list 1 Operator: Disabled Counterauto Description Allows the transactions charged to a table to be selected and moved to another table. Select an item MOVE Select the transaction you require.
-
Page 79: Functions Related To Table Management - Sharing Division
FUNCTIONS RELATED TO TABLE MANAGEMENT - SHARING DIVISION This function allows you to move the items attributed to a table to a separate account. 03.03.2012 18.10 Till No.: 1 Vch: ON Pr.list 1 Operator: Disabled Counterauto Description Allows transactions charged to a table to be selected and moved to a separate account. -
Page 80: Recall Separate Account
RECALL SEPARATE ACCOUNT To recall the account separated previously with the Move function; once separation has been confirmed, the separate account is opened automatically. To recall this, press [F] (Functions) > OPS. ON TABLE and select [Share account]; at this point, the open account is shown in the sales screen page and the operations required can be carried out. -
Page 81: Functions
7. FUNCTIONS From the main Sales environment, using the F (Functions) key, you can access the Functions environment from which you can perform operations on the current ticket such as “ACCOUNT FUNCTIONS” and “ACCOUNT CLOSURE”, or on the register such as “TILL STATUS”, “ECR FUNCTIONS”, “GENERAL FUNCTIONS”, or otherwise carry out ”OPS. -
Page 82: Till Status
TILL STATUS Description Activates the “Deposit” screen from which you can perform a deposit Deposit operation using one of the payment methods available. Activates the “Withdrawal” screen from which you can perform a Withdrawal withdrawal operation using one of the payment methods available. The total amount present in the till is displayed in the area reserved for the Display Till Tot. - Page 83 Description You can apply an increase to the price of an item that is selected in the ticket on the screen. Different methods are possible, for example: To apply an absolute increase of 5 to the selected item: Select the item in the ticket on the screen (if it is not the last item). Press the key [5] on the numeric keypad.
-
Page 84: Ecr Functions
Description Allows you to separate the figures in an amount for that of a PLU from that of a DEPT. Separation The “I” character is displayed in the area dedicated to displaying the total of a sale. Change Allows you to change the price of the item selected in the ticket on the screen. Price Change Allows you to change the quantity of the item selected in the ticket on the... -
Page 85: Account Closer
ACCOUNT CLOSER Description With a single operation cancels all the transactions entered up to that Void Ticket moment in the ticket shown on the screen. When printed, an appendix is provided with the ticket divided according to the various groups programmed. Multiple Ticket In the main screen, a message is displayed advising that the current ticket is a Multiple Ticket. -
Page 87: Programming
8. PROGRAMMING The cash register can be programmed from the Programming environment accessible from the main Sales screen by selecting [F] (Functions)> GENERAL FUNCTIONS environment followed by the [Config] > [Set setup] key. 03.03.2012 18.10 Till No.: 1 Vch: ON Pr.list 1 Operator: Disabled set the related parameter as described in the perform programming following pages. -
Page 88: Error Messages
confirm the settings made and press Total return to the start of the SET mode press cancel an error message when programming a department Press .Subtotal. field, skip to the next department to program the same field When programming sales prices, the decimal separator is inserted automatically when you enter amounts consisting of whole figures. -
Page 89: Programming List
PROGRAMMING LIST With the [Set List] key, you can display a list of all the functions available on the register for programming, and the code to use for enabling the function. 03.03.2012 18.10 Till No.: 1 Vch: ON Pr.list 1 Operator: Disabled Note: The programming functions that can be used by the user are listed below. - Page 90 Programming Type Format machine data Display till total amount Set machine date and time Change automat. date & time Reset register GT Activate obligatory invoice heading for invoice Language selection Rounding type selection Training mode Print Series 200 options list Set up merchandise icons Set up point icons Set up public holiday icons...
- Page 91 Programming Type Select rapid update mode Enable single item sales Set header lines for invoice Set Simplified Invoice parameters Set WEEE generic message descriptors Set WEEE message value descriptors Set proforma receipt message Save database data and def. settings Restore database data and def. settings Reset BCR PLU data Save database data, def.
- Page 92 Programming Type Dealer chipcard code management Wallet chipcard code management Chipcard pnts management Print Series 400 options list Set information for each department Print information of all EJ used by machine Print ticket selected by number Print tickets of a given date Print tickets comprised between two numbers Print tickets comprised between two dates Full printing of EJ...
- Page 93 Select DB update mode Set Slip Printer information Calibrate Slip Printer module For more detailed information on the functions provided by the SET commands, a Programming manual is provided on the Olivetti site (www.olivetti.com) that provides detailed information on programming the settings.
-
Page 94: Abr Management (Customer-Completed Personal Details)
ABR MANAGEMENT (CUSTOMER-COMPLETED PERSONAL DETAILS) When issuing an Invoice, pressing the [Temporary Customer] key executes an ABR function that allows customer details to be entered for an invoice. These details can be filled in either by the customer or by the operator. To issue an invoice with ABR: •... -
Page 95: Printing Daily And Periodic Reports
PRINTING DAILY AND PERIODIC REPORTS These functions can be accessed by pressing the [Reports] key in the [F] (Functions) > ECR JOURNAL environment. From the screen that appears, shown below, you can print a report by selecting it on the touch screen. Printing of the report starts when the key is pressed. - Page 96 Item Description Report WITHOUT Selection tabs for printing reports WITH zeroing or WITHOUT zeroing / Reports ZEROING. WITH zeroing tab The following types of report can be printed: Departments, Management, Till operations, Currencies, BCR PLUs, Slip Printer Periodic1 / Daily key Documents, Operators, Luncheon voucher, Customer account, Customer account movements, Sales per hour.
-
Page 97: Set 315 - X Mode Automatic Report Management Set 316 - Z Mode Automatic Report Management
SET 315 – X MODE AUTOMATIC REPORT MANAGEMENT SET 316 – Z MODE AUTOMATIC REPORT MANAGEMENT This function is used to program automatic printing of a number of reports. This means that with a single operation you can print all the reports programmed at the same time. - Page 98 The following table indicates the reports that can be printed automatically and their execution codes: REPORT Execution codes Execution codes Report in X MODE (SET315) in Z MODE (SET316) SET 328 = 0 screen key Daily Periodic Daily Periodic SET 328 = 1 Periodic1 Periodic2 Periodic1...
-
Page 99: Set 328 - Select Rapid Update Mode
The following table indicates the ticket header for each report: Report Printing Ticket Header Screen Key Name Depts. DEPT. REPORT “Z” PERIODIC 1 /PERIODIC 2 Management MANAGEMENT REPORT “Z” PERIODIC 1/ PERIODIC 2 Till operations TILL MOVEMENTS “Z” PERIODIC 1 /PERIODIC 2 Sales per hour HOURLY REPORT “Z”... -
Page 100: Vchr On/Off (Ticket On/Off)
VCHR ON/OFF (TICKET ON/OFF) The ticket printing function is enabled on the cash register with the status indicated on the display by the message “Vch: ON”. A ticket is printed automatically when a sales transaction is terminated by pressing the TICKET key. 03.03.2012 18.10 Till No.: 1 Vch: ON Pr.list 1 Operator: Disabled... -
Page 101: Disabling Ticket Printing
3. . Select to finish key association operations and return to the main sales environment. 03.03.2012 18.10 Till No.: 1 Vch : ON Price 1 Operator: Disabled TOTAL 7,50 Vchr On/Off Vchr On/Off 4. The new “Vchr On/Off” key is now available in the main sales environment. DISABLING TICKET PRINTING To disable the automatic ticket printing function, press the Vchr On/Off key that appears in the main sales screen. -
Page 103: Saving/Restoring Data On Usb Pen
9. SAVING/RESTORING DATA ON USB PEN Data can be saved and restored using specific SET options allowing the user to conserve the information registered on the cash register. Data is saved on a USB pen that must be inserted into the port at the front of the cash register. SAVING/RESTORING CASH REGISTER PROGRAMMING These procedures are performed using the options: •... -
Page 104: Saving The Cash Register Programming - Code 345
SAVING THE CASH REGISTER PROGRAMMING – CODE 345 Code 345 can be used to save the following types of data on the pen: all cash register programming data (configuration setup), the database descriptive part, accounting data used by the cash register for generating Management reports. Operating Procedure Insert the USB pen into the cash register. - Page 105 The files present on the pen, organised as described above (DBxxxxxDesc.csv, DBxxxxxField.csv, DBxxxxxStruct.txt) have the following structure: File name Description Department Department database DiscountMarkUp Discount and markup tables Group Merchandise groups Hourly Hourly sales InternalClientAccount Customer accounts InternalPlu PLUs accessed by number (1-250) Operator Operators...
-
Page 106: Restoring The Cash Register Programming - Code 346
RESTORING THE CASH REGISTER PROGRAMMING – CODE 346 The SET 346 option restores the following types of information to the cash register: • descriptive part (all data saved by the user excluding accounting data) of all the databases present on the cash register •... -
Page 107: Saving The User Configuration (Database) Of The Cash Register - Code 348
SAVING THE USER CONFIGURATION (DATABASE) OF THE CASH REGISTER – CODE 348 Code 348 saves the user configuration (DATABASE) of the cash register. Operating Procedure Insert the USB pen into the cash register. Note: If you try to save the data without first inserting the pen, an error is displayed: “STICK NOT INSERTED”. -
Page 108: Restoring The User Configuration (Database) Of The Cash Register - Code 349
RESTORING THE USER CONFIGURATION (DATABASE) OF THE CASH REGISTER – CODE 349 Option SET 349 restores the user configuration (DATABASE) of the cash register. Preliminary Operations Data archival on the USB pen performed using the option SET 348 saves the data in a file “<cashregisterid>-database.tar”... -
Page 109: Making A Security (Backup) Copy Of The Cash Register
MAKING A SECURITY (BACKUP) COPY OF THE CASH REGISTER ON A USB PEN – CODE 350 Code 350 makes a security, backup, copy of the cash register. Operating Procedure Insert the USB pen into the cash register. Note: If you try saving the data without first inserting the pen, an error is displayed: “STICK NOT INSERTED”. -
Page 110: Restoring A Security (Backup) Copy Of Cash Register From A Usb Pen - Code 351
RESTORING A SECURITY (BACKUP) COPY OF CASH REGISTER FROM A USB PEN – CODE 351 Code 351 restores a backup copy of the cash register that was previously saved. Preliminary Operations Data archival on the USB pen executed with the option SET 350 is saved in a file “<daymonthyear-cashregisterid>-backup.tar”... -
Page 111: 10. The Electronic Journal
10. THE ELECTRONIC JOURNAL The Electronic Journal is an SD-type memory card housed in a special bay inside the cash register, as shown in the figure. The electronic journal stores information related to sales operations and daily closure data. Electronic Journal For the cash register to be operational, the memory card must be inserted inside. -
Page 112: Initialising The Electronic Journal
INITIALISING THE ELECTRONIC JOURNAL Before the electronic journal (EJ) can be used, it must first be initialised. 1. When the cash register is powered on after inserting a new (or deleted) EJ, it executes automatically an initialisation procedure, displaying the message below on the touch screen: JOURNAL NOT INIT’D. -
Page 113: Ej Label
EJ LABEL To make archival of the EJ memory cards easier, a label is provided that the user can fill in with the related data. To enter the data, proceed as follows: 1. Power off the cash register and disconnect it from the 220V electrical supply. Wait for approximately 20 seconds. - Page 114 4. Insert the SD card into the slot (2) so that it clicks into place. Close the hatch. 5. Insert the power plug into the 220V electrical socket, and power on the cash register using the On/Off key. 10-4...
-
Page 115: Replacing The Ej
Wait for about 20 seconds. WARNING: SD memory cards commonly found on the market cannot be used in the cash register, but only cards supplied specifically by Olivetti Authorised Centres. 2. Open the hatch (1) and push the card inwards to eject it (2). -
Page 116: Printing The Ej Information - Code 460
PRINTING THE EJ INFORMATION - CODE 460 This function can be used to print the EJ identification data. To print the information, proceed as follows: 1. Press [Config] in the [F] (Function) > GENERAL FUNCTION environment > [Set setup] : The following screen appears: 03.03.2012 18.10 Till No.: 1... -
Page 117: Deleting The Ej - Code 459
DELETING THE EJ – CODE 459 To be able to reuse an SD-type memory device on which an electronic journal has previously been registered, first of all its contents must be deleted and then the card must be initialised. In order to start the deletion procedure, an SD-type memory device that has already been used must be loaded inside the cash register;... - Page 118 6. Close the door again. The cash register restarts automatically. Note: you may be asked to print (Z10) reports before proceeding with the deletion operation. Print the report and then proceed with the procedure. For more information consult the chapter “Printing Reports”. 7.
-
Page 119: 11. Technical Specifications
1 Ethernet RJ 45 network port • 4 USB – Master (2.0) • 1 USB - Slave (2.0) • 1 RJ12 port for the Olivetti DRW410 drawer CARD Front access smartcard reader INTEGRATED THERMAL PRINTER • Speed (lines/sec.) 100 mm/sec •... -
Page 120: External Power Unit
EXTERNAL POWER UNIT • External power unit: 24 Volt +/- 3%, 3 A. ELECTRICAL DATA • Power supply: 100 – 240 Volt , 1,8 A - 50-60 Hz • Average power absorbed: 8 W POWER SUPPLY DATA • Power supply technology External power supply: 24 Volt +/- 3%, 3 A Furnished by F10722-A model external power unit (included in packaging) AMBIENT CHARACTERISTICS... -
Page 121: Ticket, Report And Ej Printing Examples
A. TICKET, REPORT AND EJ PRINTING EXAMPLES TICKET TYPES Using the option SET 324 you can select the type of ticket you require. The options available are: 0 (No VAT Info) 2 (VAT DETAILS) Default setting 1 (VAT INFO) 3 (TAXBL. AND VAT DETAILS) -
Page 122: Department Report
DEPARTMENT REPORT Number of sales for Price list 1 of Dept 1 Dept number and descriptor Sales total for Price list 1 of Dept 1. Discount and markup totals are provided Number in stock Number of discounts for Dept 1 Discount total for Dept 1 Number of markups for Dept 1 Markup total for Dept 1... -
Page 123: Plu Report
PLU REPORT PLU descriptor Number of items Quantity of items sold for PLU_1 remaining in stock in Price List 1 Sales total for PLU_1 in Price List 11 Sales total for all PLUs MANAGEMENT REPORT Sales totals for period broken down by VAT rate. -
Page 124: Cash Register Movements Report
CASH REGISTER MOVEMENTS REPORT Number of payments and totals broken down by payment type, with sales total Sales total Details of PAID IN operations Details of WITHDRAWAL operations Cash register position... -
Page 125: Sales Hourly Report
SALES HOURLY REPORT Time period with number of sales made Total sales over time period CURRENCY REPORT Local currency* description Currency descriptor Number of sales in foreign currencies Sales total in foreign currency Sales total in Euro GBP or Euro... -
Page 126: Operator Report
OPERATOR REPORT Payment details Paid in details Withdrawal details Cash till position broken down by payment types Details of operations performed... -
Page 127: Customer Account Report
CUSTOMER ACCOUNT REPORT... -
Page 128: Daily Closure Report
DAILY CLOSURE REPORT Number of this ticket Date and time report issued Total amount for sales operations related to Tickets Total amount for sales operations related to invoices Total number of discounts Total number of markups Total number of returns Total number of corrections Amounts by document type... -
Page 129: Tax Extraction Report
TAX EXTRACTION REPORT Data relating to tickets issued, broken down by VAT rate Ticket totals Data relating to invoices issued, broken down by VAT rate with totals Grand total (tickets + invoices) -
Page 130: Ej Printout
EJ PRINTOUT EXAMPLE PRINTOUT FOR ALL TICKETS ISSUED ON 06-11-2012 (CLOSURE NO. 1) Name of report re quested EJ i dentification data Printout of data Verifica tion Type: requested - A uthenticity - Integrity P rintout of data requested Coding characters Outcome of verification corresponding to data operation... -
Page 131: Ej Id Data Printout
EJ ID DATA PRINTOUT Number of management ticket Cash register serial number Amount of space still available on EJ Initialisation date Number of EJ read reports printed Date of last registration A-11... - Page 132 The crossed dustbin symbol on the device means that: - When it to be disposed of, the device is to be taken to the equipped waste collection centres and is to be handled separately from urban waste; - Olivetti guarantees the activation of the treatment, collection, recycling disposal...
- Page 133 77702 Printed in China...
Need help?
Do you have a question about the Nettun@3000 and is the answer not in the manual?
Questions and answers