Table of Contents
Advertisement
Quick Links
Download this manual
See also:
Installation Manual
Advertisement
Table of Contents

Related Manuals for Audiovox AVXMTG13UHD


Summary of Contents for Audiovox AVXMTG13UHD
- Page 1 13.3 -Inch LED Backlit LCD Roof-Mount DVD Player With DVD/CD/MP /HDMI/MHL AVXMTG13UHD OPERATION MANUAL ®...
-
Page 2: Table Of Contents
TABLE OF CONTENTS Important Notices �����������������������������������������������������������������������������������������������������������������������������������������������������������������������������������������������������������������������������3 Congratulations ���������������������������������������������������������������������������������������������������������������������������������������������������������������������������������������������������������������������������������4 Features ������������������������������������������������������������������������������������������������������������������������������������������������������������������������������������������������������������������������������������������������4 IR Transmit and Receive Modes (M1 or M2) �����������������������������������������������������������������������������������������������������������������������������������������������������������������������������5 Controls and Indicators Diagram �������������������������������������������������������������������������������������������������������������������������������������������������������������������������������������������������6 Remote Control Operation ������������������������������������������������������������������������������������������������������������������������������������������������������������������������������������������������������������8 DVD Basics ���������������������������������������������������������������������������������������������������������������������������������������������������������������������������������������������������������������������������������������� 12 Loading and Playing Discs ���������������������������������������������������������������������������������������������������������������������������������������������������������������������������������������������������������� 14 Settings and Adjustments (Use Remote Control for setting and adjusting) ������������������������������������������������������������������������������������������������������������ 14 Playing JPEG Files ���������������������������������������������������������������������������������������������������������������������������������������������������������������������������������������������������������������������������... -
Page 3: Important Notices
System adjustments can be accomplished using the remote control, while seat belts remain fastened� Enjoy your AUDIOVOX entertainment system but remember that the safety of all passengers remains the number one priority�... -
Page 4: Congratulations
CONGRATULATIONS Congratulations on your purchase of the AUDIOVOX AVXMTG13UHD DVD player with Drop-Down Video/Monitor� The AVXMTG13UHD player has been designed to give you and your family many years of video entertainment in the mobile environment� Please read the directions that follow in order to familiarize yourself with the product to ensure that you obtain the best results from your equipment�... -
Page 5: Ir Transmit And Receive Modes (M1 Or M2)
M1 mode� Conversely, a unit set to M1 mode will not work with a remote control programmed to the M2 mode� To change from M1 to M2 mode, point the remote control towards the IR receiver on the AVXMTG13UHD� Press and hold the M2 button for 5 to 7 seconds�... -
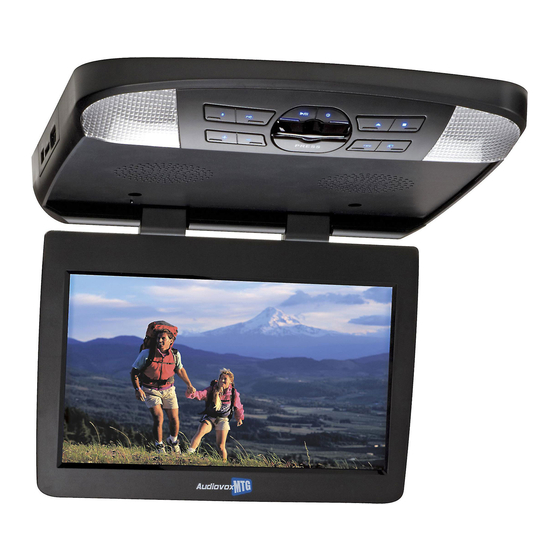
Page 6: Controls And Indicators Diagram
CONTROLS AND INDICATORS DIAGRAM Front View 1� Dome Lights - Provides additional interior illumination� 2� SOURCE (S) Button - Press to select the source menu (AV/DVD/HDMI/ 2 3 4 5 6 7 8 9 10 11 12 1 MHL/USB/CARD)� 3� VOLUME ( + ) Button - Press this button to increase the volume of wired headphones and increase the level of selected picture controls�... - Page 7 Side Views 1� DISC Indicator light - Illuminates Red when a disc is inserted� 2� DVD Disc insertion Slot - For loading and removing discs� Turn the unit on before loading a disc� Insert a disc with the label facing up towards the headliner�...
-
Page 8: Remote Control Operation
REMOTE CONTROL OPERATION Battery Installation Before attempting to operate the remote control, remove the protective pull tab at the bottom of the remote� Protective Pull Tab Clear Plastic Tab (1) Battery Holder (2) Battery Replacement 1� Depress the tab (1) and slide the battery holder (2) out in the direction of the arrow� 2�... - Page 9 Remote Control Functional Description 1� POWER ( ) Button - Press this button to turn the unit ON and OFF� 2� NUMBER Buttons - Press to enter the numbers 0 to 9 for selection of CD tracks, DVD chapters or password setting� POWER EJECT 3�...
- Page 10 Remote Control Functional Description 11� MUTE Button - Press this button to mute the audio� 12� DAY/NIGHT Button - This control toggles the unit between “DAY” and “NIGHT” LCD illumination modes� In the “DAY” mode, the LCD backlight intensity is at maximum� In the “NIGHT” mode, the LCD backlight is POWER EJECT dimmed to a preset level that is more suitable for low light operation�...
- Page 11 Remote Control Functional Description 21� STOP ( n ) Button - Press this button to stop playback� 22� SOURCE Button - Press to select the source menu (AV/DVD/HDMI/MHL/ USB/CARD)� POWER EJECT 23� SCAN FORWARD/RIGHT ( ) Button - Scan forward at 2, 4, 8, 16, and 32 times speed�...
-
Page 12: Dvd Basics
DVD BASICS To get the optimum use out of the DVD player, please read this section� DVD Region Code The DVD player is preset to a region code at the factory depending on where the unit is sold� DVDs are also coded by region� These region codes must match in order for the disc to play�... -
Page 13: Disc Compatibility
Types of Discs the System Will Play The system will play the following types of discs: • DVD disc - DVD discs that contain video� • Audio discs - Audio CDs that contain musical or sound content only� • MP3 discs - A disc that contains audio files (for example, a CD-R with downloaded MP3 files)� • Picture discs - A disc that contains JPEG picture files�... -
Page 14: Loading And Playing Discs
LOADING AND PLAyING DISCS 1� Press the Screen Release (PRESS) button to unlock the LCD screen� The LCD screen will drop down slightly� 2� Pivot the screen downward until a comfortable viewing angle is reached� The hinge friction will hold the screen in position while the unit is in use� 3�... - Page 15 General Setup Page Menu TV Display General Password Preference Exit This item allows the user to set the screen display format� ..General Setup Page.. General Wide Normal/PS Optional Settings: Normal/PS, Normal/LB, Wide Angle Mark Normal/LB The default setting is Wide� TV Type NTSC Wide...
- Page 16 General Setup Page Menu (continued) Screen Saver General Password Preference Exit This item allows the user to turn the screen saver on or off� ..General Setup Page.. General Wide Optional Settings: On, Off Angle Mark The default setting is On� TV Type NTSC OSD Lang...
- Page 17 Preference Page Menu Audio General Password Preference Exit This item allows the user to select an audio language for DVD playback� The audio language depends on the ..Preference Page.. Audio information available on each disc� Subtitle Optional Settings: English, French, Spanish, Italian� Disc Menu English Parental...
-
Page 18: Playing Jpeg Files
Preference Page Menu (continued) Default General Password Preference Exit This item allows the user to reset all settings to the original factory settings� Select this item and press the “OK” ..Preference Page.. Audio button� Subtitle Note: This function does not reset the Parental level to the original factory setting. Disc Menu Parental Default... -
Page 19: Playing Mp3 Files
CH. 12: 90�3 MHz CH. 16: 91�1 MHz 4� If the audio quality is not acceptable using the wireless FM modulator, the Audiovox FMDIRB will allow direct connection to the vehicle radio� Refer to the installation guide for details� 5� Tune the vehicle radio to the selected frequency�... -
Page 20: Source Features
SOURCE FEATURES 1� Press the “SOURCE” button on the unit or remote control� The following menu will appear on the screen: HDMI/MHL CARD 2� Press the " " or " " on the unit or the “ " or " ”... - Page 21 Applicable HDMI Feature • Input audio signal: 2 channel� • Input video signal: 480p, 576p, 720p, 1080i, and 1080p� Insert a USB device located on the side on the unit and play the content� Supported formats: MP3, JPEG, AVI, MPEG 1 and MPEG 2 Note: USB charging is only available in DVD mode�...
-
Page 22: Hdmi/Mhl And Usb Port Information
HDMI/MHL AND USB PORT INFORMATION HDMI/MHL (Input located on the side of the unit) HDMI devices **: Chromecast media streaming device: This input can be used for devices with HDMI or MHL output ports (such • www.google.com and search for Chromecast as smartphones, tablets, HDMI/MHL devices) and may require the purchase of an HDMI cable and HDMI adapter which is available from your device Roku HDMI streaming device: manufacturer�... -
Page 23: Troubleshooting
TROUBLESHOOTING Problem Solution IR remote is inoperative� 1� Verify that the batteries in the remote are fresh� 2� Verify that the infrared remote sensor is not obstructed� 3� Verify remote control mode (See page 5)� Disc will not play or wrong region is 1�... - Page 24 Problem Solution Picture is distorted� 1� The disc might be damaged, try another disc� 2� It is normal for some distortion to appear during forward or reverse scan� HDMI/MHL input not working for the 1� May require a special HDMI/MHL adapter� Contact your HDMI/MHL device supplier for adapter� HDMI/MHL enabled device�...
-
Page 25: Specifications
SPECIFICATIONS Type: TFT Active Matrix LCD Screen Resolution: 1280 x 3(RGB) x 800 Operation Temperature: 32 to 140 °F (0 to 60 °C) Storage Temperature: -4 to 158 °F (-20 to 70 °C) Backlight: Power Source: 12 VDC Video Display System: NTSC/PAL Headphone Audio Output: 5mw @ 32 ohms... -
Page 26: Notes
NOTES... - Page 27 12 MONTH LIMITED WARRANTy Applies to Movies To Go Mobile Video Products VOXX ELECTRONICS CORP� (the Company) warrants to the original retail purchaser of this product that should this product or any part thereof, under normal use and conditions, be proven defective in material or workmanship within 12 months from the date of original purchase, such defect(s) will be repaired or replaced with reconditioned product (at the Company's option) without charge for parts and repair labor�...
- Page 28 www.voxxelectronics.com © 2014 VOXX Electronics Corp.,150 Marcus Blvd. Hauppauge, NY 11788 128-9268...
Need help?
Do you have a question about the AVXMTG13UHD and is the answer not in the manual?
Questions and answers