Table of Contents
Advertisement
Advertisement
Table of Contents
Troubleshooting

Related Manuals for Lockwood Digital Deadbolt


Summary of Contents for Lockwood Digital Deadbolt
- Page 1 DIGItal DEaDbolt USER GUIDE Lockwood Digital Deadbolt...
-
Page 3: Table Of Contents
table of Contents Warnings _______________________________________________________________________________________________4 Introduction _____________________________________________________________________________________________4 Installation _______________________________________________________________________________________________ Components and Tools _________________________________________________________________________________5 Prepare Lock for Installation _____________________________________________________________________________6 Install Lock ___________________________________________________________________________________________7 Programming _____________________________________________________________________________________________ Programming Features-Menu Keys-Definitions _____________________________________________________________9 Components and Tools ________________________________________________________________________________10 Definitions __________________________________________________________________________________________10 Operation ___________________________________________________________________________________________11 Feature Programming Through Menu Mode Using Master PIN code ___________________________________________13 Miscellaneous Information __________________________________________________________________________________ Hardware Troubleshooting _____________________________________________________________________________14 Programming Troubleshooting __________________________________________________________________________15... -
Page 4: Warnings
IMPoRtant: The accuracy of the door preparation is critical for the proper functioning and security of this product. Misalignment can cause premature wear and a lessening of security. The Lockwood Digital Deadbolt should only be serviced by a qualified technician. -
Page 5: Installation
InStallatIon Components and tools Included in the box... • Installation & Programming Guide • Inside Mounting Plate • Strike Plate • Outside Escutcheon • Battery Cover • Screw Pack • 4 AA Alkaline Batteries • Keys • Plastic Gaskets • Inside Escutcheon •... -
Page 6: Prepare Lock For Installation
Prepare lock for installation Unpack the lock The lock is packed representative of how it will install on the door. Before installing the lock on the door: A. Inside escutcheon 1. Loosen the screw (Phillips #2) holding the battery cover. (The screw remains attached to battery cover) Battery Cover 2. -
Page 7: Install Lock
Install lock 1. Install bolt in door. notE: The bolt must be in a retracted (unlocked) position when installing the lockset. Attach with (2) M4 x 25.4mm screws supplied. (2) M4 x 25.4mm [8-32 x 1"] Flat Head Combination Screws 2. - Page 8 CaUtIon: Use care when assembling to ensure that the cable lies against the back recessed area of the inside escutcheon (Fig. 6A). Position and bend cable, using the harness clips as shown in Fig. 6A to prevent binding when installing the escutcheon over the mounting plate.
-
Page 9: Programming
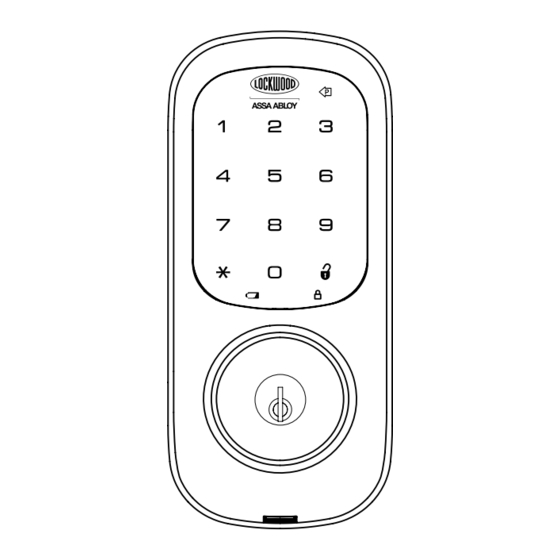
PRoGRaMMInG Programming Features-Menus-Keys-Definitions ________________________________________9 Operation ________________________________________________________________________11 Programming Features - Menus - Keys - Definitions outside Inside Phillips Head Screw P Key Touchscreen (Return to Previous) Battery Cover Numbers Alkaline Batteries Low Battery Indicator 4 AA Type Lockout Mode Status Indicator Cylinder Thumbturn Privacy Mode Button... -
Page 10: Components And Tools
Components and tools Low Battery Warning All Code Lockout Mode Return to previous step Definitions Master PIn Code: The Master PIN code is used for programming and for feature settings. It must be registered prior to programming the lock. The Master code will not operate (unlock/lock) the lock (Main menu selection #1). User PIn Code: The User code operates the lock. -
Page 11: Operation
operation Register Master PIn Code before Programming Step 1 Press the key to enter Master PIN Code Registration. Step 2 Press the key followed by the key. Step 3 Enter a unique 4-8 digit Master PIN code followed by the key. - Page 12 open Door with PIn Code Enter PIN code. Touch lock with back Press the key to of hand or fingers confirm the selection. to activate. Privacy Mode vs. all Code lockout Mode • All Code Lockout is a Menu feature (#6) that restricts Pin code access (except Master). •...
-
Page 13: Feature Programming Through Menu Mode Using Master Pin Code
Feature Programming through Menu Mode Using Master PIn code 1. Enter the 4-8 digit Master PIN code followed by the key. 2. Enter digit corresponding to the function to be performed followed by the key. Continue Complete Continue Features Complete •... -
Page 14: Hardware Troubleshooting
MISCEllanEoUS Hardware Troubleshooting _________________________________________________________14 Programming Troubleshooting ______________________________________________________15 Reset the Lock to Factory Default ____________________________________________________16 Pin Code Management Sample Sheet _________________________________________________17 How to Replace/Install Cylinder ______________________________________________________18 troubleshooting Hardware troubleshooting Cycle the lock in both the locked and the unlocked positions. If problems are found: Symptom Suggested action Door is binding... -
Page 15: Programming Troubleshooting
Programming troubleshooting Symptom Suggested action Lock does not respond - door is open and • Press each keypad button to see if they respond when pressed. accessible. • Check batteries are installed and oriented correctly in the battery case. • Check batteries are in good condition; replace batteries if discharged. •... -
Page 16: Reset Lock To Factory Default
to RESEt tHE loCK to FaCtoRy DEFaUlt, SEE tHE FolloWInG: Reset lock to Factory Default The following procedure returns the lock to its factory defaults by deleting all user codes (including the Master PIn code) and returning all programming features to their original default settings (see below). 1. -
Page 17: Pin Code Management Sample Sheet
Pin Code Management Sample Sheet PIn Code Management (up to 20 users) location: Door number: User type User name PIn Code User type User name PIn Code Master User 01 User 11 User 02 User 12 User 03 User 13 User 04 User 14 User 05... -
Page 18: Replace/Install Cylinder
How to Replace or Install Cylinder 1. Remove cylinder: A. Remove outside escutcheon from door. B. Remove rubber gasket. C. Remove two screws holding plastic guide in place D. Remove plastic guide. E. Remove screw with washer holding cylinder in place (visible after plastic guide is removed). - Page 20 Lockwood is the leading brand in the Australian locking industry. With an established reputation for high quality products, this iconic brand provides a wide range of locking solutions to residential housing, commercial building and industrial application markets.
Need help?
Do you have a question about the Digital Deadbolt and is the answer not in the manual?
Questions and answers
I ran out of battery for my Lockwood ASSA Abloy keyless entry . After changing batteries, I can't remember how to program it. I can't find my manual.
To program the Lockwood Digital Deadbolt after changing the batteries, follow these steps:
1. Insert Batteries – Install four alkaline batteries. The lock will respond with beeps and a quick flash of all keypad LEDs.
2. Register the Master PIN Code – Before programming features:
- Press the "1" key followed by the "*" key.
- Enter a unique Master PIN code.
Once the Master PIN is set, you can proceed with additional programming features through the menu mode using the Master PIN code.
This answer is automatically generated