Table of Contents
Advertisement
Advertisement
Table of Contents

Related Manuals for Fujitsu Siemens Computers D2568


Summary of Contents for Fujitsu Siemens Computers D2568
-
Page 1: Mainboard D2568
Component English Technical Manual Mainboard D2568... - Page 2 ... any technical problems or other questions you need clarified? Please contact: ● your sales partner ● your sales outlet The latest information and updates (e. g. BIOS update) on our mainboards can be found on the Internet under: http://www.fujitsu-siemens.com...
- Page 4 Questo manuale è stato stampato su carta da riciclaggio. Denna handbok är tryckt på recyclingpapper. Dit handboek werd op recycling-papier gedrukt. Herausgegeben von/Published by Fujitsu Siemens Computers GmbH Bestell-Nr./Order No.: A26361-D2568-Z120-1-7619 Ausgabe/Edition 1 Printed in the Federal Republic of Germany...
- Page 5 English Mainboard D2568 Technical Manual October 2007 edition 1...
- Page 6 All other trademarks referenced are trademarks or registered trademarks of their respective owners, whose protected rights are acknowledged. Copyright © Fujitsu Siemens Computers GmbH 2007 All rights, including rights of translation, reproduction by printing, copying or similar methods, even of parts are reserved.
-
Page 7: Table Of Contents
Contents Overview Mainboard D2568 ....................... 1 Mainboard D2568..........................3 Notational conventions ......................... 3 Important notes............................. 4 Information about boards ......................4 Hardware Specifications........................5 Block Diagram ............................7 Choose Proper Parts for Your System ..................... 9 Central Processor Unit (CPU) Considerations ..................9 Memory Considerations........................ - Page 8 Contents A26361-D2568-Z120-1-7619, Edition 1...
-
Page 9: Overview Mainboard D2568
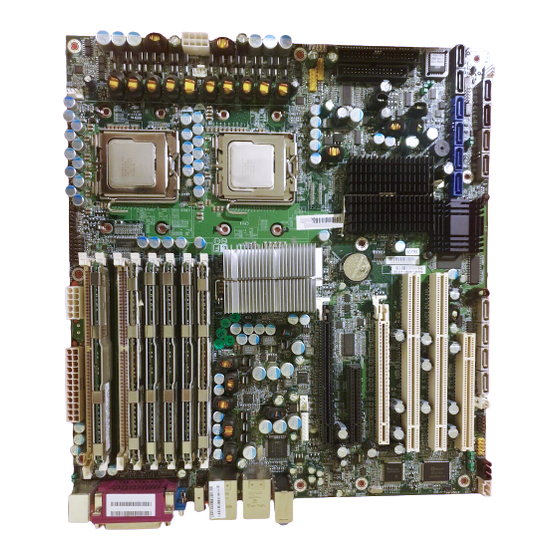
Overview Mainboard D2568 1 = PS/2 Wakeup Enable/Disable (PS2 PWR) 2 = Front Panel Header (FP) FLOPPY 3 = LCD Header (LCD) FAN1 SATA 2 4 = Front USB Header (FRNT USB) FAN0 5 = IEEE 1394 Header SATA 3... - Page 10 Overview Mainboard D2568 A26361-D2568-Z120-1-7619, edition 1...
-
Page 11: Mainboard D2568
Mainboard D2568 Mainboard D2568 Based on the Intel® 5400 chipset, the D2568 features some state-of-the-art technologies such as dual/single 1333 MHz FSB Dual-Core Xeon® Processor 5200 Series as well as Quad-Core Xeon® Processor 5400 Series support, multiple PCI-Express buses, quad channel DDR2 FB-DIMM memory design, onboard Dual-Port PCI-Express Gigabit Ethernet, SATA ports, SAS ports and multiple USB2.0 (Universal Serial Bus) ports. -
Page 12: Important Notes
The equipment and tools you use must be free of static charges. ● Remove the power plug from the mains supply before inserting or removing boards containing ESDs. ● Always hold boards with ESDs by their edges. ● Never touch pins or conductors on boards fitted with ESDs. A26361-D2568-Z120-1-7619, edition 1... -
Page 13: Hardware Specifications
Two ports 400Mbit ● One UART serial port connector ● One ECP/EPP/SPP parallel connector Trusted Platform Management (TPM) ● Eight USB2.0 ports (4 USB ports via ● Infineon SLB9635TT 1.2 header) ● PS/2 mouse & keyboard ports A26361-D2568-Z120-1-7619, edition 1... -
Page 14: Software Specifications
Red Hat Enterprise Linux 4.0 Update 4 ● SuSE Linux Enterprise Desktop/Server 10.0 ● Other distributions of Linux pending validation Fujitsu Siemens Computers reserves the right to add support or discontinue support for any OS with or without notice. A26361-D2568-Z120-1-7619, edition 1... -
Page 15: Block Diagram
The above picture is purely representative. Due to engineering updates and new board revisions, certain components may change and or be repositioned. The picture above may or may not look exactly like the board you received. The following page includes details on the vital components of this motherboard. A26361-D2568-Z120-1-7619, edition 1... - Page 16 Mainboard D2568 A26361-D2568-Z120-1-7619, edition 1...
-
Page 17: Choose Proper Parts For Your System
Single/Dual Processor System D2568 board supports one or two Dual-Core or Quad-Core Intel® Xeon® Processors. Single Processor System: When only install a single processor on D2568, the processor must be installed in the CPU0 socket. Dual Processor System: D2568 supports dual processor configurations only in which both processors operate with the same FSB frequency, core frequency, and have the same internal cache sizes. -
Page 18: Power Supply Considerations
● Power connectors D2568 is powered by a split plane PSU with six +12V-rails and 1000W continuous power. One rail is for each processor, one for systemboard and three for peripherals (e.g. HHDs, add. 6-pin graphics connector). There are three power connectors on this motherboard as listed below. -
Page 19: Board Installation
Pin4: Fan PWM (speed) Control This 4-pin fan connector supports tachometer monitoring. There are five 4-pin fan connectors on D2568. Use these connectors to connect chassis and processor cooling fans to your motherboard. Cooling fans can keep the system stable and reliable for its product’s life. -
Page 20: Cd-In And Auc-In (Cd / Aux)
Normally, a chassis has some control or signal wires can be connected onto a motherboard for hard drive LED, Power LED, power button, and reset button; The front panel header has been implemented on D2568 for such purposes. Signal Signal... -
Page 21: Lcd Header (Lcd)
HDA compliant Front Panel Audio Header (AUDIO - yellow) Signal Signal PORT1-L Analog GND PORT1-R Presence Detect PORT2-R PORT1 Sens Return Jack Sens Send PORT2-L PORT2 Sens Return IEEE 1394 Header (FRNT1394 – grey) Signal Signal TPA+ TPA- TPB+ TPB- P12VP P12VP A26361-D2568-Z120-1-7619, edition 1... - Page 22 PS/2 Wakeup Enable/Disable (PS2 PWR) Close Pin-1 and 2 no PS/2 device wakeup Close Pin- 2 and 3 – enables PS/2 device wakeup (Default) BIOS Write Protect (PROT) Open – FWH can be written (Default) Closed – FWH write protection A26361-D2568-Z120-1-7619, edition 1...
-
Page 23: Installing The Memory
Installing the Memory Before attempting to install any memory, make sure that the memory you have is compatible with the motherboard as well as the processor. The D2568 board supports up to eight 240-pin 1.8-Volt DDR2-667 ECC FB-DIMM modules. Here are a few key points to note before installing memory into your D2568: ●... -
Page 24: Memory Installation Procedure
Push the holders on each side of the memory slot outwards. ► Insert the memory module into the location (1). ► At the same time flip the lateral holders upwards until the memory module snaps in place (2). A26361-D2568-Z120-1-7619, edition 1... - Page 25 You must unplug the power connector to the motherboard before performing system hardware changes, to avoid damaging the board or expansion device. A26361-D2568-Z120-1-7619, edition 1...
-
Page 26: Installing The Processor And Heatsink
Installing the processor The processor socket ist covered with a protective cap to protect the spring contacts In a warranty case the mainboard can only be taken back by Fujitsu Siemens Computers with the protective cap secured! Never touch the underside of the processor. Even minor soiling such as grease from the skin can impair the processor's operation or destroy the processor. - Page 27 (a). ► Fold down the frame (1). ► Press the lever downward (2) until it is hooked in again. ► Remove the protective cap (3) and keep it. A26361-D2568-Z120-1-7619, edition 1...
-
Page 28: Mounting Heat Sink
► Secure the heat sink - depending on the model - with four screws or push it into the mounts. A26361-D2568-Z120-1-7619, edition 1... -
Page 29: Installing Add-In Cards
This allows air to more easily circulate within the chassis, providing improved cooling for all installed devices. You must unplug the power connector to the motherboard before performing system hardware changes, to avoid damaging the board or expansion device. A26361-D2568-Z120-1-7619, edition 1... -
Page 30: Connecting External Devices
While the ports have been created to accept connectors in only one direction, make sure to be careful when inserting connectors. At times, attaching connectors in the incorrect orientation can damage, bend and or break the pins. A26361-D2568-Z120-1-7619, edition 1... -
Page 31: Installing The Power Supply
CPU +12V regulator power source. Therefore, the CPU will not be powered if you do not connect the 8-pin square 12V power connector. You must unplug the power supply before plugging in the power cables to motherboard connectors. A26361-D2568-Z120-1-7619, edition 1... -
Page 32: Replacing Lithium Battery
Press the catch in the direction of the arrow (1). The battery jumps out of the holder slightly. ► Remove the battery (2). ► Push the new lithium battery of the identical type into the holder (3) and press it downward until it engages (4). A26361-D2568-Z120-1-7619, edition 1... -
Page 33: Bios Update
Board Installation BIOS update When should a BIOS update be carried out? Fujitsu Siemens Computers makes new BIOS versions available to ensure compatibility to new operating systems, new software or new hardware. In addition, new BIOS functions can also be integrated. -
Page 34: Bios Recovery
Start the PC and invoke BIOS Setup. ► Select the menu item Reset configuration in the menu Advanced and change the setting to Yes. ► Save the change and terminate BIOS Setup. The BIOS recovery has now been completed. The system restarts. A26361-D2568-Z120-1-7619, edition 1... -
Page 35: Glossary
I/O Controller Hub Trusted Platform Module Intelligent Drive Electronics UDMA Ultra DMA Input/Output Universal Serial Bus Initial Program Load Video Graphic Adapter IPSEC Internet Protocol Security Zero Channel Raid Industrial Standard Architecture ZIF Socket Zero Insertion Force socket A26361-D2568-Z120-1-7619, edition 1... - Page 36 Danger of explosion if battery is incorrectly replaced. Replace only with the same or equivalent type recommended by manufacturer. Dispose of used battery according to manufacturer instructions and in accordance with your local regulations. A26361-D2568-Z120-1-7619, edition 1...