
Subscribe to Our Youtube Channel
Related Manuals for Fujitsu Siemens Computers D2156


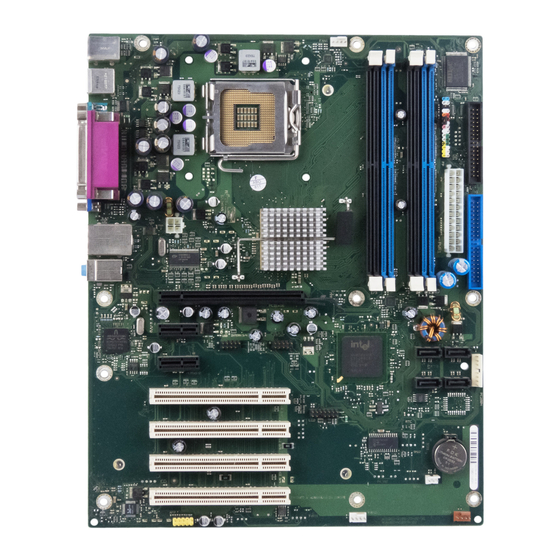
Summary of Contents for Fujitsu Siemens Computers D2156
- Page 1 Mainboard Deutsch - English Technisches Handbuch / Technical Manual Basisinformationen Mainboard Basic information on mainboard...
- Page 2 Sie haben ..technische Fragen oder Probleme? Wenden Sie sich bitte an: ● unsere Hotline: Mo-Fr: 8 - 18 Uhr 9 - 14 Uhr Tel.: ++49 (0) 180 3777 000 ● Ihren zuständigen Vertriebspartner oder Ihre Verkaufsstelle ● unsere Hotline über das Kontaktformular unter www.fujitsu-siemens.com/support/contact/ contact.html oder für Kunden, die ein einzelnes Mainboard gekauft haben: +49(0) 180 3777 005 Aktuelle Informationen und Updates (z.
- Page 4 Questo manuale è stato stampato su carta da riciclaggio. Denna handbok är tryckt på recyclingpapper. Dit handboek werd op recycling-papier gedrukt. Herausgegeben von/Published by Fujitsu Siemens Computers GmbH Printed in the Federal Republic of Germany AG 08/05 Ausgabe/Edition 3 Bestell-Nr./Order No.: A26361-D2000-Z120-1-7419...
-
Page 5: Table Of Contents
Contents Basisinformationen Mainboard ......................1 Notational conventions ......................... 1 Important notes............................. 2 Information about boards ......................2 Special features..........................3 Brief instructions on installing mainboard ..................... 5 Prior to installation........................5 External ports ............................7 Internal ports and connectors ....................... 8 Audio front panel .......................... -
Page 7: Basisinformationen Mainboard
Basisinformationen Mainboard This manual contains supplemental information to the "Short Description" manual of your mainboard. The mainboards are available in different configuration levels. Depending on your mainboard, you will not find several hardware components, although they are described in the manual. Details on your mainboard are contained in the "Short Description"... -
Page 8: Important Notes
Basisinformationen Mainboard Important notes With the mainboard installed you must open the system to access the mainboard. How to dismantle and reassemble the system is described in the operating manual accompanying the system. Connecting cables for peripherals must be adequately shielded to avoid interference. Observe the safety notes in the operating manual of your system. -
Page 9: Special Features
Silent Fan A micro controller developed by Fujitsu Siemens Computers monitors and controls the fans in the PC and thus prevents any unnecessary noise annoyance. Should the processor become in spite of full turning ventilator too hot, then the processor clock rate will automatically be reduced so that the system continues to run stably. - Page 10 CD "Drivers & Utilities" and on the Internet. Multi Boot The BIOS of the Fujitsu Siemens Computers mainboards enables booting from all types mass storage devices. In addition to IDE hard disks, this also includes optical drives, such as CD-ROM, DVD and external drives that can be connected to USB or FireWire.
-
Page 11: Brief Instructions On Installing Mainboard
Basisinformationen Mainboard Brief instructions on installing mainboard If you have purchased a separate mainboard, you can install the mainboard in your system in accordance with the following brief instructions. The activities described here assume a basic knowledge of PCs and cannot be carried out by a layperson. -
Page 12: Driver Installation
Basisinformationen Mainboard ► Should no suitable connection field be provided in the case, then you must install the connection field (1) provided. Ensure the plate is aligned properly so that the connections are suitable for the mainboard later. ► Set the mainboard on the edge on which the connection field is located (2) and then insert the board in the case (3). -
Page 13: External Ports
Basisinformationen Mainboard External ports The locations of the external connections are usually marked with the following symbols. PS/2 keyboard port, purple Audio input (Line in), light blue Serial interface, turquoise PS/2 mouse port, green Monitor port, blue Parallel port/Printer, burgundy LAN port USB - Universal Serial Bus, black Audio output (Line out), light green... -
Page 14: Internal Ports And Connectors
Basisinformationen Mainboard Internal ports and connectors The location of the internal connections and connectors of your mainboard is specified in the "Short Description" manual. Audio front panel If you want to use the internal connection for the audio front panel for the front side of the system, then proceed as follows: ►... - Page 15 Basisinformationen Mainboard Drivers A corresponding driver must be installed for the 2, 4 or 6-channel audio mode. If the drive is not installed yet, proceed as described in the chapter "Add-on modules / Upgrading", in the section "Drivers". Connecting loudspeakers The number of loudspeakers connected should match the number of audio channels you select in the driver software.
-
Page 16: High Definition Audio - 2, 4 Or 6-Channel Audio Mode
Basisinformationen Mainboard High Definition Audio - 2, 4 or 6-channel audio mode Audio port front High Definition Audio (yellow) Signal Signal Micro input Left Analogue GND Micro input Right Presence Detect Right line / Headphone Sense 1 return output Jack sense Send Left line / Headphone output Sense 2 return When equipped with a high-definition audio controller the mainboard can support an 8-channel audio... -
Page 17: Front Panel
Basisinformationen Mainboard The following mixers or input devices are available: Realtek HD Front Green Jack Front (green) jack Realtek HD Front Pink Jack Front (pink) jack Rear (pink) jack (microphone) Realtek HD Audio Rear Input Rear (blue) jack (Line-In) Audio-In (internal jack on mainboard) Message LED Front panel Power On/Off... - Page 18 Basisinformationen Mainboard LCD display Signal Signal SMB CLK LAN Link Icon Harddisk Action Icon SMB DATA BMC Alert Icon Message Icon Sleep Icon Power Icon Reserved for Future use LAN Active Icon P3V3P_DUAL Audio In Signal Left audio input Analogue GND Analogue GND Right audio input Audio S/PDIF (optional)
- Page 19 Basisinformationen Mainboard Temperature sensor SMB Signal P3V3P DUAL SMB CLK SMB DATA USB - dual channel A = with chipcard reader support B = without chipcard reader support Signal Signal Chipcard reader on or not connected VCC x VCC y Data negative x Data negative y Data positive x...
- Page 20 Basisinformationen Mainboard (only for 4 pin fans) Signal +12 V Fan sense Fan control (PWM) 1394 connector (internal header) Signal Signal TPA+ TPA- TPB+ TPB- +12 V +12 V Power supply ATX Signal Signal +3.3V(P3V3P) +3.3V(P3V3P) +3.3V(P3V3P) -12V (P12VN) +5V (VCC) PS on (low asserted) +5V (VCC) Powergood (high asserted)
- Page 21 Basisinformationen Mainboard Power supply BTX (ATX compatible) 24-Pin BTX connector Signal Signal +3.3 V (P3V3P) +3.3 V (P3V3P) +3.3 V (P3V3P) -12 V (P12VN) +5V (VCC) PS on (low asserted) +5V (VCC) Powergood (high asserted) -5 V (P5VN) +5 V Auxiliary (VCC Aux) +5 V (VCC) +12 V (P12VP) +5 V (VCC)
- Page 22 Basisinformationen Mainboard Additional power supply ATX12 V Signal Signal +12 V +12 V Power supply control (System monitoring) Signal Power Guard Control PS FAN Control PS FAN Sense Intrusion Signal Case open (low asserted) Intrusion switch present (low asserted) 16 - English A26361-D2000-Z120-1-7419, edition 3...
-
Page 23: Settings With Switches And Jumpers
Settings with switches and jumpers Switches and jumpers Your mainboard is optionally equipped with switches or jumpers. The location of the switches or jumpers is specified in the "Short Description" manual. Setting with switches Switch 1 = Skipping system and BIOS Setup password Switch 2 = System BIOS recovery 1 2 3 4... - Page 24 Settings with switches and jumpers Skipping system and BIOS Setup password - switch 1 / pin pair 1 / pin pair A Switch 1 / pin pair 1 / pin pair A enables skipping the system and BIOS Setup password. System and BIOS Setup password are skipped when the device is switched on and Inserted may be changed.
-
Page 25: Add-On Modules / Upgrading
Add-on modules / Upgrading Exit energy-saving mode, switch off the system and remove the power plug from the mains outlet, before carrying out any of the procedures described in this chapter! Even when you have run down the device, parts of the device (e.g. memory modules, PCI extension boards) are still energised. - Page 26 Add-on modules / Upgrading Mounting heat sink Be sure to use heat conducting material between the processor and the heat sink. If a heat conducting pad (rubber-like foil) is already applied to the heat sink, then use it. Otherwise you must apply a very thin layer of heat conducting paste.
-
Page 27: Socket Type Lga775
Socket type LGA775 The processor socket ist covered with a protective cap to protect the spring contacts In a warranty case the mainboard can only be taken back by Fujitsu Siemens Computers with the protective cap secured! Never touch the underside of the processor. Even minor soiling such as grease from the skin can impair the processor's operation or destroy the processor. - Page 28 Add-on modules / Upgrading Hold the new processor between your thumb and index finger and insert it into the socket (b) so that the marking of the processor is aligned with the marking on the socket (a). ► Fold down the frame (1). ►...
- Page 29 Add-on modules / Upgrading Mounting heat sink Use only the heat sink supplied with your system! Be sure to use heat conducting material between the processor and the heat sink. If a heat conducting pad (rubber-like foil) is already applied to the heat sink, then use it. Otherwise you must apply a very thin layer of heat conducting paste.
-
Page 30: Upgrading Main Memory
Add-on modules / Upgrading Upgrading main memory Information on equipment, memory modules, module sizes and memory expansion is contained in the "Short Description" manual. A current list of the memory modules recommended for this mainboard is available on the Internet at: www.fujitsu-siemens.com. -
Page 31: Replacing The Lithium Battery
Add-on modules / Upgrading Replacing the lithium battery In order to permanently save the system information, a lithium battery is installed to provide the CMOS-memory with a current. A corresponding error message notifies the user when the charge is too low or the battery is empty. The lithium battery must then be replaced. Incorrect replacement of the lithium battery may lead to a risk of explosion! The lithium battery may be replaced only with an identical battery or with a type recommended by the manufacturer. -
Page 32: Pci Slots
► BIOS update When should a BIOS update be carried out? Fujitsu Siemens Computers makes new BIOS versions available to ensure compatibility to new operating systems, new software or new hardware. In addition, new BIOS functions can also be integrated. -
Page 33: Bios Recovery - Recovering System Bios
Add-on modules / Upgrading BIOS Recovery - Recovering System BIOS All BIOS settings are reset to the default values. ► Open the casing as described in the operating manual. ► On the mainboard set the jumper to the appropriate setting to restore the system BIOS (see chapter "Settings with switches and jumpers"). -
Page 34: Microcode Update (Intel Processors Only)
Intel refers to the use of the processor without microcode updates as operation outside the specifications. Safety for processor on Fujitsu Siemens Computers mainboards If the processor uses an old or incorrect microcode, error-free operation cannot be ensured. Fujitsu Siemens Computers has therefore implemented a function on its mainboards that interrupts the booting process if no suitable microcode is available for the installed processor. -
Page 35: Annex
Annex Mainboard Revision and BIOS Version The compatibility, e.g. with new processors, can be independent of the BIOS version or the revision status of the mainboard used. The CPU and BIOS compatibility lists are available on the Internet at www.fujitsu-siemens.com/mainboards. Mainboard Revision The revision status of the mainboard exactly identifies which mainboard you have. -
Page 36: Error Messages
Annex Error messages This chapter contains error messages generated by the mainboard. Available CPUs do not support the same bus frequency - System halted! Memory type mixing detected Non Fujitsu Siemens Memory Module detected - Warranty void There are more than 32 RDRAM devices in the system Check whether the system configuration has changed. - Page 37 Annex DMA test failed EISA CMOS not writable Extended RAM Failed at offset: nnnn Extended RAM Failed at address line: nnnn Failing Bits: nnnn Fail-Safe Timer NMI failed Multiple-bit ECC error occurred Memory decreased in size Memory size found by POST differed from EISA CMOS Single-bit ECC error occurred Software NMI failed System memory exceeds the CPU’s caching limit...
- Page 38 Annex Keyboard error nn nn Stuck Key Release the key on the keyboard (nn is the hexadecimal code for the key). Missing or invalid NVRAM token Switch the device off and on again. If the message is still displayed, please contact your sales outlet or customer service centre.
- Page 39 Annex System Management Configuration changed or Problem occurred A system fan or system sensor has failed. Check the hardware operation. System timer error Switch the device off and on again. If the message is still displayed, please contact your sales outlet or customer service centre.
-
Page 40: Glossary
Annex Glossary The technical terms and abbreviations given below represent only a selection of the full list of common technical terms and abbreviations. Not all technical terms and abbreviations listed here are valid for the described mainboard. AC'97 Audio Codec '97 IPSEC Internet Protocol Security ACPI...
Need help?
Do you have a question about the D2156 and is the answer not in the manual?
Questions and answers