Advertisement
Quick Links
Toll Free:
8 0 0 - 8 2 8 - 8 1 8 4
Phone:
4 0 6 - 5 8 7 - 9 4 6 6
Fax:
4 0 6 - 5 8 7 - 9 4 8 4
The BitHead & Total BitHead
headphone amplifier
Package Contents
1 BitHead/Total BitHead
assorted adhesive velcroe feet
2020
Gilkerson
Bozeman,
MT
w w w . h e a d p h o n e . c o m
owner's manual
1 mini-to-mini cable
1 USB cable
3 rubber adhesive feet
Drive
59715
Advertisement

Related Manuals for HeadRoom BitHead


Summary of Contents for HeadRoom BitHead
-
Page 1: Package Contents
The BitHead & Total BitHead headphone amplifier owner’s manual Package Contents 1 BitHead/Total BitHead 1 mini-to-mini cable 1 USB cable 3 rubber adhesive feet assorted adhesive velcroe feet Toll Free: 8 0 0 - 8 2 8 - 8 1 8 4... - Page 2 7. Headphone Jack2- On the far right is the second headphone jack. You can connect two headphones to the BitHead at the same time. It’s best to use the same type of headphone, as the volumes will be somewhat different unless both headphones are the same efficiency.
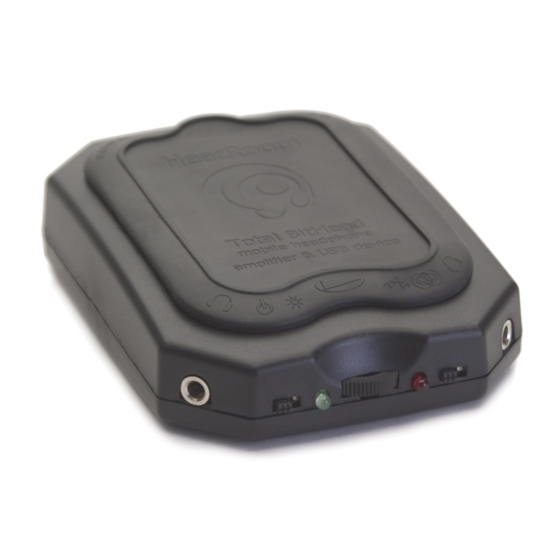
- Page 3 The BitHead Clipping Indicator Headphone Jack 2 Power Volume Switch Control Crossfeed Switch Headphone Power Jack...
- Page 4 8. Battery Door-On the top of the BitHead is a battery door. To replace your batteries (the BitHead requires 4 AAA cells), gently pull up on the small tab sticking out of the back of the battery door. This will lift the entire rubber door. This exposes the battery compartment;...
- Page 5 How to Mount Your BitHead Amp Your BitHead has been supplied with a number of different feet. The rubber feet can be stuck to the bottom of the amp if you are simply going to place it on a tabletop. But we like to attach the amp to the various source devices with the enclosed Velcoins.
- Page 6 3/4, or two steps less than full volume on digital players. On home audio equipment, connect the line- in of the BitHead to any line-out using an RCA to stereo mini- plug cable. When hooking-up to the USB port on a computer simply connect a USB A to mini-B cable between the BitHead and the computer or USB hub.
-
Page 7: Frequently Asked Questions
Q. Can I upgrade my BitHead to a Total BitHead, or change my BitHead into a AirHead? A. No. If you purchase an BitHead and would like to exchange it for a Total BitHead, AirHead, or Total AirHead within the first 30 days of your purchase, you can exchange it for a full credit towards the other unit. - Page 8 HeadRoom amplifiers cure this problem by allowing you to cross-feed a little of the left and right channels through a short time delay using the crossfeed switch. The usefulness of the circuit varies depending on what type of recording you are listening to: old studio recordings (beatles and old jazz for example) that have instruments hard panned left or right, benefit...
- Page 9 “clipped” off. The result is a miserable crackling sound. But in the case of the BitHead, the clipping indicator not only tells you when you’ve got a hot signal, it also tells you when your batteries are low. Because we’re using some of those new multi-voltage “rail-to-rail”...
- Page 10 The HeadRoom BitHead and Total BitHead amps are warrantied for two years. If anytime within the first two years of your purchase you have a problem with your BitHead or Total BitHead, you can return it for repairs under the terms of our 30 Day Guaranty.
- Page 11 You will receive the replacement item along with a return shipping label and a card to include with the defective item to return to HeadRoom. Important: Fill in your name and original invoice number of your order on the card and return the item to HeadRoom within 2 weeks.
- Page 12 As a result, even though the volume control on your HeadRoom amp may appear to be set to a low level, you may not be listening at a safe level. Generally speaking, when listening to headphones you should only turn up the volume to the point at which the sound isn’t too quiet.
Need help?
Do you have a question about the BitHead and is the answer not in the manual?
Questions and answers