Advertisement
Advertisement
Table of Contents

Related Manuals for Fetch TV iinet


Summary of Contents for Fetch TV iinet
- Page 1 Quick Start Guide...
- Page 3 It’s here – a New Breed of TV entertainment. Welcome to Fetch TV – an exciting new television experience that puts you in control of the best TV, great movies, and popular interactive applications. There are 5 easy steps to get you started: 1.
-
Page 4: Unpacking The Box
Unpacking the box Before you install your Fetch TV Set Top Box (STB), check that all the accessories you need have You will need: been supplied using this 1 STB Unit page as a checklist. 1 Power Adaptor 1 Power Cord (1.5m) 1 Antenna Cable (1.5m) 1 HDMI Cable (1.8m) 1 Remote Control... -
Page 5: Installation Tips
Installation Tips And Now a Safety Message Position the STB horizontally on a clean, dry, steady surface with 5cm of space all around it. The Fetch TV STB is designed to operate from Don’t stack it on audiovisual appliances that a 100V-240V 50Hz AC power source only. -
Page 6: Wireless Bridge
Connect the STB to your modem Fetch TV is delivered by broadband, so you need Connection Option 1 – Ethernet Cable: Modem direct to STB to connect your STB to You can use this option if your TV and STB are close the modem. - Page 7 Connection Option 3 – PLC Adaptors You can use this option if you cannot connect using Ethernet Cable and you ordered PLC Adaptors with your Fetch TV service. The PLC adaptor will transmit your Fetch TV service to your STB using the existing power cables inside your walls.
- Page 8 Connection Option 4 – Wireless Bridge You can use this option if you ordered the Wireless Bridge with your Fetch TV service. Install the Wireless Bridge using the instructions included with it. Locate one device near your broadband modem, and the other near your TV and STB.
- Page 9 Connecting the Set Top Box 1. Plug the other end (not connected to the wall) of the existing antenna cable into the to your TV Antenna socket labelled Antenna-IN on the back of your STB. 2. Plug one end of the second antenna cable into the socket labelled Antenna-OUT on You receive your free-to-air Digital the back of your STB.
- Page 10 Connecting The Set Top Box Recommended Option 1 To Your TV Digital High Definition (HDMI) This connection delivers the highest quality picture and audio letting you watch High Definition programming. Only the HDMI There are various ways to connect cable is required. the Fetch TV STB to your TV or home 1.
- Page 11 Alternative Option 2 Analogue Composite Video and Analogue Stereo Audio This mode delivers Standard Definition viewing only. Use this type of connection when or if your TV display has no other video input types available. Use the Yellow/Red/ White cable when connecting. 1.
- Page 12 Turning On Fetch TV This is the home stretch where you activate the devices you have connected to turn on Fetch TV. Connect the STB to Power 1. Plug one end of the power cable into the power socket of the power adaptor. 2.
- Page 13 Fetch TV menu will appear on the screen. 8. Fetch TV is now ready for you. 9. Visit www.iinet.net.au/fetchtv to download the Fetch TV User Guide. It will help you get the most from your Fetch TV service.
-
Page 14: Remote Control
Remote Control The remote control brings Fetch TV to life every time you use it. It has all the functions you need for quick and easy viewing. To make your remote control work, remove the battery cover, insert the two batteries supplied, and replace the cover. Set Up for Universal Remote You can use the Fetch TV remote to operate your TV as well as your Fetch TV Set Top Box. -
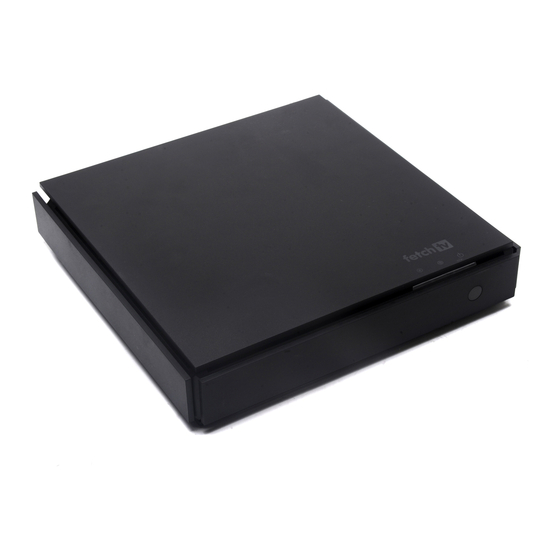
Page 15: Front Panel
Fetch TV Set Top Box Front Panel IR Sensor Rec/Remote Internet Standby/ Power Button Back Panel Audio Audio Left Right HDMI Power Tuner Tuner Output Output Input Output Output Socket Input 12V AC OPTICAL ANTENNA INTERNET VIDEO AUDIO HDMI POWER Ethernet Composite SPDIF... -
Page 16: Troubleshooting
If using a PLC, check the status lights on the PLC adaptors. User Guides You can download the following User Guides from the footers at www.iinet.net.au/fetchtv 1. Fetch TV User Guide 2. Universal Remote Instructions 3. Remote App Reference Guide... -
Page 17: Specifications
Specifications Input Connector Specification Signal Power DC Male jack Input 100-240V (5.5mm diameter) Output 12.0V 4A Antenna Belling-Lee UHF (IEC169) 75 Ohms Channel Bandwidth 7 or 8 MHz Broadband RJ-45 Ethernet IPv4, IPv6 Input Connector Specification Signal Composite Video RCA Phono 1Vp/p 75 Ohms PAL –... - Page 18 Compliance Contact iiNet Support Product Code M605T Phone: 1300 701 006 This product complies with the following Standards: Email: fetchtv@iinet.net.au Electrical Safety AS/NZS 60065.1-2008 RF Emissions AS/NZS CISPR 13 and 22 C-Tick Supplier Code N25670 Internode Support Phone: 1300 866 737 Email: fetchtv@ticket.internode.com.au...
- Page 20 © Fetch TV Pty Limited. ABN 36 130 669 500. All rights reserved. Fetch TV Pty Limited is the owner of the trade marks Fetch TV. The set top box and the Fetch TV service may only be used lawfully and in accordance with relevant terms of use of which you are notified by your service provider. You may only use the recording functionality of the set top box for the purpose of viewing programs at your address at a more convenient time.
Need help?
Do you have a question about the iinet and is the answer not in the manual?
Questions and answers