Garmin NavComm SL30 User Manual
Vhf transceiver
Hide thumbs
Also See for NavComm SL30:
- Installation manual (88 pages) ,
- Quick reference manual (2 pages) ,
- Installation (2 pages)
Table of Contents
Advertisement
Quick Links
Advertisement
Table of Contents

Related Manuals for Garmin NavComm SL30


Summary of Contents for Garmin NavComm SL30
- Page 2 © 2003 Garmin Ltd. or its subsidiaries. All rights reserved. Printed in the U.S.A. Garmin International, Inc., 1200 East 151 Street, Olathe Kansas 66062, U.S.A. Tel: 913/397.8200 Fax: 913/397.8282 Garmin (Europe) Ltd., Unit 5, The Quadrangle, Abbey Park Industrial Estate, Romsey, Hampshire S051 9DL, U.K.
- Page 3 Welcome ... Welcome ... Welcome to a new era of aviation communication and navigation. Once again, Garmin AT, Inc. has set new standards in features and ease of use for the general aviation public. SL30 Navigation/Communications Transceiver for use by the aviation pilot.
-
Page 4: History Of Revisions
Welcome ... History of Revisions Date Software Version Manual Revision November 1999 Original Release February 2000 Rev -00a August 2001 Rev -01 August 2003 Rev -01a November 2003 Rev-01b Ordering Information To receive additional copies of the SL30 User’s Guide, order part #560-0403-xx. -
Page 5: Table Of Contents
Table of Contents Welcome ....... . . i History of Revisions ..... . . ii Ordering Information . - Page 6 Recalling a Nav channel ....18 DST Data Display..... 20 OBS Mode .
-
Page 7: Getting Started
Getting Started Getting Started Combining powerful channel communications transceiver with 200 channel VOR, Localizer and Glideslope receivers, the SL30 provides a full-functioned navigation and communications solution in a small footprint at a very affordable price. Besides traditional Nav/Comm features, SL30 also incorporates workload-reducing... -
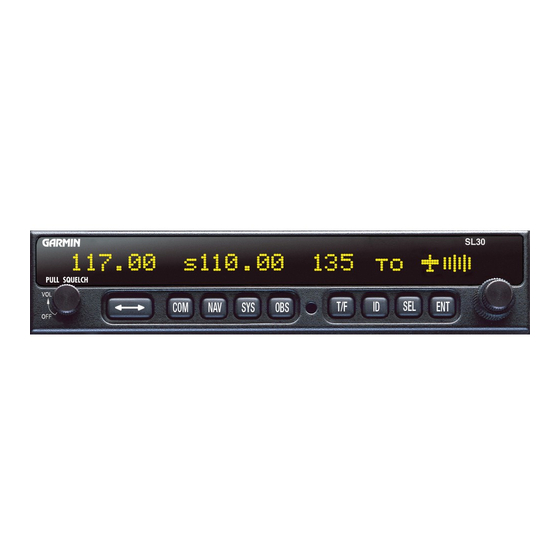
Page 8: Display
Getting Started Display The SL30 Nav/Comm uses a single line by 32-character 5x7 dot matrix alphanumeric display. A photocell is located in the top left corner of the front panel display. The photocell automatically controls the light intensity of the display LEDs from low brightness at night to high brightness during daylight operation. - Page 9 Getting Started Standby frequency. See the Advanced Operation section for more about monitoring frequencies. Press to select the Nav radio mode. The annunciator above the button will light when you are in Nav mode. Press a second time to monitor the Standby frequency.
-
Page 10: Operation Summary
Getting Started annunciator will light above the button when this function is active. Press to save selected values, to confirm a prompt, or to save the Standby frequency. Operation Summary Power On Turn the SL30 on. Either turn the Power/Volume knob clockwise to turn the power on or, if installed, turn on the master switch that powers the radios. -
Page 11: Selecting A Comm Frequency
Getting Started Selecting a Comm Frequency New frequencies are first selected as a Standby frequency and then toggled to the Active side when desired. While LARGE viewing the Standby frequency display, use the SMALL knobs on the right side of the SL30 to select the desired frequency. -
Page 12: System Mode
Getting Started System Mode In the System mode you can view software versions, setup the Nav and Comm functions, and record VOR test information. See the Advanced Operations section for more details. OBS Mode Press the button. If the annunciator above the button LARGE SMALL lights, then you may use the... -
Page 13: Advanced Operation
Advanced Operation Advanced Operation Comm Radio Mode Monitoring the Standby Comm channel The Frequency Monitoring function allows you to monitor the Standby frequency for activity, while listening to the Active frequency. Press the key in the Comm function to listen to the standby frequency. -
Page 14: Removing A Comm Channel
Advanced Operation 1. While in Comm mode, press . The right side of the display will show “store as” with a flashing cursor at the first character of the name. 119.10 s124.55 store as _ SMALL 2. Turn the knob to choose the desired character. LARGE 3. -
Page 15: Recalling Comm Channels
Advanced Operation LARGE SMALL 4. Use the knobs to enter the previously used name and frequency type. 5. Press . The previously used name and frequency are now replaced with your new entry. Recalling Comm Channels There are several lists of channels that you can recall from memory, they are: remote channels, the ten most recently used channels, user-stored channels, weather channels, and the emergency channel. - Page 16 Advanced Operation Automatic Comm Channel List (Autolist) The last ten used active frequencies are available separately for Nav and Comm channels (ten for Nav and ten for Comm). The channels are stored in chronological order beginning with the most recent used. Duplicates are not saved again, but they are moved to the front of the list.
-
Page 17: Emergency Channel
Advanced Operation Weather Channels The standard weather channels are stored in the memory of the SL30. You cannot transmit on a weather channel frequency. Weather channels are not available in all locations. Weather Frequencies 162.400 MHz 162.425 MHz 162.450 MHz 162.475 MHz 162.500 MHz 162.525 MHz... -
Page 18: Stuck Mic
Advanced Operation Stuck Mic The SL30 helps protect you from a situation where the microphone may get stuck in the ON or Transmit position. If the microphone is keyed for longer than 35 seconds, the SL30 will return to the receive mode on the selected frequency. -
Page 19: Nav Radio Mode
Advanced Operation Nav Radio Mode Monitoring the Standby Nav channel The Nav radio provides a monitor function for VORs as the standby channel similar to the Comm radio. The monitor function is activated or deactivated by pressing button while in the Nav function. The From radial for the standby channel is shown in parentheses when the VOR monitor mode is activated. - Page 20 Advanced Operation Navigating along a Back Course approach 1. Press to select the Nav receiver. 2. Set the Localizer frequency of your approach as the Active channel. 3. Press . The display will prompt you to enable the back course. Press to enable the back course.
- Page 21 Advanced Operation Navigating to a MAHP 1. Press to select the Nav receiver. 2. Set the VOR frequency for the radial you are following to the MAHP as the Active channel. 3. Set the Standby channel to the appropriate VOR and note where a radial crosses the MAHP for your runway.
-
Page 22: Listening To The Audio Channel
Advanced Operation Listening to the Audio channel The audio for the active Nav channel is toggled between modes using the button. The annunciator above the button will light while Nav audio is activated, and the detected audio signal will be sent to the Nav audio output circuit. -
Page 23: Saving A Nav Channel
Advanced Operation Saving a Nav channel You can save the frequency in the Standby position and give it a name of up to four characters. Additional information can be saved along with the name, if the selection is a Localizer or ILS. ILS selections may include the runway number (01-36) and designation (L, R, or C). -
Page 24: Recalling A Nav Channel
Advanced Operation Recalling a Nav channel There are several lists of channels that you can recall from memory in Nav mode. Remote Localizer, remote VORs, the ten most recently used channels in Nav mode, and the user-stored channels. 1. In Nav mode, press LARGE 2. - Page 25 Advanced Operation Remote Localizer List If Localizer channels have been sent by an external device, then this list will be the first displayed for convenience while preparing for a landing. The list shows the airport identifier on the left, a runway identifier for the station in the center, and the channel frequency on the right.
-
Page 26: Dst Data Display
Advanced Operation DST Data Display When the SL30 has received data from an external device, such as a DME sensor, through the serial port, DST data is added to the Nav recall list. If you aren’t connected to an external sensor, you will not see this display. If the display of Distance-Speed-Time (DST) data is not activated, you will be prompted to show the data when you view the DST selection in the channel recall lists. -
Page 27: Obs Mode
Advanced Operation OBS Mode OBS Operation OBS mode enables the VOR CDI which is displayed on the right side. The OBS course setting is shown in the center of the display. The button is used to select this mode. If OBS mode is allowed in the unit’s installed configuration, the annunciator over the button will light. - Page 28 Advanced Operation The CDI display is selected by pressing the button. The CDI display is not available if the SL30 is set to use an external indicator head that does not provide a resolver input. The graphic CDI shows an airplane icon at the center that points up in the To condition or down for From.
- Page 29 Advanced Operation the additional information only switches sides after the CDI deflection has exceeded two degrees on the side that is currently used. Localizer A localizer (ILS) frequency is distinguished from the VOR OBS display by the label, “loc,” to the left of the CDI rather than the OBS course.
-
Page 30: To/From Radial
Advanced Operation 3) The SL30’s internal CDI will show “BC” and the external CDI annunciator will show “BC.” 111.10 s116.00 loc bc +}} 4) Make sure you are flying a Back Course approach, because the CDI is now reversed so you can still “chase”... -
Page 31: System Mode
Advanced Operation System Mode Configuration adjustments for the SL30 are made in the System mode. When you press the button, the annunciator above the button will light, and the display will change to the System mode menus. The menus available are: System info Nav options Comm options... -
Page 32: System Info
Advanced Operation System Info System Info provides information about the Software versions and the Display Intensity. LARGE 1. Press and turn the knob if necessary to the System Info page. Press LARGE 2. Turn the knob to view the selections. Software Version The Software version is available for reference when you contact Technical Support. -
Page 33: Nav Options
Advanced Operation Nav Options Nav Audio Level This setting is for the SL30’s output to its external audio panel. The factory default value is “Variable”, which slaves it to the volume knob. The range of values it can be set to are 1 to 100. Nav/Comm Mixing Level The Nav audio output may be mixed with the com audio output for installations without an audio panel. -
Page 34: Comm Options
Advanced Operation Comm Options The Comm Options selection allows you to set up options available for Comm radio operation. LARGE 1. In the System mode rotate the knob to display the Com Options page. Press LARGE 2. Rotate the knob to view the Com Options RF Signal Level The RF Level function shows the relative signal strength of the active frequency. -
Page 35: Vor Equipment Test
Advanced Operation Intercom Level This function adjusts the Intercom Audio Level. Turn the SMALL knob to change the value. The range is from 1 to 100. Setting the value to “variable” slaves the intercom level to the volume control knob. Sidetone Level This function displays and adjusts the sidetone audio level that is heard when the transmitter is keyed. - Page 36 Advanced Operation Notes...
-
Page 37: Appendix
Appendix Appendix Troubleshooting If efforts to resolve the problem fail, contact your dealer or the factory for technical assistance. The Garmin customer service staff will gladly assist you. Please have the following information ready: System configuration (products, antennas, mounting locations, etc.) Model No., part number, and serial number... - Page 38 Appendix Problem Possible Cause Action SL30 does not No power to the Check power power on SL30 connections, breakers, and main avionics switch Faulty electrical Contact your dealer wiring or connection to perform electrical system test No Nav audio Output disabled or Check System page, set to a low level Nav options, Nav...
-
Page 39: Installation Configurations
Appendix Installation Configurations Certain functions are either available or not depending on the configuration of your particular installation. The following table illustrates the features available for the described installations. A feature that is available is indicated by the black dot. VOR CDI Localizer Glide... -
Page 40: Specifications
Appendix Specifications General Features 32 character high-intensity alphanumeric LED display Sunlight readable full alphanumeric display Automatic display intensity Back-lit buttons 200 channel memory (stored alphabetically) Remote frequency flip-flop input pin Navigation Radio Features 200 channel Nav with solid state DSP technology VOR/Localizer and Glideslope receivers Built-in VOR/Localizer converter Frequency range:... -
Page 41: Physical Specifications
Appendix 12 watt audio amplifier Includes two-place VOX intercom Physical Specifications 1.3"(H) x 6.25" (W) x 10.5" (D) Weight 2.25 lbs. (unit only) Depth 11.452 inches (29.09cm) behind panel, including mounting frame and connectors NAV Radio Performance Specifications Input voltage range 10 to 40 VDC Operating temperature range –20ºC to +55ºC Certified TSO C34e/JTSO C34e (Glideslope receive) Certified TSO C36e/JTSO C36e (ILS Localizer receive) -
Page 42: Localizer And Paired Glideslope Frequencies
Appendix Localizer and Paired Glideslope Frequencies Localizer MHz Glideslope MHz Localizer MHz Glideslope MHz 108.1 334.7 110.1 334.4 108.15 334.55 110.15 334.25 108.3 334.1 110.3 335.0 108.35 333.95 110.35 334.85 108.5 329.9 110.5 329.6 108.55 329.75 110.55 329.45 108.7 330.5 110.7 330.2 108.75... -
Page 43: Vor Station Frequencies
Appendix VOR Station Frequencies VOR stations occur every 50 kHz from 112.00 through 117.95 MHz and on the following frequencies in the 108 to 112 MHz band. 108.20 109.20 110.20 111.20 108.25 109.25 110.25 111.25 108.40 109.40 110.40 111.40 108.45 109.45 110.45 111.45... - Page 44 Appendix Notes...
-
Page 45: Index
Distance data ..20 Index DME display ..20 DST Data Display ..20 Arrow button ..2 Audio Emergency channel . - Page 46 Com channels ..7 Nav channel ..17 Mic ....28 Select (SEL) Button ... . 3 Monitor Sidetone .
- Page 48 © 2003 by Garmin Corporation, Inc. 1200 East 151st Street Olathe, KS 66062-3426 U.S.A. Phone 913.397.8200 FAX 913.397.8282 http://www.garmin.com Part #560-0403-01 Rev B November 2003...
Need help?
Do you have a question about the NavComm SL30 and is the answer not in the manual?
Questions and answers