JVC KW-ADV793 Instructions Manual
Dvd receiver with monitor
Hide thumbs
Also See for KW-ADV793:
- Installation & connection manual (4 pages) ,
- Instructions manual (147 pages) ,
- Instructions manual (93 pages)
Table of Contents
Advertisement
Available languages
Available languages
DVD RECEIVER WITH MONITOR
RECEPTOR DVD CON MONITOR
KW-AVX838/KW-AVX830
KW-ADV793/KW-AVX738/KW-AVX730
• Only for KW-AVX838/KW-AVX830: To use the Bluetooth function, insert the Bluetooth adapter (KS-UBT1). (See page 37.)
• Sólo para KW-AVX838/KW-AVX830: Para utilizar la función Bluetooth, inserte el adaptador Bluetooth (KS-UBT1). (Consulte la
página 37)
For canceling the display demonstration, see page 4.
Para cancelar la demonstración en pantalla, consulte la página 4.
For installation and connections, refer to the separate manual.
Para la instalación y las conexiones, refiérase al manual separado.
INSTRUCTIONS
MANUAL DE INSTRUCCIONES
Only for KW-AVX830/KW-ADV793/KW-AVX730
Sólo para KW-AVX830/KW-ADV793/KW-AVX730
For customer Use:
Enter below the Model
No. and Serial No. which
are located on the top or
bottom of the cabinet.
Retain this information
for future reference.
Model No.
Serial No.
LVT2086-001B
[J/JW]
Advertisement
Chapters
Table of Contents

Related Manuals for JVC KW-ADV793


Summary of Contents for JVC KW-ADV793
- Page 1 For installation and connections, refer to the separate manual. Para la instalación y las conexiones, refiérase al manual separado. INSTRUCTIONS MANUAL DE INSTRUCCIONES Only for KW-AVX830/KW-ADV793/KW-AVX730 Sólo para KW-AVX830/KW-ADV793/KW-AVX730 For customer Use: Enter below the Model No. and Serial No. which are located on the top or bottom of the cabinet.
- Page 2 – Connect the equipment into an outlet on a circuit different from that to which the receiver is connected. – Consult the dealer or an experienced radio/TV technician for help. Caution: Changes or modifications not approved by JVC could void the user’s authority to operate the equipment. WARNINGS: (To prevent accidents and damage) •...
-
Page 3: Table Of Contents
• Connecting Bluetooth devices ... 37 • Using the Bluetooth mobile phone/audio player ... 39 • Bluetooth device settings ... 44 Bluetooth operations for KW-ADV793/KW-AVX730 ... 45 • Connecting Bluetooth devices ... 45 • Using the Bluetooth mobile phone ... 48 •... -
Page 4: Canceling The Display Demonstration And Setting The Clock
INTRODUCTIONS Canceling the display demonstration and setting the clock Canceling the display demonstration Display <AV Menu> screen. 3:45 Display <Setup> screen. AV Menu AV Setup Mode Equalizer List Sound Bluetooth Select <Off>. Setup Demonstration Ambient Wall Paper Blue Color Scroll Once Dimmer Auto... -
Page 5: Basic Operations
Basic operations Detaching/attaching the monitor panel Caution: • Hold the monitor panel securely so as not to drop it accidentally. • Fit the monitor panel onto the attaching plate until it is firmly locked. Detaching While the unit is turned on: Close Detach Detach? -
Page 6: Basic Operations On The Monitor Panel
Basic operations on the monitor panel Screen (touch panel) Resets the unit. ( • Turns on the power. • Attenuates the sound. • Turns off the power. (Hold) • Changes the display information. – Each time you press DISP, the display changes to show the various information. -
Page 7: Basic Operations On The Touch Panel
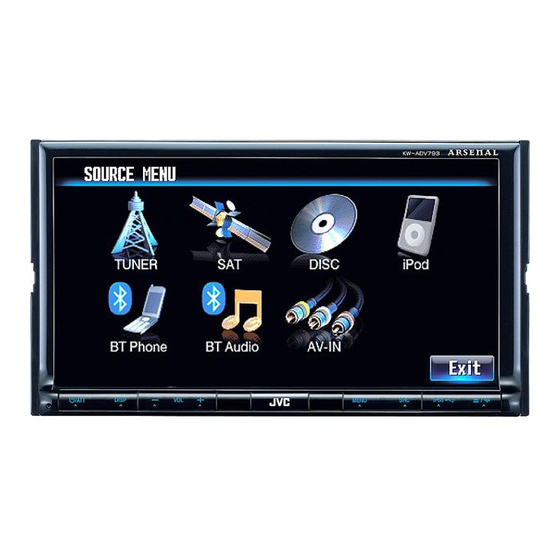
(KW-AVX838/ KW-AVX830: KW-ADV793/KW-AVX730: [Exit] Goes back to the current source screen. Appears only when the Bluetooth adapter is attached. (KW-AVX838/KW-AVX830: 37 / KW-ADV793/ KW-AVX730: <Source Menu> ( Only for KW-AVX830/KW-ADV793/KW-AVX730 Source Menu SOURCE TUNER Current source Short cut menu... - Page 8 Setting the lighting sensor You can change the condition for turning off/on the screen and the lights of the monitor panel buttons. AV Setup Setup Demonstration Ambient Wall Paper Setup Beep Muting1 Telephone Muting Prox./Motion-LED Lighting Sensor Motion Sensitiv. Initialize Enter Setup Beep...
- Page 9 Changing the settings on the menu Moves to the preceding Indicates the next hierarchy menu page level/setting item exists Setup Beep Muting1 Telephone Muting Prox./Motion-LED Lighting Sensor Motion Sensitiv. Initialize Enter Back • Returns to the previous screen • Closes the sub-setting screen Moves to the succeeding menu page Assigning the titles to the...
-
Page 10: Selecting The Playback Source
Switches to an external component connected to LINE IN/VIDEO IN jacks on the rear panel. Only for KW-AVX830/KW-ADV793/KW-AVX730. "HD Radio" is shown as the source instead of "TUNER" when the HD Radio tuner box is connected. "iPod" is shown as the source instead of "USB" when an iPod/iPhone is connected. -
Page 11: Av Source Operations
AV SOURCE OPERATIONS Listening to the radio SOURCE TUNER Band Sound mode ST indicator 3:45 • The ST indicator lights up when receiving an FM stereo broadcast with sufficient signal strength. * Touching the preset number also displays the preset list (see below). Searches for a station. - Page 12 When the FM reception is interfered... AV Setup Setup Demonstration Ambient Wall Paper Setup Auto IF Band Width Europe Area Setting 112233445566 Sirius ID Back Auto Increases the tuner selectivity to reduce interference noises between adjacent stations. (Stereo effect may be lost.) Wide Subject to the interference from...
-
Page 13: Disc/Usb Operations
Disc/USB operations Playing a disc • If a disc does not have any disc menu, all tracks on it will be played repeatedly until you change the source or eject the disc. • If “ ” appears on the screen, the unit cannot accept the operation you have tried to do. –... -
Page 14: Playable Disc Type
The Non-DVD side of a “DualDisc” does not comply with the “Compact Disc Digital Audio” standard. Therefore, the use of Non-DVD side of a DualDisc on this product may not be recommended. Recording format, file type, etc DVD-Video * Region Code: KW-AVX838/KW-AVX738: 4 KW-AVX830/KW-ADV793/ Ex.: KW-AVX730: 1 Ex.: DVD-Audio/DVD-ROM DVD-Video... -
Page 15: Playing A Usb Device
• Make sure all important data has been backed up to avoid losing the data. * Except for MPEG2 files recorded by JVC Everio camcorder (extension code <.mod>). You can connect a USB mass storage class device such as a USB memory, Digital Audio Player etc. to the unit. - Page 16 Disc/file playback operations When watching a playback picture, press DISP or touch the screen to display the operation buttons ( Only for discs: Video format/playback mode—VIDEO, MPEG, JPEG, VR-PRG (program), VR-PLAY (playlist), PBC SOURCE VIDEO Media type Audio format DIGITAL FLAT Sound mode CHAP.
-
Page 17: Operation Buttons On The Screen
Operation buttons on the screen You can display the following operation buttons while watching the playback pictures on the screen. • If no operation is done for about 15 seconds, the operation buttons disappear (except when a disc menu is displayed). -
Page 18: Selecting Playback Modes
Selecting folder/track on the list List Select a folder (1), then a track (2). Current track number/ Current folder number/ total total track number folder number List 0005/0035 0003/0099 Track001.mp3 Folder 01 Track002.mp3 Folder 02 Track003.mp3 Folder 03 Track004.mp3 Folder 04 Track005.mp3 Folder 05 Track006.mp3... -
Page 19: Operations
Listening to the iPod/iPhone device Preparation Connecting iPod/iPhone To iPod/iPhone USB cable from the rear of the unit • You can control the following iPod/iPhone models: – iPod with video (5th Generation) * – iPod classic * – iPod nano (1st Generation) –... -
Page 20: Ipod/Iphone Playback Operations
[SOURCE] Notice: When operating an iPod/iPhone, some operations may not be performed correctly or as intended. In this case, visit the following JVC web site: <http://www.jvc.co.jp/english/car/> (English website only) Playback status — 3: play/8: pause 0 : 01 : 20 (See “Scroll,”... - Page 21 Selecting track/video from <Search Mode> • Available search modes depend on the type of your iPod/iPhone. List Search Mode Music Playlists Videos Artists Shuffle Songs Albums Songs Podcasts Genres Back Music Selects the desired item from the list Videos Shuffle Songs Playback starts Current track (video) number/total track (video) number Search Mode 0003/0099...
-
Page 22: Activating Subscription
CNPJVC1 are connected) appears. • Update takes a few minutes to complete. • Do not press any buttons or perform any operations until updating is completed. (Only for KW-AVX830/KW-ADV793/KW-AVX730) SC-C1 and KS-SRA100 PnP, SC-VDOC1 and KS-SRA100 JVC Smart Digital Adapter–XMDJVC100... -
Page 23: Tuning In To A Channel You Want
Dance/Erectronic Back Press/drag to browse the list. Exit • You can also browse the list by dragging your finger up and down on the list. KW-ADV793 KW-AVX730 Preset number* Channel number Only for SIRIUS Selects the band. For SIRIUS Radio: For XM Radio: Selects a category.*... -
Page 24: Listening To The Hd Radio
Listening to the HD Radio (Only for KW-AVX830/KW-ADV793/KW-AVX730) Before operating, connect HD Radio tuner box, KT-HD300 (separately purchased) to the expansion port on the rear of the unit. What is HD Radio Technology? HD Radio Technology can deliver high-quality digital sound—AM digital will have FM-like quality (in stereo) and FM digital will have CD-like quality—with static-free and clear reception. -
Page 25: Changing Hd Radio Reception Mode
Changing HD Radio reception mode While receiving an HD Radio broadcast, the unit tunes to digital or analog audio automatically due to the receiving condition. Mode Mode Mono DX/Local Local Start Blend Hold Auto Digital Analog Tuning to analog audio only. Digital Tuning to digital audio only. -
Page 26: Using Other External Components
Using other external components SOURCE Source type — “AV-IN” AV-IN (see below) or “EXT-IN” 3:45 [SOURCE] Preparation: • To listen to the music from the connected component, select <Audio> for <AV Input> setting. • To watch the video from the connected component, select <Audio & Video> for <AV Input> setting. AV-INPUT Connect an external component to the LINE IN/VIDEO IN jacks. -
Page 27: Ext-Input
Displaying navigation screen You can also connect a Navigation system to the VIDEO IN plug so that you can watch the navigation screen. AV Setup Setup Demonstration Ambient Wall Paper Setup Audio&Video AV Input External Input Setup AV Input External Input iPod Video Audio&Video Navigation... -
Page 28: Dual Zone Operations (Only For Kw-Avx838/Kw-Avx830)
Dual Zone operations You can enjoy disc playback on the external monitor connected to the VIDEO OUT and 2nd AUDIO OUT jacks, while listening to any source other than “USB/iPod” through the speakers. • When Dual Zone is in use, you can only operate the DVD/CD player using the remote controller ( SOURCE VIDEO Ÿ... -
Page 29: Sound Equalization
Sound equalization Equalizer Ÿ Select a sound mode. Equalizer Flat Natural Dynamic Vocal Boost Bass Boost Super Bass Back Edit Move to other six sound modes • You can also change the sound mode by pressing the short cut icon. ( Storing your own adjustments You can store your adjustments into <User1>, <User2>, and <User3>. -
Page 30: Av Setup/Sound/Equalizer Menu Items
AV Setup/Sound/Equalizer menu items AV Menu AV Setup Equalizer Sound AV Setup Menu item Demonstration Wall Paper Color Scroll Dimmer Dimmer Time Set Dimmer Level Bright When <Ecology> is selected, <Color> is automatically set to <Blue>. Mode List Bluetooth Selectable setting/item ♦... - Page 31 Menu item Selectable setting/item Picture Adjust You can adjust the following to make the screen clear and legible for watching the playback picture. The setting will be stored—one for “DISC/USB” (common) and the other for “AV-IN.” Press [ ♦ ♦ ♦...
- Page 32 Menu item Selectable setting/item Time Set Initial 1:00 AM ( Time Format ♦ OSD Clock ♦ ♦ Clock Adjust * Select <Auto> to adjust the clock automatically using the clock time data provided via the satellite radio channel. ♦ Time Zone * Select your residential area from one of the following time zones for clock adjustment.
- Page 33 Appears only when <Clock Adjust> is set to <Auto>. Selectable only for “DISC/USB.” (Playback stops when you change the setting.) For KW-AVX838/KW-AVX738: <SA> is the initial setting. For KW-AVX830/KW-ADV793/KW-AVX730: <US> is the initial setting. Only for KW-AVX830/KW-ADV793/KW-AVX730. Appears only when SIRIUS Satellite Radio is connected.
- Page 34 Menu item AV Input External Input Beep Telephone Muting Lighting Sensor Motion Sensitiv. Initialize Equalizer Selectable setting/item Flat, Natural, Dynamic, Vocal Boost, Bass Boost, Super Bass, Rhythm, Acoustic, Relax, User1, User2, ♦ User3 ( Selectable setting/item You can determine the use of LINE IN and VIDEO IN jacks. •...
- Page 35 Sound Menu item Selectable setting/item Fader/Balance Fader : Adjust the front and rear speaker output balance. F6 to R6; Initial 0 Fader/Balance ♦ Reset Fader • When using a two-speaker system, set the fader to the center (0). Balance 0 Balance : Adjust the left and right speaker output balance.
-
Page 36: Bluetooth Operations
(or reset the unit). Bluetooth Information: If you wish to receive more information about Bluetooth, visit the following JVC web site: <http://www.jvc.co.jp/english/car/> (English website only) Bluetooth operations for KW-AVX838/KW-AVX830... -
Page 37: Connecting Bluetooth Devices
Open the monitor panel. Bluetooth adapter (KS-UBT1) • Insert the Bluetooth adapter firmly with the JVC logo facing up. • This port is designed for the use with KS- UBT1 only. Other Bluetooth adapters or USB devices cannot be used. -
Page 38: Connecting/Disconnecting A Registered Bluetooth Device
Connecting/disconnecting a registered Bluetooth device Bluetooth Bluetooth Enter Dial Menu Enter Device Menu Settings Enter Select desired operation, then select the registered device you want to connect/ disconnect. To connect Device Menu Enter Phone Connect Enter Audio Connect Delete Pairing Enter New Pairing Enter... -
Page 39: Using The Bluetooth Mobile Phone/Audio Player
Using the Bluetooth mobile phone/audio player Bluetooth icon • (Blue): Bluetooth device ( : mobile phone* audio player) is connected. • (White): Not connected. Status of the device • Signal strength/Battery remainder (only when the information comes from the device). Tag data* (current track title/artist name/album title) •... -
Page 40: Receiving A Call
Receiving a call When a call comes in... The source is changed to “ Bluetooth” automatically. Name and phone number (if acquired) • Pressing any button on the monitor panel (except and VOL +/–) also receives a call. When <Auto Answer> is activated... The unit answers the incoming call automatically. -
Page 41: Making A Call
Making a call Display <Dial Menu>. • You can also display <Dial Menu> by following methods: – Holding SRC on the monitor panel – Pressing [Dial Menu] in the <Bluetooth> menu ( Select a calling method, then select the desired item to call. Redial Shows the list of the phone numbers you have dialed. -
Page 42: Copying The Phone Book
Presetting the phone numbers You can preset up to 6 phone numbers. Select the phone number you want to preset from <Redial>, <Received Calls>, <Phonebook>, <Missed Calls>, or <Phone Number>. Select a telephone number to store. Received Calls 12312341234 Redial Received Calls 12311112222 12322223333... - Page 43 Selecting which phone book/ call lists to use When your mobile phone is compatible with Phone Book Access Profile (PBAP), all the phone numbers in the phone book and call lists are automatically copied to the unit when connected (up to 5000 entries from the phone book, 50 entries each from the redialed calls, received calls, and missed calls).
-
Page 44: Bluetooth Device Settings
Bluetooth device settings Bluetooth Menu item Dial Menu * Phone Connect* Audio Connect* Phone Disconnect* Audio Disconnect* Delete Pairing New Pairing Auto Connect Auto Answer SMS Notify Add Phonebook MIC Setting Phone Volume Only for the device connected for Bluetooth phone. When a device has already been connected to the unit, <Phone Connect>... -
Page 45: Bluetooth Operations For Kw-Adv793/Kw-Avx730
Ring Mode Ring Tone Change Initialize Information Bluetooth operations for KW-ADV793/KW-AVX730 For Bluetooth operations, it is required to connect the Bluetooth Adapter (KS-BTA200: separately purchased) to the expansion port on the rear. • Refer also to the instructions supplied with the Bluetooth Adapter and the Bluetooth device. -
Page 46: Change The Pin Code
Make sure “NEW DEVICE” is selected. If not, press [ Bluetooth To register using <Open> Open Connect Back Go to other menu items Change the PIN code. • You can enter any number you like (1-digit to 16-digit number). • If you skip changing PIN code, press [Enter]. PIN code (initial: 0000) PIN Code Enter... - Page 47 To connect a special device <Special Device> Bluetooth NEW DEVICE Bluetooth Dial Menu Search Message Special Device Open Connect Back The unit displays the list of the preset devices. Select a device you want to connect. Use <Open> (or <Search>) to connect. To connect/disconnect a registered device Select “BT Phone”...
-
Page 48: Using The Bluetooth Mobile Phone
• Holding any button on the monitor panel (except and VOL +/–) also ends a call. Stopping ringing (canceling the outgoing call) (Any button except and VOL +/–) KW-ADV793 KW-AVX730 Connected device name • Displays <AV Menu> screen. • Activates <Voice Dialing> function. (Hold) −... - Page 49 Checking Text message reception If the mobile phone is compatible with Text message, you can read the messages on the screen. To read a received message, operate the unit or the mobile phone after stopping the car in a safe place. •...
- Page 50 Ex.: When calling from received calls Dial Menu Enter Redial Received Calls Enter Phonebook Enter Missed Calls Enter Phone Number Enter Voice Dialing Enter Back Received Calls 12312341234 Redial Received Calls 12311112222 12322223333 Phonebook 12345678900 Missed Calls 12345678911 Phone Number 12345678922 Voice Dialing Back...
-
Page 51: Using The Bluetooth Audio Player
Connected Device Name FLAT Current Track Title Artist Name 3:45 Album Title [SOURCE] KW-ADV793 KW-AVX730 Playback status — 3: play/8: pause* 0 : 01 : 20 Connected device name Displays <Dial Menu> screen. Displays <Source Menu> screen. Displays <AV Menu> screen. -
Page 52: Bluetooth Device Settings
: The unit rejects all incoming calls. : The unit informs you of the arrival of a message by ringing and displaying “Receiving Message.” : The unit does not inform you of the arrival of a message. KW-ADV793 KW-AVX730 Device01 Search... -
Page 53: Reference
REFERENCE Using the remote controller For KW-AVX830/KW-ADV793/KW-AVX730: To use the remote controller, purchase RM-RK252P separately. Installing the batteries Insert the batteries (not supplied) into the remote controller by matching the polarity (+ and –) correctly. Caution: • Danger of explosion if battery is incorrectly replaced. Replace only with the same or equivalent type. - Page 54 • Does not function as “2nd VOL”. Adjusts the volume of the incoming calls. Selects the source. Answers incoming calls. Starts playback. Displays <Dial Menu> screen.* (KW-AVX838/KW-AVX830: 41 / KW-ADV793/KW-AVX730: Answers incoming calls. Selects the bands. Stops playback. Ends the call. Pauses playback.
- Page 55 Disc/file Disc Disc — Disc/file Only for KW-AVX830/KW-ADV793/KW-AVX730. Only for KW-AVX838/KW-AVX830/KW-ADV793/KW-AVX730. Only for KW-AVX838/KW-AVX830: When Dual Zone is activated, these buttons cannot be used. Functions as number buttons when pressed with SHIFT button. ( See below.) Only for KW-AVX838/KW-AVX830. Using the number buttons •...
- Page 56 Searching for an item directly DVD-Video/DVD-VR/MPEG1/MPEG2/JPEG/MP3/ WMA/WAV/VCD/CD Enter the search mode. (Hold) • Each time you press DIRECT, the item to search for changes as follows: DVD-Video Chapter → Chapter → DVD-VR canceled → MPEG1/ MPEG2/JPEG/ Track/file → MP3/WMA/ canceled VCD/CD Track canceled...
- Page 57 Using the on-screen bar DVD-Video/DVD-VR/MPEG1/MPEG2/JPEG/VCD (twice) Information Operation (See below.) Select an item. Make a selection. If pop-up menu appears... • To enter time/numbers: : Move the entry position : Select a number • To cancel pop-up menu: To remove the on-screen bar: Operating items in the on-screen bar Change time indication Time Search (Enter the elapsed playing time...
-
Page 58: Maintenance
Maintenance Caution on cleaning the unit Do not use any solvent (for example, thinner, benzine, etc.), detergent, or insecticide. This may damage the monitor or the unit. Recommended cleaning method: Gently wipe the panel with a soft, dry cloth. How to clean the connector Frequent detachment will deteriorate the connectors. -
Page 59: More About This Unit
<.mpg>, <.mpeg>, or <.mod>*. * <.mod> is an extension code used for the MPEG2 files recorded by JVC Everio camcorders. The MPEG2 files with the <.mod> extension code cannot be played back when stored on a USB mass storage class device. -
Page 60: Satellite Radio Operations
Numbers and symbols • When <Руccĸий> is selected for <Language> 31): Upper and lower cases Numbers and symbols JVC bears no responsibility for any loss of data in an iPod/iPhone and USB mass storage class device while using this unit. - Page 61 Sound signals emitted through the rear terminals Through the analog terminals (Speaker out/REAR OUT/FRONT OUT) 2-channel signal is emitted. When playing multi-channel encoded disc, multi-channel signals are downmixed. • DTS sound cannot be reproduced. Language codes (for DVD language selection) Code Language Code Language Code Language Code Language Code Language Afar Persian...
- Page 62 • The Bluetooth word mark and logos are owned by the Bluetooth SIG, Inc. and any use of such marks by Victor Company of Japan, Limited (JVC) is under license. Other trademarks and trade names are those of their respective owners.
-
Page 63: Troubleshooting
Troubleshooting What appears to be trouble is not always serious. Check the following points before calling a service center. • For operations with the external components, refer also to the instructions supplied with the adapters used for the connections (as well as the instructions supplied with the external components). •... - Page 64 Symptom • <Lighting Sensor> function does not work properly. • SSM automatic presetting does not work. • Static noise while listening to the radio. • Disc can be neither recognized nor played back. • Disc cannot be ejected. • Recordable/Rewritable discs cannot be played back.
- Page 65 Symptom • Disc cannot be played back. • Noise is generated. • Tracks are not played back as you have intended them to play. • Elapsed playing time is not correct. • “Not Support” appears on the screen and track skips. •...
- Page 66 Symptom • The iPod/iPhone does not turn on or does not work. • Sound is distorted. • A lot of noise is generated. • Playback stops. • “No Files” appears on the screen. • No operations are available when playing back a track containing Artwork.
- Page 67 Symptom • “OFF AIR” appears on the screen while listening to the XM Satellite radio. • “LOADING” appears on the screen while listening to the XM Satellite radio. • “Reset08” appears on the screen. • Satellite radio does not work at all. •...
- Page 68 Symptom • “Bluetooth” is not shown in <AV Menu>. • Bluetooth device does not detect the unit. • The unit does not make pairing with the Bluetooth device. • Echo or noise occurs. • The unit does not response when you tried to copy the phone book to the unit.
-
Page 69: Specifications
Low: 60 Hz, 80 Hz, 100 Hz, 200 Hz Mid: 500 Hz, 1 kHz, 1.5 kHz, 2.5 kHz High: 10 kHz, 12.5 kHz, 15 kHz, 17.5 kHz ±12 dB Line-Out Level/Impedance KW-AVX838/KW-AVX830/KW-ADV793/ KW-AVX738: 5 V/20 kΩ load (full scale) KW-AVX730: 2.5 V/20 kΩ load (full scale) Output Impedance 1 kΩ... - Page 70 Signal Detection System Non-contact optical pickup (semiconductor laser) Frequency Response DVD, fs=48 kHz/96 kHz VCD/CD Dynamic Range Signal-to-Noise Ratio Wow and Flutter USB Standards USB 2.0 Full Speed Data Transfer Rate Full Speed Low Speed Compatible Device Mass storage class Compatible File System FAT 32/16/12 Max.
- Page 71 Power Requirement Operating Voltage Grounding System Allowable Storage Temperature Allowable Operating Temperature Dimensions (W × H × D) Installation Size (approx.) Panel Size (approx.) Mass (approx.) Design and specifications are subject to change without notice. If a kit is necessary for your car, consult your telephone directory for the nearest car audio speciality shop. Required space for installation and the monitor ejection 20 (13/16) 160 (6-5/16)
- Page 72 Muchas gracias por la compra de un producto JVC. Como primer paso, por favor lea detenidamente este manual para comprender a fondo todas las instrucciones y IMPORTANTE PARA PRODUCTOS LÁSER 1. PRODUCTO LÁSER CLASE 1 2. PRECAUCIÓN: No abra la tapa superior.
-
Page 73: Cómo Reposicionar Su Unidad
• Uso del teléfono móvil Bluetooth/reproductor de audio ... 39 • Ajustes del dispositivo Bluetooth ... 44 Operaciones Bluetooth para KW-ADV793/KW-AVX730 ... 45 • Conexión de dispositivos Bluetooth ... 45 • Uso del teléfono móvil Bluetooth ... 48 • Uso del reproductor de audio Bluetooth ... 51 •... -
Page 74: Introducción
INTRODUCCIÓN Cancelación de la demostración en pantalla y puesta en hora del reloj Cancelación de la demostración en pantalla Visualice la pantalla <AV Menu>. 3:45 Visualice la pantalla <Setup>. AV Menu AV Setup Mode Equalizer List Sound Bluetooth Seleccione <Off>. Setup Demonstration Ambient... -
Page 75: Operaciones Básicas
Operaciones básicas Desmontaje/fijación del panel del monitor Precaución: • Sostenga firmemente el panel del monitor para no dejarlo caer accidentalmente. • Ajuste el panel del monitor en la placa de fijación hasta que quede bloqueado firmemente. Desmontando Mientras la unidad está encendida: Close Detach Detach? -
Page 76: Operaciones Básicas En El Panel Del Monitor
Operaciones básicas en el panel del monitor Pantalla (panel táctil) Reinicialice la unidad. ( • Encienda la unidad. • Atenúa el sonido. • Desconecta la alimentación. (Sostener) • Cambia la información en pantalla. – Cada vez que pulsa el botón DISP, la pantalla cambia para mostrarle diversas informaciones. -
Page 77: Operaciones Básicas En El Panel Táctil
Mode] de modo de la fuente de reproducción. Visualiza las listas. List] Visualiza el menú <Bluetooth>. Bluetooth]* (KW-AVX838/KW-AVX830: 44 / KW-ADV793/ KW-AVX730: [Exit] Retrocede a la pantalla de la fuente actual. Aparece sólo cuando se conecta el adaptador Bluetooth. (KW-AVX838/KW-AVX830:... - Page 78 Ajuste del sensor de iluminación Puede cambiar la condición de apagado/encendido de la pantalla y de las luces de los botones del panel del monitor. AV Setup Setup Demonstration Ambient Wall Paper Setup Beep Muting1 Telephone Muting Prox./Motion-LED Lighting Sensor Motion Sensitiv.
- Page 79 Cambio de los ajustes del menú Se desplaza a la Indica que existe un nivel de jerarquía/ página del menú anterior elemento de ajuste siguiente Setup Beep Muting1 Telephone Muting Prox./Motion-LED Lighting Sensor Motion Sensitiv. Initialize Enter Back • Vuelve a la pantalla anterior •...
-
Page 80: Selección De La Fuente De Reproducción
Cambia a un componente externo conectado a los jacks LINE IN/VIDEO IN en el panel trasero. Sólo para KW-AVX830/KW-ADV793/KW-AVX730. “ HD Radio” se muestra como fuente en lugar de “ TUNER”, cuando se conecta un sintonizador HD Radio. Cuando se conecta un iPod/iPhone, se visualiza “ iPod” como fuente, en lugar de “ USB”. -
Page 81: Operaciones De La Fuente Av
OPERACIONES DE LA FUENTE AV Para escuchar la radio SOURCE TUNER Banda Modo de sonido Indicador ST 3:45 • El indicador ST se enciende al recibir una radiodifusión FM estéreo con una intensidad de señal suficientemente potente. * Al tocar el número de preajuste también se visualizará la lista de preajustes (véase debajo). Busca una emisora. - Page 82 Cuando se interfiere la recepción de una emisora FM... AV Setup Setup Demonstration Ambient Wall Paper Setup Auto IF Band Width Europe Area Setting 112233445566 Sirius ID Back Auto Aumenta la selectividad del sintonizador para reducir las interferencias entre emisoras adyacentes.
-
Page 83: Operaciones De Disco/Usb
Operaciones de disco/USB Reproducción de un disco • Si el disco no dispone de ningún menú de disco, todas las pistas del mismo serán reproducidas repetidamente hasta que usted cambie la fuente o expulse el disco. • Si aparece “ ” en la pantalla, significa que la unidad no puede aceptar la operación que intentó realizar. –... -
Page 84: Tipo De Disco Reproducible
El lado no DVD de un “DualDisc” no es compatible con la norma “Compact Disc Digital Audio”. Por consiguiente, no se recomienda usar el lado no DVD de un DualDisc en este producto. Formato de grabación, tipo de archivo, etc DVD-Vídeo * Region Code: KW-AVX838/KW-AVX738: 4 KW-AVX830/KW-ADV793/ Ej.: KW-AVX730: 1 Ej.: DVD-Audio/DVD-ROM DVD-Vídeo... -
Page 85: Reproducción De Un Dispositivo Usb
• Para evitar el borrado accidental, asegúrese de sacar copia de respaldo de todos los datos importantes. * Excepto archivos MPEG2 grabados mediante la cámara JVC Everio (código de extensión <.mod>). Puede conectar a la unidad, un dispositivo de clase de almacenamiento masivo USB tal como una memoria USB, reproductor de audio digital, etc. - Page 86 Operaciones de reproducción de los discos/archivos Cuando mire una imagen reproducida, pulse DISP o toque la pantalla para que aparezcan los botones de operación ( Sólo para discos: Formato de vídeo/modo de reproducción: VIDEO, MPEG, JPEG, VR-PRG (programa), VR-PLAY (lista de reproducción), PBC SOURCE VIDEO Tipo de medios...
-
Page 87: Botones De Operación En La Pantalla
Botones de operación en la pantalla Puede visualizar los siguientes botones de operación mientras mira las imágenes reproducidas en la pantalla. • Si no realiza ninguna operación en el lapso de unos 15 segundos, los botones de operación desaparecen (salvo que se esté... -
Page 88: Selección De Los Modos De Reproducción
Selección de una carpeta/ pista de la lista List Seleccione una carpeta (1), luego una pista (2). Número de la pista actual/ Número de carpeta actual/ número total de carpetas número total de pistas List 0005/0035 0003/0099 Track001.mp3 Folder 01 Track002.mp3 Folder 02 Track003.mp3... -
Page 89: Para Escuchar Dispositivo Ipod/Iphone
Para escuchar dispositivo iPod/iPhone Preparativos Conexión del iPod/iPhone Al iPod/iPhone Cable USB desde la parte trasera de la unidad • Puede controlar los siguientes modelos de iPod/ iPhone: – iPod con Vídeo (5ta. generación) * – iPod classic * – iPod nano (1ra. generación) –... - Page 90 Nota: Cuando opera un iPod/iPhone, algunas operaciones pueden no funcionar correctamente o como se desea. En tal caso, visite el siguiente sitio web de JVC: <http://www.jvc.co.jp/english/car/> (solamente en inglés) Estado de reproducción — 3: reproducción/8: pausa 0 : 01 : 20 (Consulte “Scroll”,...
- Page 91 Selección de una pista/video desde <Search Mode> • Los modos de búsqueda disponibles dependen del tipo de iPod/iPhone. List Search Mode Music Playlists Videos Artists Shuffle Songs Albums Songs Podcasts Genres Back Music Selecciona la opción deseada de la lista Videos Shuffle Songs La reproducción se inicia Número de pista (vídeo) actual/número total de pistas (vídeos)
-
Page 92: Para Escuchar La Radio Satelital
CNP2000UC y CNPJVC1 están conectados). • La actualización tarda algunos minutos en finalizar. • No pulse ningún botón ni realice una operación hasta que finalice la actualización. (Sólo para KW-AVX830/KW-ADV793/KW-AVX730) SC-C1 y KS-SRA100 PnP, SC-VDOC1 y KS-SRA100 Adaptador JVC Smart Digital–XMDJVC100... -
Page 93: Sintonice El Canal Que Desee
Back Pulse/arrastre para buscar en la lista. Exit • También puede buscar en la lista arrastrando su dedo hacia arriba y abajo a lo largo de la lista. KW-ADV793 KW-AVX730 Número de preajuste* Número de canal Sólo para SIRIUS Selecciona la banda. -
Page 94: (Sólo Para Kw-Avx830/Kw-Adv793/Kw-Avx730)
Para escuchar la transmisión de HD Radio (Sólo para KW-AVX830/KW-ADV793/KW-AVX730) Antes de hacer funcionar, conecte el sintonizador HD Radio, KT-HD300 (de venta por separado) al puerto de expansión en la parte posterior de la unidad. ¿Qué es la tecnología HD Radio? La tecnología HD Radio puede brindar sonido digital de alta calidad—las emisiones digital AM tendrán calidad... - Page 95 Para cambiar el modo de recepción de HD Radio Cuando recibe una transmisión de HD Radio, la unidad sintoniza el audio digital o analógico automáticamente de acuerdo con las condiciones de recepción. Mode Mode Mono DX/Local Local Start Blend Hold Auto Digital Analog Para sintonizar de audio analógico...
-
Page 96: Uso De Otros Componentes Externos
Uso de otros componentes externos SOURCE Tipo de fuente — “AV-IN” AV-IN (véase debajo) o “EXT-IN” 3:45 [SOURCE] Preparativos: • Para escuchar música del componente conectado, seleccione <Audio> para el ajuste <AV Input>. • Para ver vídeo desde el componente conectado, seleccione <Audio & Video> para el ajuste <AV Input>. -
Page 97: Ext-Input
Visualización de la pantalla de navegación También puede conectar un Sistema de navegación a la clavija VIDEO IN para poder ver la pantalla de navegación. AV Setup Setup Demonstration Ambient Wall Paper Setup Audio&Video AV Input External Input Setup AV Input External Input iPod Video Audio&Video... -
Page 98: Operaciones De Zona Dual
Operaciones de Zona Dual Podrá disfrutar de la reproducción del disco en el monitor externo conectado a los jacks VIDEO OUT y 2nd AUDIO OUT, mientras escucha cualquier otra fuente distinta de “USB/iPod” a través de los altavoces. • Mientras se está usando la Zona Dual, sólo podrá operar el reproductor DVD/CD utilizando el control remoto 53). -
Page 99: Ecualización De Sonido
Ecualización de sonido Equalizer Ÿ Seleccione un modo de sonido. Equalizer Flat Natural Dynamic Vocal Boost Bass Boost Super Bass Back Edit Vaya a los otros 6 modos de sonido • También es posible cambiar el modo de sonido pulsando el icono de atajo. ( Cómo almacenar sus propios ajustes Los ajustes realizados se pueden almacenar en <User1>, <User2>... -
Page 100: Elementos De Los Menús Av Setup/Sound/Equalizer
Elementos de los menús AV Setup/Sound/Equalizer AV Menu AV Setup Equalizer Sound AV Setup (Configuración AV) Opción del menú Demonstration (Modo Demo) Wall Paper (Papel Tapiz) Color (Color) Scroll (Desplazamiento) Dimmer (Atenuador Ilum.) Dimmer Time Set (Aten. Ilum. Hora) Dimmer Level (Nivel Atenuador) Bright (Brillo) Cuando se selecciona <Ecology>, <Color>... - Page 101 Opción del menú Ajuste/elemento seleccionable Picture Adjust Puede realizar lo siguiente de manera que la pantalla aparezca clara y legible (Ajustar Imagen) para ver la imagen reproducida. El ajuste será almacenado—uno para “DISC/ USB”(común) y otro para “AV-IN”. Pulse [ ♦...
- Page 102 Opción del menú Ajuste/elemento seleccionable Time Set Inicial 1:00 AM ( (Ajustar Hora) Time Format ♦ (Formato Tiempo) OSD Clock ♦ (Reloj OSD) ♦ Clock Adjust Seleccione <Auto> para que el reloj se ajuste automáticamente mediante los (Ajustar Reloj) * datos horarios suministrados por el canal de radio satelital.
- Page 103 Sólo se puede seleccionar para “DISC/USB”. (La reproducción se detiene cuando cambie el ajuste.) Para KW-AVX838/KW-AVX738: <SA> es el ajuste inicial. Para KW-AVX830/KW-ADV793/KW-AVX730: <US> es el ajuste inicial. Sólo para KW-AVX830/KW-ADV793/KW-AVX730. Aparece sólo cuando está conectada la radio por satélite SIRIUS.
- Page 104 Opción del menú AV Input (Entrada AV) External Input (Entrada Externa) Beep (Beep) Telephone Muting (Silenc. Teléfono) Lighting Sensor (Sensor Ilumin.) Motion Sensitiv. (Sensibi. Motion) Initialize (Reiniciar) Equalizer (Ecualizador) Ajuste/elemento seleccionable Flat, Natural, Dynamic, Vocal Boost, Bass Boost, Super Bass, Rhythm, Acoustic, Relax, User1, User2, ♦...
-
Page 105: Sound (Sonido)
Sound (Sonido) Opción del menú Ajuste/elemento seleccionable Fader/Balance Fader : Ajuste el balance de salida de los altavoces delanteros y traseros. (Fader/Balance) F6 a R6; Inicial 0 ♦ • Cuando utiliza un sistema de dos altavoces, ajuste el fader al centro (0). Fader/Balance Reset Fader... -
Page 106: Operaciones Bluetooth
(o reinicialice la unidad). Información Bluetooth: Si desea obtener más información sobre Bluetooth, visite el siguiente sitio web de JVC: <http://www.jvc.co.jp/english/car/> (Solamente en inglés) Operaciones Bluetooth para KW-AVX838/KW-AVX830 Bluetooth es una tecnología de radiocomunicación inalámbrica de alcance corto para dispositivos móviles,... -
Page 107: Conexión De Dispositivos Bluetooth
Abra el panel del monitor. Adaptador Bluetooth (KS-UBT1) • Inserte firmemente el adaptador Bluetooth con el logotipo de JVC hacia arriba. • Este puerto está diseñado para usarse solamente con el KS-UBT1. No se pueden utilizar otros adaptadores Bluetooth ni dispositivos USB. -
Page 108: Conexión/Desconexión De Un Dispositivo Bluetooth Registrado
Conexión/desconexión de un dispositivo Bluetooth registrado Bluetooth Bluetooth Enter Dial Menu Enter Device Menu Settings Enter Seleccione la operación deseada y, a continuación, seleccione el dispositivo registrado que desea conectar/ desconectar. Para conectar Device Menu Enter Phone Connect Audio Connect Enter Delete Pairing Enter... -
Page 109: Uso Del Teléfono Móvil Bluetooth/Reproductor De Audio
Uso del teléfono móvil Bluetooth/reproductor de audio El icono Bluetooth Nº de pista/Tiempo de reproducción* • (Azul): Dispositivo Bluetooth ( : teléfono móvil* / : reproductor de audio) conectado. • (Blanco): No conectado. Estado del dispositivo • Intensidad de la señal/recordatorio de batería (sólo cuando la información procede del dispositivo). -
Page 110: Recepción De Una Llamada
Recepción de una llamada Cuando entra una llamada... La fuente cambiará automáticamente a “ Bluetooth”. Nombre y número de teléfono (si está disponible) • También se puede recibir una llamada pulsando cualquier botón del panel del monitor (excepto o VOL +/–). Cuando <Auto Answer>... -
Page 111: Cómo Hacer Una Llamada
Cómo hacer una llamada Visualice <Dial Menu>. • También puede visualizar <Dial Menu> mediante los siguientes métodos: – Manteniendo pulsado SRC en el panel del monitor – Pulsando [Dial Menu] en el menú <Bluetooth> ( Seleccione un método de llamada, y luego el elemento deseado para llamar. -
Page 112: Copia De La Guía Telefónica
Memorización de los números telefónicos Puede memorizar hasta 6 números telefónicos. Seleccione el número telefónico que desea preajustar en <Redial>, <Received Calls>, <Phonebook>, <Missed Calls> o <Phone Number>. Seleccione el número telefónico que desea guardar. Received Calls 12312341234 Redial Received Calls 12311112222 12322223333 Phonebook... - Page 113 Selección de la guía telefónica/ listas de llamada a usar Si su teléfono móvil es compatible con el Perfil de acceso a la guía telefónica (PBAP), todos los números de teléfono de la guía telefónica y de las listas de llamada se copian automáticamente a la unidad cuando sea conectada (hasta 5000 entradas desde la guía telefónica, 50 entradas desde cada una de las llamadas remarcadas,...
-
Page 114: Ajustes Del Dispositivo Bluetooth
Ajustes del dispositivo Bluetooth Bluetooth Opción del menú Dial Menu (Menú de Marcado) * Phone Connect (Teléfono Conect.)* Audio Connect (Audio Conect.)* Phone Disconnect (Teléfono Descon.)* Audio Disconnect (Audio Desconect.)* Delete Pairing (Borrar Vínculo) New Pairing (Nuevo Vínculo) Auto Connect (Conexión Auto.) Auto Answer (Auto Responder) -
Page 115: Operaciones Bluetooth Para Kw-Adv793/Kw-Avx730
Ring Tone Change (Cambiar Tono) Initialize (Reiniciar) Information (Información) Operaciones Bluetooth para KW-ADV793/KW-AVX730 Para las operaciones Bluetooth, se deberá conectar el adaptador Bluetooth (KS-BTA200: adquirido por separado) al puerto de expansión en la parte trasera. • Consulte también las instrucciones suministradas con el adaptador Bluetooth y el dispositivo Bluetooth. - Page 116 Asegúrese de que “NEW DEVICE” esté seleccionado. Si no lo está, pulse [ seleccionarlo. Bluetooth Para registrar usando <Open> Open Connect Back Para ir a otras opciones del menú Cambie el código PIN. • Puede introducir cualquier número que desee (número de 1 a 16 dígitos).
- Page 117 Para conectar un dispositivo especial <Special Device> Bluetooth NEW DEVICE Bluetooth Dial Menu Search Message Special Device Open Connect Back La unidad visualiza la lista de dispositivos preajustados. Seleccione el dispositivo que desea conectar. Utilice <Open> (o <Search>) para conectar. Para conectar/desconectar un dispositivo registrado Seleccione “BT Phone”...
-
Page 118: Uso Del Teléfono Móvil Bluetooth
(excepto o VOL +/–). Detención del timbre (cancelando la llamada saliente) (Cualquier botón salvo y VOL +/–) KW-ADV793 KW-AVX730 Nombre del dispositivo conectado • Visualiza la pantalla <AV Menu>. • Activa la función <Voice Dialing>. - Page 119 Verificación de recepción de mensaje de texto Si el teléfono móvil es compatible con Mensajes de texto, podrá leer los mensajes en la pantalla. Para leer un mensaje recibido, accione la unidad o el teléfono móvil después de detener el vehículo en un lugar seguro.
- Page 120 Ej.: Cuando se llama mediante las llamadas recibidas Dial Menu Enter Redial Received Calls Enter Phonebook Enter Missed Calls Enter Phone Number Enter Voice Dialing Enter Back Received Calls 12312341234 Redial Received Calls 12311112222 12322223333 Phonebook 12345678900 Missed Calls 12345678911 Phone Number 12345678922 Voice Dialing...
-
Page 121: Uso Del Reproductor De Audio Bluetooth
Connected Device Name FLAT Current Track Title Artist Name 3:45 Album Title 30.) [SOURCE] KW-ADV793 KW-AVX730 0 : 01 : 20 Nombre del dispositivo conectado Visualiza la pantalla <Dial Menu>. Visualiza la pantalla <Source Menu>. Visualiza la pantalla <AV Menu>. -
Page 122: Ajustes Del Dispositivo Bluetooth
: La unidad rechaza todas las llamadas entrantes. : La unidad le informa la llegada de un mensaje emitiendo un pitido audible y visualizando “Receiving Message”. : La unidad no le informa la llegada de un mensaje. KW-ADV793 KW-AVX730 Device01 Search... -
Page 123: Referencia
REFERENCIA Uso del control remoto Para KW-AVX830/KW-ADV793/KW-AVX730: Para utilizar el control remoto, compre el RM-RK252P vendido separadamente. Instalación de las pilas Instale las pilas (no suministradas) en el control remoto haciendo coincidir correctamente las polaridades (+ y –). Precaución: • Peligro de explosión si se instala la pila de manera incorrecta. Cámbiela solamente por una del mismo tipo o de un tipo equivalente. - Page 124 Selecciona la fuente. Inicia/pausa la reproducción. Contesta las llamadas entrantes. Inicie la reproducción. Visualiza la pantalla <Dial Menu>.* (KW-AVX838/KW-AVX830: 41 / KW-ADV793/KW-AVX730: Contesta las llamadas entrantes. Selecciona las bandas. Detiene la reproducción. Finaliza la llamada. Pone la reproducción en pausa.
- Page 125 Disco Disco — Disco/archivo Sólo para KW-AVX830/KW-ADV793/KW-AVX730. Sólo para KW-AVX838/KW-AVX830/KW-ADV793/KW-AVX730. Sólo para KW-AVX838/KW-AVX830: Estos botones no se pueden utilizar cuando está activada la Zona dual. Funciona como botones numéricos cuando se pulsa junto con el botón SHIFT. ( Véase abajo.) Sólo para KW-AVX838/KW-AVX830.
- Page 126 Para buscar directamente un elemento DVD-Vídeo/DVD-VR/MPEG1/MPEG2/JPEG/MP3/ WMA/WAV/VCD/CD Ingrese en el modo de búsqueda. (Sostener) • Cada vez que pulsa DIRECT, el elemento de búsqueda cambia como sigue: Capítulo → DVD-Vídeo cancelado Capítulo → DVD-VR reproducción MPEG1/ MPEG2/JPEG/ Pista/archivo MP3/WMA/ cancelado VCD/CD Pista cancelado...
- Page 127 Uso de la-barra en pantalla DVD-Vídeo/DVD-VR/MPEG1/MPEG2/JPEG/VCD (dos veces) Información Operación (Véase debajo.) Seleccione una opción. Efectúe una selección. Si aparece el menú emergente... • Para introducir tiempos/números: : Mover la posición de entrada : Seleccionar un número • Para cancelar el menú emergente: Para borrar la barra en pantalla: Operación de elementos en la barra en pantalla Cambia la indicación del tiempo...
-
Page 128: Mantenimiento
Mantenimiento Precaución sobre la limpieza de la unidad No utilice disolventes (por ejemplo, diluyente, bencina, etc.), detergentes, ni insecticidas de ningún tipo. Se podría dañar el monitor o la unidad. Método de limpieza recomendado: Limpie el panel suavemente, con un trapo suave y seco. Cómo limpiar el conector Un desmontaje frecuente... -
Page 129: Más Sobre Este Receptor
<.mod>*. * <.mod> es un código de extensión utilizado para archivos MPEG2 grabados mediante videocámaras JVC Everio. Los archivos MPEG2 con el código de extensión <.mod> no se pueden reproducir cuando se encuentre almacenado en un dispositivo de clase de almacenamiento masivo USB. -
Page 130: Operaciones De La Radio Satelital
• Cuando selecciona <Руccĸий> en <Language> ( 31): Mayúsculas y minúsculas Números y símbolos JVC no se hará responsable de ninguna pérdida de datos en un iPod /iPhone y dispositivo de clase de almacenamiento masivo USB mientras se utiliza esta unidad. - Page 131 Señales de sonido emitidas a través de los terminales traseros A través de los terminales analógicos (Salida de altavoz/REAR OUT/FRONT OUT) Se emite la señal de 2 canales. Cuando se reproduce un disco codificado multicanal, se mezclan las señales multicanal. •...
- Page 132 • La marca Bluetooth y sus logotipos son propiedad de Bluetooth SIG, Inc., y cualquier uso de los mismos por Victor Company of Japan, Limited (JVC) se realiza bajo licencia. Otras marcas y nombres comerciales son de sus respectivos propietarios.
-
Page 133: Localización De Averías
Localización de averías Lo que aparenta ser una avería podría resolverse fácilmente. Verifique los siguientes puntos antes de llamar al centro de servicio. • En cuanto a las operaciones con los componentes externos, consulte asimismo las instrucciones suministradas con los adaptadores utilizados para las conexiones (así como las instrucciones suministradas con los componentes externos). - Page 134 Síntoma • La función <Lighting Sensor> no funciona correctamente. • El preajuste automático SSM no funciona. • Ruidos estáticos mientras se escucha la radio. • Los discos no se pueden reconocer ni reproducir. • El disco no puede ser expulsado. •...
- Page 135 Síntoma • No se puede reproducir el disco. • Se generan ruidos. • Las pistas no se reproducen de la manera intentada por usted. • El tiempo de reproducción transcurrido no es correcto. • Aparece “No Soportes” en la pantalla y se omiten las pistas.
- Page 136 Síntoma • El iPod/iPhone no se enciende o no funciona. • El sonido está distorsionado. • Ruidos considerables. • La reproducción se detiene. • Aparece “No hay Archivos” en la pantalla. • Las operaciones no se pueden realizar cuando se reproduce una pista que contenga una ilustración.
- Page 137 Síntoma • La señal “OFF AIR” aparece en la pantalla mientras escucha la radio satelital XM. • La señal “LOADING” aparece en la pantalla mientras escucha la radio satelital XM. • Aparece “Reiniciar08” en la pantalla. • La radio satelital no funciona. •...
- Page 138 Síntoma • “Bluetooth” no aparece en <AV Menu>. • El dispositivo Bluetooth no detecta la unidad. • La unidad no puede realizar apareamiento con el dispositivo Bluetooth. • Hay eco o ruidos. • La unidad no responde cuando intento copiar la guía telefónica a la unidad.
-
Page 139: Especificaciones
Mediana: 500 Hz, 1 kHz, 1,5 kHz, 2,5 kHz Alta: 10 kHz, 12,5 kHz, 15 kHz, 17,5 kHz ±12 dB Nivel/impedancia salida KW-AVX838/KW-AVX830/KW-ADV793/ línea KW-AVX738: 5 V/20 kΩ de carga (plena escala) KW-AVX730: 2,5 V/20 kΩ de carga (plena escala) Impedancia de salida 1 kΩ... - Page 140 Sistema de detección de Captor óptico sin contacto (láser semiconductor) señal Respuesta en frecuencia DVD, fs=48 kHz/96 kHz VCD/CD Rango dinámico Relación señal a ruido Lloro y trémolo Normas USB USB 2.0 Full Speed Velocidad de transferencia Toda velocidad de datos Baja velocidad Dispositivo compatible Clase de almacenamiento masivo...
- Page 141 Requisitos de potencia Voltaje de funcionamiento Sistema de puesta a tierra Temperatura de almacenamiento admisible Temperatura de funcionamiento admisible Dimensiones (An × Al Tamaño de instalación (aprox.) × Pr) Tamaño del panel (aprox.) Peso (aprox.) El diseño y las especificaciones se encuentran sujetos a cambios sin previo aviso. Si necesita un kit para su automóvil, consulte su directorio telefónico para buscar la tienda especializada en car audio más cercana.
-
Page 142: The Countries Where You May Use The Bluetooth® Function
The countries where you may use the Bluetooth® function nh ng qu c gia mà b n có th s 您能够使用 您能夠使用 기능을 사용할 수 있는 국가 d ng ch c n ng Bluetooth 功能的国家 功能的國家 ®... - Page 143 Country Andorra Australia Österreich Bosna i Hercegovina Belgien Belgique България Canada Schweiz Suisse Chile Κύπρος Kıbrıs Česká republika Deutschland Danmark Eesti España Suomi Finland France United Kingdom Ελλάδα Hong Kong 香港 香港 Hrvatska Magyarország Ireland Éire Country Ísland Italia 대한민국 Lichtenstein Lietuva Luxemburg...
- Page 144 The countries where you may use the Bluetooth® function Ở những quốc gia mà bạn có thể sử dụng chức năng Bluetooth 您能够使用 您能夠使用 功能的国家 功能的國家 ®...
- Page 145 Country Andorra Australia Österreich Bosna i Hercegovina Belgien Belgique България Canada Schweiz Suisse Κύπρος Kıbrıs Česká republika Deutschland Danmark Eesti España Suomi Finland France United Kingdom Ελλάδα Hong Kong 香港 香港 Hrvatska Magyarország Indonesia Ireland Éire Ísland Italia Lichtenstein Lietuva Country Luxemburg Luxembourg...
- Page 146 Having TROUBLE with operation? Please reset your unit Refer to page of How to reset your unit Still having trouble?? USA ONLY Call 1-800-252-5722 http://www.jvc.com We can help you! EN, SP 0110NYMMDWJEIN © 2010 Victor Company of Japan, Limited...
Need help?
Do you have a question about the KW-ADV793 and is the answer not in the manual?
Questions and answers