Table of Contents
Advertisement
Available languages
Available languages
CD RECEIVER
RECEPTOR CON CD
RECEPTEUR CD
KD-S5050/KD-S10
For installation and connections, refer to the separate manual.
Para la instalación y las conexiones, refiérase al manual separado.
Pour l'installation et les raccordements, se référer au manuel séparé.
INSTRUCTIONS
MANUAL DE INSTRUCCIONES
MANUEL D'INSTRUCTIONS
DIRECT TRACK ACCESS
7
8
9
10
11
12
DIRECT TRACK ACCESS
7
8
9
10
11
12
For customer Use:
Enter below the Model No. and
Serial No. which are located on
the top or bottom of the cabinet.
Retain this information for future
reference.
Model No.
Serial No.
GET0171-001B
[J]
Advertisement
Chapters
Table of Contents

Related Manuals for JVC Model KD-S10J


Summary of Contents for JVC Model KD-S10J
- Page 1 CD RECEIVER RECEPTOR CON CD RECEPTEUR CD KD-S5050/KD-S10 For installation and connections, refer to the separate manual. Para la instalación y las conexiones, refiérase al manual separado. Pour l’installation et les raccordements, se référer au manuel séparé. INSTRUCTIONS MANUAL DE INSTRUCCIONES MANUEL D’INSTRUCTIONS DIRECT TRACK ACCESS DIRECT TRACK ACCESS...
-
Page 2: Important For Laser Products
INFORMATION (For U.S.A.) This equipment has been tested and found to comply with the limits for a Class B digital device, pursuant to Part 15 of the FCC Rules. These limits are designed to provide reasonable protection against harmful interference in a residential installation. This equipment generates, uses, and can radiate radio frequency energy and, if not installed and used in accordance with the instructions, may cause harmful interference to radio communications. -
Page 3: Table Of Contents
Thank you for purchasing a JVC product. Please read all instructions carefully before operation, to ensure your complete understanding and to obtain the best possible performance from the unit. CONTENTS How to reset your unit ... 2 How to use the MODE button ... 3 LOCATION OF THE BUTTONS ...4... -
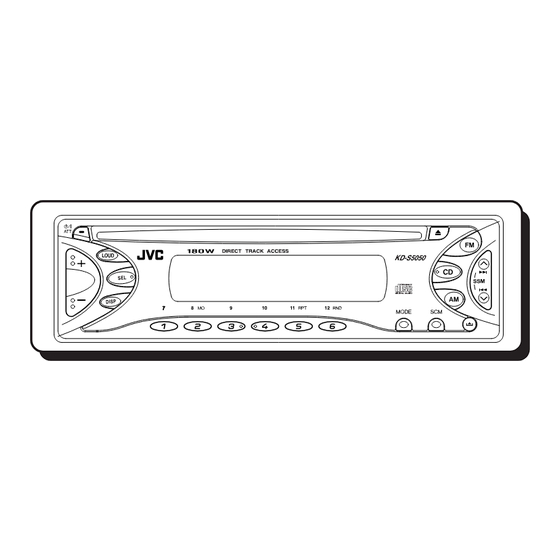
Page 4: Location Of The Buttons
LOCATION OF THE BUTTONS Control panel Display window 12 34 (Standby/On Attenuator) button 2 +/– button 3 LOUD (Loudness) button 4 SEL (Select) button 5 Loading slot 6 AM button 7 0 (Eject) button 8 CD button 9 FM button p DISP (Display) button q MO (Monaural) button w RPT (Repeat) button... -
Page 5: Basic Operations
Turning on the power Turn on the power. Note on One-Touch Operation: When you select a source in step 2 below, the power automatically comes on. You do not have to press this button to turn on the power. Select the source. To operate the tuner (FM or AM), see pages 6 –... -
Page 6: Radio Operations
RADIO OPERATIONS Listening to the radio You can use either automatic searching or manual searching to tune in to a particular station. Searching a station automatically: Auto search Select the band (FM 1 – 3, AM). Lights up when receiving an FM stereo broadcast with Selected band appears sufficient signal strength... -
Page 7: Storing Stations In Memory
Tune in to a station you want while “M” (manual) is flashing. Press stations of higher frequencies. Press 4 stations of lower frequencies. • If you release your finger from the button, the manual mode will automatically turn off after 5 seconds. -
Page 8: Manual Preset
Manual preset You can preset up to 6 stations in each band (FM1, FM2, FM3 and AM) manually. Ex: Storing an FM station of 92.5 MHz into the preset number 1 of the FM1 band. Select the band (FM1 – 3, AM) you want to store FM stations into (in this example, FM1). -
Page 9: Cd Operations
Playing a CD Insert a disc into the loading slot. The unit turns on, draws a CD and starts playback automatically. Note on One-Touch Operation: When a CD is already in the loading slot, pressing CD turns on the unit and starts playback automatically. The CD-in indicator flashes The CD-in indicator lights up Total playing time of... -
Page 10: Locating A Track Or A Particular Portion On A Cd
Locating a track or a particular portion on a CD To fast-forward or reverse the track Press and hold while playing a CD, to fast forward the track. Press and hold 4 while playing a CD, to reverse the track. To go to the next tracks or the previous tracks Press... -
Page 11: Mode
Prohibiting CD ejection You can prohibit the CD ejection and can lock a CD in the loading slot. While pressing CD, press and hold 0 for more than 2 seconds. “EJECT” flashes on the display for about 5 seconds, and the CD is locked and cannot be ejected. -
Page 12: Sound Adjustments
SOUND ADJUSTMENTS Adjusting the sound You can adjust the sound characteristics to your preference. Select the item you want to adjust. Each time you press the button, the adjustable items change as follows: Indication To do: Adjust the bass. (Bass) Adjust the treble. -
Page 13: Using The Sound Control Memory (Scm)
Using the Sound Control Memory (SCM) You can select and store a preset sound adjustment suitable to each playback source. (Advanced SCM) Selecting and storing the sound modes Once you select a sound mode, it is stored in memory. It will be recalled every time you select the same source and will be shown on the display. -
Page 14: Storing Your Own Sound Adjustments
Storing your own sound adjustments You can adjust the sound modes (BEAT, SOFT, POP: see page 13) to your preference and store your own adjustments in memory. • There is a time limit in doing the following procedure. If the setting is cancelled before you finish, start from step 1 again. -
Page 15: Other Main Functions
Setting the clock Press and hold SEL (Select) for more than 2 seconds. “CLOCK H”, “CLOCK M”, “SCM LINK” or “LEVEL” appears on the display. Set the hour. 1 Select “CLOCK H” if not shown on the display. 2 Adjust the hour. Set the minute. -
Page 16: Selecting The Level Display
Selecting the level display You can select the level display according to your preference. When shipped from the factory, “VOL 2” is selected. VOL 1 : Shows the volume level indicator. VOL 2 : Alternates “VOL 1” setting and illumination display. : Erases the volume level indicator. -
Page 17: Detaching The Control Panel
Detaching the control panel You can detach the control panel when leaving the car. When detaching or attaching the control panel, be careful not to damage the connectors on the back of the control panel and on the panel holder. Detaching the control panel Before detaching the control panel, be sure to turn off the power. -
Page 18: Maintenance
MAINTENANCE Handling discs This unit has been designed to reproduce CDs and CD-Rs (Recordable). • This unit is not compatible with MP3 discs. How to handle discs When removing a disc from its case, press down the center holder of the case and lift the disc out, holding it by the edges. -
Page 19: Troubleshooting
What appears to be trouble is not always serious. Check the following points before calling a service center. Symptoms • Sound cannot be heard from the speakers. • This unit does not work at all. • SSM (Strong-station Sequential Memory) automatic preset does not work. -
Page 20: Specifications
SPECIFICATIONS AUDIO AMPLIFIER SECTION Maximum Power Output: Front: 45 watts per channel Rear: 45 watts per channel Continuous Power Output (RMS): Front: 17 watts per channel into 4 Ω, 40 Hz to 20 000 Hz at no more than 0.8% total harmonic distortion. 17 watts per channel into 4 Ω, Rear: 40 Hz to 20 000 Hz at no more than... - Page 21 IMPORTANTE (EE.UU.) Este equipo se ha sometido a todo tipo de pruebas y cumple con las normas establecidas para dispositivos de Clase B, de conformidad con la Parte 15 de las reglas de la FCC (Comisión Federal de Comunicaciones). Estas reglas están diseñadas para asegurar una protección razonable contra este tipo de interferencias en las instalaciones residenciales.
- Page 22 Muchas gracias por la compra de un producto JVC. Como primer paso, por favor lea detenidamente este manual para comprender a fondo todas las instrucciones y obtener un máximo disfrute de esta unidad. CONTENIDO Cómo reposicionar su unidad ... 2 Cómo utilizar la botón MODE ...
-
Page 23: Ubicacion De Los Botones
UBICACION DE LOS BOTONES Panel de control Ventanilla de visualización 12 34 1 Botón (En espera/Encendido Atenuador) 2 Botón +/– 3 Botón LOUD (Sonorided) 4 Botón SEL (Selección) 5 Ranura de carga 6 Botón AM 7 Botón 0 (Expulsión) 8 Botón CD 9 Botón FM p Botón DISP (Indicación) q Botón MO (Monofónico) -
Page 24: Operaciones Basicas
Conexión de la alimentación Encienda la unidad. Nota sobre la operación con pulsación única: La unidad se enciende automáticamente cuando usted selecciona el siutouzador como fuente en el paso 2 de abajo. No necesitará presionar este botón para encender la unidad. Reproduzca la fuente. -
Page 25: Operaciones De La Radio
OPERACIONES DE LA RADIO Para escuchar la radio Podrá sintonizar una determinada emisora mediante búsqueda automática o búsqueda manual. Para buscar una emisora automáticamente: Búsquede automática Seleccione la banda (FM 1 – 3, AM). Se enciende cuando se recibe una radiodifusión Aparece la banda en FM estéreo de seleccionada... -
Page 26: Cómo Almacenar Emisoras En La Memoria
Sintonice la emisora deseada mientras “M” (manual) está destellando. Pulse sintonizar emisoras de frecuencias más altas. Pulse 4 sintonizar emisoras de frecuencias más bajas. • Si aparta su dedo del botón, el modo manual se desactivará automáticamente después de 5 segundos. -
Page 27: Preajuste Manual
Preajuste manual Podrá preajustar manualmente hasta 6 emisoras en cada banda (FM1, FM2, FM3 y AM). Ej.: Almacenamiento de una emisora FM de 92,5 MHz en el número de preajuste 1 de la banda FM1 Seleccione la banda (FM1 – 3, AM) en que desea almacenar las emisoras (en este ejemplo, FM1). -
Page 28: Operacion Del Reproductor De Cd
OPERACION DEL REPRODUCTOR DE CD Para reproducir un CD Inserte un disco en la ranura de carga. Se conecta la alimentación de la unidad, entra el CD y comienza la reproducción automáticamente. Nota sobre la operación de un solo toque: Si pulsa CD cuando hay un CD introducido en la ranura de carga, la unidad se enciende y empieza a reproducir el disco automáticamente. -
Page 29: Cómo Encontrar Una Pista O Un Punto Determinado De Un Cd
Cómo encontrar una pista o un punto determinado de un CD Para efectuar la búsqueda progresiva o regresiva de las pistas Pulse y mantenga pulsado ¢, mientras se está reproduciendo el CD para la búsqueda progresiva de las pistas. Pulse y mantenga pulsado reproduciendo el CD para la búsqueda regresiva de las pistas. -
Page 30: Prohibición De La Expulsión Del Cd
Prohibición de la expulsión del CD Es posible inhibir la expulsión del CD y bloquear el CD dentro de la ranura de carga. Mientras pulsa CD, pulse y mantenga pulsado 0 0 0 0 0 durante más de 2 segundos. “EJECT”... -
Page 31: Ajustes Del Sonido
AJUSTES DEL SONIDO Ajuste del sonido Usted puede ajustar las características de sonido a su preferencia. Seleccione el ítem que desea ajustar. Cada vez que pulsa el botón, los items ajustables cambian de la siguiente manera: Indicación Para: Ajustar los graves (Graves) Ajustar los agudos (Agudos) -
Page 32: Utilización De La Memoria De Control De Sonido (Scm)
Utilización de la memoria de control de sonido (SCM) Usted puede seleccionar y almacenar un ajuste de sonido preestablecido para cada fuente de reproducción. (SCM avanzado) Selección y almacenamiento de los modos de sonido Una vez que seleccione un modo de sonido, será almacenado en la memoria y llamado cada vez que seleccione la misma fuente y se visualiza en la indicación. -
Page 33: Cómo Almacenar Sus Propios Ajustes De Sonido
Cómo almacenar sus propios ajustes de sonido Podrá ajustar los modos de sonido (BEAT, SOFT, POP: consulte la página 13) adaptándolos a su gusto y almacenar sus propios ajustes en la memoria. • Hay un límite de tiempo para realizar los siguients pasos. -
Page 34: Otras Funciones Principales
OTRAS FUNCIONES PRINCIPALES Ajuste del reloj Pulse y mantenga pulsado SEL (selección) durante más de 2 segundos. En el visor aparece “CLOCK H”, “CLOCK M”, “SCM LINK” o “LEVEL”. Ajuste la hora. 1 Seleccione “CLOCK H” si no está indicado en el visor. -
Page 35: Selección De La Indicación De Nivel
Selección de la indicación de nivel Usted puede seleccionar la indicación de nivel a su gusto. La unidad se expide de fábrica con “VOL 2” seleccionado. VOL 1 : Muestra el indicador de nivel de volumen. VOL 2 : Aparecen alternativamente “VOL 1” y la indicación de iluminación. -
Page 36: Desmontaje Del Panel De Control
Desmontaje del panel de control Podrá desmontar el panel de control cuando salga de su automóvil. Al desmontar o instalar el panel de control, preste atención para no dañar los conectores provistos al dorso del panel de control y en el portapanel. Cómo desmontar el panel de control Antes de desmontar el panel de control, asegúrese de desconectar la alimentación. -
Page 37: Mantenimiento
MANTENIMIENTO Manipulación de los discos Esta unidad ha sido diseñada para reproducir CDs y CD-Rs (grabables). • Esta unidad no es compatible con discos MP3. Cómo tratar los discos Cuando saque el disco de su caja, presione el sujetador central de la caja y extraiga el disco agarrándolo por los bordes. -
Page 38: Localización De Averias
LOCALIZACIÓN DE AVERIAS Lo que aparenta ser una avería podría resolverse fácilmente. Verifique los siguientes puntos antes de acudir al centro de servicio. Síntomas • El sonido no sale por los altavoces. • Esta unidad no funciona en El microcomputador absoluto. -
Page 39: Especificaciones
ESPECIFICACIONES SECCION DEL AMPLIFICADOR DE AUDIO Máxima potencia de salida: Delantera: 45 W por canal Trasera: 45 W por canal Potencia de salida continua (RMS): Delantera: 17 W por canal en 4 Ω, 40 Hz a 20 000 Hz con una distorsión armónica total no mayor de 0,8 %. -
Page 40: Comment Réinitialiser Votre Appareil
IMPORTANT POUR PRODUITS LASER 1.PRODUIT LASER CLASSE 1 2.ATTENTION: Ne pas ouvrir le volet supérieur. Il n’y a pas de pièce réparable par l’utilisateur à l’intérieur. Confier le service après-vente à un personnel qualifié. 3. ATTENTION: Radiation laser invisible quand l’appareil est ouvert ou que le verrouillage est en panne ou désactivé. -
Page 41: Comment Utiliser La Touche Mode
Merci pour avoir acheté un produit JVC. Veuillez lire attentivement toutes les instructions avant d’utiliser l’appareil afin de bien comprendre son fonctionnement et d’obtenir les meilleures TABLE DES MATIERES Comment réinitialiser votre appareil ... 2 Comment utiliser la touche MODE ... 3 EMPLACEMENT DES TOUCHES ... -
Page 42: Emplacement Des Touches
EMPLACEMENT DES TOUCHES Panneau de command Fenêtre d’affichage 12 34 1 Touche (Attente/En service Sourdine) 2 Touche +/– 3 Touche LOUD (Contour) 4 Touche SEL (Sélection) 5 La fente d’insertion 6 Touche AM 7 Touche 0 (Éjection) 8 Touche CD 9 Touche FM p Touche DISP (Affichage) q Touche MO (Monaural) -
Page 43: Fonctionnement De Base
FONCTIONNEMENT DE BASE Mise sous tension Mettez l’appareil sous tension. Remarque sur le fonctionnement monotouche: Quand vous choisissez tuner comme source à l’étape 2 ci-dessous, l’appareil se met automatiquement sous tension. Vous n’avez donc pas besoin d’appuyer d’abord sur cette touche pour mettre l’appareil sous tension. -
Page 44: Fonctionnement De La Radio
FONCTIONNEMENT DE LA RADIO Ecoute de la radio Vous pouvez utiliser la recherche automatique ou l’accord manuel pour accorder une station particulière. Recherche d’une station automatiquement: Recherche automatique Choisissez la bande (FM1 – 3, AM). S’allume lors de la réception La bande d’une émission FM stéréo de choisie apparaît. -
Page 45: Mémorisation Des Stations
Accordez une station souhaitée pendant que “M” (manuel) clignote. Appuyez sur accorder des stations de fréquences supérieures. Appuyez sur 4 accorder des stations de fréquences inférieures. • Si vous relâchez la touche, le mode manuel est mis automatiquement hors service après 5 secondes. -
Page 46: Présélection Manuelle
Présélection manuelle Vous pouvez présélectionner manuellement un maximum de 6 stations pour chaque bande (FM1, FM2, FM3 et AM). Ex.: Mémorisation de la station FM située à 92,5 MHz sur le numéro de présélection 1 de la bande FM1 Choisissez le numéro de la bande (FM1 –... -
Page 47: Fonctionnement Du Lecteur Cd
FONCTIONNEMENT DU LECTEUR CD Lecture d’un CD Insérez un disque dans la fente d'insertion. L’appareil se met en marche, tire le CD et commence la lecture automatiquement. Remarque sur le fonctionnement monotouche: Si un CD se trouve déjà dans la fente d’insertion, appuyer sur CD met l’appareil sous tension et commence la lecture automatiquement. -
Page 48: Localisation D'une Plage Ou D'un Point Particulier Sur Un Cd
Localisation d’une plage ou d’un point particulier sur un CD Pour avancer rapidement ou inverser une plage Maintenez pressée pendant la reproduction d’un CD, pour avancer rapidement la plage. Maintenez pressée 4 pendant la reproduction d’un CD, pour inverser la plage. Pour aller aux plages suivantes ou aux plages précédentes Appuyez brièvement sur... -
Page 49: Interdiction De L'éjection De Cd
Interdiction de l’éjection de CD Vous pouvez interdire l’éjection d’un CD et le verrouiller dans la fente d’insertion. Tout en maintenant pressée CD, appuyez sur 0 0 0 0 0 pendant plus de 2 secondes. “EJECT” clignote sur l’affichage pendant environ 5 secondes, le CD est verrouillé... -
Page 50: Ajustement Du Son
AJUSTEMENT DU SON Ajustement du son Vous pouvez ajuster les caractéristiques du son à votre préférence. Choisissez l’élément que vous souhaitez ajuster. Chaque fois que vous appuyez sur la touche, l’élément ajustable change comme suit: Indication Pour: Ajuster les graves. –06 (min.) (Graves) Ajuster les aigus. -
Page 51: Utilisation De La Mémoire De Commande Du Son (Scm)
Utilisation de la mémoire de commande du son (SCM) Vous pouvez choisir et mémoriser un ajustement du son spécifique pour chaque source de lecture (SCM avancé). Sélection et mémorisation des modes sonores Une fois que vous avez choisi un mode sonore, il est mémorisé. -
Page 52: Mémorisation De Votre Propre
Mémorisation de votre propre ajustements sonore Vous pouvez ajuster les modes sonore (BEAT, SOFT, POP: voir la page 13) comme vous le souhaitez et mémoriser votre propre ajustement. • Il y a un temps limite pour effectuer les étapes suivantes. Si le réglage est annulé avant que vous ne terminiez, recommencez à... -
Page 53: Autres Fonctions Principales
AUTRES FONCTIONS PRINCIPALES Réglage de l’horloge Maintenez pressée la touche SEL (sélection) pendant plus de 2 secondes. “CLOCK H”, “CLOCK M”, “SCM LINK” ou “LEVEL” apparaît sur l'affichage. Réglez les heures. 1 Choisissez “CLOCK H” s’il n’apparaît pas sur l’affichage. 2 Ajustez les heures. -
Page 54: Sélection De L'affichage Du Niveau
Sélection de l’affichage du niveau Vous pouvez choisir l’affichage du niveau en fonction de vos préférences. À l’expédition de l’usine, “VOL 2” est choisi. VOL 1 : Montre l’indicateur du niveau de volume. VOL 2 : Alterne entre le réglage “VOL 1” et l’affichage de l’éclairage. -
Page 55: Détachement Du Panneau De Commande
Détachement du panneau de commande Vous pouvez détacher le panneau de commande quand vous quittez la voiture. Lors du détachement ou de la remise en place du panneau de commande, faites attention de ne pas endommager les connecteurs situés à l'arrière du panneau et sur le porte-panneau. -
Page 56: Entretien
ENTRETIEN Manipulation des disques Cet appareil a été conçu uniquement pour reproduire les CD, CD-R (enregistrables). • Cetappareil n’est pas compatible avec les disques MP3. Manipulation des disques Pour retirer un disque de son boîtier, faites pression sur le support central du boîtier et retirez le disque en le tenant par ses arêtes. -
Page 57: Depannage
Ce qui apparaît comme un problème n’est pas toujours très sérieux. Vérifier les points suivants avant d’appeler un centre de réparation. Symptoms • Le son ne peut pas être entendu des enceintes. • Cet appareil ne fonctionne pas du tout. •... -
Page 58: Specifications
SPECIFICATIONS SECTION AMPLIFICATEUR AUDIO Puissance de sortie maximum: Avant: 45 watts par canal Arrière: 45 watts par canal Puissance de sortie en mode continu (efficace): 17 watts par canal pour 4 Ω, 40 Hz Avant: à 20 000 Hz à moins de 0,8% de distorsion harmonique totale. - Page 59 Having TROUBLE with operation? Please reset your unit Refer to page of How to Reset Still having trouble?? USA ONLY Call 1-800-252-5722 http://www.jvc.com We can help you! VICTOR COMPANY OF JAPAN, LIMITED 1103KKSFLEJEIN EN, SP, FR © 2003 VICTOR COMPANY OF JAPAN, LIMITED...
Need help?
Do you have a question about the Model KD-S10J and is the answer not in the manual?
Questions and answers