Mira Vision Dual User Manual
Wireless controller for shower
Hide thumbs
Also See for Vision Dual:
- Installation manual (52 pages) ,
- Installation manual (45 pages) ,
- Owner's installation manual (50 pages)
Table of Contents
Advertisement
Advertisement
Table of Contents

Related Manuals for Mira Vision Dual


Summary of Contents for Mira Vision Dual
- Page 1 Mira Vision Dual These instructions must be left with the user User Guide...
-
Page 2: Table Of Contents
CONTENTS Introduction ..................... 3 General ....................3 Safety Information ................... 3 Control Layout ..................4 Display Symbols ..................5 Using the Shower ..................6 Switch On/Off ..................6 Adjust Temperature ................7 Adjust Flow ................... 7 Functions ....................8 Function Menu ..................10 Changing Functions/Settings .............. -
Page 3: Introduction
INTRODUCTION General Thank you for purchasing a quality Mira product. To enjoy the full potential of your new product, please take the time to read this guide thoroughly and keep it handy for future reference. The Mira Vision Dual Wireless Controller is a remote user interface and controls the following functions: •... -
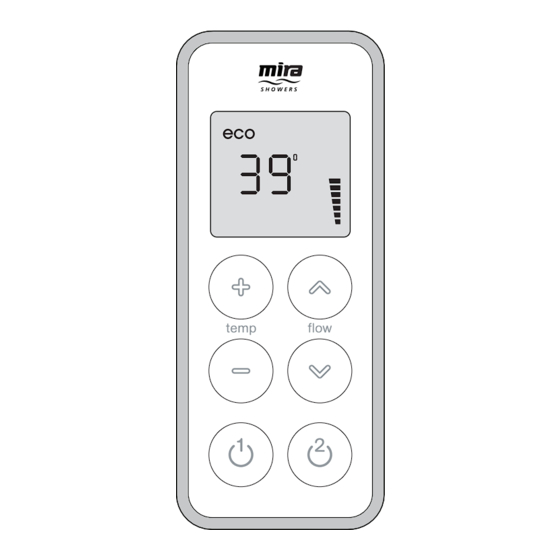
Page 4: Control Layout
CONTROL LAYOUT Display Increase Increase Temperature Flow Decrease Decrease Temperature Flow Outlet 1 Outlet 2 Start/Stop Start/Stop... -
Page 5: Display Symbols
DISPLAY SYMBOLS Control Out Of Low Battery Range Economy Flow Display Temperature Flow Display Outlet 1 Selected Countdown Outlet 2 Mode Enabled Selected Clock... -
Page 6: Using The Shower
USING THE SHOWER Switch On/Off Press “ ” or “ ” to start or stop each outlet. Temperature and flow settings will be same as when last used. After a short period, display will dim to help extend battery life. Approximately 5 seconds after shower has stopped, display will turn off automatically. Shower will not run continuously for more than 30 minutes before stopping automatically (5 minutes when “ECO”... -
Page 7: Adjust Temperature
Adjust Temperature While shower is running, press “ + ” or “ - ” to adjust to the desired temperature. Showering temperature appears on display in degrees Celsius ( 1°C). Adjust Flow Press “ ” or “ ” to adjust flow. Showering flow level appears on display in black segments. -
Page 8: Functions
FUNCTIONS The following functions can be altered individually to adjust how the shower operates: F1 - Maximum Showering Water Temperature. Adjustable per outlet, this is the temperature the shower cannot go beyond when in use. F2 - Eco. The shower will stop automatically after 5 minutes. - Page 9 F7 - Control Frequency. An unreliable functioning of the appliance (not always able to change settings of shower) may indicate radio interference by another device transmitting locally on same channel. Changing channel may resolve this problem. F8 - Count Down Display Enable. If enabled, the remaining shower time is shown instead of the clock.
-
Page 10: Function Menu
FUNCTION MENU Enter the Function Menu Note! If the display of the Wireless User Interface is asleep press buttons “+” and “ ” simultaneously to ‘wake’ it before attempting to enter Function Menu. Press and hold “+” and “ ” buttons simultaneously for approximately 5 - 10 seconds until “End”... -
Page 11: Changing Functions/Settings
CHANGING FUNCTIONS/SETTINGS Maximum Showering Water Temperature Factory default “45°C”. Cycle menu to “F 1” and press “ ” to enter, then press “+” or “-” to toggle between which outlet you wish to set the maximum showering temperature to. The outlet selected will be indicated on the display. -
Page 12: Eco
Factory default “off”. C y c l e m e n u t o “ F 2 ” a n d p r e s s “ ”. Press “+” or “-” to change setting “on” or “off”. Press “ ”... -
Page 13: Warm-Up
Warm-Up Factory default “off”. Note! Function will not work with combination boilers. C y c l e m e n u t o “ F 3 ” a n d p r e s s “ ”. Press “+” or “-” to change setting: Selected outlet will warm up. -
Page 14: Clock Setting
Clock Setting Factory default “10:00”. Note! Can also be activated by disconnecting and reconnecting battery. C y c l e m e n u t o “ F 4 ” a n d p r e s s “ ”. Press “+”... -
Page 15: Clock Display
Clock Display Factory default “on”. C y c l e m e n u t o “ F 5 ” a n d p r e s s “ ”. Press “+” or “-” to change setting “on” or “off”. Press “... -
Page 16: Flow Range
Flow Range For use with High Pressure / Combi Valve version only. Factory default “1 - 99” Cycle menu to “F 6” and press “ ” to enter, then press “+” or “-” to toggle between which outlet you wish to adjust the flow range of. - Page 17 Press “ ” to set lower limit. H i g h e r l i m i t i s d i s p l a y e d , e . g . “H 99”. Adjust flow to desired lower limit 1-99 using “ ” & “ ”.
-
Page 18: Control Frequency
Control Frequency Factory default “1”. Note! This should only be changed if you are experiencing wireless intererence. C y c l e m e n u t o “ F 7 ” a n d p r e s s “... -
Page 19: Countdown Enable
Countdown Enable Factory default “off “. C y c l e m e n u t o “ F 8 ” a n d p r e s s “ ”. Press “+” or “-” to change setting “on” or “off ”. Press “... -
Page 20: Shower Run Time
Shower Run Time Factory default “30 minutes“. C y c l e m e n u t o “ F 9 ” a n d p r e s s “ ”. Press “+” or “-” to change the amount of time the shower will run before switching itself off. -
Page 21: Bath Fill Mode
Bath Fill Mode Factory default “off ”. Cycle menu to “F 10” and press “ ”. Press “+” or “-” to toggle between options “on” ,”Lrn” and “off”. Note! selecting either ‘on’ and ‘Lrn’ will enable further options in the function menu: = see “Bath Fill Duration and Temperature”... - Page 22 Bath Fill Duration and Temperature - (ON) Cycle through menu and set “Bath Fill Mode” to “on”. Press “+” or “-” to toggle between which outlet you have selected to use as a bath fill. The outlet selected will be indicated on the display.
- Page 23 Press “+” or “-” to adjust the temperature of the water supplied to the outlet selected as a bath fill. Adjustable between 30° - 48°C. Note! The maximum temperature set in function F 1 will reflect the maximum selectable outlet temperature in Bath Fill Mode. Press “ ”...
- Page 24 Bath Fill Learn Mode - (Lrn) Note! This function allows you to set Bath Fill parameters by actually filling the bath. Cycle through menu and set “Bath Fill Mode” to “Lrn”, press “ ” to select. Press “+” or “-” to toggle between which outlet has been selected as a bath fill. The outlet selected will be indicated on the display.
- Page 25 Press “+” or “-” to adjust temperature. Maximum = 48°C Minimum = 30°C Note! The maximum temperature set in function F 1 will reflect the maximum selectable outlet temperature in Bath Fill Mode. When the water has reached the desired level and temperature press “ ” to store the information. Press “...
-
Page 26: Connecting A Second Wireless Controller
CONNECTING A SECOND WIRELESS CONTROLLER The following procedure details how to assign the Wireless Controller to the Digital Mixer Valve and test the remote signal strength. Note! Other radio signals from sources such as mobile phones, radio controlled boiler thermostats, wireless broadband etc. can dramatically reduce the ability of the digital mixer valve to register. -
Page 27: Re-Registering
Place wireless controller in approximate final position (no more than 10 m (free air) from digital mixer valve) and test wireless signal by pressing either “ ” or “ ”, and adjusting the temperature. If temperature display remains unchanged Out of Range and “out of range”... -
Page 28: Replacing The Batteries
REPLACING THE BATTERIES Change the batteries when the low battery symbol is displayed. To access the batteries, the controller must be removed from the wall. Press button to release and remove the controller from the wall. Make sure the controller is dry before removing the battery cover. -
Page 29: Fault Diagnosis
See “Mira Vision Installation Guide - Specifications”. 5. If problem still occurs, make a note of the error code and contact our Customer Services Team. - Page 30 Digital Mixer Temperature Motor (E61) 1. Turn digital mixer valve off for 15 seconds. Turn back on and allow 15 seconds to reset. 2. If shower operation does not return to normal, check and, if necessary, replace Mixer Valve. (To be performed by competent tradesperson only!) 3.
-
Page 31: General Faults
Vision Dual Installation Guide”. If problem persists, contact our Customer Services Team. Incorrect or fluctuating Controller out of range. Refer to “Fault Diagnosis” in the “Mira Vision Dual temperature. Radio interference. Installation Guide”. Warm up feature is being used Disable Warm-Up feature. with combi-boiler. - Page 32 Fluctuating or reduced flow. Filters blocked. Refer to “Fault Diagnosis” in the “Mira Vision Dual Water pressure too low. Installation Guide”. Flow rate is too low. Fluctuating water temperature. Maximum blend temperature Incorrect maximum Refer to “Maximum Shower too hot or too cold.
-
Page 33: Cleaning
CLEANING Many household cleaners contain abrasives and chemical substances, and should not be used for cleaning chrome plated or plastic fittings. These finishes should be cleaned with a mild washing up detergent or soap solution, and then wiped dry using a soft cloth. DISPOSAL AND RECYCLING End of Product Life When the appliance has reached the end of its serviceable life, it should be disposed of in a safe manner and in accordance with current local authority recycling or waste disposal policy. -
Page 34: Notes
NOTES... - Page 35 NOTES...
-
Page 36: Customer Service
The product must be installed and maintained in Spares and Accessories - We hold the largest accordance with the instructions given in this user stocks of genuine Mira spares and accessories. guide. Contact us for a price or visit our website to...
Need help?
Do you have a question about the Vision Dual and is the answer not in the manual?
Questions and answers