KKT KOLBE KFS59ED Instruction And Installation Manual
Hide thumbs
Also See for KFS59ED:
- Instruction and installation manual (56 pages) ,
- User manual (48 pages)

Related Manuals for KKT KOLBE KFS59ED


Summary of Contents for KKT KOLBE KFS59ED
- Page 1 Instruction and Installation Manual for your hob Model: KFS59ED Version: 1.0 / 140724...
-
Page 2: Safety Warnings
Safety Warnings Your safety is important to us. Please • Failure to install the appliance correctly read this information before using your could invalidate any warranty or liability cooktop. claims. This appliance is designed for private and Operation and maintenance home use and intended for heating food. - Page 3 • Failure to use caution could result in abrasive cleaning agents to clean your injury or cuts. cooktop, as these can scratch the glass. • If the power supply cable is damaged, Important safety instructions it must only be replaced by a qualified technician.
- Page 4 For installation, please read the installation section. Read all the safety instructions carefully before use and keep this Instruction / Installation Manual for future reference. Instruction and Installation manual Ceramic hob - Model: KFS59ED Version: 1.0...
-
Page 5: Table Of Contents
Table of content Overview 1. Product overview 2. Product informations 3. Before using your new hob 4. Using the Touch Controls 5. Choosing the right Cookware 6. Using the Ceramic hob 6.1 Start cooking 6.2 After cooking 6.3 The dual zones 7. -
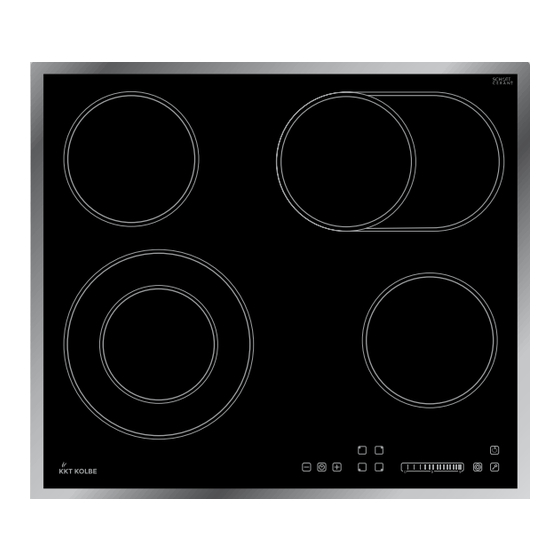
Page 6: Product Overview
Product overview 1. Product overview Zone 1 Zone 3 1200 W 1000 W/ 2200 W Zwei. Zone 2 Zone 4 1100 W/ 1200 W 2000 W Dual ON/OFF-control Key lock Dual zones Zone Power selection control slider buttons Timer control... -
Page 7: Product Informations
Before using your hob 2. Product Information The microcomputer ceramic cooker hob can meet different kinds of cuisine demands because of resistance wire heating, micro-computerized control and multi-power selection, really the optimal choice for modern families. The ceramic cooker hob centers on customers and adopts personalized design. -
Page 8: Choosing The Right Cookware
Using your hob 5. Choosing the right cookware Do not use cookware with jagged edges or a curved base. Make sure that the base of your pan is smooth, sits flat against the glass, and is the same size as the cooking zone. -
Page 9: Using The Ceramic Hob
Using your hob 5.1 Optimal pan dimensions The cooking zones are, up to a limit, automatically adapted to the diameter of the pan. However the bottom of this pan must have a minimum of diameter according to the corres- ponding cooking zone. To obtain the best efficiency of your hob, please place the pan in the centre of the cooking zone. -
Page 10: When You Have Finished Cooking
Using your hob 3. Touch the zone selection button to select your desired zone. 4. Select a power level by using the slider. • If you don‘t select a power level within one minute, the configuration will be cancelled. • Then start again at step 1. •... - Page 11 Using your hob 6.3 The double zone function • The function only work in 3# and 4# cooking zone • The dual cooking zone has two cooking areas that you can use a central section and an outer section. You can use the central section (A) independently or both sections (B) at once.
-
Page 12: Using The Timer
Using the timer 7. Using the timer You can use the timer to turn a zone off in a specified time. Proceed as shown below: • Firstly set up a desired power level for your cooking zone by pressing the buttons. •... - Page 13 Using the timer Set the timer on more than one zone • If you want to set the timer at several cooking zones, the lowest remai- ning time is always displayed. (eg Zone # 1 - rest time 5 minutes, Zone # 2 Rest time 15 minutes, the timer display shows „5“.) 15 minutes set 5 minutes set...
-
Page 14: Safety
Safety features 8. Locking the Controls • You can lock the controls to prevent unintended use (for example children accidentally turning the cooking zones on). • When the controls are locked, all the controls except the ON/OFF control are disabled. To lock the controls Touch the keylock control. - Page 15 Safety features Over-Temperature Protection A temperature sensor equipped can monitor the tempera- Power Default ture inside the ceramic hob. When an excessive temperature level timer (h) is monitored, the ceramic hob will stop operation automa- tically. Residual Heat Warning When the hob has been operating for some time, there will be some residual heat.
-
Page 16: Cooking Guidelines
Cooking Guidelines 10. Cooking Guidelines Risk of fire! Be careful when frying, as oil and grease heat very quickly. Oil and grease can easily catch fire at extremely high temperatures even. Cooking Tips • When food comes to the boil, reduce the power setting. •... -
Page 17: Care And Cleaning
Care and Cleaning 12. Care and Cleaning The following settings should only be considered as guidelines. The exact procedure depends on several factors, including your cookwa- re and the amount you want to cook. Experiment a little with the hob to find the right settings for you. -
Page 18: Care & Cleaning
Cooking guidelines What? How? Important! Spillovers on the 1. Switch the power to the • The cooktop may beep and touch controls cooktop off. turn itself off, and the touch 2. Soak up the spill controls may not function 3. Wipe the touch control area while there is liquid on them. -
Page 19: Technical Specification
Technical specification 14. Technical specification KF592RL Model Cooking Zones 220-240V ~ 50/60Hz Supply Voltage Electrical power 6000 – 7200 W 560x490 Built-in dimension 550x590x55 Product Size L×W×H(mm) Weight 9.0 / 10.5kg Weight and Dimensions are approximate. Because we continually strive to improve our products we may change specifications and designs without prior notice. - Page 20 Installation Under any circumstances, make sure the ceramic cooker hob is well ventilated and the air inlet and outlet are not blocked. Ensure the ceramic cooker hob is in good work state. As shown below: Note: The safety distance between the hotplate and the cupboard above the hotplate should be at least 760mm.
- Page 21 Installation A: Screw B: Bracket C: Screw hole D: Base Adjust the bracket position to suit for different work surface’s thickness. Cautions • The ceramic cooker hob must be installed by qualified personnel or tech- nicians. We have professionals at your service. Please never conduct the operation by yourself.
-
Page 22: Connecting The Hob To The Mains Power Supply
Connecting the hob to the main power supply 16. Connecting the hob to the mains power supply The power supply should be connected in compliance with the rele- vant standard, or a single-pole circuit breaker. The method of connection is shown below. •... - Page 23 Disposal This appliance is labeled in compliance with European directive 2002/96/EC for Waste Electrical and Electronic Equipment (WEEE). By ensuring that this appliance is disposed of correctly, you will help prevent any possible damage to the environment and to human health, which might otherwise be caused if it were disposed of in the wrong way.
- Page 24 Vielen Dank fürs Lesen. Wir wünschen Ihnen viel Spaß beim Kochen. Thanks for reading. We wish you much fun while cooking. Version: 1.0 / 140724...
Need help?
Do you have a question about the KFS59ED and is the answer not in the manual?
Questions and answers