Table of Contents
Advertisement
Quick Links
Integrated Video-Assist System II for the ARRIFLEX 435
T
HEY MUST NOT BE COPIED FOR REPRODUCTION
I
F YOU ARE DOWNLOADING
W
E CANNOT TAKE ANY LIABILITY WHATSOEVER FOR DOWNLOADED FILES
IVS 435 / II
Instruction Manual
As of: August 2003
A
,
LL ARTWORK
PICTURES AND TEXTS ARE COVERED BY OUR COPY
(
.
.
CD-ROM
I
-
E
G
ON
DISKS OR
NTERNET
PDF-
I
FILES FROM OUR
NTERNET HOME
-
RIGHT
)
SITES
OR USED IN THEIR ENTIRE FORM OR IN EXCERPTS WITHOUT OUR PREVIOUS WRITTEN AGREEMENT
-
,
PAGE FOR YOUR PERSONAL USE
MAKE SURE TO CHECK FOR UPDATED VERSIONS
,
AS TECHNICAL DATA ARE SUBJECT TO CHANGE WITHOUT NOTICE
.
.
.
.
Advertisement
Table of Contents

Subscribe to Our Youtube Channel
Related Manuals for ARRI IVS 435


Summary of Contents for ARRI IVS 435
-
Page 1: Instruction Manual
IVS 435 / II Integrated Video-Assist System II for the ARRIFLEX 435 Instruction Manual As of: August 2003 LL ARTWORK PICTURES AND TEXTS ARE COVERED BY OUR COPY RIGHT CD-ROM HEY MUST NOT BE COPIED FOR REPRODUCTION DISKS OR NTERNET... - Page 2 • Mini monitor connector • Switch ON/OFF/Keyboard locked • Manual gain control (ON) • White balance (Indoor/Outdoor/Automatic/Manual) • Flicker free (ON/OFF) • Mode (Frame store / Compare) • Store key • Activate inserter onscreen menu or • store position of inserted windows •...
-
Page 3: Table Of Contents
8. Order numbers ..........114 5.4 White Balance (WB) ......... 30 5.5 Gain Control ........... 35 9. Index ............. 115 5.6 Flicker Free on/off ........38 5.7 Frame Store and Compare ......40 ARRI Service ............121 5.8 Changing Format marking number .... 43... -
Page 5: Safety Specifications
ARRIFLEX 435. service centers! • Use the IVS only with ARRIFLEX 435 cameras, and • Use only original ARRI replacement parts and acces- only as described in this manual. sories! • Check all operations on the corresponding monitor. -
Page 6: Product Specifications
Important Notes Product Specifications • In wet weather the normal safety precautions for In the case of inquiries or when ordering parts, please handling electrical equipment should be taken. advise serial number and model. • Avoid operational errors! Explanation of the Symbols •... -
Page 7: General Description Of The Ivs
3. General Description of the IVS The Integrated Video-Assist System (IVS) for the ARRIFLEX • High resolution 435 responds to a strong request from camera users and The design of the new IVS optics was based on the integrates a complete video assist system totally into the 435´s view finder data and resulted in an image quality camera body. - Page 8 • Even further resolution in camera run mode can be inserted as well, ensures the same reliability in Video images are now also in the camera run mode in an NTSC environment. almost full video resolution due to a new technology. •...
-
Page 9: System Components
it against other images. This clearly shows the difference 3.2 System Components between the images e.g. during stop effect shots. • Automatic and manual gain control • Optic Silent and/or ......... K2.47230.0 The gain is controlled automatically to its best value but can also be set manually. -
Page 10: Optic Silent
3.2.1 Optic Silent 3.2.2 Optic Academy For a complete and working IVS, either the optic silent or For a complete and working IVS, either the optic silent or the optic acacemy has to be installed inside the CCD optic the optic acacemy has to be installed inside the CCD optic module. - Page 11 Mixing the modules might lead to a reduced image quality. Mixing the modules might lead to a reduced image quality. On request ARRI can supply a second CCD optic module On request ARRI can supply a second CCD optic module optimized for a particular Inserter/Antiflicker Module.
-
Page 13: Setup
4. Setup 4.1 Inserting the Optic cap • For a complete and working IVS, either the optic silent or the optic academy has to be installed inside the CCD optic module. A 1.5 mm allen key is used. Do not touch optic surfaces. All lenses must be clean. - Page 14 c) Insert the optic with the bayonet first into the CCD optic module. Make sure that the key is aligned with the key way §. d) Press the optic carefully into the mount and rotate clock wise to the stop. Make sure that the key is on the right side of the lens securing spring.
-
Page 15: Mounting The Ivs
4.2 Mounting the IVS • 3 screws The following tools are needed to mount the IVS: 3 mm allen key 0.5 x 3.5 mm screw driver (first time installation only) 2.5 mm allen key 1.5 mm allen key As there is a vertical connector between the CCD optic module and the Inserter/Antiflicker Module, it is necessary to take the view finder system off the ARRIFLEX 435 before the IVS is installed. - Page 16 b) Remove the protection cap of the video tap photo. Note: Step c) is only necessary for the initial installation of the IVS. If the flange is already modified with three additional threads, proceed with step d). c) Remove the old flange by taking out the four screws protection cap •...
- Page 17 e) Take the expanded function module or the cover off the camera. To do so open the mounting screw § with a 3 mm allen key and swing the cover or the module off. screw • f) Attach the Inserter/Antiflicker module to the camera by placing the registration-pins in the appropriate receptables and swing module on.
- Page 18 i) Place the view finder system back on the camera body and close the three mounting screws. Ensure clean contacts. Do not use force. Note: Because of the high speed video optic (Academy or Silent), it is no longer necessary to use a 50 : 50 beam splitter, as it was with other color video assists.
-
Page 19: Changing The Optic
4.3 Changing the Optic • 3 screws For exchanging the optic between academy and silent format, it is necessary to take the view finder system off the camera in order to remove the CCD optic module. The following tools are necessary: 3 mm allen key 2.5 mm allen key 1.5 mm allen key. - Page 20 d) Make sure that the focus screw (S3) § is in the middle of its range. e) To release the optic rotate carefully counter clock wise until the key is on the other side of the spring and the optic gets loose. Remove forward. f) Insert the new lens with the bayonet first into the CCD optic module.
-
Page 21: Connections
4.4 Connections 4.4.1 Outputs In case that the composite output should be used The IVS has two separate outputs for composite video, and it is unknown, weather the BNC connectors two outputs for Y/C and one output for a mini monitor. on the IVS are switched to composite or to Y/C, The Y/C signal can be taken from the standard S-VHS please connect the composite signal to the ”OUT 1”... - Page 22 4.4.1.1 Composite Video Outputs Make sure that Y/C mode is switched off to get composite video signal out of the BNC connectors. See chapter 6.4.9 ”Composite or Y/C signal at BNC Connectors” The difference between the outputs is that there is ”normal video”...
- Page 23 4.4.1.2 Y/C Outputs Spring • Y/C Output • In comparison to the composite outputs, the Y/C outputs offer the even better S-VHS quality. There are also ”normal video” and ”video with data” signals available. Y/C on the BNC connectors is only available when BNC Y/C is selected on the menu.
- Page 24 Alternatively, the Y/C signal can be taken from the two BNC outputs on the rear side of the IVS. For this, it is necessary to switch the BNC output from composite to Y/C, using the menu. Please see chapter 6.4.9 ”Composite or Y/C signal at BNC Connectors”.
-
Page 25: Mini-Monitor Output
4.4.1.3 Mini-Monitor Output The IVS has a connector for a standard mini-monitor §. As there is only one mini monitor connector, it is possible to switch between ”Normal Video” and ”Video with Data” on this output: To do so, please use the on-screen display menu. - Page 26 All inserter functions of the IVS, which can be called or set with the on screen menu, can also be controlled via the film camera’s CCU interface. A corresponding software for the ARRI Laptop Camera Controller is available on request (refer to seperate manual). • Genlock Input...
-
Page 27: Standard Video Controls
5. Standard Video Controls The IVS can be used like a standard Video Assist if no inserter functions are used. Note: For exchanging the optic between academy and silent format, refer to chapter ”4.3 Changing the Optic”. • Switch Note: All currently used settings are stored even if the IVS or the camera is switched off. -
Page 28: Mechanical Iris
5.2 Mechanical Iris Only a relatively small portion of the light which goes • Adjustment ring through the film cameras´s lens reaches the CCD-Chip of the video assist as the light is shared between the view finder, the CCD-Chip and the film. Therefore the IVS lenses are designed for a normal usage with a totally open iris to have maximum light on the CCD-Chip. -
Page 29: Aligning The Image And Focusing
5.3 Aligning the Image and Focusing The position of the image on the CCD-Chip can vary slightly from film camera to film camera. The video image on the • cap monitor may appear not centered. In addition to that, it is necessary to focus the lens on every new film camera. -
Page 30: White Balance (Wb)
5.4 White Balance (WB) The IVS offers a choice for White Balance between • an automatic control (ATW), • a fixed setting of indoor (IND) • a fixed setting of outdoor (OTD) • White Balance Key • and a full manual control of white balance. •... - Page 31 • If automatic White Balance (ATW) is selected §, the IVS will automatically set White Balance. For this no manual steps are necessary. • If indoor (IND) is selected §, white balance is optimized for tungsten lighting with 3200 K. •...
- Page 32 SUB MENU 5.4.2 Using the on screen menu VID ADJ Please see the chapter 6 ” Inserter Facilities ” for basics on -VALUE > WB the on-screen display. -RED -BLUE EXPOSE MM- DAT Y/C-DAT White Balance BNC-OUT LINE In parallel to the control via keyboard, the white balance INTEREP.ON can also be programmed via the on-screen menu.
-
Page 33: Manual White Balance Red Increase/Decrease
SUB MENU Manual White Balance red increase/decrease VID ADJ Manual white balance red increase/decrease -VALUE is only available if white balance control is on > -RED manual. -BLUE EXPOSE MM- DAT If manual white balance is on MAN, it is possible to adjust Y/C-DAT BNC-OUT the red and blue saturation of the video image manually. -
Page 34: Manual White Balance Blue Increase/Decrease
SUB MENU Manual White Balance blue increase/decrease VID ADJ Manual white balance blue increase/decrease -VALUE is only available if white balance control is on -RED manual. > -BLUE EXPOSE MM- DAT Y/C-DAT If manual white balance is on MAN, it is possible to adjust BNC-OUT the red and blue saturation of the video image manually. -
Page 35: Gain Control
5.5 Gain Control The IVS can control the brightness of the video image electronically. This gain control can be automatic or manual. • Manual Gain Control Key If the automatic control is selected, the IVS outputs the best possible image brightness at all the time. Light changes in front of the film camera are compensated by the IVS, the brightness impression remains almost unchanged. -
Page 36: Manual Gain Control
SUB MENU 5.5.2 Using the on screen menu VID ADJ > MGC Please see the chapter 6 ” Inserter Facilities ” for basics on -VALUE the on-screen display. -RED -BLUE EXPOSE MM- DAT Y/C-DAT Manual Gain Control BNC-OUT LINE In parallel to the control via keyboard, the manual gain INTEREP.ON control can also be programmed via the on-screen menu. - Page 37 SUB MENU Manual Gain increase/decrease VID ADJ Manual gain increase/decrease is only available > -VALUE if manual gain control is on. -RED -BLUE EXPOSE Move the cursor > with the keys to the line MM- DAT -VALUE. Pressing the key will increase the gain, Y/C-DAT BNC-OUT...
-
Page 38: Flicker Free On/Off
5.6 Flicker Free on/off The IVS suppresses the flickering of the video image, which normally occurs when the film camera and the video camera are running at different frame rates or if they are not in phase. This is done using a frame store. Under critical conditions, like motion control, where it is •... -
Page 39: Using The Keyboard
5.6.1 Using the Keyboard SUB MENU VID ADJ The flicker reduction key § switches the anti flicker -VALUE facility on and off should this become necessary. -RED -BLUE EXPOSE The LED indicates flicker free on. MM- DAT Y/C-DAT BNC-OUT Note: The lowest camera speed for flicker free display >... -
Page 40: Frame Store And Compare
5.7 Frame Store and Compare The IVS can store one video image and compare it against the currently incoming images. Frame store and compare can be adjusted in two different ways. It is possible to control it using the keyboard on the IVS, or using the on-screen control menu. - Page 41 SUB MENU By pressing the key MODE the IVS goes from normal mode to store mode to compare mode and back to normal mode. VID ADJ Every time the key STO is pressed with the IVS in store -VALUE mode, a new video frame is grabbed. -RED -BLUE EXPOSE...
- Page 42 SUB MENU Store image VID ADJ Please see paragraph above, ” Display mode ”, for information -VALUE on different display modes, e.g. live, store and compare. -RED -BLUE EXPOSE Call the sub menu VID ADJ. MM- DAT Y/C-DAT BNC-OUT Move the cursor > with the keys to the line LINE -STORE.
-
Page 43: Changing Format Marking Number
5.8 Changing Format marking number The IVS can insert different format markings. It is possible to have • no format marking (OFF), • format marking number one (1), • format marking number two (2) • or both format markings at the same time (1 & 2) on display. MODE The adjustment of the different format markings can only be done via the on-screen display as described in chapter 6.5... -
Page 45: Inserter Facilities
6. Inserter Facilities In addition to the usual video assist functions, the IVS offers All inserted data are only available at the outputs ”Video with data”. a variety of inserter facilities. There are three different groups of information: All engravings from the ground glass (i. -
Page 46: Setting The On Screen Displays
Pressing the key will move the cursor > up or down. Pressing the key activates sub menus. ENTER Within sub menus the cursor > can be moved up and • Key Enter Insert INSERT down again by pressing the key . -
Page 47: Main Menu
6.2 Main Menu The inserter´s main menu is displayed on the monitor MAIN MENU screen when the on-screen programming is activated by > LOAD/STORE VIDEO ADJUST pressing the E -key § for more than three NTER NSERT FORMAT MARKING STATUS seconds. -
Page 48: Load/Store Menu
6.3 Load/Store Menu The IVS can store up to 6 sets of settings and recall them. SUB MENU Thus it is possible to make all settings for e.g. indoor shooting > LOAD SET and store them as setting 1. Shooting continues with some STORE SET exterior scenes and the operator will make all settings for this (CONFIRM... -
Page 49: Load Settings
6.3.1 Load Settings SUB MENU > LOAD SET It is possible to load one out of six settings. Those new settings STORE SET will influence all adjustments, that can be made electronically. (CONFIRM BY E) The new settings will immediately replace the STANDARD previous settings. -
Page 50: Store Settings
6.3.2 Store Settings SUB MENU LOAD SET The set of settings, that is currently active, can be stored > STORE SET (CONFIRM as one out of six settings. BY E) Move the cursor > with the keys to the line STANDARD STORE SET. - Page 51 6.3.3 All Standard SUB MENU LOAD SET This menu recalls a default setting of all inserter values. STORE SET By this, it is possible to obtain basic setting for the IVS. (CONFIRM BY E) > ALL The default values are: STANDARD EXIT Format marking 1, White Level 2, Outside Full...
- Page 52 6.3.4 Exit SUB MENU LOAD SET Return to the main menu using EXIT. STORE SET (CONFIRM BY E) Move the cursor > with the keys to the line EXIT and press the key STANDARD > EXIT Note: Pressing the E -key for more than three NTER NSERT...
-
Page 53: Video Adjust Menu
6.4 Video Adjust Menu SUB MENU Video Adjust controls the entire video appearance. It VID ADJ > MGC enables the control of settings, which can be in parallel to -VALUE this menu accessed via the keyboard but it enables also -RED -BLUE EXPOSE... -
Page 54: Manual Gain Control On/Off
SUB MENU 6.4.1 Manual Gain Control On/OFF VID ADJ > MGC In parallel to the control via keyboard, the manual gain -VALUE control can also be programmed via the on-screen menu. -RED Manual gain control can be switched on or off. If it is on, -BLUE EXPOSE specific values can be set between 0 (low gain) and 63... - Page 55 6.4.2 Manual Gain increase/decrease SUB MENU VID ADJ Manual gain increase/decrease is only available > -VALUE if manual gain control is on. -RED -BLUE EXPOSE If manual gain is on, it is possible to adjust the gain MM- DAT manually. Y/C-DAT BNC-OUT LINE...
-
Page 56: White Balance
SUB MENU 6.4.3 White Balance (Indoor/Outdoor/Automatic/ VID ADJ Manual) -VALUE > WB -RED In parallel to the control via keyboard, the white balance -BLUE EXPOSE can also be programmed via the on-screen menu. It toggles MM- DAT Y/C-DAT from indoor, outdoor and automatic to manual. BNC-OUT LINE Move the cursor >... -
Page 57: Manual White Balance
6.4.4 Manual White Balance SUB MENU red increase/decrease VID ADJ -VALUE Manual white balance red increase/decrease is > -RED only available if white balance control is on -BLUE EXPOSE manual. MM- DAT Y/C-DAT BNC-OUT If manual white balance is on MAN, it is possible to adjust LINE the red and blue saturation of the video image manually. - Page 58 SUB MENU 6.4.5 Manual White Balance blue increase/decrease VID ADJ -VALUE Manual white balance blue increase/decrease -RED is only available if white balance control is on > -BLUE EXPOSE manual. MM- DAT Y/C-DAT BNC-OUT If manual white balance is on MAN, it is possible to adjust LINE the red and blue saturation of the video image manually.
- Page 59 6.4.6 Exposure time video assist SUB MENU same as film VID ADJ -VALUE The exposure time of the video assist can be programmed -RED to follow the exposure time of the film. Thus, identical motion -BLUE > EXPOSE blur on film and video assist is achieved. The mirror shutter MM- DAT of the film camera consists of a reflective part, which will Y/C-DAT...
-
Page 60: Normal Video
SUB MENU 6.4.7 Mini-Monitor Output as ”normal video” VID ADJ or ”video with data” -VALUE -RED The mini monitor output can be programmed to have -BLUE EXPOSE ”normal video” or ”video with data”. > MM- DAT Y/C-DAT BNC-OUT Note: If the on-screen menu control is on (red LED LINE next to the E -key is on), there will... - Page 61 6.4.8 Y/C-Output as ”normal video” SUB MENU or ”video with data” VID ADJ -VALUE It can be programmed to have ”normal video” or ”video -RED with data” on the Y/C output. -BLUE EXPOSE MM- DAT Note: If the on-screen menu control is on (red LED >...
- Page 62 SUB MENU 6.4.9 Composite or Y/C signal at BNC Connectors VID ADJ -VALUE If selected, the Y/C signal is available on the same BNC -RED connectors, on which the composite signal is outputted. -BLUE EXPOSE Therefore it is necessary to switch between both signals MM- DAT Y/C-DAT on the BNC connecter.
- Page 63 6.4.10 Flicker free on/off SUB MENU VID ADJ Flicker free can be switched of to bypass the digital frame -VALUE store and have the video assist output with no delay. -RED -BLUE EXPOSE The film camera runs normally at a different speed than MM- DAT the video assist.
-
Page 64: Line Interpolation On/Off
SUB MENU 6.4.11 Line interpolation on/off VID ADJ Due to the rotating mirror shutter of the film camera, the -VALUE CCD chip of the IVS gets light only for a maximum of 50 % -RED of the time. All video assists will therefore have one true -BLUE EXPOSE video field and the next one will be the repetition of the... -
Page 65: Display Mode
6.4.12 Display mode SUB MENU VID ADJ In parallel to the keyboard, the display mode can also be -VALUE programmed via the on-screen menu. -RED -BLUE EXPOSE The IVS can store one particular image, display that or MM- DAT overlay it against the live image in front of the camera to Y/C-DAT BNC-OUT compare both images. - Page 66 SUB MENU 6.4.13 Store image VID ADJ The IVS can store one particular image, display that or -VALUE overlay it against the live image in front of the camera to -RED compare both images. The store image command will -BLUE EXPOSE grab one particular image, no matter of the selected MM- DAT...
- Page 67 6.4.14 Exit SUB MENU VID ADJ Return to the main menu using EXIT. -VALUE -RED Move the cursor > with the keys to the line -BLUE EXPOSE EXIT and press the key MM- DAT Y/C-DAT BNC-OUT Note: Pressing the E -key for more than three NTER NSERT...
-
Page 68: Format Marking Menu
6.5 Format Marking Menu The IVS can insert two different format markings electronically SUB MENU in the video image, either individually or simultaneously. > FORMAT The position of these format markings can be set anywhere POSITION on the screen, to line up exactly with the ground glass mark- EDGE WHITE ings. - Page 69 6.5.1 Activate Format Markings SUB MENU FORMAT POSITION It is possible to have no format marking (OFF), EDGE format marking number one (1), WHITE LEVEL format marking number two (2) OUTSIDE FULL > EXIT or both format markings at the same time (1 & 2) on display. If the electronic format markings are not parallel to the ground glass format markings, readjust the CCD chip with the alignment screws on the...
- Page 70 SUB MENU b) Move the cursor > with the keys to the line POSITION. Call the positioning mode with the FORMAT > POSITION<> keys EDGE WHITE The submenu is displayed on the screen §. LEVEL OUTSIDE FULL EXIT • The symbol indicates that it is now possible to move the left and the upper line of format 1.
- Page 71 6.5.3 ”White” Setting the Brightness SUB MENU of the Format Markings FORMAT POSITION EDGE The brightness of the format markings can be set to black > WHITE LEVEL (0), dark gray (1), light gray (2) or white (3). OUTSIDE FULL EXIT Move the cursor >...
- Page 72 SUB MENU 6.5.5 Exit FORMAT POSITION Return to the main menu using EXIT. EDGE WHITE LEVEL Move the cursor > with the keys to the line OUTSIDE FULL > EXIT EXIT and press the key Note: Pressing the E -key for more than three NTER NSERT seconds will cause the system to exit the onscreen...
-
Page 73: Status Menu
6.6 Status Menu The IVS can insert the camera status into the video image. SUB MENU The following information is available: > STATUS POSITION • standby or run SIZE SMALL BACK- GROUND BOXED • forward (FWD) or reverse (REV) CAM-DIR IVS-FILM •... - Page 74 SUB MENU 6.6.1 Status > STATUS POSITION This sub menu line switches the insertion of camera status SIZE SMALL BACK- data on (ON) and off (OFF) independently of other GROUND BOXED inserted data. CAM-DIR IVS-FILM COUNTER ON -MODE DOWN Move the cursor > with the keys to the line -PERF STATUS.
- Page 75 6.6.3 Size SUB MENU STATUS POSITION The format of the inserted characters can be changed > SIZE SMALL BACK- independently of other windows from SMALL to GROUND BOXED WIDE to HIGH to BIG. CAM-DIR IVS-FILM COUNTER ON Move the cursor > with the keys to the line -MODE DOWN...
-
Page 76: Camera Direction
SUB MENU 6.6.5 Camera Direction STATUS POSITION The camera direction forward ”FWD” or reverse ”REV” must SIZE SMALL BACK- be set in the IVS in order to get valid information in the GROUND BOXED IVS film counter. > CAM-DIR IVS-FILM COUNTER ON -MODE DOWN... -
Page 77: Ivs Film Counter Mode
Move the cursor > with the keys to the line IVS-FILM. The keys will switch between IVS film counter on and off. If the IVS film counter is on, the status line has film counter CAM-STATUS: 24 fps 107 m information otherwise the information is blanked out. -
Page 78: Ivs Film Counter Perf
SUB MENU 6.6.8 IVS Film Counter Perf STATUS POSITION Depending on the installed movement in the film camera SIZE SMALL BACK- the advance step per frame can be either 3 or 4 perforations. GROUND BOXED The correct advance step must be set in order to get correct CAM-DIR IVS-FILM data in the IVS film counter. - Page 79 > -SET <> Move the cursor > with the keys to the line -SET. -RESET 0107m Pressing the keys will lead into the set menu. EXIT Within this set menu, it is possible to change the active digit, which is the digit, marked with the ^ symbol. >...
-
Page 80: Ivs Film Counter Reset
SUB MENU 6.6.10 IVS Film Counter Reset STATUS POSITION This sub menu line will reset the IVS film counter to 0000. SIZE SMALL BACK- GROUND BOXED Move the cursor > with the keys to the line CAM-DIR IVS-FILM -RESET. The keys will reset the counter to COUNTER ON -MODE... -
Page 81: Time Code Menu
6.7 TIME CODE Menu 11:24:30/03 For all TC- and related functions, the ARRIFLEX 435 must be equipped with a Function Expansion SUB MENU Module (FEM). > TC TIME POSITION SIZE SMALL BACK- GROUND BOXED The IVS can insert the film camera’s time code into the video FRAME COUNTER FILM... -
Page 82: Tc Time
6.7.1 TC Time SUB MENU > TC TIME POSITION This sub menu line switches the insertion of time code data SIZE SMALL BACK- on (ON) and off (OFF) independently of other inserted data. GROUND BOXED FRAME COUNTER FILM Move the cursor > with the keys to the line TC EXIT TIME. - Page 83 6.7.3 Size SUB MENU TC TIME POSITION The format of the inserted characters can be changed > SIZE SMALL independently of other windows from SMALL to BACK- GROUND BOXED WIDE to HIGH to BIG. FRAME COUNTER FILM EXIT Move the cursor > with the keys to the line SIZE.
-
Page 84: Frame Counter
SUB MENU To have the time code count related to the film camera, select the mode ”Frame counter Film”, which is often refer- TC TIME POSITION red to as ”film related time code”. In this mode, the frame SIZE SMALL BACK- counter of the time code (the last two digits of the time code GROUND... - Page 85 In case of ”Frame counter Film” there will be a ”/” before 11:24:30/03 the frame count (the last two digits of the time code display), in case of ”Frame counter Video” there will be a ”:” §. 11:24:30:03 The frame count is only active if time code is actually recorded on film.
- Page 86 6.7.6 Exit SUB MENU TC TIME POSITION Return to the main menu using EXIT. SIZE SMALL BACK- GROUND BOXED Move the cursor > with the keys to the line FRAME COUNTER FILM EXIT and press the key > EXIT Note: Pressing the E -key for more than three NTER...
-
Page 87: User Bits Menu
6.8 USER BITS Menu 100297C1 For all TC- and related fuctions, the ARRIFLEX 435 must be equipped with a Function Expansion SUB MENU Module (FEM). > TC UBIT POSITION SIZE SMALL BACK- The IVS can insert the user bits of the film camera’s time GROUND BOXED EXIT... - Page 88 SUB MENU 6.8.1 TC UBit > TC UBIT POSITION This sub menu line switches the insertion of user bit data SIZE SMALL BACK- on (ON) and off (OFF) independently of other inserted data. GROUND BOXED EXIT Move the cursor > with the keys to the line TC UBIT.
- Page 89 6.8.3 Size SUB MENU TC UBIT POSITION The format of the inserted characters can be changed > SIZE SMALL BACK- independently of other windows from SMALL to GROUND BOXED WIDE to HIGH to BIG. EXIT Move the cursor > with the keys to the line SIZE.
- Page 90 SUB MENU 6.8.5 Exit TC UBIT POSITION Return to the main menu using EXIT. SIZE SMALL BACK- GROUND BOXED Move the cursor > with the keys to the line > EXIT EXIT and press the key Note: Pressing the E -key for more than three NTER NSERT...
-
Page 91: Text Menu
Prod. Name Unit A Take 35 Scene 11/III 6.9 Text Menu The IVS can insert additional text into the video image, for example the production name or a scene number. As SUB MENU there is no text input possibility on the camera or on the IVS >... - Page 92 SUB MENU 6.9.1 Text > Text POSITION This sub menu line switches the insertion of additional text SIZE SMALL BACK- on (ON) and off (OFF) independently of other inserted data. GROUND BOXED Exit Move the cursor > with the keys to the line TEXT.
- Page 93 SUB MENU 6.9.3 Size Text POSITION The format of the inserted characters can be changed > SIZE SMALL BACK- independently of other windows from SMALL to GROUND BOXED WIDE to HIGH to BIG. Exit Move the cursor > with the keys to the line SIZE.
- Page 94 SUB MENU 6.9.5 Exit Text POSITION Return to the main menu using EXIT. SIZE SMALL BACK- GROUND BOXED Move the cursor > with the keys to the line > Exit EXIT and press the key Note: Pressing the E -key for more than three NTER NSERT seconds will cause the system to exit the onscreen...
-
Page 95: Pull-Down Menu
6.10 Pull-Down Menu For all TC- and related functions, the ARRIFLEX 435 must be equipped with a Function Expansion SUB MENU Module (FEM). > PULL DN. ON POSITION SIZE SMALL BACK- The IVS can generate information on whether the current GROUND BOXED EXIT... - Page 96 Film Film Film Film...
- Page 97 All video assists are based either on PAL or NTSC video In spite of the fact that the name Pull-Down comes from the systems, with a fixed video frequency of either 25 full video working practice in the NTSC systems, where on a telecine frames per second with PAL or 29.97 full video frames per the film is running on 23.976 fps and gets converted to second with NTSC.
- Page 98 SUB MENU 6.10.1 Pull-Down > PULL DN. ON POSITION This sub menu line switches the insertion of pull down SIZE SMALL BACK- information on (ON) and off (OFF) independently of GROUND BOXED other inserted data. EXIT Move the cursor > with the keys to the line PULL DN..
- Page 99 6.10.3 Size SUB MENU PULL DN. ON POSITION The format of the inserted characters can be changed > SIZE SMALL independently of other windows from SMALL to BACK- GROUND BOXED WIDE to HIGH to BIG. EXIT Move the cursor > with the keys to the line SIZE.
- Page 100 SUB MENU 6.10.5 Exit PULL DN. ON POSITION Return to the main menu using EXIT. SIZE SMALL BACK- GROUND BOXED Move the cursor > with the keys to the line > EXIT EXIT and press the key Note: Pressing the E -key for more than three NTER NSERT...
-
Page 101: Display Menu
6.11 Display Menu 11:24:30/03 100297C1 In the sub menu ”Display” it is possible to change some basic settings, which effect all active man-readable SUB MENU windows of the inserter at the same time. > DISPLAY VERT. POS. WHITE • Enter the Display Menu from the main menu. LEVEL INVERSE EXIT... - Page 102 SUB MENU 6.11.1 Vertical Position DISPLAY > VERT. By changing the setting in the line ”Vertical Position” of this POS. WHITE sub menu it is possible to simultaneously shift all man-read- LEVEL able windows with the exception of the format markings INVERSE EXIT vertically by one video line (fine adjust).
-
Page 103: White Level
6.11.2 White Level SUB MENU DISPLAY VERT. This line is used to change the brightness of all man- POS. readable windows but the frame lines. Value 0 means dark > WHITE LEVEL gray, value 4 corresponds to bright white characters. INVERSE EXIT Move the cursor >... - Page 104 SUB MENU 6.11.4 Exit DISPLAY VERT. Return to the main menu using EXIT. POS. WHITE LEVEL Move the cursor > with the keys to the line INVERSE > EXIT EXIT and press the key Note: Pressing the E -key for more than three NTER NSERT seconds will cause the system to exit the onscreen...
-
Page 105: Vitc Line Menu
6.12 VITC Line Menu For all TC- and related fuctions, the ARRIFLEX 435 must be equipped with a Function Expansion Module (FEM). SUB MENU > VITC POS.1 POS.2 The IVS can convert the time code, which can also be dis- EXIT played man-readable in the video image, into machine readable VITC (Vertical Interval Time-Code) and place it... - Page 106 SUB MENU 6.12.1 VITC > VITC POS.1 This sub menu line switches the insertion of VITC on (ON) POS.2 EXIT and off (OFF). Move the cursor > with the keys to the line VITC. The keys switch the insertion on and off.
- Page 107 SUB MENU 6.12.3 Position 2 VITC POS.1 The insertion of VITC can be single or multiple line between > POS.2 EXIT line 6 and 22. If the same lines on position 1 and position 2 are selected, the insertion will be single line, otherwise multiple line.
-
Page 109: White Line Menu
6.13 White Line Menu For all TC- and related fuctions, the ARRIFLEX 435 must be equipped with a Function Expansion Module (FEM). SUB MENU > WHITE L. ON POS. The IVS can generate information on whether the current EXIT video image corresponds to a new film frame or whether it is a repeated video image. - Page 110 Film Film Film Film...
- Page 111 All video assists are based either on PAL or NTSC video video signal white, indicating that only these video frames systems, with a fixed video frequency of either 25 full video correlate one-to-one to film frames. The duplicated video frames per second with PAL or 29.97 full video frames per fields are not marked.
- Page 112 SUB MENU 6.13.1 White Line > WHITE L. ON POS. This sub menu line switches the insertion of White-Lines EXIT on (ON) and off (OFF). Move the cursor > with the keys to the line WHITE L. The keys switch the insertion on and off.
- Page 113 6.13.3 Exit SUB MENU WHITE L. ON POS. Return to the main menu using Exit. > EXIT Move the cursor > with the keys to the line EXIT and press the key Note: Pressing the E key for more than three NTER NSERT seconds will cause the system to exit the onscreen...
-
Page 114: Technical Data
7. Technical Data 8. Order numbers Weight ..................approx. 0,7 kg Optic Silent and/or ............... K2.47230.0 Power Consumption ..............approx. 11 W Optic Academy ................K2.47231.0 Width of the Inserter/Antiflicker Module ..........21,5 mm Video Electronic complete ..........K2.47365.0 for PAL or K2.47366.0 for NTSC Inputs ............ -
Page 115: Index
9. Index 3 Perforation ............78 Camera Direction ..........76 3-way S-VHS cable ..........24 Camera Status ............. 74 3-way Y/C cable ..........24 Exit ............80 CCD Optic Module ......... 9, 11 Changing blue ..........31, 34 Academy Format ..........10 Changing Format marking number ...... - Page 116 Enter Insert ............47 Gain Control ............35 Exit ........52, 67, 72, 80, 86, 90, Automatic ..........35 94, 100, 104, 107, 113 Manual ............. 35 Expanded Function Module ........9 General Description ..........7 Exposure time video assist same as film ....59 Genlock .............
- Page 117 Keyboard ............27 Normal Video Composite Video Output ......22 Mini Monitor Output ......22, 25 Line interpolation on/off ........64 Y/C Output ..........23 Load Settings ............49 Load/Store Menu ..........48 All Standard ..........51 Off ..............27 Exit ............
- Page 118 Flicker free on/off ........38 Perforations Focus ............29 3 or 4 perforation film advance ....78 Frame store and compare ......40 Power Consumption ........... 114 Gain Control ..........35 Product Specifications ..........6 Locking the Keyboard ......... 27 Pull-Down Menu ...........
- Page 119 Technical Data ........... 114 Undo ..............51 Text Menu ............91 User Bits Menu ............ 87 Background ..........93 Background ..........89 Exit ............94 Exit ............90 Position ............. 92 Position ............. 88 Size ............93 Size ............89 Text ............
- Page 120 Video related Time Code ........84 Video with Data Warnings ............. 5 Composite Video Output ......22 Weight ............. 114 Mini Monitor Output ......22, 25 White Balance ..........30, 56 Y/C Output ..........23 Auto White Balance ........30 VITC Line Menu ..........
-
Page 121: Arri Service
ARRI Service Germany ....... Arnold & Richter Cine Technik Italy ........ARRI ITALIA S.R.L. Türkenstraße 89 Viale Edison 318 D-80799 München 20099 Sesto S. Giovanni (Milano) phone: (089) 3809-0 phone: (02) 26 22 71 75 fax: (089) 3809-1244 fax: (02) 242 16 92 E-mail: webmaster@arri.de... - Page 122 SUB MENU SUB MENU SUB MENU SUB MENU SUB MENU SUB MENU > LOAD SET > VID ADJ > STATUS > TC TIME > FORMAT > TC UBIT POSITION POSITION POSITION POSITION STORE SET -VALUE EDGE SIZE SMALL SIZE SMALL SIZE SMALL (CONFIRM...
- Page 123 MAIN MENU > LOAD/STORE VIDEO ADJUST FORMAT MARKING STATUS TC TIME TC USER BIT TEXT PULL DOWN DISPLAY VITC LINE WHITE LINE Main Menu SUB MENU SUB MENU SUB MENU SUB MENU SUB MENU > Text > PULL DN. ON >...
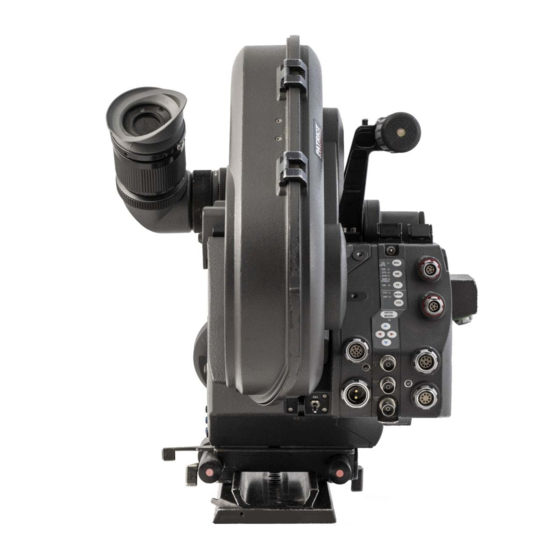
- Page 124 • Adjustment wheel for iris IVS lens • Y/C out (”normal video” and ”video with data”)
- Page 125 Identnumber for Instruction Manual: K 5.58233.0 available languages German English © ARRI/KVW Technical data are subject to change without notice Printed in Germany ARNOLD & RICHTER CINE TECHNIK TÜRKENSTR. 89 D-80799 MÜNCHEN TEL. (089) 3809-0 • • FAX (089) 3809 - 1244 http://www.arri.com...
Need help?
Do you have a question about the IVS 435 and is the answer not in the manual?
Questions and answers