
Subscribe to Our Youtube Channel
Related Manuals for Bushnell TROPHY CAM


Summary of Contents for Bushnell TROPHY CAM
-
Page 1: Instruction Manual
ROPHY INSTRUCTION MANUAL Model#: 119405 / 119415 Lit# 98-1406 / 03-09 Trophy 119405+119415 Trail Cams-1LIM-rev2.indd 1 3/11/2009 9:42:09 AM... - Page 2 Trophy 119405+119415 Trail Cams-1LIM-rev2.indd 2 3/11/2009 9:42:09 AM...
- Page 3 The device is designed for outdoor use and is resistant against water and snow. 1.2 Application The BUSHNELL TROPHY CAM can be used as a trail camera for hunting or scouting. It can also be used as a surveillance device. 1.3 Parts The BUSHNELL TROPHY CAM has the following interfaces: USB port, SD card slot, TV Out, and external DC power in.
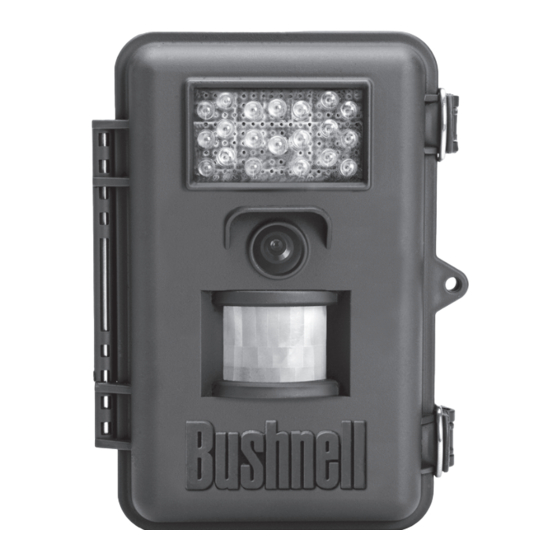
- Page 4 “video” mode. The “RIGHT” key also serves as the shutter (“SHOT”) key of the camera and the “OK” key sets the “Playback” mode. Figure 1: Front view of the Bushnell Trophy Cam Figure 2: Button and Switch Guide Trophy 119405+119415 Trail Cams-1LIM-rev2.indd 4...
- Page 5 SD cards or batteries. 2 Cautions • The working voltage of the BUSHNELL TROPHY CAM is 6V. You can provide it with 4 or 8 AA batteries, or use an external 6V DC power supply (positive “tip” (inside) polarity). •...
-
Page 6: Basic Operation
CAM. 3.1 Loading Batteries First, you will need to load the TROPHY CAM with batteries. In fact, there are two methods to supply power for the device: one is to use eight AA batteries and the other is to use an external DC power supply. It is recommended to use eight new alkaline or lithium AA batteries. - Page 7 (>400mA). Please use the power source cable (Optional) to connect the external DC power source and insert it into the power jack of the BUSHNELL TROPHY CAM, be sure that the polarity is correct.
- Page 8 CAM , it will enter into the ON mode. The motion indication LED (red) will blink for about 10s. This time interval is for you to make the BUSHNELL TROPHY CAM ready for operation, e.g., to close the front cover and to lock it.
- Page 9 Time Stamp Timer Switch On (00:00 – 23:59) In the ON (Live) mode the BUSHNELL TROPHY CAM is ready for motion detection. After having entered the ON mode, the BUSHNELL TROPHY CAM will take pictures or videos automatically according to previous settings when it is triggered by detection of activity.
-
Page 10: Advanced Operation
SD-card under the directory of \DCIM\100EK113. To use a TV: Connect a TV monitor with the BUSHNELL TROPHY CAM to review by TV. Next enter into the SETUP mode. The last picture will be shown on the TV monitor after pressing the OK key. - Page 11 4.1 Parameters Setting and Operations (continued) setting some guide information will be shown on the LCD. So it is easy to do the next step according to this information. Generally speaking, certain icons, which indicate which value is subject to change, will be shown on the LCD.
- Page 12 Figure 5: Setting Camera Mode 4.1.2 Formatting the SD Card a) The system will delete all files stored in the SD card after formatting. Therefore you should make sure that you have made a backup of important data. In MENU state press UP or DOWN key until the system enters into the format menu, shown in Fig.
- Page 13 4.1.2 Formatting the SD Card (continued) 6(4). Please note, you’ll quit the parameter setting without any saving and no parameter is changed if you press the MENU key at any time before pressing OK key in step d. After formatting, you can push the UP or DOWN key to set another parameter, or push the MENU key for leaving the MENU state.
- Page 14 4.1.3 Setting Image Size (Resolution) This parameter has two values: 5 megapixels (5M Pixel or 5MP) and 3 megapixels (3M Pixel or 3MP). The default value is 3 megapixels. The following shows you how to set pixel size as “3M Pixel” provided that the previous value is “5M Pixel”...
- Page 15 4.1.4 Setting Video Size (Resolution) This parameter also has two values: VGA (640×480)and QVGA (320×240). The default value is “640x480” (VGA). The following shows you how to set video size as “320×240” provided that the previous value is at “640x480”: Push the UP or DOWN key until the parameter “Video Size”...
- Page 16 4.1.5 Setting Date and Time You can change the date and time of the device by setting this parameter when necessary, e.g., after every battery change. It must be pointed out that the function of some keys is not the same as previous, such as UP/ DOWN key is used for changing the value of date/ time and RIGHT/LEFT key is used for jumping to the next setting menu.
- Page 17 Press the UP or DOWN key until the second changes to 00 as shown in the Fig. 9(l) and 9(12). After the settings of the date and time are all finished, push the OK key to save them. Please note, you’ll quit the parameter setting without any saving and no parameter is changed if you press the MENU key at any time only before pressing OK key in step m.
- Page 18 Figure 9: Setting Date and Time (continued) (10) (11) (12) Trophy 119405+119415 Trail Cams-1LIM-rev2.indd 18 3/11/2009 9:42:11 AM...
- Page 19 4.1.6 Setting Continuous Shooting Numbers This parameter affects the number of pictures taken for each triggering in the camera mode and is effective and can be adjusted only when the device is set to the ON (Live) mode. It has three values: “1 Photo” (take 1 picture after triggered) and “2 Photo”...
- Page 20 4.1.7 Setting Video Length This parameter is effective and can be adjusted only with the device in the video mode for the ON mode. Its value extends from 1 to 60 seconds with a step of one second. The default value is 10 seconds. During adjusting (by the UP or Down key), there is a accelerating function for the RIGHT key: pressing the RIGHT key steadily for a few seconds, the step length will increase to 5 seconds first, and then to 10 seconds per step a few...
- Page 21 This parameter is only effective in the ON mode. It means that how long the PIR of the BUSHNELL TROPHY CAM will be disabled after each triggering in the ON mode. During this time the PIR of the device will not react to the motion.
- Page 22 This parameter defines the sensitivity of the PIR. There are three degrees: High, Normal and Low with default value “Normal”. The higher degree indicates that the BUSHNELL TROPHY CAM is more easily triggered by motion, taking more pictures or recording more videos. It is recommended to use high sensitivity degree in warmer environments, and to use lower sensitivity for cooler environments.
- Page 23 4.1.10 Setting Time Stamp This parameter defines whether the time should be stamped in the pictures and video clips or not. The following shows you how to set time stamp as “Off” provided that the previous value is “On” in MENU state: Push the UP or DOWN key until the parameter “Time Stamp”...
- Page 24 This parameter is only valid in the ON mode and defines a certain time lapse in a day when the BUSHNELL TROPHY CAM can be triggered. In the rest of the time the device is shut off. The effective value of the hour ranges from 0 to 23 while the minute ranges from 0 to 59.
- Page 25 Figure 15: Setting the Timer Trophy 119405+119415 Trail Cams-1LIM-rev2.indd 25 3/11/2009 9:42:13 AM...
- Page 26 Figure 15: Setting the Timer (10) (11) Trophy 119405+119415 Trail Cams-1LIM-rev2.indd 26 3/11/2009 9:42:13 AM...
- Page 27 4.1.12 Reloading the Default Settings Sometimes it is very helpful to load the default settings. This can be simply done according to the following steps: In MENU state press the UP or DOWN key until the parameter “Default Set” appears as shown in the Fig. 16(a) and 16(1). Push the OK key to load default settings or MENU key to cancel this operation.
- Page 28 To do this, connect a TV monitor or a Picture Viewer (such as a digital picture frame) that has a TV-in interface with the BUSHNELL TROPHY CAM by a video cable (included). Enter into the SETUP mode.
- Page 29 10s. This time lets you make preparation for monitoring. For example, you can mount and lock the front cover, fix the BUSHNELL TROPHY CAM and then walk away. In this waiting time, the PIR indication light (RED) will blink continuously. After the light is put off, the PIR starts to work.
- Page 30 BUSHNELL TROPHY CAM unless you have problems with reading the SD card by your equipment. If this happens, please format the SD card in a BUSHNELL TROPHY CAM or in a computer at first and then insert the card into your camera to make a try.
- Page 31 There are two ways to mount the BUSHNELL TROPHY CAM : using a band shaped strap, or the bottom screw. Using the strap: To use the strap to fix the BUSHNELL TROPHY CAM on a tree is illustrated in Fig. 17. Take the strap ends and go through the two back holes of the BUSHNELL TROPHY CAM At the end, tie the buckle the strap together around the tree.
-
Page 32: Technical Specifications
Technical Specifications Image Sensor 5 Megapixel Color CMOS Maximum Pixel Size 2560x1920 Lens F=3.1; FOV=40°; Auto IR-Cut-Remove (at night) IR-Flash Range 12m-15m Display Screen 25x35mm (1.7") Memory SD Card, Maximum capacity 2GB Picture Size 5MP = 2560x1920; 3MP = 2048x1536 Video Size 640x480: 16fps;... -
Page 33: Two-Year Limited Warranty
Lenexa, Kansas 66214 Richmond Hill, Ontario L4B 2M9 For products purchased outside the United States or Canada please contact your local dealer for applicable warranty information. In Europe you may also contact Bushnell at: Bushnell Germany GmbH European Service Centre Mathias-Brüggen-Str. - Page 34 · Consult the dealer or an experienced radio/TV technician for help. The device does not contain any user-serviceable parts. Repairs should only be made by an Authorized Bushnell repair center. Unauthorized repairs or modifications could result in permanent damage to the equipment, and will void your warranty and your authority to operate this device under Part 15 regulations.
- Page 35 Trophy 119405+119415 Trail Cams-1LIM-rev2.indd 35 3/11/2009 9:42:14 AM...
- Page 36 For further questions or additional information please contact: Bushnell Outdoor Products 9200 Cody, Overland Park, Kansas 66214 (800) 423-3537 • www.bushnell.com ©2009 Bushnell Outdoor Products Trophy 119405+119415 Trail Cams-1LIM-rev2.indd 36 3/11/2009 9:42:15 AM...
Need help?
Do you have a question about the TROPHY CAM and is the answer not in the manual?
Questions and answers