Table of Contents

Related Manuals for PEERLESS PSC II Series


Summary of Contents for PEERLESS PSC II Series
- Page 1 Series ™ Boilers As an ENERGY STAR ® Partner, PB Heat, LLC has determined that this product meets the ENERGY STAR guidelines for energy efficiency. I n s t a l l a t i o n , O p e r a t i o n & M a i n t e n a n c e M a n u a l...
-
Page 2: Table Of Contents
TABLE OF CONTENTS TABLE OF CONTENTS USING THIS MANUAL 5. GAS PIPING A. INSTALLATION SEQUENCE ... . .1 6. ELECTRICAL B. SPECIAL ATTENTION BOXES ... .1 A. -
Page 3: Using This Manual
USING THIS MANUAL USING THIS MANUAL A. INSTALLATION SEQUENCE DANGER Follow the installation instructions provided in this Indicates a condition or hazard which will cause manual in the order shown. The order of these severe personal injury, death or major property instructions has been set in order to provide the installer damage. -
Page 4: Preinstallation
PREINSTALLATION 1. PREINSTALLATION Read carefully, study these instructions before beginning work. This boiler must be installed by a qualified contractor. The boiler warranty can be voided if the boiler is not installed, maintained and serviced correctly. NOTICE The equipment must be installed in accordance with those installation requirements of the authority having jurisdiction or, in the absence of such requirements, to the current edition of the National Fuel Gas Code, ANSI Z223.1/NFPA 54 and/or CAN/CSA B49.1, Natural Gas and Propane Installation Code . - Page 5 PREINSTALLATION DETECTORS: Each carbon monoxide detector See the latest edition of Massachusetts Code 248 CMR shall comply with NFPA 720 and be ANSI/UL for complete verbage and also for additional (non-vent 2034 listed and IAS certified. related) requirements (248 CMR is available online). •...
-
Page 6: Boiler Set-Up
BOILER SET-UP 2. BOILER SET-UP 1. Provide a sound, level foundation. Locate boiler as 4. Separate the wood shipping pallet from the boiler near to the outside wall as possible and centralized base by removing two (2) hold-down bolts at each with respect to the heating system. -
Page 7: Water Piping And Controls
WATER PIPING AND CONTROLS 3. WATER PIPING AND CONTROLS 3. Supply Piping: A. BOILER SUPPLY AND RETURN a. Pipe the supply to the 1-1/2" NPT supply tapping 1. Size the supply and return to suit the system. A typical at the top of the boiler. piping arrangement is shown in Figure 3.1. -
Page 8: Safety Relief Valve
WATER PIPING AND CONTROLS 6. Install this boiler so that the gas ignition system components are protected from water (dripping, spraying, etc.) during appliance operation and service (circulator replacement, condensate trap, control replacements, etc.). 7. If this boiler and distribution system is used in conjunction with a refrigeration system, pipe the chilled medium in parallel with the boiler and install the proper valve to prevent the chilled medium from... -
Page 9: Piping For Zoned Systems
WATER PIPING AND CONTROLS C. PIPING FOR ZONED SYSTEMS 1. See Figures 3.5 and 3.6 for basic zoned system layouts. 2. Run each zone pipe down then up to zone to prevent air accumulation in piping. 3. If required, provide means to isolate and drain each zone separately. -
Page 10: Expansion Tank
WATER PIPING AND CONTROLS D. EXPANSION TANK FREEZE PROTECTION 1. Consult the tank manufacturer’s instructions for For new or existing systems that must be freeze-protected: specific information relating to tank installation. Size the expansion tank for the required system volume WARNING and capacity. -
Page 11: Venting, Ventilation And Air Inlet
VENTING, VENTILATION AND AIR INLET 4. VENTING, VENTILATION AND AIR INLET c. Provide 2" (51 mm) clearance between vent pipe A. GENERAL and combustible construction. No clearance is Install vent system in accordance with Venting of required between Thimble and combustible Equipment part of the National Fuel Gas Code, ANSI construction. - Page 12 VENTING, VENTILATION AND AIR INLET 5. Slide Stainless Steel Collar over vent pipe and slide to 11. Secure Inside Thimble cap to Wall Thimble with #10 end of pipe. screws. Seal Thimble Cap perimeter with silicone. 6. Insert pipe with collar through Outside Vent Cap and 12.
-
Page 13: Roof Terminations
VENTING, VENTILATION AND AIR INLET C. ROOF TERMINATIONS (VERTICAL Table 4.1 VENTING) *Equivalent Length of 3" (76 mm) Diameter Stainless Steel Vent Pipe 1. Vent pipe and air inlet terminations must be within the Boiler Model Minimum Vent Length Maximum Vent Length maximum and minimum vent and air intake lengths shown in Tables 4.1 and 4.2. -
Page 14: Vent Pipe Installation
VENTING, VENTILATION AND AIR INLET 7. To prevent condensation from forming on exposed E . VENT PIPE INSTALLATION portions of Wall Thimble and 4" (102 mm) diameter air inlet piping, wrap exposed areas with insulation. 1. For minimum and maximum vent pipe lengths see Table 4.1. -
Page 15: Gas Piping
GAS PIPING 5. GAS PIPING 1. Size and install the gas supply piping properly in order to provide a supply of gas sufficient to meet the maximum demand without undue loss of pressure between the meter and the boiler. 2. Determine the volume of gas to be provided to the boiler in cubic feet per hour. - Page 16 GAS PIPING Table 5.1: Natural Gas Natural Gas Input LP Gas Input Boiler Model Cu. Ft/hr Cu. Meter/hr Cu. Ft/hr Cu. Meter/hr PSCII-03 PSCII-04 PSCII-05 PSCII-06 Table 5.2: Pipe Capacity Capacity of pipe of different diameters and lengths in cubic feet per hour (cubic meter per hour) with pressure drop of 0.3 inches of water (75 Pa) and specific gravity of 0.60.
-
Page 17: Electrical
ELECTRICAL 6. ELECTRICAL Install all electrical wiring in accordance with the National Electrical Code and local requirements. NOTICE This unit when installed must be electrically grounded in accordance with the requirements of the authority having jurisdiction or, in the absence of such requirements, with the current edition of the National Electrical Code, ANSI/NFPA 70 and/or the Canadian Electrical Code , Part 1, CSA C221. -
Page 18: Sequence Of Operation
ELECTRICAL Figure 6.2: Wiring and Connection Diagram 7. Pilot flame detected. D. SEQUENCE OF OPERATION a. Igniter off. 1. Thermostat calls for heat, energizes Control Relay (CR). b. Main gas on, igniting main burners. 2. Control Relay (CR) energizes circulator. Note: If pilot flame is not detected within 30 seconds, the 3. - Page 19 ELECTRICAL Figure 6.3: Ignition System Operating Sequence...
- Page 20 ELECTRICAL Figure 6.4: Zone Wiring with Zone Valves Figure 6.5: Zone Wiring with Circulators...
-
Page 21: Start-Up Procedures
START-UP PROCEDURES 7. START-UP PROCEDURES 7. Check joints and fittings throughout the system for A. COMPLETING THE INSTALLATION leaks. If leaks are found, drain the system and repair as required. 1. Confirm that all water, gas and electricity are turned off. 8. - Page 22 START-UP PROCEDURES Figure 7.1: Gas Valve, Manifold and Burner Assembly – Intermittent Ignition Figure 7.2: Valve Tapping and Adjustment Screw Locations...
- Page 23 START-UP PROCEDURES Figure 7.3: Operating Instructions...
-
Page 24: Control Descriptions
START-UP PROCEDURES B. CONTROL DESCRIPTIONS D. CHECKING BURNER INPUT See Figure 6.1 in Section 6 (Electrical) for locations of 1. Refer to rating label mounted on the jacket top panel these devices. to obtain the rated BTU per hour input. In no case shall the input to the boiler exceed the value shown 1. - Page 25 START-UP PROCEDURES Table 7.1a: Meter Conversion Natural Gas Table 7.1b: Meter Conversion Natural Gas (U.S. Customary Units) (SI Metric System) Burner inputs in Btu/hr for various meter timings and Burner inputs in kW for various meter timings and heating values. (Tables based on 2 cubic feet of gas heating values.
-
Page 26: Troubleshooting
TROUBLESHOOTING 8. TROUBLESHOOTING A. SHUT-DOWN CAUSED BY PILOT DANGER OUTAGE, PRESSURE SWITCH OR When servicing or replacing items that communicate FLAME ROLL-OUT SAFETY with the boiler water, be certain that: SHUT-OFF SWITCH ● There is no pressure on the boiler. In the event of a shut-down caused by a pilot outage, ●... - Page 27 TROUBLESHOOTING Figure 8.1: Measuring Fan Suction Pressure Table 8.1: Boiler Troubleshooting Guide (Burners Functioning) PROBLEM POSSIBLE CAUSES CORRECTIVE ACTIONS Burners not functioning. See Figure 8.2 See Figure 8.2 Burners will not shut down. 1. Defective gas valve. 1. Use Figure 8.2 to troubleshoot intermittent ignition gas valve.
- Page 28 TROUBLESHOOTING Figure 8.2: Boiler Troubleshooting Guide (Burners Not Functioning)
-
Page 29: Maintenance
MAINTENANCE 9. MAINTENANCE WARNING Product Safety Information Refractory Ceramic Fiber Product This appliance contains materials made from refractory ceramic fibers (RCF). Airborne RCF, when inhaled, have been classified by the International Agency for Research on Cancer (IARC), as a possible carcinogen to humans. After the RCF materials have been exposed to temperatures above 1800°F (980°C), they can change into crystalline silica, which has been classified by the IARC as carcinogenic to humans. -
Page 30: General
MAINTENANCE A. GENERAL D. MONTHLY (WITH BOILER IN USE) 1. Disconnect this boiler from the gas supply piping 1. Verify condensate drain trap (loop) has sufficient during any pressure testing of the gas system. water to maintain seal and is not blocked. Fill and/or unblock as necessary. - Page 31 MAINTENANCE b. Remove jacket removable door, air inlet pipe, air r. Examine air box cover seal. Reposition/replace as box cover, and air box diffuser screen. necessary to assure air tight seal. c. Remove burner hitch pin clips. Disconnect pilot s. Reinstall air box cover. tubing at compression elbow.
- Page 32 MAINTENANCE Figure 9.2: Inspection of Flueways, Burners, and Vent System.
-
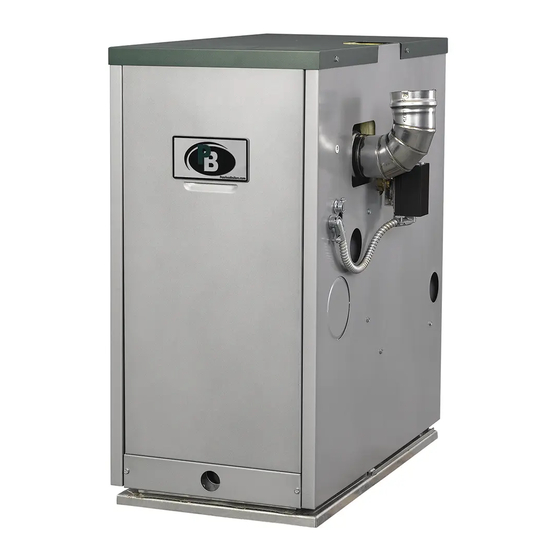
Page 33: Boiler Dimensions & Ratings
BOILER DIMENSIONS & RATINGS 10. BOILER DIMENSIONS & RATINGS Figure 10.1: Boiler Views Table 10.1: Series PSC II™ Boiler Dimensions SERIES PSC II™ BOILER DIMENSIONS Boiler Jacket Width “A” Model Number PSCII-03 12-1/2" 318 mm PSCII-04 15-7/8" 403 mm PSCII-05 19-1/4"... -
Page 34: Repair Parts
REPAIR PARTS 11. REPAIR PARTS REPAIR PARTS SERIES PSC II™ GAS BOILER Repair parts are available from your installer or by contacting PB Heat, LLC, New Berlinville, PA. Use the figures and tables on pages 32-36 to assist in ordering parts. Note: Remember to include boiler model number and serial number when ordering parts. - Page 35 REPAIR PARTS Table 11.1 Quantity Stock Description Required Code Base Assembly – PSCII-03 – 7800 Base Assembly – PSCII-04 – 7801 Base Assembly – PSCII-05 – 7802 Base Assembly – PSCII-06 – 7803 Floor Pan – PSCII-03 – 50100 Floor Pan – PSCII-04 –...
- Page 36 REPAIR PARTS Figure 11.2...
- Page 37 REPAIR PARTS Table 11.2 Quantity Stock Description Required Code Insulation Blanket, 1/2" x 1.50", Block to Base – 50867 Block – PSCII-03 – 90419 Block – PSCII-04 – 90420 Block – PSCII-05 – 90421 Block – PSCII-06 – 90422 Flue Baffle – PSCII-03 51584 Flue Baffle –...
- Page 38 NOTES...
- Page 39 NOTES...
- Page 40 Series ™ Boilers I n s t a l l a t i o n , O p e r a t i o n & M a i n t e n a n c e M a n u a l TO T H E I N S TA L L E R : This manual is the property of the owner and must be affixed near the boiler for future reference.
Need help?
Do you have a question about the PSC II Series and is the answer not in the manual?
Questions and answers