Table of Contents
Advertisement
Quick Links
Advertisement
Table of Contents

Related Manuals for AMC Live

Summary of Contents for AMC Live
-
Page 2: Table Of Contents
LIVE RADIO PLAYER - modern and universal music player which gives a possibility to choose one of the five available music sources. LIVE RADIO PLAYER unrestricted freedom to listen world wide radio stations independently on your location. Nowadays technologies and freedom choice are the main idea of this internet radio player’s. -
Page 3: Safety Instructions
Safety instructions Important Do not install this equipment in a confined space such as a book case or similar unit. The apparatus should not be dripped or splashed and no objects filled with liquids, such as vases, should not be placed on the apparatus. -
Page 4: System Components
Power cable............................1pc. Wi-Fi antenna ............................1pc. User manual ............................1pc. What do you need before starting? Before you start using LIVE RADIO PLAYER you need the following: • A broadband Internet connection. • A wireless access point (Wi-Fi) connected to your broadband Internet, preferably via a router. -
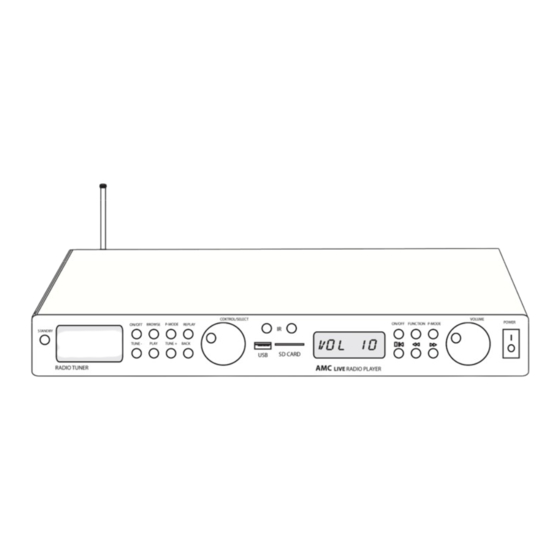
Page 5: Front Panel
Front panel Stand by switch Radio tuner’s display Radio tuner’s function buttons Volume and menu navigation’s USB slot SD card’s slot IR detectors USB/SD player’s display USB/SD player’s function buttons USB/SD player’s volume control Power switch Rear panel Main power socket Fuse holder USB/SD player’s line output FM antenna plug... -
Page 6: Radio Section
Radio section FUNCTIONS KEY • Standby switch – allows setting standby mode on the device. • ON/Off - turns on and off radio section on the device. • BROWSE – browse the track info in the playlist (active in media mode only) •... - Page 7 DISPLAY STATUS IN STOP MODE First digits indicate total files number in the USB or SD card. Second three digits indicate total folders number. DISPLAY STATUS IN PLAY MODE Playing track number. Time display (minutes) Time display (seconds) When the unit is playing, after each 5 seconds display will show information about playing file.
-
Page 8: Remote Control
USB/SD FUNCTIONS KEY • ON/Off - turns on and off USB/SD section on the device. • Function – music source selection. Change music source between USB and SD. • P mode – change playing mode: repeat one → repeat folder → random→ normal. - Page 9 16. Up key for navigation in menu. When unit is in FM mode pressing this adds 0.05Mhz displayed frequency. 17. SELECT for menu selection 18. Back – allows to go back in to previously menu page. 19. Menu – calls menu in radio display 20.
-
Page 10: Connecting To The Wireless Network
Connecting to the wireless network. Power up the Radio Please connect power cable and turn power switch on, wait about 15 seconds until display lights up. In this moment displays shows: Initialising network After a few seconds, this indication will change to: Scanning Note: If you would like to give your radio a static IP address then please look at the “Network configuration”... -
Page 11: The Radio Stations Finding
It is possible, and in some locations highly likely, that your radio will find more than one wireless access point, in that case you can choose which one you want to connect to. Turn the knob on the radio to see the ESSID for each access point the radio has found. - Page 12 If selected station has on-demand content it gives the option of listening radio programs which have already been broadcast (more info see “Radio stations which not live broadcasting” guide in the user manual ) When the Internet radio is playing a radio station display will shows the station’s name and bit rate.
-
Page 13: Storing The Radio Stations To The Presets
Turn the knob to choose <Live> or <On Demand>, and then press the SELECT button. If you choose <Live> then the radio plays the current output from this station as normal. If you choose <On Demand> then more screens are displayed where you choose what you want to listen to. -
Page 14: Fm Radio Tuner
Programmes which enable you to choose the time also enable you to fast- forward and rewind to the part you want while the radio is playing. When you press the SKIP TO PREVIOUS TRACK or SKIP TO NEXT TRACK button, the elapsed time that the programme has been playing is displayed. -
Page 15: Time, Data And Alarm Settings
Press the SELECT button and turn the knob until the hour setting is correct, then press the SELECT button one more time to confirm your settings Set Time 14:03 Set Time 15:03 Turn the knob until the minute setting is correct, and then press the SELECT for confirmation. - Page 16 Press SELECT button on the Set Alarm, after this you will see display like below. < 1 OFF 00:00 Sunday > Turn the knob to swap between the various alarms and Disable All. Pressing the SELECT button on ‘Disable All’ will cause all the alarms turning off. In this case the display will shows “All alarms disabled”...
-
Page 17: Media Player
This guide helps you to setups your PC which has Microsoft Windows XP or VISTA operational system and Windows Media player 11and helps to share audio files from your PC to LIVE RADIOPLAYER. If your PC has oldest Windows media player’s versions, please upgrade this player in to Windows Media player 11. - Page 18 Picture 1 In to the ‘Media Sharing’ window, the radio will be listed as an unknown device. Click on this unknown device icon, ‘Allow’ and ‘OK’ buttons. Please find Sharing windows photo (Picture 2) Picture 2...
-
Page 19: Media Files Playing Using Upnp Server
Media files locating and playing using UPnP server Once the UPnP server is configured to share media files with the Internet radio, you can play the files by doing the following on the radio. • Keep pressing BACK to get to the radio’s top-level menu and then turn the knob to select ‘Media Player’. - Page 20 Queuing up albums for later playback • Highlight the required album. • Press the SELECT button. • Turn the knob until “Add To Queue” is displayed. • Press the SELECT button. ‘Tracks Added to Queue’ will be displayed. Playback controlling •...
- Page 21 • Press the SELECT button. • Turn the knob to select YES or NO to confirm that shuffle mode should be enabled or disabled. Tracks playing in repeat mode. • Select the individual tracks as described previously. • Navigate to top-level menu item 'Media Player' using the SELECT and BACK buttons.
-
Page 22: Setup
Setup Network configuration Static IP address • From your radio menu, select the ‘Settings > Network config > Edit Config’ menu and then press SELECT. • The radio will now display ‘Auto (DHCP)? YES / NO’. Turn the radio’s rotary encoder to select ‘NO’... -
Page 23: Firmware Upgrade
Configuring the radio to use either an ethernet or a wireless connection (AUTO mode) Selecting the ‘Auto’ option from the ‘Wired/Wireless’ menu will allow cause the radio to reboot and then attempt to establish an Ethernet connection, if it is available, to communicate with the network. -
Page 24: My Stuff" Configuring
Factory Reset From your radio menu, select the ‘Settings > Factory Reset>… Resets all the settings back to their defaults as they were when they left the factory. If you perform a factory reset on your radio you will lose all your presets and your wireless network connection. - Page 25 My profile configuring Once logged into you Reciva account, you can edit your account’s details from your ‘Profile’ section. Click on the ‘Profile’ link to view your account’s current information. This information will include various details such as your address, user name, password etc.
- Page 26 “My Podcasts” configuring It is possible to add audio podcasts (RSS feeds) to your Reciva account that can be accessed on your Internet radio. To add a podcast, simply login to your account and then click on the ‘My Podcasts’ link. From your ‘My Podcasts’...
-
Page 27: Troubleshooting
Troubleshooting If you experience any trouble with your wireless Internet radio, then you may find useful to visit the help section on our webpage: http://www.reciva.com If you have trouble with connecting the radio to your wireless network, these steps may help to resolve the problem: •... -
Page 28: Specifications
SPECIFICATIONS Power supply: AC 230V 50 Hz Max power consumtion: FM frequency range: 87.5 – 108 MHz FM preset stations: Internet radio preset stations: USB/SD player Supports compressed audio formats.
Need help?
Do you have a question about the Live and is the answer not in the manual?
Questions and answers