Celestron NexStar 90 MAK Instruction Manual
Hide thumbs
Also See for NexStar 90 MAK:
- User manual (47 pages) ,
- Instruction manual (48 pages) ,
- User manual

Related Manuals for Celestron NexStar 90 MAK


Summary of Contents for Celestron NexStar 90 MAK
-
Page 2: Table Of Contents
INTRODUCTION ................................4 Warning ..................................4 ASSEMBLY ..................................6 Assembling the NexStar ..............................6 Attaching the Hand Control Holder ..........................7 Attaching the Fork Arm to the Tripod......................... 7 Attaching the Telescope to the Fork Arm ........................7 The Star Diagonal ............................... 7 The Eyepiece................................ - Page 3 Scrolling Menu ................................. 23 Calibrate Goto................................23 Set Mount Position..............................23 TELESCOPE BASICS ..............................25 Focusing..................................25 Image Orientation ..............................25 Calculating Magnification............................26 Determining Field of View ............................26 General Observing Hints............................26 CELESTIAL OBSERVING............................27 Observing the Moon ..............................27 Lunar Observing Hints..............................
-
Page 4: Warning
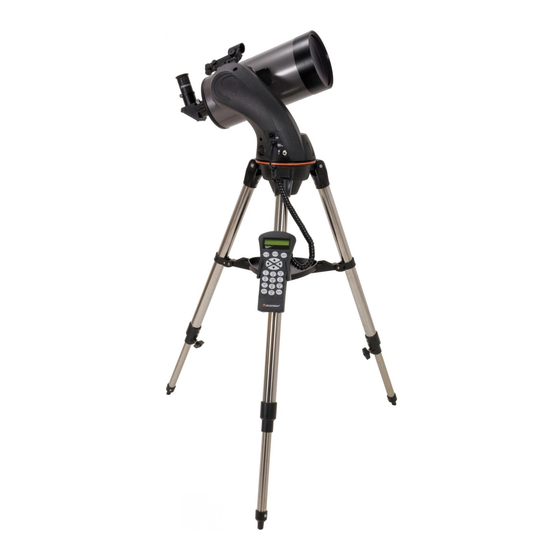
Congratulations on your purchase of the Celestron NexStar telescope! The NexStar ushers in a whole new generation of computer automated technology. Simple and friendly to use, the NexStar is up and running after locating just three bright celestial objects. It’s the perfect combination of power and portability. If you are new to astronomy, you may wish to start off by using the NexStar's built-in Sky Tour feature, which commands the NexStar to find the most interesting objects in the sky and automatically slews to each one. - Page 5 The NexStar SLT Telescope (NexStar 127MAK Shown) Corrector Lens Tripod Leg Extension Clamp Fork Arm Hand Control Battery Compartment Star Diagonal Tripod Coupling Screw Eyepiece Tripod Star Pointer Finderscope Accessory Tray Telescope Tube...
-
Page 6: Assembling The Nexstar
The NexStar comes partially assembled and can be operational in a matter of minutes. The NexStar is conveniently packaged in one reusable shipping carton that contains the following accessories: 25mm and 9mm Eyepieces – 1¼" 1¼" Star Diagonal Star Pointer Finderscope and Mounting Bracket Deluxe Accessory Tray The Sky™... -
Page 7: The Star Diagonal
The NexStar comes with a snap-on hand control holder that conveniently attaches to any of the tripod legs. To attach the hand control holder simply position the holder with the square plastic tab facing up and push against the tripod leg until it snaps in to place. With the tripod properly assembled, the telescope tube and fork arm can easily be attached using the quick release coupling screw located underneath the tripod mounting platform: Place the fork arm base inside the tripod mounting platform. -
Page 8: The Eyepiece
The eyepiece, is the optical element that magnifies the image focused by the telescope. The eyepiece fits directly into the star diagonal. To install the eyepiece: Loosen the thumbscrew on the star diagonal so it does not obstruct the inner Star Pointer Finderscope diameter of the eyepiece end of the diagonal. -
Page 9: Star Pointer Operation
Sight Tube ON/OFF Brightness Control Azimuth Adjustment Control Battery Compartment (not shown) Dovetail Tightening Screw Altitude Adjustment Control Dovetail Mount Slide the Star Pointer bracket into the dovetail mounting platform on top of the Thumb Screw focuser assembly (see figure 2-9). Orient the Star Pointer so that the sight tube is facing towards the front of the tube. -
Page 10: Powering The Nexstar
If the LED dot is brighter than the alignment star, it may make it difficult to see the star. Turn the brightness control counterclockwise, until the red dot is the same brightness as the alignment star. This will make it easier to get an accurate alignment. -
Page 11: The Hand Control
The NexStar SLT's hand controller is designed to give you instant access to all the functions the NexStar has to offer. With automatic slewing to over 4,000 objects, and common sense menu descriptions, even a beginner can master its variety of features in just a few observing sessions. Below is a brief description of the individual components of the NexStar SLT hand controller: Liquid Crystal Display (LCD) Window: Has a dual-line, 16 character display screen that is backlit for comfortable viewing of telescope information and scrolling text. -
Page 12: Hand Control Operation
Figure 3-1 The NexStar Hand Control Info: Displays coordinates and useful information about objects selected from the NexStar database. Tour: Activates the tour mode, which seeks out all the best objects for a given month and automatically slews the NexStar to those objects. Enter: Pressing Enter allows you to select any of the NexStar functions, accept entered parameters and slew the telescope to displayed objects. -
Page 13: Alignment Procedure
In order for the NexStar to accurately point to objects in the sky, it must first be aligned to known positions (stars) in the sky. With this information, the telescope can create a model of the sky, which it uses to locate any object with known coordinates. - Page 14 Time - Enter the current time for your area. You can enter either the local time (i.e. 8:00), or you can enter military time (i.e. 20:00). Select PM or AM. If military time was entered, the hand control will bypass this step. Choose between Standard time or Daylight Savings time.
-
Page 15: Auto Two-Star Align
As with Sky Align, Auto Two-Star Align requires you to enter all the necessary time/site information as before. Once this information is entered, NexStar will prompt you to select and point the telescope at one known star in the sky. The NexStar now has all the information it needs to automatically choose a second star that will assure the best possible alignment. -
Page 16: One-Star Align
One-Star Align requires you to input all the same information as you would for the Two-Star Align procedure. However, instead of slewing to two alignment stars for centering and alignment, the NexStar uses only one star to model the sky based on the information given. -
Page 17: Nexstar Re-Alignment
The NexStar has a re-alignment feature which allows you to replace either of the original alignment stars with a new star or celestial object. This can be useful in several situations: If you are observing over a period of a few hours, you may notice that your original two alignment stars have drifted towards the west considerably. -
Page 18: Slewing To An Object
Once the desired object is displayed on the hand control screen, you have two options: This will give you useful information about the selected object such as magnitude, Press the INFO Key. constellation and fascinating facts about many of the objects. Press the ENTER Key. -
Page 19: Direction Buttons
The NexStar has four direction buttons in the center of the hand control which controls the telescope motion in altitude (up and down) and azimuth (left and right). The telescope can be controlled at nine different speed rates. 1 = 2x 6 = 64x 2 = 4x 7 = 1º... -
Page 20: Tracking Rate
Tracking Rate In addition to being able to move the telescope with the hand control buttons, the NexStar will continually track a celestial object as it moves across the night sky. The tracking rate can be changed depending on what type of object is being observed: This rate compensates for the rotation of the earth by moving the telescope at Sidereal... -
Page 21: Identify
Identify Identify Mode will search any of the NexStar database catalogs or lists and display the name and offset distances to the nearest matching objects. This feature can serve two purposes. First, it can be used to identify an unknown object in the field of view of your eyepiece. -
Page 22: Goto Approach
Direction Buttons – The direction a star moves in the eyepiece varies depending on the accessories being used. This can create confusion when guiding on a star using an off-axis guider versus a straight through guide scope. To compensate for this, the direction of the drive control keys can be changed. To reverse the button logic of the hand control, press the MENU button and select Direction Buttons from the Utilities menu. -
Page 23: Sun Menu
Sun Menu For safety purposes the Sun will not be displayed as a database object unless it is first enabled. The enable the Sun, go to the Sun Menu and press ENTER. The Sun will now be displayed in the Planets catalog as can be used as an alignment object when using the Solar System Alignment method. - Page 24 NexStar SLT MENU ALIGNMENT LIST NAMED STAR TRACKING SKY ALIGN NAMED OBJECT ASTERISM MODE Saved Site TOUR ENTER if OK VARIABLE STAR UNDO to Edit ALT-AZ DOUBLE STAR EQ NORTH CCD OBJECTS Center Alignment Object 1 EQ SOUTH ABELL IC CATALOG RATE Center Alignment Object 2 CALDWELL...
-
Page 25: Focusing
A telescope is an instrument that collects and focuses light. The nature of the optical design determines how the light is focused. Some telescopes, known as refractors, use lenses. Other telescopes, known as reflectors, use mirrors. The Maksutov-Cassegrain optical system uses a combination of mirrors and lenses and is referred to as a compound or catadioptric telescope. -
Page 26: Calculating Magnification
Continuing with our example, multiply the angular field .83° by 52.5. This produces a linear field width of 44 feet at a distance of one thousand yards. The apparent field of each eyepiece that Celestron manufactures is found in the Celestron Accessory Catalog (#93685). -
Page 27: Observing The Moon
See the "Seeing Conditions" section later in this section. To increase contrast and bring out detail on the planetary surface, try using Celestron eyepiece filters. Although overlooked by many amateur astronomers, solar observation is both rewarding and fun. However, because the Sun is so bright, special precautions must be taken when observing our star so as not to damage your eyes or your telescope. -
Page 28: Solar Observing Hints
The best time to observe the Sun is in the early morning or late afternoon when the air is cooler. To center the Sun without looking into the eyepiece, watch the shadow of the telescope tube until it forms a circular shadow. -
Page 29: Seeing
Seeing conditions refers to the stability of the atmosphere and directly affects the amount of fine detail seen in extended objects. The air in our atmosphere acts as a lens which bends and distorts incoming light rays. The amount of bending depends on air density. Varying temperature layers have different densities and, therefore, bend light differently. -
Page 30: Care And Cleaning Of The Optics
While your NexStar telescope requires little maintenance, there are a few things to remember that will ensure your telescope performs at its best. Occasionally, dust and/or moisture may build up on the lens of your telescope. Special care should be taken when cleaning any instrument so as not to damage the optics. -
Page 31: Collimation
To collimate your telescope, remove the diagonal and eyepiece and look into rear opening of the tube (also remove the dust cover from the front of the tube). This can be done indoors, with the telescope pointed at a white wall in a well-lit room. - Page 32 For ease of reference, all the accessories are listed in alphabetical order. Adapter, Car Battery (#18778) – Celestron offers the Car Battery Adapter that allows you to run the NexStar drive off an external power source. The adapter attaches to the cigarette lighter of your car, truck, van, or motorcycle.
- Page 33 They reduce the amplitude and vibration time of your telescope when shaken by the wind or an accidental bump. A full description of all Celestron accessories can be found on our web site at www.celestron.com...
-
Page 34: Appendix A - Technical Specifications
APPENDIX A - TECHNICAL SPECIFICATIONS NexStar 90mm NexStar 127mm Design Maksutov-Cassegrain Maksutov-Cassegrain Aperture 90mm 127mm Focal Length 1250mm 1500mm F/ratio of the Optical System Optical Coatings Fully Coated Fully Coated Highest Useful Magnification 213x 300x Resolution: Rayleigh Criterion 1.55 arc seconds 1.1 arc seconds Dawes Limit 1.29 arc seconds... -
Page 35: Appendix B - Glossary Of Terms
GLOSSARY OF TERMS Absolute magnitude The apparent magnitude that a star would have if it were observed from a standard distance of 10 parsecs, or 32.6 light-years. The absolute magnitude of the Sun is 4.8. at a distance of 10 parsecs, it would just be visible on Earth on a clear moonless night away from surface light. - Page 36 Jovian Planets Any of the four gas giant planets that are at a greater distance form the sun than the terrestrial planets. Kuiper Belt A region beyond the orbit of Neptune extending to about 1000 AU which is a source of many short period comets.
- Page 37 Terminator The boundary line between the light and dark portion of the moon or a planet. Universe The totality of astronomical things, events, relations and energies capable of being described objectively. Variable Star A star whose brightness varies over time due to either inherent properties of the star or something eclipsing or obscuring the brightness of the star.
-
Page 38: Appendix C - Rs-232 Connection
In addition to NSOL, the telescope can be controlled using other popular astronomy software programs. For detailed information about controlling NexStar via the RS-232 port, Communication protocols and the RS-232 cable, refer to the NexStar SLT section of the Celestron web site at: http://www.celestron.com. - Page 39 APPENDIX D – MAPS OF TIME ZONES...
- Page 47 Tel. (310) 328-9560 Fax. (310) 212-5835 Web site at http://www.celestron.com Copyright 2010 Celestron All rights reserved. (Products or instructions may change without notice or obligation.) This device complies with Part 15 of the FCC Rule. Operation is subject to the following two conditions: 1) This device may not cause harmful interference, and 2) This device must accept any interference received, including interference that may cause undesired operations.
- Page 48 NexStar 90 & 127SLT Item #22097 Item #22087 Quick Set-up Guide Your NexStar includes: optical tube; fork arm; Assemble tripod by spreading the legs Extend tripod legs 6 to 8 inches by pre-assembled tripod; computerized hand out until the center leg brace is fully loosening the tripod leg locking knob extended.
- Page 49 Quick Set-up Guide [cont] Secure optical tube to fork arm by To attach the finderscope, loosen the silver Secure finderscope to mounting platform by tightening the screw located on the screw and slide finderscope into mounting tightening the silver screw. The glass window of inside of the fork arm assembly.
- Page 50 Hand Control Guide Before you can begin using your NexStar SLT, you must setup your computerized hand control and go through the SkyAlign alignment procedure. In order for the NexStar to accurately point to the objects in the sky, it must first be aligned with known positions (stars) in the sky.
- Page 51 ENTER to the date and location entered. accept these three objects for alignment. For general usage information, please consult your user’s manual. If you have questions or problems with set-up, please contact Celestron Technical Support: 310 5955...
- Page 52 TheSkyX First Light Edition User Guide Copyright 2010 Software Bisque, Inc. Revision 1.0.4...
- Page 54 Disclaimer Information in this document is subject to change without notice and does not represent a commitment on the part of Software Bisque. The software and/or databases described in this document are furnished under license agreement nondisclosure agreement. They may be used or copied only in accordance with the terms of the agreement (www.bisque.com/eula).
- Page 55 Telescope images) and are reproduced with permission. Photographs from the Anglo Australian Observatory telescopes are by David Malin. The photograph of the Milky Way is licensed from Digital Sky LLC. TheSkyX copyright 2010 Software Bisque, Inc. All rights reserved. TheSkyX First Light Edition is a trademark of Software Bisque, Inc.
- Page 56 Table of Contents Welcome to TheSkyX First Light Edition! ....7 Getting Started ................8 Updating Your Computer’s Video Driver ......9 Installing TheSkyX First Light Edition ......11 Removing TheSkyX First Light Edition ......13 Having a Look Around TheSkyX ..........14 Entering Your Location ............
- Page 57 Some Tips on Using Star Charts ........36 An Interstellar Perspective ............38 Closer to Home: Atmospheric Phenomena ......39 Our Celestial Backyard: The Solar System ......42 The Moon ................43 The “Classical” Planets ............45 But Wait – There’s More ............54 Beyond the Backyard: Our Home Galaxy ........
-
Page 58: Welcome To Theskyx First Light Edition
Welcome to TheSkyX First Light Edition! Most of you have never seen the sky. Not really. If you live in a city or suburb, a pale blue or grey dome looms overhead while the Sun is up, and a darkish brown curtain hangs down at night, with maybe a few sparks of light poking through here and there if the clouds haven’t gathered and the glare from buildings and cars and billboards isn’t... -
Page 59: Getting Started
You’ll also enjoy experiences that are only possible through the magic of simulation and virtual-reality programming. Faster-than-light flights through the solar system, out-of-this-world views of the Earth and Moon, and the orbital tracks of hundreds of satellites are just some of the animations built into TheSkyX First Light Edition. -
Page 60: Updating Your Computer's Video Driver
TheSkyX First Light Edition User Guide Windows TheSkyX for Windows can run on any desktop or laptop computer running Windows Vista or XP with a 1.5 GHz or faster Intel Pentium 4, Pentium M, Pentium D, or AMD K-8 (Athlon) or better processor. - Page 61 In order to obtain the latest version of OpenGL, you must install the latest video driver directly from the original equipment manufacturer (OEM) of your computer's video display adaptor. Video driver software is updated very frequently, so chances are you don't have the latest driver installed on your computer right now.
-
Page 62: Installing Theskyx First Light Edition
TheSkyX First Light Edition User Guide Installing TheSkyX First Light Edition Macintosh Like all Macintosh software, TheSkyX is easy to install. Insert the CD-ROM in the CD-ROM drive. TheSkyX icon should appear on your screen. Double click it. TheSkyX install icon should now appear. - Page 63 Windows XP To install TheSkyX under Windows XP: TheSkyX 1. Log on as an administrator. requires administrative privileges to be installed under XP. 2. Insert the CD-ROM in the CD-ROM or DVD drive and wait for the ReadMe file to appear in a browser window.
-
Page 64: Removing Theskyx First Light Edition
TheSkyX First Light Edition User Guide concepts. We also hope the Guide will stimulate you to become more interested in astronomy and space science, and excited to start learning about the extraordinary universe we live in. More comprehensive information about TheSkyX can be found on our website: http://www.bisque.com Removing TheSkyX First Light Edition... -
Page 65: Having A Look Around Theskyx
Having a Look Around TheSkyX The star chart display is the heart and soul of TheSkyX. We call it the Sky Chart, to distinguish it from the real thing. To the left of the Sky Chart you’ll find the Command Center window with vertical tabs to access the most commonly used commands and options. -
Page 66: Tours
TheSkyX First Light Edition User Guide longitude or U.S. zip code from the Custom tab, or double-click your site on the Earth Map tab. When you’ve finished setting your location, close the dialog box. To save this setting, click the Save command from the File menu. -
Page 67: Photos From The Deep Sky
• Saturn from Earth Over 10 Years • Venus and Mercury Paths • What Was That? (Iridium Flare Example) • Winter Constellations Go ahead and take one of the tours. Highlight one that sounds interesting, then click the Start button. Or, click the Run All button to watch them consecutively. -
Page 68: Your Sky Tonight
TheSkyX First Light Edition User Guide As you scroll through the list of objects, a small picture of each will be displayed below the list. Click the Show in Photo Viewer option to view them in a separate window. Your Sky Tonight This section of the User’s Guide is intended to help you explore the night sky from your location on any date, at any time. -
Page 69: The Calendar
Go to the Tools menu. The first item in the Tools menu is What’s Up? Select it. A list of objects that will be visible from your location in tonight’s sky will be generated. When you highlight an item and click the adjacent Information button, various astronomical data regarding that object will be displayed. -
Page 70: Exploring The Sky Chart
TheSkyX First Light Edition User Guide For a more detailed calendar, go to the Tools item in the Main Menu. Scroll down to Calendar and select it. A larger, printable calendar is displayed. Note that you can select various kinds of information to be included in the calendar by checking the appropriate boxes on the right-hand side of the window. -
Page 71: Direction - The Look Commands
sky will look at that time for the current date. Try several of the options and watch how the chart changes. You can make time speed up and even go backwards. In the Tools menu, choose the item called Time Skip. Try one of the various options. The Sky Chart will continue moving backward or forward in time until you select Stop, or the Use Computer’s Clock option. -
Page 72: Field Of View
TheSkyX First Light Edition User Guide compass direction displayed at the bottom of the screen indicates E, for east. Experiment with the other compass direction buttons. In addition to the compass direction buttons, a set of arrow buttons can be used to shift your viewing direction incrementally. -
Page 73: Setting The Field Of View
an immense spherical bowl above your head. When you look up at it, you’re seeing a slice of the sky that spans a particular angle. Assuming you have normal peripheral vision, that angle is about sixty degrees – one slice of our imaginary pie. -
Page 74: Stellar Cartography
TheSkyX First Light Edition User Guide The Wide Field option shows you the sky from horizon to horizon, 180 degrees. The Naked Eye option gives you a 100-degree field of view – a bit wider field than what you can actually see with your eyes, but we wouldn’t want you to miss anything. -
Page 75: Cosmic Coordinates
Cosmic Coordinates Maps of the Earth identify the location of landmarks with two numbers: latitude and longitude. Latitude is measured in degrees north or south of the equator, and longitude is measured in degrees east or west of the Prime Meridian. A similar system is used for objects in the sky. - Page 76 TheSkyX First Light Edition User Guide dividing 360 by 24 gives 15, so every hour of right ascension is equal to 15 degrees. Imagine a line running across the sky from due north to due south, splitting the sky in two. This line is called the meridian.
-
Page 77: Stars And Constellations
Stars and Constellations There are some 6,000 stars visible to the naked eye. Most of these stars can only be seen from locations far from the bright lights of a city or town. If you really want to see the stars, you either have to go to Hollywood or get out of Dodge. -
Page 78: Bright Stars And Dim Stars
TheSkyX First Light Edition User Guide Bright Stars and Dim Stars Long before the invention of the telescope, astronomers also came up with a numerical system for classifying stars by their brightness. They decided that the brightest stars would be called First Magnitude. -
Page 79: Setting The Magnitude Limit
names of the brighter stars and constellations, you should set the magnitude filter in TheSkyX to Second or Third magnitude. That way, when you go out at night to compare what you see on your computer to what you can see in the real sky, you won’t be confused by a screen display that shows more stars than you can actually see from your location. -
Page 80: Other Chart Elements
TheSkyX First Light Edition User Guide Other Chart Elements Like land maps, star charts can be overlaid with a variety of lines and markings intended to highlight specific celestial features and help you find objects at specific coordinates. The Chart Elements menu lets you display or hide various reference lines and symbols, but you should be aware that even though the cosmos mostly consists of empty space, a star chart can get very... -
Page 81: Double Stars
essentially the same for all of these cities, and any other place along this line of latitude. More than anything else, latitude determines what you can see in the sky. The North Star is not visible from the Southern Hemisphere, as are most of the stars and constellations near it. -
Page 82: Finding Mizar
TheSkyX First Light Edition User Guide Finding Mizar Mizar only visible from Northern Hemisphere, and is easiest to find in the evening sky in Spring. Select the Find tab from the vertical tabs on the Command Center window. Type Mizar into the “Search For” box, then click the Find Now button. -
Page 83: Classifying Stars: The Stellar Zoo
hours. These are called variable stars, and TheSkyX distinguishes them with a small red “v” to the lower left of the star. The most notorious variable star is called Algol, a name derived from an Arabic word that means demon. Located in the constellation Perseus, its rhythmic dips in magnitude can easily be observed with the naked eye. -
Page 84: Giants And Dwarfs
TheSkyX First Light Edition User Guide density in the core of a star are so great that lighter atoms smash into each with enough force to fuse into heavier atoms. In our own Sun, for example, atoms of hydrogen fuse to produce atoms of helium (this process involves several intermediate steps). -
Page 85: More About Constellations
Astronomers distinguish between apparent magnitude and absolute magnitude. Apparent magnitude is how bright a star looks in the sky. Absolute magnitude refers to how bright a star would appear if it were located exactly 10 parsecs (32.6 light years) away. The apparent magnitude of Rigel is about 0.2, but its absolute magnitude is nearly -7.0. - Page 86 TheSkyX First Light Edition User Guide immortalized in constellations: Canis Major and Canis Minor, the big and little dogs, respectively. When you look at Orion, it isn’t hard to imagine the figure of a hunter with a raised arm wielding a club. You can see one classic representation of this figure by going to the Display menu and selecting Constellations &...
-
Page 87: Asterisms
avoid confusion, astronomers designated boundary lines between the constellations. unlike borders between countries, any star that falls within the borders of a given constellation is said to belong to it, whether it was included in the original depiction of that constellation or not. Asterisms There are familiar patterns of stars that don’t quite qualify as constellations. - Page 88 TheSkyX First Light Edition User Guide When hundreds of stars are displayed on your chart, finding individual stars and constellations can be very challenging. But if you limit the number of stars in the chart to just a few dozen of the brightest stars, you’ll have a much easier time learning the sky.
-
Page 89: An Interstellar Perspective
The best time to start learning the sky is a clear, cloudless night, when there is no moon or at most a crescent moon. Moonlight can interfere as much as city lights when it comes to seeing the stars, and if the moon is close to Full, you probably won’t be able to find any but the very brightest stars and planets. -
Page 90: Closer To Home: Atmospheric Phenomena
TheSkyX First Light Edition User Guide galaxy would look like from dozens of light years away. TheSkyX includes a utility for showing this to you. Choose Tools from the Main Menu. Near the bottom of the pull down menu, you’ll see an item called 3D Stars. - Page 91 material falls to Earth every single day. If you get away from the lights of the city and watch the sky on a moonless night for an hour or two, you’ll see at least a few meteors – maybe quite a few. They’re falling everywhere, all the time.
- Page 92 TheSkyX First Light Edition User Guide A few people around the world make a good living hunting meteorites. A decent-sized specimen can be worth thousands of dollars to a museum or a private collector. A really big meteorite with an unusual composition can be worth millions.
-
Page 93: Our Celestial Backyard: The Solar System
Click it, and a new list of items is displayed. Check the box next to Meteor Shower Radiants. The radiants for all meteor showers will now be displayed on the Sky Chart. If you move the cursor to the center of any radiant, details on that shower, including when it is expected to peak, will be displayed. -
Page 94: The Moon
TheSkyX First Light Edition User Guide neither too cold nor too hot for liquid water and life to flourish on its surface. But the rest of the Sun’s family – the solar system – is full of diverse and fascinating characters. Some of them may once have harbored some form of primitive life. - Page 95 same side of the Moon always faces the Earth. We had no way of seeing the far side of the Moon until spacecraft were sent there in the late 1950’s. Some people mistakenly call the far side of the Moon the dark side of the Moon.
-
Page 96: The "Classical" Planets
TheSkyX First Light Edition User Guide To locate the Moon, on the Edit menu, click the Find command, enter the name “moon” in the Find text box, then click the Find Now button. The “Classical” Planets Not counting Earth, five planets are visible to the naked eye. - Page 97 Mercury Mercury is the closest planet to the Sun. It takes only 88 days to travel around the Sun once. This is another way of saying that a year on Mercury is 88 days long. Because Mercury is so close to the Sun, it can only be spotted shortly after sunset and shortly before sunrise, when it is near the “edge”...
- Page 98 TheSkyX First Light Edition User Guide beneath those relentless clouds. Could Venus harbor steamy, tropical rainforests, inhabited by alien dinosaurs or even more exotic forms of life? Much to the disappointment of science fiction writers, astronomers discovered in the early 1960’s that the surface temperature of this deceptively serene-looking planet is hot enough to melt lead.
- Page 99 covered by liquid water, and water is essential for life. Our world is the only planet in the solar system that can support life as we know it. A day is defined as the amount of time it takes for Earth to make one complete rotation on its axis.
- Page 100 TheSkyX First Light Edition User Guide derived from Latin and means “equal night.” During an equinox, night and day are both just about 12 hours long. Like all planets, the orbit of the Earth is not perfectly circular, but slightly elliptical. The Earth is about a million kilometers closer to the Sun in December than June.
- Page 101 astronauts. Even though liquid water can’t exist on Mars today, there is lots of geological evidence to suggest that in the distant past, the atmosphere of Mars was much thicker, and water flowed there freely. This gives scientists hope that Mars may have once harbored simple forms of life.
- Page 102 TheSkyX First Light Edition User Guide century. He mistakenly believed that the dark features were seas and lakes, and he used the Latin terms mare and lacus accordingly. Today we know there is no surface water on Mars, but like Earth, the Red Planet does have polar caps.
- Page 103 Ceres is the largest asteroid, and the first to be discovered back on New Year’s Day in 1801. Jupiter Jupiter is the king of the planets. Ten times wider than Earth, it has more mass than all of the other planets in our solar system combined.
- Page 104 TheSkyX First Light Edition User Guide interesting phenomenon involving Jupiter’s moons, an occulation. These occur when one of the moons enters the giant planet’s shadow and passes behind Interesting Historical Note: by timing the occulations of the Jovian moon Io, the astronomer Ole Romer was able to make a rough estimate of the speed of light way back in 1676.
-
Page 105: But Wait - There's More
But Wait – There’s More Saturn is the farthest planet that was known to man in ancient times. The invention of the telescope revealed innumerable new worlds never before seen by human eyes, including previously unknown planets in our own solar system. Uranus The seventh planet out from the Sun, Uranus is the first planet discovered by telescope. - Page 106 TheSkyX First Light Edition User Guide of course, can tell you where to find it. Uranus is relatively easy to find in a good pair of binoculars. Neptune The next planet out, Neptune is similar in size and composition to Uranus. It is also considered an Ice Giant.
- Page 107 Pluto and the Ice Dwarfs We all used to be taught that there are nine planets in the solar system. That is no longer the case. Pluto has been demoted. Today it is not considered a full-fledged planet, but an ice dwarf, one of perhaps hundreds of such objects that inhabit the outer reaches of the solar system.
- Page 108 TheSkyX First Light Edition User Guide Land of the Comets: The Kuiper Belt and the Oort Cloud One of the most beautiful things you’ll ever see in the sky is a bright comet. Comets are refugees from the outer fringes of the solar system. Mixtures of ice and dust, the astronomer Fred Whipple famously described comets as “dirty snowballs.”...
-
Page 109: Beyond The Backyard: Our Home Galaxy
Beyond the Backyard: Our Home Galaxy Our Sun is but one member of a huge assemblage of hundreds of billions of stars that comprise our home galaxy, the Milky Way. Our galaxy is also peppered with vast, colorful clouds of gas and dust, called nebulae, and other exotic objects. -
Page 110: Beyond Our Galaxy: The Great Big Universe Out There
TheSkyX First Light Edition User Guide you look at the Milky Way, you’re looking at a section of one of these spiral arms (galaxies come in a variety of shapes and sizes, from spherical to irregular – more on this later). An unfortunate fact of modern life is that the Milky Way is too faint to be seen from within cities and most of their suburbs. - Page 111 ancient stars, some of them over ten billion years old. Just as some planets have moons, the Milky Way and many other galaxies are orbited by smaller “satellite” galaxies. The Milky Way has at least two. They were originally described by Persian astronomers, but today we call them the Magellanic Clouds in honor of Ferdinand Magellan, a 16 century European explorer who observed and...
-
Page 112: What's Up? - A Closer Look
TheSkyX First Light Edition User Guide Galaxies of various shapes and sizes exist right out to the edge of observable space. We live in a truly extraordinary universe. We hope the TheSkyX will enrich and expand your appreciation of it. What’s Up? –... -
Page 113: What's Up? Setup
green laser pointer indicating position of each object. What’s Up? Setup Use the Tools > What’s Up Setup command to configure your viewing time (current time, morning, evening or midnight) and what optical aid you’ll be using (naked eye, binoculars or small telescope). The Interesting Objects (Top Ten) option finds what the authors believe are the best objects or events to view. -
Page 114: Index
Index 3D stars, 39 field width, 22 absolute magnitude, 34 find albedo, 50 objects, 43 altitude, 25 planets, 43 analemma, 15 fireball, 40 apparent magnitude, 34 galaxies, 58 Asteriod Belt, 51 globular clusters, 59 asteriods, 40 Hipparco/Tycho stellar asterisms, 36 catalog, 61 aurora australis, 42 ice dwarfs, 56... - Page 115 radiant, 41 retrograde motion, 50 showers, 41 right ascension, 24 meteorites, 40 Saturn, 53 iron, 40 save command, 15 stony, 40 seasons, 48 Milky Way galaxy, 38, 58, 60 sky chart, 14 minor planets, 40 small solar system bodies Moon, 43 comets, 57 naked eye, 23 pluto, 56...
- Page 118 Observer List software. Establishing a link with your NexStar will require the use of an optional RS-232 cable (#93920) available through your local Celestron dealer. Before attempting to create a link with your computer, you must do the following: Connect the RS-232 cable - Connect the phone jack end of the RS-232 cable to the port on the bottom of the hand control and connect the 9-pin connector to the back of your computer.
-
Page 119: Introduction
NexStar Observer List Version 2 Operating Instructions If you are running the program for the first time, NexStar Observer List will start after you close this window. If you do not wish to read these instructions now, you can view them at any time you are in the program by pressing F1 or choosing "Operating Instructions"... - Page 120 time zone in Control Panel, Date/Time (you can also set this by double-clicking the time in the lower right corner of the Windows screen). If your time zone is not available in Windows, you will need to remove the check mark on this option and manually enter the number of hours you are away from UT.
- Page 121 One of the eight lists is different from the rest - the User Supplied Objects. Using the Edit button to the left of this list, you can add, edit and delete items in this list. Below the object lists is a section for quickly slewing to any desired Right Ascension and Declination.
- Page 122 sky chart makes it easier to both organize the order of the items in your observer list as well as insuring you select objects that will actually be above the horizon at your expected viewing time. The Messier, Caldwell, NGC and IC lists (note that they are all on the same row of tabs) can also be sorted by Object Number (the default), Constellation, Magnitude and Right Ascension.
- Page 123 normal screen colors can ruin your night vision. To change the screen colors to a scheme more friendly to dark-adapted eyes, use the "Tools, Red Screen" menu command, or click the button on the toolbar with the red-lens glasses. To change back to a normal color scheme, repeat the above process or, simply close the program.
- Page 124 seconds/arcseconds, you must convert them to decimal fractions of an minute/arcminute and include them in the minutes/arcminutes box. The Seconds to Decimal conversion boxes help to simplify this process. For example, if you want to enter 23m 34s, type 34 in the box under seconds and you will find this equates to 0.57.
- Page 125 __________________________________________________________ Technical Support I provide support via email for any questions or problems you might have regarding NexStar Observer List. To contact me, simply send an email to swanson.michael@usa.net. If you received an error message on the screen, please describe what you where doing when you got the error, provide the full text of the error, and let me know if you can recreate the error.
Need help?
Do you have a question about the NexStar 90 MAK and is the answer not in the manual?
Questions and answers