Table of Contents
Advertisement
Advertisement
Table of Contents

Related Manuals for Pride Mobility Jazzy Select gt


Summary of Contents for Pride Mobility Jazzy Select gt
- Page 1 JAZZY SELECT GT...
- Page 2 The latest/current version of this manual is available on our website. Copyright © 2009 Pride Mobility Products Corp. INFMANU3807/Rev B/September 2009...
-
Page 3: Table Of Contents
III. YOUR POWER CHAIR ........................17 IV. ASSEMBLY ............................21 COMFORT ADJUSTMENTS ......................22 VI. BATTERIES AND CHARGING ....................26 VII. CARE AND MAINTENANCE ......................30 VIII. WARRANTY ............................37 APPENDIX I – SPECIFICATIONS ....................... 39 Jazzy Select GT www.pridemobility.com... -
Page 4: Introduction
I . I N T R O D U C T I O N SAFETY WELCOME to Pride Mobility Products Corporation (Pride). The power chair you have purchased combines state- of-the-art components with safety, comfort, and styling in mind. We are confident that these design features will provide you with the conveniences you expect during your daily activities. - Page 5 Avoid exposure to rain, snow, ice, salt, or standing water whenever possible. Maintain and store in a clean and dry condition. Jazzy Select GT www.pridemobility.com...
- Page 6 3-pronged adapter to an electrical outlet having 2-pronged plug access. Wear safety goggles. Corrosive chemicals contained in battery. Do not remove the anti-tip wheels. EMI-RFI — This product has been tested and passed at an immunity level of 20 V/m. www.pridemobility.com Jazzy Select GT...
- Page 7 Connect Red wire to Red Positive (+) Terminal Post. Connect Black wire to Black Negative (-) Terminal Post. Do not use batteries with different amp-hour (Ah) capacities. Do not mix old and new batteries. Always replace both batteries at the same time. Pinch/Crush point. Jazzy Select GT www.pridemobility.com...
- Page 8 Pride product and its packaging. Locked and in drive mode. Unlocked and in freewheel mode. Do not place power chair in freewheel mode on a decline. Do not place power chair in freewheel mode on an incline. Contains Lead. www.pridemobility.com Jazzy Select GT...
-
Page 9: General Guidelines
Check all controller connections to the power base. Make sure they are secured properly. Check the brakes. See VII. “Care and Maintenance.” Check battery charge. See VI. “Batteries and Charging.” NOTE: If you discover a problem, contact your authorized Pride Provider for assistance. Jazzy Select GT www.pridemobility.com... -
Page 10: Your Power Chair
WARNING! You should not travel up or down a potentially hazardous incline (i.e., areas covered with snow, ice, cut grass, or wet leaves). WARNING! Never travel down an incline backward. Doing so may cause the power chair to tip. Always exercise caution when negotiating an incline. www.pridemobility.com Jazzy Select GT... -
Page 11: Braking Information
WARNING! When cornering sharply, reduce your speed and maintain a stable center of gravity. This greatly reduces the possibility of a tip or fall. Jazzy Select GT www.pridemobility.com... -
Page 12: Outdoor Driving Surfaces
Doing so could cause instability in your power chair. WARNING! Do not attempt to have your power chair proceed backward down any step, curb, or other obstacle. This may cause the power chair to tip. www.pridemobility.com Jazzy Select GT... - Page 13 In addition, all removable power chair parts, including the armrests, seat, front riggings, con- troller, and shrouds should be removed and/or properly secured during motor vehicle transport. Jazzy Select GT www.pridemobility.com...
-
Page 14: Positioning Belts
Pride recommends that the power chair user determine his/her personal limitations and practice bending and reaching in the presence of a qualified healthcare professional. www.pridemobility.com Jazzy Select GT... - Page 15 WARNING! Consult your physician if you are taking prescribed or over-the-counter medication or if you have certain physical limitations. Some medications and limitations may impair your ability to operate your power chair in a safe manner. Jazzy Select GT www.pridemobility.com...
- Page 16 NOTE: For further information on EMI/RFI, go to the Resource Center on www.pridemobility.com. If unin- tended motion or brake release occurs, turn your power chair off as soon as it is safe to do so. Call Pride at 1- 800-424-8205 to report the incident. www.pridemobility.com Jazzy Select GT...
-
Page 17: Assembly
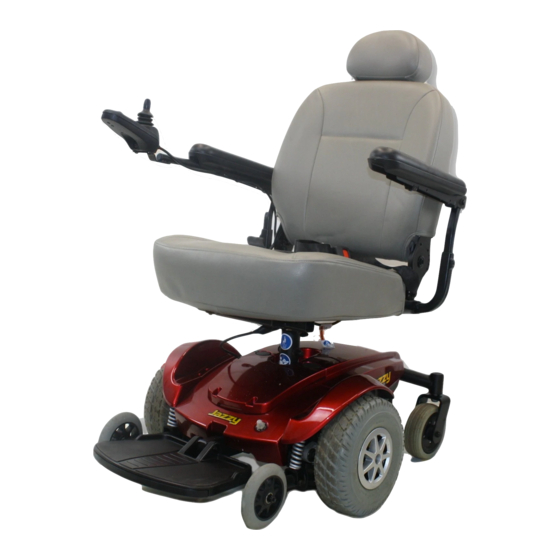
THE JAZZY SELECT GT POWER CHAIR The Jazzy Select GT Power Chair has two main assemblies: the seat assembly and the power base assembly. See figure 5. Typically, the seat assembly includes the armrests, seatback, and seat base. The power base assembly includes two motor/brake assemblies, two drive wheels, two rear caster wheels, two front anti-tip wheels, two batteries, and wiring harnesses. - Page 18 I I I . Y O U R P O W E R C H A I R SEAT POST REAR SHROUD MAIN CIRCUIT BREAKER CONTROLLER HARNESS REAR CASTER WHEEL ANTI-TIP WHEELS FRONT COVER Figure 6. The Jazzy Select GT Power Base www.pridemobility.com Jazzy Select GT...
-
Page 19: Electrical Components
Pride Provider. Power Module: Provides connection between the joystick module and the motors, batteries, and off-board charger. CONTROLLER HARNESS BATTERY CONNECTORS MOTOR CONNECTORS MAIN CIRCUIT BREAKER BATTERY CONNECTORS Figure 7. Jazzy Select GT Electrical Components Jazzy Select GT www.pridemobility.com... - Page 20 WARNING! Do not use the freewheel lever handles as tie-down points to secure this product. FREEWHEEL LEVER FREEWHEEL LEVER Figure 8. Drive Mode (Drive Engaged) Figure 9. Freewheel Mode (Drive Disengaged) www.pridemobility.com Jazzy Select GT...
-
Page 21: Initial Assembly
5. Plug the controller harness into the connector WIRE on the power base. See figure 6. TIES Figure 11. Controller Harness Routing Jazzy Select GT www.pridemobility.com... -
Page 22: Comfort Adjustments
Your authorized Pride Provider has evaluated your power chair and made any necessary adjustments to suit your specific requirements. Do not change your seating configuration without first contacting Pride Mobility Products or your authorized Pride Provider. -
Page 23: Armrest Width Adjustment
Armrest Height Adjustment To change the armrest height: 1. Loosen the setscrew on the armrest. See figure 13. 2. Raise or lower the armrest to the desired height. 3. Tighten the setscrew to secure the armrest. Jazzy Select GT www.pridemobility.com... -
Page 24: Controller Position
To adjust the foot platform angle: ADJUSTMENT SCREW 1. Flip up the foot platform and locate the adjustment screw. Figure 15. Foot Platform Angle Adjustment 2. Turn the adjustment screw to raise or lower the front of the foot platform. www.pridemobility.com Jazzy Select GT... - Page 25 1. Remove the two adjustment screws from the side of each leg rest extension. 2. Slide the leg rest up or down to the desired length. 3. Reinstall the two adjustment screws. LEG REST EXTENSION ADJUSTMENT SCREWS Figure 17. Elevating Leg Rests Jazzy Select GT www.pridemobility.com...
-
Page 26: Batteries And Charging
Refer to the manual supplied with the battery charger for more information. www.pridemobility.com Jazzy Select GT... - Page 27 Many factors come into play when deciding how often to charge the batteries. You may use your power chair all day on a daily basis or you may not use it for weeks at a time. Jazzy Select GT www.pridemobility.com...
- Page 28 More importantly, it will take a few “charging cycles” (a partial drain — then a full recharge) to establish the critical chemical balance that is essential to the battery’s peak performance and long life. It will be well worth it to take the time to break in your battery properly. www.pridemobility.com Jazzy Select GT...
- Page 29 What about shipping? If you wish to use a freight company to ship your power chair to your final destination, repack your power chair in the original shipping container and ship the batteries in separate boxes. Jazzy Select GT www.pridemobility.com...
-
Page 30: Care And Maintenance
V I I . C A R E A N D M A I N T E N A N C E CARE AND MAINTENANCE Your Jazzy Select GT is a sophisticated power chair. Like any motorized vehicle, it requires routine maintenance checks. You can perform some of these checks, but others require assistance from your authorized Pride Provider. - Page 31 Take your power chair to your authorized Pride Provider for yearly maintenance, especially if you use your power chair on a daily basis. This helps ensure that your power chair is functioning properly and helps prevent future complications. Jazzy Select GT www.pridemobility.com...
-
Page 32: Cleaning And Disinfection
WARNING! When changing a tire, remove only the center lug nut and washer, then remove the wheel. If any further disassembly is required, deflate the tire completely or it may explode. www.pridemobility.com Jazzy Select GT... - Page 33 WARNING! Make sure both the nut and the washer are reinstalled and tightened properly. 13. Reinstall the hub cap. 14. Inflate the pneumatic tire to the psi/bar/kPa air pressure rating indicated on each tire. 15. Remove the power chair from the base support. Jazzy Select GT www.pridemobility.com...
- Page 34 V I I . C A R E A N D M A I N T E N A N C E CORRECT CONNECTION REAR SHROUD INCORRECT CONNECTION FRONT COVER REAR BATTERY FRONT BATTERY SIDE COVER Figure 21. Battery Installation (Seat Removed for Clarity) www.pridemobility.com Jazzy Select GT...
-
Page 35: Battery Replacement
17. Reinstall the rear shroud. NOTE: When installing the rear shroud, make sure that the controller harness is routed through the notch in the right side of the front cover. 18. Charge the batteries. See VI. “Batteries and Charging.” Jazzy Select GT www.pridemobility.com... - Page 36 Disconnect both batteries before load testing and follow the directions that come with the load tester. If either one of the batteries fails the load test, replace both of them. If your power chair still does not power up, contact your authorized Pride Provider. www.pridemobility.com Jazzy Select GT...
-
Page 37: Warranty
Circumstances beyond the control of Pride Labor, service calls, shipping, and other charges incurred for repair of the product, unless specifically autho- rized by Pride Mobility Products Corporation Repairs and/or modifications made to any part without specific consent from Pride... - Page 38 This warranty gives you specific rights, and you may also have other rights which vary from state to state. Please fill out and return the product registration card to Pride. This will aid Pride in providing the best possible technical and customer service. www.pridemobility.com Jazzy Select GT...
-
Page 39: Appendix I - Specifications
A P P E N D I X I - S P E C I F I C A T I O N S JAZZY SELECT GT SPECIFICATIONS Suspension: Active-Trac Drive Wheels: 10 in. (25.4 cm), solid Caster Wheels: 6 in. (15.24 cm), solid, rear-mounted Anti-tip Wheels: 5 in. - Page 40 A P P E N D I X I - S P E C I F I C A T I O N S Figure 22. Jazzy Select GT Dimensions and Ground Clearance www.pridemobility.com Jazzy Select GT...
- Page 41 N O T E S Jazzy Select GT www.pridemobility.com...
- Page 42 N O T E S www.pridemobility.com Jazzy Select GT...
- Page 44 Quality Control - Jazzy Select GT Inclusion of all Parts Joystick Serial Number Controller Serial Number Left Motor Serial Number Right Motor Serial Number Fit and Finish Performance Date Inspected Inspector *INFMANU3807* Product Serial #...
Need help?
Do you have a question about the Jazzy Select gt and is the answer not in the manual?
Questions and answers
How old is this chair? Jazzy green
@Linda king I meant jazzy gt
where is fuse in jazzt select gt what does fuse look like ?
The fuse, referred to as the main circuit breaker, is located on the front of the power base of the Pride Mobility Jazzy Select GT. It is part of the electrical components housed on or inside the power base.
This answer is automatically generated