ooma HUB Quick Start Manual
Voip phone device with no monthly phone service bills
Hide thumbs
Also See for HUB:
- User manual (61 pages) ,
- User manual (58 pages) ,
- Quick start manual (22 pages)
Table of Contents
Advertisement
Quick Links
Download this manual
See also:
User Manual
Advertisement
Table of Contents

Related Manuals for ooma HUB


Summary of Contents for ooma HUB
- Page 1 Quick Start Guide...
- Page 2 Premier features may only be available with subscription. © 2008 ooma, Inc. All rights reserved. Reproduction in whole or in part without written permission is prohibited. ooma, the ooma logo, ooma Hub, ooma Scout, Instant Second Line, Broadband Answering Machine, the sound of the ooma dialtone, and all other ooma company, product and service names and...
- Page 4 Port and Color Guide Here is a closer look at the back of your ooma Hub device. Throughout the set up process, each port on the back of your ooma Hub will be indicated with the following colors for quick identification.
- Page 5 Hub online Before proceeding with the ooma Hub installation, you must activate it online. To complete the online activation, open a web browser on your home computer and navigate to: http://www.ooma.com/activate After you’ve finished your online activation, be sure to TURN OFF any personal computers, modems, switches and routers that are connected to your home network before proceeding to the next installation step.
-
Page 6: Connect To The Modem
Plug the existing Ethernet cable into the port labeled HOME on the ooma Hub. HOMe Modem Connect to the modem Use the Ethernet cable provided and connect the port MODEM labeled on the ooma Hub to the Ethernet MOdeM Modem port of the modem. SkiP tO PaGe 6... - Page 7 HOMe Connect to the modem May not be present with Wi-Fi Use the Ethernet cable provided and connect the port MODEM Router Modem labeled on the ooma Hub to the Ethernet MOdeM port of the modem. SkiP tO PaGe 6...
-
Page 8: Connect To The Router
COntinUed FrOM PaGe 2 If your computers connect wirelessly to your router or you have an advanced networking configuration and do not want to connect devices behind the ooma Hub, skip to step C3. disconnect the existing cable Unplug the existing Ethernet cable from your router. - Page 9 Choose the example below that best matches your situation: If you plan on using the ooma Hub with an existing landline or you plan on installing one or more ooma Scouts, follow the directions below to connect your ooma Hub to your phone system. Otherwise, you may: SkiP tO PaGe 7 If you’re not sure whether you have DSL or Cable, ask yourself this: Who do I pay for high-speed Internet service?
-
Page 10: Confirm Installation
Hub and the other end into a POwer power outlet. The clear ooma Tab, at the top left corner of the ooma Hub device, should light up RED and begin to blink as it boots up. Next, power on your network devices (modem, switch, router). - Page 12 AC Adaptor Port and Color Guide Here is a closer look at the back of your ooma Scout device. Throughout the set up process, each port on the back of your ooma Scout will be indicated with the following colors.
-
Page 13: Connect Your Phone
Scout and the other end into a POwer power outlet. Within 30 seconds, the clear ooma Tab at the top left corner should turn BLUE. install more ooma Scout devices Locate other phones that you want to use with your ooma system. -
Page 14: How Phone Devices Work With The Ooma System
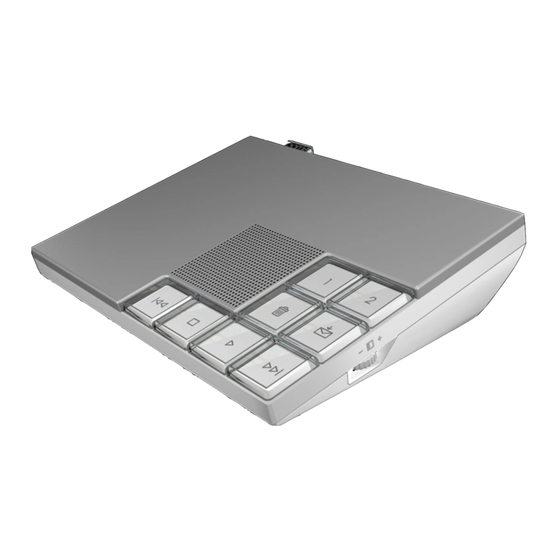
How Phone devices work with the ooma System See below for more information about how your ooma system works with common devices that plug into the phone line. Cordless Phones To connect a cordless phone to your ooma system, simply plug... - Page 16 TaB Line 1 and Line 2 Trash send-To-VoiCeMaiL reVerse PLay sToP Forward ooma Hub device VoLUMe adJUsTMenT BriGhTness adJUsTMenT left side view right side view...
- Page 17 TaB Line 1 and Line 2 Trash send-To-VoiCeMaiL PLay reVerse Forward sToP ooma Scout device VoLUMe adJUsTMenT BriGhTness adJUsTMenT left side view right side view...
- Page 18 If you are using your ooma system with a landline and there is no power, you will hear the your regular landline dialtone, not the ooma dialtone.
-
Page 20: Troubleshooting
If your ooma Tab is not blue or you do not hear the signature ooma dialtone, check if you have run into one of the following common installation problems. on the ooma Hub is blinking red are solid red on the ooma Scout... - Page 21 Completed setup of an ooma Hub device (with no ooma Scout) Power Computer Router Modem Completed setup of an ooma Hub device when high-speed internet and landline phone service are on separate lines Phone Jack Power Computer Router Modem...
Need help?
Do you have a question about the HUB and is the answer not in the manual?
Questions and answers