Table of Contents
Advertisement
P r o v e n P e r f o r m a n c e
Installation, Operation, and Maintenance Manual
HOT WATER PRESSURE WASHER
To the Owner:
Thank you for purchasing a NorthStar hot water pressure washer. Your machine is designed for long life,
dependability and the top performance you demand! Take time now to read through this manual so you better
understand the machine's operation, maintenance and safety precautions. Everyone who operates this machine
must read and understand this manual. The time you take now will prolong your machine's life and prepare you
for its safe operation. Enjoy the exceptional performance of your NorthStar hot water pressure washer, the
industry leader! The manufacturer reserves the right to make improvements in design and/or changes in
specifications at any time without incurring any obligation to install them on units previously sold.
Engine Oil
Engine is shipped without oil. Fill before starting.
Use SAE 10W-30 motor oil.
Pump Oil
Pump is shipped with oil. Remove shipping tape and check pump oil level before
starting. Use SAE 30 Non-detergent pump oil (item # 4043) or Cat Pump Oil (item
#22158) for oil changes.
Water
Make sure your water flow is 20% higher than the pressure washer's flow rate.
Make sure your water is clean and particle free.
Storage
Do not allow water to freeze in the pump, hose, coil, or spray gun.
Spraying
Use any NorthStar brand or equivalent pressure washer chemicals.
Chemicals
Adjust soap adjustment knob to regulate cleaning power.
Maintenance
Engine:
Schedule
Pump:
Read and understand all manuals before operating.
Any Questions, Comments, Problems, or Parts Orders
Quick Facts
Oil: change after first 20 hours, then annually or every 100 hours.
Spark Plug: clean every 100 hours, replace annually or every 300 hours.
Air Filter: clean every 100 hours, replace annually or every 300 hours.
Oil: change after first 40 hours, then every 3 months or 500 hours.
Call NorthStar Product Support 1-800-270-0810
M157310E.2
ITEM NUMBER:
SERIAL NUMBER:
Engine Model:
Pump Model:
Flow:
Hose Length:
Nozzle Size:
Cleans dirty surfaces with high
:
pressure hot water.
157310
Pressure:
Lance Length:
Advertisement
Table of Contents

Related Manuals for North Star M157310E.2


Summary of Contents for North Star M157310E.2
-
Page 1: Quick Facts
M157310E.2 ITEM NUMBER: 157310 SERIAL NUMBER: Engine Model: Pump Model: Flow: Pressure: Hose Length: Lance Length: P r o v e n P e r f o r m a n c e Nozzle Size: Installation, Operation, and Maintenance Manual... -
Page 2: Table Of Contents
Table of Contents Important Safety Instructions Maintenance Instructions 12-15 Specifications Moving and Handling Instructions Machine Component Long Term Storage Identification Installation Instructions Troubleshooting Operation Instructions 9-11 Parts Breakdowns 18-20 Safety Features Electrical Schematic 21-23 Important Safety Instructions WARNING -Risk of injection or injury to persons - Do not direct discharge stream at persons. - Do not use hose if exterior damage is evident. -
Page 3: Specifications
Specifications ITEM 157310 Pressure Rating 3000 psi Flow Output 4 gpm Pump Type Cat 66DX Water Supply Standard tap water @ 20-75 Engine Horsepower 13 hp BTU Output 353,700 BTU Temperature Rise 140° F Maximum Temperature 250° F Approved Fuels #1 or #2 Diesel, Kerosene, Fuel Oil Fuel Capacity... -
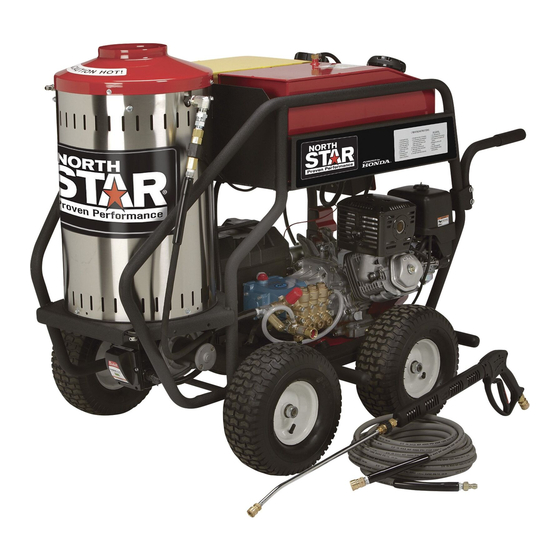
Page 4: Machine Component Identification
Machine Component Identification Ref # Description Ref # Description Exhaust Vent Fuel Cap Pump Fuel Tank Battery Box Control Panel Fuel Filter/Water Separator Engine Gas Cap Burner Gas Tank... -
Page 5: Installation Instructions
Installation Instructions I.) Unpack Your pressure washer is shipped on one pallet. Separate and identify the components and use the assembly instructions in this manual for assembly. -
Page 6: Hardware Bag
Hardware Bag Owner’s Honda Manual Manual 6X Grommet 1X Chemical Injector 6X Nozzle 4Ft Braided 4X Wheel Hose Retainer 4X - 5/16 X 3/4” Flange Bolt 1X Strainer 4X - 5/16 Flange Nut... - Page 7 II.) Assembly Instructions LIFT BACK OF UNIT BY HANDLES TO INSTALL REAR WHEELS, THEN LIFT FRONT OF UNIT TO INSTALL FRONT WHEELS INSTALL WHEEL ONTO AXLE FASTEN WHEEL WITH RETAINER, SECURE RETAINER WITH WRENCH PROVIDED NOTE: IT IS RECOMMENDED THAT TWO PEOPLE LIFT THIS UNIT WHILE A THIRD SLIDES THE WHEELS ONTO THE AXLES PRESS BRAIDED HOSE ONTO...
-
Page 8: Exhaust Vent
VI.) Getting Started IMPORTANT: Proper initial installation of equipment 1.) Turn the engine and heat switches ON (Refer to will assure more satisfactory performance, longer “Operation” for details). Have someone operate the service life, and lower maintenance cost. spray gun so the burner fires. 2.) Loosen the locking screw and close the air band until Make sure the pressure washer is on a level surface and black smoke appears from the burner exhaust vent. -
Page 9: Operating Instructions
Operating Instructions Read and understand the entire manual before operating the pressure washer. Follow these instructions every time you use the pressure washer. I.) Pre-Operation III.) Attach Garden Hose A.) Position the machine for easy access to all Remove shipping plug from pump inlet and confirm controls. - Page 10 inserted correctly. Do not attempt to use different V.) Turn Water Supply ON types of nozzles that may not fit the coupler. Make sure the hose is not “kinked”. A kinked hose will VIII.) Applying Chemicals provide insufficient water supply to the pump and will reduce its life.
- Page 11 IX.) Start Engine *Refer to the engine manual to start your engine. Safety 00417 IMPORTANT: The water must be turned on before A.) Hold the lance with two hands, have a sturdy stance. starting. Running the pump dry will cause damage B.) Point lance at dirty surface and squeeze trigger.
-
Page 12: Safety Features
All mechanical equipment, no matter how well designed, will need repairs. A North Star pressure washer is no exception. At times, a North Star pressure washer may be inoperable because repairs are required. North Star Customer Service... -
Page 13: Pump
Cleaning The Inlet Filter WARNING: Check whether dangerous chemicals have been used, and take precautions when handling filters. Good A.) Unscrew inlet filter. B.) Remove filter screen. C.) Run water though to clean filter. Checking the Tire Air Pressure Water A.) Remove air fill cap. - Page 14 Coil Descaling Coil Desooting In hard water areas, scale build-up within the Poor grades of fuel oil or inadequate combustion heating coil will occur. Scale deposits will decrease air will cause heavy soot build-up on the outside the water temperature rise and may eventually clog surface of the heating coil.
- Page 15 Electrodes 4. Reset the spacing as shown below. On a yearly basis the electrodes should be inspected and any necessary adjustments made. 1. Remove the 4 nuts that attach the burner to the heating chamber. You do not have to Electrodes disconnect the fuel lines or the electric cords.
-
Page 16: Moving And Handling Instructions
Moving and Handling Instructions Maneuvering Your Pressure Washer Lift Here 1.) Use the handles to move the pressure washer. 2.) To turn, lift slightly on the handles and pivot the pressure washer on its front wheels. 3.) To engage brakes, pull brake arms out, rotate them down and use them as chocks. -
Page 17: Troubleshooting Guide
Troubleshooting Guide Engine Will Not Start Causes Solutions Low Oil Shutdown Fill engine with the adequate amount of oil. Cold Engine Choke engine to start. No Fuel Add gas to engine, make sure fuel shutoff valve is open. Dead Battery Recharge/Replace battery. -
Page 18: Parts Breakdowns
Parts Explosion 157310 – Rev E.2... -
Page 19: Battery Box
Parts Explosion 157310 – Rev E.2 ITEM PART# DESCRIPTION ITEM PART# DESCRIPTION 778210 Outer Frame Weldment 777410 3/8” Street Elbow 778274 Instruction Decal 37537 Flow Switch, 8.0 GPM 8000 PSI 3083041 Fuel Tank 777800 Unloader 777149 Fuel/Gas Cap 2294 ½” NPT x ½” Hose Barb 30825 1.0”... -
Page 21: Electrical Schematic
Electrical Wiring Diagram – Rev E.2... - Page 24 Manufactured by Northern Tool + Equipment Co., 2800 SouthCross Drive West P.O. Box 1499 Burnsville, MN 55337-0499...
Need help?
Do you have a question about the M157310E.2 and is the answer not in the manual?
Questions and answers