
Related Manuals for Star SSG Series


Summary of Contents for Star SSG Series
- Page 1 STAR PROFESSIONAL OUTDOOR GRILL SSG Series SSG48C Installation and Operating Instructions 2M-Z6972 Rev. C 5/4/2006...
- Page 2 MAINTENANCE AND REPAIRS Contact your local dealer for service or required maintenance. For your convenience, you may contact the Star Service Help Desk for questions and inquiries by telephone at 1-800-807-9054, by fax at 1-800-396-2677, or by e-mail at info@star-mfg.com.
-
Page 3: Table Of Contents
Table of Contents Safety Statements 5 - 7 General Information ............................5 Purchaser's Responsibility ..........................5 California Proposition 65 Warning ........................6 Safety Practices to Avoid Injury .........................6 Additional Safety Statements ..........................7 Propane Gas Usage 8 - 9 Propane (LP) Gas Warnings ..........................8 Important Safety Information ..........................8 LP Gas Cylinder Information ..........................8 Overfi... - Page 4 Table of Contents Care and Maintenance 27 - 29 Cleaning and Care of Your Grill ........................27 Ignitor Battery Replacement ..........................29 Clearing Spider Webs and Nests ........................29 Grill Troubleshooting Guide Warranty Wiring Diagrams 32 - 33 Exploded Views and Parts Lists 34 - 51 Grill Body Removable Parts ..........................34 Grill Body Service Parts ...........................36...
-
Page 5: Safety Statements
GENERAL Read this installation operation manual thoroughly before attempting to operate your Star Grill. Proper installation and servicing will ensure the long life of your grill. INFORMATION Adherence to the safety statements in this manual will allow for safe and effective operation. -
Page 6: California Proposition 65 Warning
Safety Statements CAUTION Post in a prominent location the emergency telephone number of your local gas supplier and instructions to be followed in the event you smell gas. If the smell of gas is detected, immediately call the emergency phone number of your local gas company. -
Page 7: Additional Safety Statements
Safety Statements ADDITIONAL When heating or cooking, use a covered or protected hand when opening the grill hood. Open the hood slowly to allow the heat to escape. Never lean over an open SAFETY grill or touch the grill rack, burner grate, hot skewer, or any surrounding areas near STATEMENTS the grill since they can be very hot and could cause serious burns. -
Page 8: Propane Gas Usage
Propane Gas Usage PROPANE 1. Know the odor of LP gas. If you hear, see, or smell leaking LP gas, immediately get everyone away from the cylinder and call the fi re department. Do not attempt (LP) GAS any repairs. WARNINGS 2. -
Page 9: Overfi Ll Protection Device (Opd)
Propane Gas Usage WARNING Do not store a second 20 pound propane cylinder within the Star Grill base. The base is designed for the use and storage of one 20 pound propane cylinder. Storage of an outdoor cooking gas appliance indoors is permissible only if the cylinder is disconnected and removed from the grill. -
Page 10: Grill Installation
Grill Installation Your new Star Grill can be located in a Star Grill base (model series 24SSB, 30SSB, LOCATING 36SSB, or 48SSB) or can be installed into an immovable masonry enclosure. When THE GRILL selecting a suitable location for your grill, take into account concerns such as wind exposure and areas of high traffi... -
Page 11: Clearance To Non-Combustibles
The grill may be placed in a combustible enclosure only when used with an insulating jacket around the grill. The jacket must be supported on its bottom. See cut-out dimensions for the correct dimensions using the insulated jacket. Use only the Star Manufacturing supplied jacket for this installation. -
Page 12: Grill Head And Base Installation
Grill Installation CAUTION DO NOT INSTALL THIS UNIT INTO A COMBUSTIBLE ENCLOSURE WITHOUT AN INSULATED JACKET. THIS COULD RESULT IN A FIRE, PROPERTY DAMAGE, OR PERSONAL INJURY. GRILL HEAD 1. Remove the base from the pallet AND BASE by removing the screws holding the INSTALLATION packing brackets. -
Page 13: Natural Gas Installation
Grill Installation NATURAL GAS The grill has a 1/2 NPT female connector at the rear left side of the grill bottom. Use the 5" water column natural gas regulator supplied and a short nipple to connect to INSTALLATION the manifold inlet pipe. A natural gas supply line can then be attached to the inlet side of the regulator. -
Page 14: Grill Features
Grill Features THE GRILL Each grill section consists of an oversized stainless steel burner, a high-performance radiant panel, and a multi-functional stainless steel grate. Models SSG30 and larger provide a high-performance infrared broiler burner for the searing of low-fat meats such as lean cuts of steaks and chops. This broiler burner will provide high temperature radiant heat to the grates, searing faster than the standard burner. -
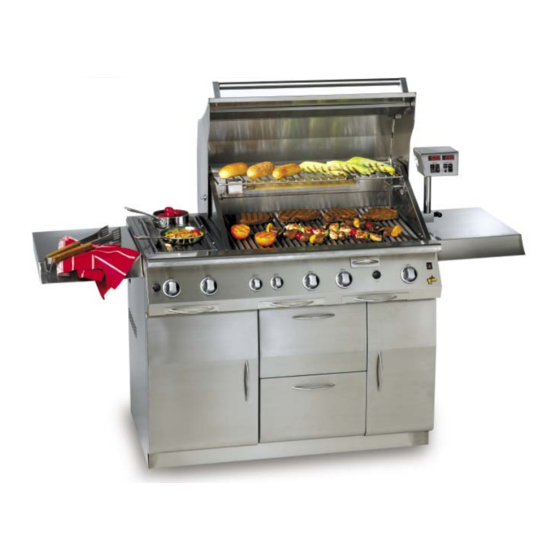
Page 15: Grill Combo
Grill Features GRILL COMBO 1. Side Burners Side Burner Drip Tray 2. Side Burner Ignitor Button Grill Drip Trays 3. Rear Side Burner Control Knob Smoker Box 4. Front Side Burner Control Knob Grill Burner Ignitor Button CONTROL POD Halogen Light Light Power Switch Time Display Temperature Display... -
Page 16: Grill Burners
Grill Features GRILL BURNERS 1. Infrared Rotisserie Burner Smoker Box 2. Infrared Broiler Burner Grates 3. Grill Burner... -
Page 17: Grill Operation
Grill Operation CAUTION DO NOT TURN ON ALL THE GRILL/SEARING BURNERS AND LEAVE THE HOOD CLOSED FOR MORE THAN 20 MINUTES. EXCESS HEAT CAN BUILD UP INSIDE THE GRILL. OPENING THE HOOD WITH AN UNPROTECTED HAND OR ARM CAN LEAD TO BURNS CAUSED BY THE RELEASE OF THIS HEAT. Before attempting to light your grill, check the following: LIGHTING 1. -
Page 18: Smoker Burner
Grill Operation MATCH LIGHTING Smoker Burner: THE GRILL The same method used for the grill burner can be used for lighting the smoker (continued) burner. However, the smoker tray should be removed fi rst, exposing the burner ports. Light the smoker burner near the electrode at the front ports. Infrared Broiler Burner: Use the same method to light the infrared broiler burner, locating the lit match at the front corner as shown. -
Page 19: Infrared Rotisserie Burner
Grill Operation Infrared Rotisserie Burner: MATCH LIGHTING Turn the knob to the HI/LITE position and push it in toward the front panel. Push THE GRILL the ignitor button. You should see a spark at the back rotisserie electrodes. After (continued) burner ignition, continue to push the knob in for approximately 30 seconds until the rear burner begins to glow a dull red. -
Page 20: Burner Adjustments
Grill Operation BURNER Prior to adjusting burners, observe the appearance of the burner fl ame with the burner set on HI. Flame height should be approximately 1-1/4" high with a blue ADJUSTMENTS fl ame. If your fl ame meets these criteria, you probably do not need to adjust your burner. -
Page 21: Temperature Display
Grill Operation TEMPERATURE When turning on the electronic control pod, the grill temperature will be displayed in °F. To use the meat probe, insert the probe into the yellow inlet on the bottom of the DISPLAY control housing. Be sure to remove the plastic from around the meat probe. With the probe properly connected, press the PROBE button. -
Page 22: Grill Surface Light
Grill Operation GRILL SURFACE To turn the grill light on: LIGHT 1. Install the control pod and the wire connector. 2. Press the ON/OFF button to turn on the electronic control. 3. The light can then be turned on or off by pressing the LIGHT button. 1. -
Page 23: Power Panel
Grill Operation POWER PANEL The deluxe bases are equipped with a power inlet/outlet panel. This panel is equipped with an inlet into which an extension cord can be plugged along with two receptacles on the outside of the base and two receptacles on the inside. CAUTION A THREE-PRONG EXTENSION CORD MUST BE USED WITH THE POWER PANEL. -
Page 24: Cooking Features
Cooking Features GRILL The grates provided with this grill can be used on both sides (V up or down). There are also two positions to mount your grates: one position is fl at and the second is sloped, draining toward the front grease trough. For higher fat meats such as bratwurst or hamburger you may wish to place the grates with the down and in the sloped position to facilitate grease run-off into the grease trough. -
Page 25: Rotisserie
The high torque drive motor is mounted in the lower rear of the grill away from the heat for long life. The rotisserie drive output coupling is designed to accept the Star provided skewer rod that is supported on the other end by a high performance roller bearing assembly. -
Page 26: Menu Guide
Cooking Features The burner and skewer location are designed to roast large cuts of meat while allowing the placement of a rotisserie basting pan beneath the meat. Drippings can be collected for basting or to make gravy. You can add garlic, onion, or other fl... -
Page 27: Care And Maintenance
Care and Maintenance CLEANING The grill is made of non-rusting stainless steel and will provide many years of service. After cooking on the grill several times, there may be discolored areas due to high AND CARE OF performance temperatures provided by this grill. Grease and grease vapors will YOUR GRILL also accumulate in areas requiring cleaning to maintain grill appearance. - Page 28 Care and Maintenance The infrared broiler burner can be removed and cleaned of any debris on the high- performance radiant screen. An air hose can be used to carefully blow out any particles from the burner. Apply air to the burner in the same direction as the gas fl...
-
Page 29: Care And Maintenance 27
Care and Maintenance IGNITOR The electronic ignitor button provides the spark to the electrode mounted by the burner to provide ignition. The ignitor button should provide many years of service, BATTERY but the AAA battery in the unit should be replaced every year. The ignitor button REPLACEMENT can be easily unscrewed allowing removal of the AAA alkaline battery. -
Page 30: Grill Troubleshooting Guide
Grill Troubleshooting Guide This is a general guide provided to help the end user. If your problem continues, contact your dealer. A. Grill will not light when the appropriate ignitor button is pushed. 1. Are you getting a spark to the burner? If there is no sparking noise at all, replace the AAA alkaline battery in the ignitor. -
Page 31: Warranty
Star factory authorized service center or the service center's sub-agency during normal working hours. This warranty applies to equipment used in residential applications only. This warranty applies to all units shipped in the United States and Canada. - Page 33 BLACK WHITE WHITE...
-
Page 53: Notes
Notes... - Page 54 Notes...
- Page 55 Notes...
- Page 56 Star Manufacturing International Inc. 10 Sunnen Drive St. Louis, Missouri 63143 Phone: (314) 781-2777 Fax: (314) 781-3636 Made in the USA...
Need help?
Do you have a question about the SSG Series and is the answer not in the manual?
Questions and answers