
Related Manuals for Troy-Bilt 5000 Watt


Summary of Contents for Troy-Bilt 5000 Watt
- Page 1 5000 Watt Portable Generator Operator’s Manual Printed in U.S.A. Manual No. 203727GS Revision - (04/12/2007)
-
Page 2: Model Number
Thank you for purchasing this quality-built Troy-Bilt generator. We are pleased that you’ve placed your confidence in the Troy- Bilt brand. When operated and maintained according to the instructions in this manual, your Troy-Bilt generator will provide many years of dependable service. -
Page 3: Table Of Contents
Table of Contents Operator Safety ....... . . 2 Equipment Description......... 2 Safety Rules. -
Page 4: Operator Safety
SAVE THESE INSTRUCTIONS Operator Safety Hazard Symbols and Meanings Equipment Description Read this manual carefully and become familiar with your generator. Know its applications, its limitations and any hazards involved. The generator is an engine–driven, revolving field, alternating current (AC) generator. It was designed to supply electrical power for operating compatible electrical lighting, appliances, tools and motor loads. - Page 5 WARNING WARNING The engine exhaust from this product contains Fuel and its vapors are extremely flammable and chemicals known to the State of California to cause explosive. cancer, birth defects, or other reproductive harm. Fire or explosion can cause severe burns or death.
- Page 6 WARNING CAUTION Excessively high operating speeds increase risk of injury Contact with muffler area can result in serious and damage to generator. burns. Excessively low speeds impose a heavy load. Exhaust heat/ gases can ignite combustibles, • DO NOT tamper with governed speed. Generator supplies structures or damage fuel tank causing a fire.
-
Page 7: Assembly
Assembly Install the wheel kit as follows: 1. Tip generator so that engine end is up. Read entire operator’s manual before you attempt 2. Slide axle (A) through both mounting brackets. to assemble or operate your new generator. 3. Place a wheel (B) on each side as shown below. Your generator requires some assembly and is ready for use 4. -
Page 8: Add Fuel
Add Fuel High Altitude At altitudes over 5,000 feet (1524 meters), a minimum Fuel must meet these requirements: 85 octane / 85 AKI (89 RON) gasoline is acceptable. To • Clean, fresh, unleaded gasoline. remain emissions compliant, high altitude adjustment is •... -
Page 9: System Ground
System Ground Generator Location The generator has a system ground that connects the Clearances and Air Movement generator frame components to the ground terminals on the WARNING AC output receptacles. The system ground is connected to the AC neutral wire (the neutral is bonded to the generator Exhaust heat/ gases can ignite combustibles, frame). -
Page 10: Features And Controls
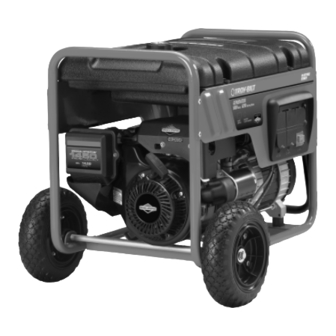
Features and Controls Read this Operator’s Manual and safety rules before operating your generator. Compare the illustrations with your generator, to familiarize yourself with the locations of various controls and adjustments. Save this manual for future reference. A - Fuel Valve — Used to turn fuel supply on and off to L - Double Pole Circuit Breaker (AC) —... -
Page 11: Cord Sets And Receptacles
Cord Sets and Receptacles 120 Volt AC, 20 Amp, Duplex Receptacles Both duplex receptacles are protected against overload by a Use only high quality, well-insulated, grounded extension double pole rocker switch circuit breaker. cords with the generator’s 120 Volt duplex receptacle. Inspect extension cords before each use. -
Page 12: Battery Float Charger
Battery Float Charger 2. Unplug charger from unit and wall outlet when generator is being started and while it is in operation. Use battery float charger jack to keep the starting battery 3. Keep this charger plugged in when generator is not in charged and ready for use. -
Page 13: Operation
Operation 5B. For manual starting, grasp recoil handle and pull slowly until slight resistance is felt. Then pull rapidly one time only to start engine. Starting the Engine • If engine starts, proceed to step 7. IMPORTANT: Always unplug the battery float charger before •... -
Page 14: Connecting Electrical Loads
Connecting Electrical Loads Stopping the Engine 1. Let engine stabilize and warm up for a few minutes 1. Turn OFF and unplug all electrical loads from generator after starting. panel receptacles. NEVER start or stop engine with electrical devices plugged in and turned ON. 2. -
Page 15: Don't Overload Generator
Don’t Overload Generator NEVER add more loads than the generator capacity. Take special care to consider surge loads in generator capacity, as Capacity described above. You must make sure your generator can supply enough Wattage Reference Guide rated (running) and surge (starting) watts for the items you will power at the same time. -
Page 16: Maintenance
Maintenance Maintenance Schedule Follow the hourly or calendar intervals, whichever occurs first. More frequent service is required when operating in adverse conditions noted below. Maintenance Schedule - Fill in Dates as You Complete Regular Service Maintenance Task Service Intervals Service Dates Before Every 25 Hours Every 50 Hours... -
Page 17: Battery Maintenance
SAE 30: 40°F and higher (5°C and higher) is good for all NOTICE purpose use above 40°F, use below 40°F will cause hard Improper treatment of generator can damage it and starting. shorten its life. 10W-30: 0 to 100°F (-18 to 38°C) is better for varying •... - Page 18 Service Spark Plug 3. Clean area around oil drain plug (A). The oil drain plug is located at base of engine, opposite carburetor. Change the spark plug every 100 hours of operation or once each year, whichever comes first. This will help your engine to start easier and run better.
- Page 19 1. To remove muffler heat shield (A) from muffler (B), Check Valve Clearance remove four screws that connect guard to muffler Regular valve clearance check and adjustment will improve bracket. performance and extend engine life. This procedure cannot be done without partial engine disassembly and the use of special tools.
-
Page 20: Storage
Storage Change Oil While engine is still warm, drain oil from crankcase. Refill The generator should be started at least once every seven with recommended grade. See Changing Engine Oil. days and allowed to run at least 30 minutes. If this cannot be done and you must store the unit for more than 30 days, use Oil Cylinder Bore the following guidelines to prepare it for storage. -
Page 21: Troubleshooting
Troubleshooting Problem Cause Correction 1. One of the circuit breakers is open. 1. Reset circuit breaker. 2. Fault in generator. 2. Contact authorized service facility. Engine is running, but no AC 3. Poor connection or defective cord set. 3. Check and repair. output is available. -
Page 22: Warranties
Warranties As the small off-road engine owner, you should however be aware that B&S may deny you warranty coverage if your small off-road engine or a part has failed due to abuse, Emissions Control System Warranty neglect, improper maintenance or unapproved modifications. Briggs &... - Page 23 2. Length of Coverage Emission Information B&S warrants to the initial owner and each subsequent Engines that are certified to meet the California Air purchaser that the Warranted Parts shall be free from Resources Board (CARB) Tier 2 Emission Standards must defects in materials and workmanship which caused the display information regarding the Emissions Durability failure of the Warranted Parts for a period of two years...
-
Page 24: Generator Owner Warranty
LIMITED WARRANTY Troy-Bilt® is a registered trademark of MTD Products Inc. and is used under license to Briggs & Stratton Power Products. Briggs & Stratton Power Products Group, LLC will repair or replace, free of charge, any part(s) of the portable generator that is defective in material or workmanship or both. - Page 25 This Page Reserved.
-
Page 26: Product Specifications
Portable Generator Product Specifications Starting Wattage ......6,250 watts Wattage ......5,000 watts AC Load Current: at 120 Volts . - Page 27 Generador Portátil de 5000 Vatios Manual del Operario...
- Page 28 Páginas Amarillas. Hay más de 30.000 proveedores de Briggs & Stratton autorizados en todo el mundo, proporcionando un servicio de calidad. También puede ponerse en contacto con Atención al Cliente de Troy-Bilt llamando al (888) 611-6708 o por Internet en www.troybilt.com.
- Page 29 Tabla de Contenido Seguridad de operario ......2 Descripción del equipo ........2 Reglas de seguridad .
-
Page 30: Seguridad De Operario
CONSERVE ESTAS INSTRUCCIONES Seguridad de operario Símbolos de peligro y sus significados Descripción del equipo Lea atentamente este manual y familiarícese con el generador. Conozca sus aplicaciones, limitaciones y riesgos. Este generador funciona en base a un motor de campo eléctrico giratorio y de corriente alterna (CA). - Page 31 ADVERTENCIA ADVERTENCIA El escape del motor de este producto contiene La combustible y sus vapores son elementos químicos reconocidos en el Estado de extremadamente inflamables y explosivos. California por producir cáncer, defectos de nacimiento u otros daños de tipo reproductivo. El fuego o una explosión pueden causar quemaduras severas e inclusive la muerte.
- Page 32 ADVERTENCIA PRECAUCIÓN El contacto con la zona del silenciador puede Las velocidades de operación en exceso, aumentan los producir quemaduras graves. riesgos de heridas y daños al generador. Los gases y el calor de escape pueden inflamar Las velocidades bajan en exceso, imponen una carga muy los materiales combustibles y las estructuras o pesada.
-
Page 33: Montaje
Montaje Instale el juego de ruedas conforme a las instrucciones siguientes: Su generador requiere de ciertos procedimientos de montaje 1. Dele la vuelta al generador de forma que el motor y solo estará listo para ser utilizado después de haberle quede arriba. -
Page 34: Agregue Combustible
Agregue combustible 2. Añada lentamente gasolina sin plomo (A) al tanque de combustible (B). Tenga cuidado de que el nivel de El combustible debe reunir los siguientes requisitos: combustible no rebase el límite (C). Esto permite dejar el espacio adecuado para que el combustible se •... -
Page 35: Tierra Del Sistema
Tierra del sistema Ubicación del generador El generador dispone de una conexión a tierra del sistema Espacio libre alrededor del generador que conecta los componentes del bastidor a los terminales de tierra de los enchufes hembra de salida de CA. La tierra ADVERTENCIA del sistema está... -
Page 36: Controles Y Características
Controles y características Lea este Manual del Operario y reglas de seguridad antes de poner en marcha su generador. Compare las ilustraciones con su generador, para familiarizarse con la ubicación de los diversos controles y ajustes. Guarde este manual para futuras consultas. A - Válvula de Combustible —... -
Page 37: Juegos De Cordones Y Enchufes Conectores
Juegos de cordones y enchufes conectores AVISO Utilice exclusivamente cables prolongadores de alta calidad, Las tomas eléctricas pueden marcar un valor nominal bien aislados y con conexión a tierra para la toma doble de mayor que la capacidad de salida del generador. 120 V del generador. -
Page 38: Cargador De Flotación De La Batería
Cargador de flotación de la batería 2. Desconecte el cargador de la unidad y del enchufe de la pared durante el arranque del generador y mientras Utilice el enchufe hembra del cargador de flotación (carga esté funcionando. lenta y continua) de la batería para mantener la batería de 3. -
Page 39: Operando
Operando 5B. Para el arranque manual, hale la manija de retroceso, en forma suave hasta que sienta resistencia, Luego para arrancar el motor hacer tracción en forma rápida Encienda el motor una sola vez. IMPORTANTE: Desenchufe siempre el cargador de flotación ADVERTENCIA de la batería antes de arrancar el generador. -
Page 40: Conexión De Cargas Eléctricas
NOTA: Si el motor arranca después de tirar tres veces del Parada del motor arrancador pero no sigue funcionando, o si la unidad se para 1. Desconecte todas las cargas eléctricas de los en funcionamiento, asegúrese de que la unidad está en una tomacorrientes del panel del generador. -
Page 41: No Sobrecargar El Generador
No sobrecargar el generador 6. Repita los pasos 4 y 5 para cada carga adicional que usted tenga. Capacidad NUNCA añada cargas que sobrepasen la capacidad del Debe asegurarse de que su generador puede proveer los generador. Tenga especial cuidado en contar con las cargas suficientes vatios de potencia continua (vatiaje nominal) y adicionales en la capacidad del generador, como se describe vatios de salida para los elementos que desee alimentar al... -
Page 42: Mantenimiento Del Generador
Mantenimiento Plan de mantenimiento Siga los intervalos de horas o de calendario, los que sucedan antes. Si opera en condiciones adversas (señaladas más abajo) es necesario un mantenimiento más frecuente. Plan de Mantenimiento - Anote las Fechas a Medida que Lleve a Cabo las Operaciones de Mantenimiento INTERVALOS DE MANTENIMIENTO FECHAS DE MANTENIMIENTO Antes de... -
Page 43: Mantenimiento De La Batería
NOTA: Todo aceite sintético que cumpla las especificaciones AVISO ILSAC GF-2, con marca de certificación API y con símbolo de El tratamiento inadecuado del generador puede dañarlo y servicio API con SJ/CF ENERGY CONSERVING o superior es acortar su vida productiva. un aceite aceptable a todas las temperaturas. - Page 44 Cambio de aceite del motor Servicio del depurador de aire Cambie el aceite después de las primeras 5 horas de Si se utiliza con un filtro de aire sucio, el motor no operación. Cambie el aceite cada 50 horas de ese momento funcionará...
- Page 45 4. Cambie la bujía si los electrodos están picados o 3. Inspeccione la pantalla y reemplácela si está rota, quemados o si la porcelana está agrietada. Utilice la bujía perforada o dañada. NO use pantallas defectuosas. Si la de repuesto recomendada. Consulte Especificaciones. pantalla no está...
-
Page 46: Almacenamiento
Almacenamiento Cambio de aceite Con el motor todavía caliente, drene el aceite de la caja del El generador deberá ser encendido al menos una vez cada cigüeñal. Vuelva a llenarlo con el grado de aceite siete días y deberá dejarlo funcionar al menos durante recomendado. -
Page 47: Resolución De Problemas
Resolución de problemas Problemo Causa Accion 1. El interruptor automático de circuito 1. Reposicione el interruptor. está abierto. 2. Conexión mal o defectuosa del juego 2. Revise y repare. El motor está funcionando de cables. pero no existe salida de AC 3. -
Page 48: Garantías
Garantías Como propietario del pequeño motor para máquinas de servicio, debe ser consciente de que B&S puede denegar la cobertura de la garantía si el motor o uno de sus Garantía del sistema de control de emisiones componentes falla debido a un uso indebido o negligente, un mantenimiento inadecuado o modificaciones no autorizadas. - Page 49 Información sobre emisiones e. Elementos diversos utilizados en los sistemas anteriores Los motores con certificación de cumplimiento de la • Válvulas y conmutadores de aspiración, normativa sobre emisiones de nivel 2 del California Air temperatura, posición y temporizados Resources Board (CARB) deben mostrar información sobre el período de durabilidad de las emisiones y el índice de aire.
- Page 50 GARANTÍA LIMITADA Troy-Bilt® es una marca registrada de MTD Products Inc. bajo licencia de Briggs & Stratton Power Products. Briggs & Stratton Power Products Group, LLC reparará o sustituirá sin cargo alguno cualquier componente del generador portátil que presente defectos de materiales y/o mano de obra. Los gastos de transporte de las producto enviadas para reparar o sustituir conforme a los términos de esta garantía correrán a cargo del comprador.
- Page 51 Esta página reservó.
-
Page 52: Especificaciones Del Producto
Generador Portátil Especificaciones del producto Vataje que Empieza ....6,250 Vatios (6,25 kW) Vataje ......5,000 Vatios (5,0 kW) Corriente Carga de C.A.
Need help?
Do you have a question about the 5000 Watt and is the answer not in the manual?
Questions and answers