Advertisement
Quick Links
Advertisement

Subscribe to Our Youtube Channel
Related Manuals for Progression Fitness B890P


Summary of Contents for Progression Fitness B890P
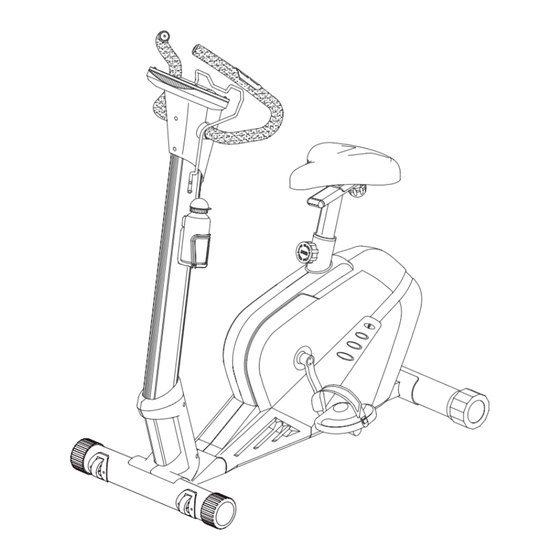
- Page 1 Magnetic Upright Bike Model: B890P Owner’s Operating Manual...
- Page 2 Adapter Book Stand (L2)Water bottle (K9) SCREW M6X15mm (K10) M6 - 1 -...
- Page 3 ASSEMBLY OF REAR STABILIZER First, remove the bolts (B3), washers (B4) and nuts (B5) from the rear stabilizer (B). Use two bolts (B3) through the rear stabilizer (B) to attach to the bracket at the back of the main frame (A). Then, secure it with washers (B4) and nuts (B5).
- Page 4 ASSEMBLY OF CENTRAL SUPPORT TUBE First, remove the bolts (D4) and washers (D5) from the central support tube (D). Step 1. Connect the cable (D2) with cable (AB). Step 2. Put the central support tube (D) on the main frame (A). Then secure it with bolts (D4) and washers (D5).
- Page 5 ASSEMBLY OF HANDLEBAR First remove the washer (E8) and nut (E9) from the handlebar (E). Secure the handlebar in the housing using washer (E8) and nut (E9). ASSEMBLY OF MONITOR HOUSING First, remove the screw (D3) from the central support tube (D). Step 1: Put the monitor front housing (K5) into the central support tube and secure it using screws (D3).
-
Page 6: Adjusting The Handlebar
Step 2: Slide the sensor wires (A8 & E4) through the monitor front housing (K4) as shown in View A). Then connect the monitor rear housing with monitor front housing by screws (K2). FINISH THE ASSEMBLY OF MONITOR HOUSING Attention: Please position all sensors outside of the monitor housing. -
Page 7: Adjust The Saddle
ASSEMBLY OF SADDLE & SADDLE SUPPORT TUBE Step 1: Loosen the screw (G6), washer (G4) and knob (G3) from the saddle (J), and position saddle on the top of the saddle support tube. Then secure the saddle (J) tightly with screw (G6), washer (G4) and knob (G3). Loosen the knob (A11). -
Page 8: Pedals Assembly
PEDALS ASSEMBLY Secure the pedal (H2-R) and (H1-L) to the crank using clockwise (H2-R) and counter clockwise (H1-L) rotation. ASSEMBLY FOR BOTTLE HOLDER & BOOK STAND Step 1: Attach plastic bottle holder (L1) at middle position of central support tube and secure with screw (K8). -
Page 9: How To Move The Machine
HOW TO MOVE THE MACHINE Stand at the back of the machine and lift it up until the weight of the machine is transferred to the transport wheels. You can now easily move the machine to a new location. TRANSPORTATION WHEELS - 8 -... - Page 10 - 9 -...
- Page 11 Description Description Main Frame Washer DRIVING WHEEL SET 1 SET Rear Stabilizer A2-1 Driving Wheel End Cap A2-2 Axle Bolt A2-3 Spring Washer Washer A2-4 Screw A2-5 Front Stabilizer A2-6 Axle Bushing End Cap A2-7 Bearing Transportation Wheel A2-8 Bushing Screw A2-9 Central Support Tube...
- Page 12 TIME: Count up - No preset target, time will count up from 00:00 to maximum 99:59 with 1 second increments. Count down - If training with preset time, time will count down from preset to 00:00. Each preset increment or decrement is 1 minute between 1:00 to 99:00. SPEED: Display current training speed from 0.0 to maximum 99.9 km or ml.
- Page 13 To set function value for TIME, DISTANCE, CALORIES, PULSE in sleep mode. To select training mode and adjust function value up. To select training mode and adjust function value down. Return to main function mode in STOP mode and clear all preset.
- Page 14 CLOCKWISE OR CLOCKWISE OR CLOCKWISE OR COUNTER-CLOCKWISE COUNTER-CLOCKWISE COUNTER-CLOCKWISE CLOCKWISE OR CLOCKWISE OR CLOCKWISE OR COUNTER-CLOCKWISE COUNTER-CLOCKWISE COUNTER-CLOCKWISE CLOCKWISE OR COUNTER-CLOCKWISE...
- Page 15 5. Training in MANUAL mode 5-1 In the MANUAL mode, you may turn UP/DOWN dial to select load level from 1 to 16, the preset level is 1. 5-2 After load level selected, you may preset function values for TIME, DISTANCE, CALORIES, and PULSE by turning UP/DOWN dial and press ENTER (dial) confirmation.
- Page 16 CLOCKWISE OR CLOCKWISE OR CLOCKWISE OR COUNTER-CLOCKWISE COUNTER-CLOCKWISE COUNTER-CLOCKWISE CLOCKWISE OR CLOCKWISE OR CLOCKWISE OR COUNTER-CLOCKWISE COUNTER-CLOCKWISE COUNTER-CLOCKWISE CLOCKWISE OR COUNTER-CLOCKWISE 4. Training in H.R.C. mode: AGE 25 is flashing after entering H.R.C. mode. You may set your age by turning UP/DOWN/ENTER dial.
- Page 17 6. Training in WATT mode: The preset watt value 120 is flashing on screen in WATT setting mode, select UP/DOWN/ENTER to set target value from 10 to 350. CLOCKWISE OR CLOCKWISE OR CLOCKWISE OR COUNTER-CLOCKWISE COUNTER-CLOCKWISE COUNTER-CLOCKWISE CLOCKWISE OR CLOCKWISE OR CLOCKWISE OR COUNTER-CLOCKWISE COUNTER-CLOCKWISE...
- Page 18 1. BODY FAT - This is a figure that is determined using your personal data and the signal measured when user’s hand is placed on the heart rate sensor. The computer will calculate the signal and your personal data to figure out the FAT percentage of your body. 2.
Need help?
Do you have a question about the B890P and is the answer not in the manual?
Questions and answers
Where can I buy replacement parts for sportop B890P electric exercise bike
Where can I find the store to buy the belt for sportop B890P
Where can I buy belt for Model: B890P