
Related Manuals for Uniden FP1355


Summary of Contents for Uniden FP1355
- Page 1 FP1355 Speakerphone Telephone with Answer Machine For more exciting new products please visit our website: Australia: www.uniden.com.au New Zealand: www.uniden.co.nz...
-
Page 2: Instructions
Important Safety InStructIonS! CAUTION: RISK OF ELECTRIC SHOCK DO NOT OPEN WARNING: TO CAUTION: TO REDUCE THE THE EXCLAMATION THE LIGHTNING PREVENT FIRE OR RISK OF ELECTRIC SHOCK, DO POINT WITHIN THE FLASH AND ARROW TRIANGLE IS A HEAD WITHIN THE NOT REMOVE COVER (OR ELECTRICAL SHOCK WARNING SIGN... -
Page 3: Table Of Contents
TABLE OF CONTENTS Important Safety . . . . . . . . . . . . . . . . . . . 12 Djusting the oluMe InStructIonS! . -
Page 4: Before You Begin
. . . . . . . . 20 (Deleting) . . . . . 24 ialing a uMBer toreD in eMory hanging toreD uMBer if you are On Hook . . . . . . . . . . . . . . . . . . . 20 iD r . -
Page 5: Desktop
InStaLLIng your phone If you will be using this unit as a speakerphone, avoid the following locations when selecting an installation location: • Areas with high background noise. The microphone might pick up these sounds and prevent the speakerphone from going into receiving mode when you finish talking. -
Page 6: Wall Mount
waLL mount Your speakerphone can also be mounted on a wall plate (not included). NOTE: To prevent the handset from falling out of the cradle while the phone is hanging on the wall, you must switch both the handset hook and the desk stand to their wall-mount positions. On the base front, slide the handset hook out of the slot. -
Page 7: Phone Layout
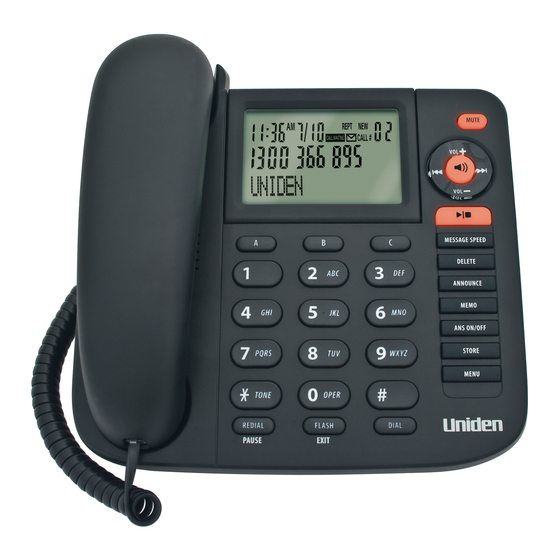
phone Layout front Hook switch Speed Dial/Emergency Repeat button Memory buttons Display (left) Skip button (right) Ringer volume switch Speaker button Play/Stop button Answering machine function keys NOTE: If the key name is spelled out on the key Microphone 12-key dial pad itself, it’s not labeled in this drawing. -
Page 8: Setup Menu
Setup menu When you provide power to the unit, it will announce Press MENU key to set up the unit. An initial setup 12:00 screen displays with the time and date flashing until they are set. MESSAGES CALLS Press menu to cycle through the following customizable options: •... -
Page 9: (Rec: Std Long )
recorDIng QuaLIty (Rec: stD Long ) This setting allows you to set the recording quality between standard (STD) and long play (LONG). Long play will give more recording time than standard. (Default = Standard) Press menu until the screen displays Rec: stD Long. -
Page 10: Day Of Week (Set Day)
Day of week (set Day) This setting allows you to set the day of the week. (Default = SUN) 12:00 Press menu until the screen displays set Day: sUn with sUn flashing. SET DAY: SkIp and repeat to scroll to the desired day. When finished, press menu to confirm and go to the next setting. -
Page 11: Using Your Telephone
uSIng your teLephone makIng phone caLLS Lift the handset or press Speaker. Wait for a dial tone. NOTE: When you go off-hook, either through the speakerphone or by picking up the handset, a timer displays. You have 20 seconds to take an action (make a call, press a function key, etc). -
Page 12: Djusting The V Olume
When using the handset, press Speaker to activate the speakerphone. The speakerphone indicator light comes on when the speakerphone is in use. Hang up the handset. To return to handset operation, pick up the handset to disconnect the speakerphone (the speakerphone indicator light goes off ). aDjuStIng the voLume LIStenIng voLume Use the voL (+ or - ) buttons to adjust the listening volume when playing back... -
Page 13: Using Your Answering
For Australian Model: Press FLASH and then press 2 to accept the waiting call. The first caller is put on hold, and you will hear the new caller after a short pause. To return to the original caller, press FLASH and then 2 again. For New Zealand Model: Press FLASH to accept the waiting call. -
Page 14: Review The Greeting
so please leave your name, number, and a brief message after the tone, and I’ll call you back. Thanks for calling. announce button. The unit announces Record announcement Hold down the after the tone and the screen displays TO RECORD. After the tone, record a greeting no longer than 1 minute. -
Page 15: Erase Messages
eraSe meSSageS You can erase either a single message or all the messages, leaving only the Caller ID information. eraSe a SIngLe meSSage Press and release DeLete while the message is playing,. The unit erases the current message and announces Message erased. eraSe aLL meSSageS You can erase all old messages, leaving new messages and Caller ID information. -
Page 16: Memory Full
memory fuLL When the unit’s memory is full (approximately 45 minutes of messages recorded), it answers after 10 rings and announces Memory is full. A 20-second waiting period follows when you can enter your security code. You can then play your messages and erase some of them to restore memory. If no entry is made during this 20-second period, the phone disconnects the call. -
Page 17: Accessing Your Messages
acceSSIng your meSSageS Call your telephone number. Enter your 3-digit security code. You can enter this code any time during the greeting or after the beep. The unit waits for a remote command for 20 seconds after the correct security code has been entered. Menu selections can be made while the menu is playing. -
Page 18: Using Memory Features
uSIng memory featureS You can store up to 13 numbers in memory for quick dialing – 3 in the Quick Dial buttons (A, B, and C) and 10 in the keypad numbers (0-9). Each memory location can store up to 32 digits. enterIng teXt on your phone To enter letters on your phone, refer to the letters in the right side of each number key. -
Page 19: Erasing A Stored Number
Press Store. To enter another name and number in a different memory location, return to Step 1 and repeat this process. StorIng a reDIaL numBer In memory Press reDIaL and the screen displays the number. Store. The screen displays Location? Press Press the desired memory location (0-9, A, B, or C ). -
Page 20: Changing A Stored Number
InSertIng a pauSe In the DIaLIng SeQuence Press reDIaL/pauSe to insert a delay in the dialing sequence of a stored telephone number when a pause is needed to wait for a dial tone (for example, after you dial 9 for an outside line, or to wait for a computer access tone). -
Page 21: Using Caller Id (Cid)
Press a memory location key (0-9, A, B, or C ) to review that location’s content. Speaker or lift the handset. • To dial the displayed number, press • To exit stored number review, press fLaSh/eXIt . • To change the displayed number, press Store. -
Page 22: Caller Id Display Messages
NOTE: The number of new calls displays until all new calls are reviewed. Status Caller Status Message Time Date Indicator (new or repeat) Waiting Area CID Record Number CID Phone Number CID Name caLLer ID DISpLay meSSageS The following messages display for incoming calls. PRivate The caller of the incoming call is registered as BLOCKED CALL... -
Page 23: Dialing Back
DIaLIng Back When reviewing Caller ID records, you can dial back a displayed number. NOTE: If PicKUP Phone shows in the display, no other changes to the number can be made (such as adjusting the area code). The information sent from the telephone company is known to be a valid number for dialing back (used only in very limited areas). -
Page 24: Storing A Pause In Memory
Use number keys to enter the name of the person associated with the phone number you just entered. See “ENTERING TEXT ON YOUR PHONE. ” NOTE: The flashing cursor automatically moves to the next position or you may press SkIp or repeat to move the cursor to the next position Press Store to save the name. -
Page 25: N Umber To M Emory
Press a memory location button ( 0 - 9, a, B, or c). The number flashes if there is a number already stored in that memory location. Store to enter Edit mode, and then press Store again to edit the name. Press NOTE: Select a different memory location by using SkIp and repeat to scroll through 0 - 9 or quick call buttons A, B, or C. -
Page 26: Using Chain Dialing
• If you are on-hook, the number in that location displays along with PicKUP Phone. Press Speaker or pick up the handset to dial the displayed number. uSIng chaIn DIaLIng This process allows you to dial a succession of stored numbers from separate memory locations. - Page 27 Problem Resolution Low Handset or Speaker Check the volume settings. Volumes Verify the phone cord is securely plugged in. Can’t Be Heard by Other Party Make sure the MUTE function is off. Make sure you entered the numbers correctly. (See Memory Dialing “MEMORY”...
-
Page 28: General Product Care
Problem Resolution Wait until after the SECOND ring before answering. Check all cabling to make sure all connections are secure No information is shown and not damaged. after the phone rings. Do you have Caller ID service from your local telephone company? eRRoR displays if the unit detects anything other than... -
Page 30: One-Year Limited Warranty
Australia or New Zealand and will expire one (1) year from the date of the original retail sale. If a warranty claim is made, this warranty will not apply if the Product is found by Uniden to be: (A) Damaged or not maintained in a reasonable manner or as recommended in the relevant Uniden Owner’s... - Page 31 Product, together with satisfactory evidence of your original purchase (such as a legible copy of the sales docket) to Uniden at the addresses shown below. You should contact Uniden regarding any compensation that may be payable for your expenses incurred in making a warranty claim.
- Page 32 © 2011 Uniden Australia Pty Ltd/Uniden New Zealand Limited Printed in PRC...
Need help?
Do you have a question about the FP1355 and is the answer not in the manual?
Questions and answers