
Subscribe to Our Youtube Channel
Related Manuals for GE USB 2.0 7-Port Hub HO97916


Summary of Contents for GE USB 2.0 7-Port Hub HO97916
- Page 1 USB 2.0 7-Port Hub www.jascoproducts.com HO97916...
-
Page 2: Table Of Contents
INTRODUCTION OVERVIEW III. SAFETY INSTRUCTIONS IV. POWER MODE SETTING HUB STAND ASSEMBLY HARDWARE INSTALLATION VII. SOFTWARE INSTALLATION VIII. TROUBLESHOOTING IX. TECHNICAL SPECIFICATIONS FCC COMPLIANCE STATEMENT XI. WARRANTY Table of Contents... -
Page 3: Introduction
Introduction Please read this entire manual carefully before using your new USB 2.0 7-Port Hub and follow the instructions to prevent damage to the USB 2.0 7-Port Hub and/or the connecting devices. THIS PACKAGE INCLUDES: USB 2.0 7-Port Hub USB 2.0 Device Cable (6 feet) AC/DC Power Adapter User’s Manual Two Magnets... -
Page 4: Ii. Overview
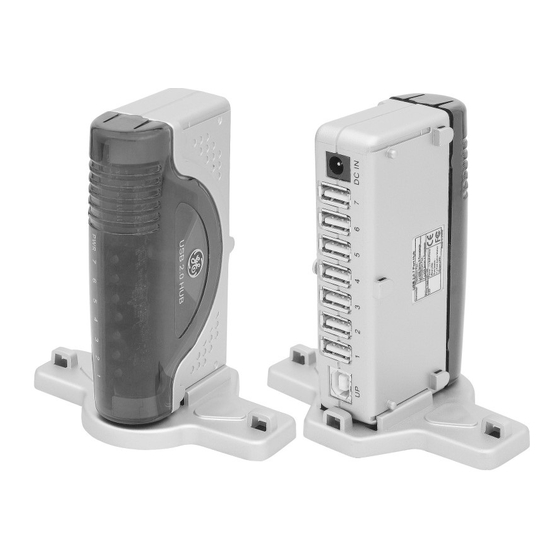
Overview This USB 2.0 7-Port Hub allows you to connect up to seven USB devices to a single USB port on your computer, including up to five high-powered devices, simultaneously. This device complies with USB 2.0 specifications and supports data speeds up to 480 Mbps. It is compatible with all USB 1.1 and 2.0 devices. -
Page 5: Safety Instructions
III. Safety Instructions Always read the Safety Instructions carefully. Keep this user’s manual for future reference. Keep this equipment away from humidity. Lay this equipment on a reliable flat surface before setting it up. If any of the following situations arises, get the equipment checked by a service technician: The equipment has been exposed to moisture. -
Page 6: Power Mode Setting
Power Mode Setting There are two power mode options for the USB 2.0 7-Port Hub. The first is self-power mode (recommended), which requires the use of the AC power adapter. In this mode, a maximum of five (5) high-powered USB devices may be connected to the hub at one time. If more than five high-powered devices are connected, you will notice a decrease in performance. -
Page 7: Hub Stand Assembly
Hub Stand Assembly Options: Stand may be mounted Magnetically or with Screws Hub may be oriented vertically or horizontally Hubs may be stacked Contents: Stand Note: Package does not include the two screws needed to mount the hub to your desk. If you choose this mounting method, you will need to purchase the two screws separately. - Page 8 Attach Hub Stand with Magnets Screw Magnet Metal Magnet Holder 1. Place the metal magnet holder, and magnet on the stand as shown in the diagram. 2. Using the included screws, fasten the magnet to the stand as shown in the diagram. 3.
- Page 9 Attach Hub Stand with Screws Desk 1. You will need to purchase two screws separately. These are not provided. 2. Place the stand where you would like it secured to your desk. 3. Fasten the screws in the screw holes on both sides of the stand. 4.
- Page 10 Attach Hub to Stand Vertically Hub Clips Rails 1. Line up the tracks of either side of the hub with the rails on the stand. 2. Slide the hub all the way back on the stand until you hear a click. Push Hub...
- Page 11 Attach Hub to Stand Horizontally Hub Clips 1. Line up the hooks on the bottom of the hub with the hub clips on the stand. 2. Slide the hub onto the stand until you hear a click. Push Hub...
- Page 12 Stacking Hubs 1. Face the Hubs in the same direction 2. Line up the hooks on the bottom of Hub A with the top cover of Hub B. 3. Slide Hub A onto Hub B as shown in the diagram. Hub A Hub B...
-
Page 13: Vi. Hardware Installation
VI. Hardware Installation 1. Make sure your computer has all the necessary updates required to support USB 2.0. These can be found on Microsoft’s website. 2. Position the Hub as desired using the directions in Section VI. - Page 14 3. Plug the included AC power adapter into the Power Jack on the rear of the USB 2.0 7-Port hub. 4. Plug the AC power adapter into a standard electrical outlet or surge protector. The power LED should illuminate. (Note: Refer to Section IV for more details. It recommended that you use the power adapter initially.
-
Page 15: Vii. Software Installation
VII. Software Installation Software installation is only required for Windows 98 and 98 SE users. Users of all other Operating Systems, including Windows 2000, XP and Mac , may skip this section. 1) When your hub is connected to your computer, Windows 98 SE will detect the hub and automatically run the “Add New Hardware Wizard”. -
Page 16: Troubleshooting
VIII. Troubleshooting Hub Not Seen Make sure you have installed all Windows updates and patches pertaining to USB. These are available on Microsoft’s website. Hub Not Seen on a laptop USB 2.0 Hubs may not work on all laptops. Try the hub on a desktop computer to confirm functionality of the hub. -
Page 17: Technical Specifications
IX. Technical Specifications USB Hub: Standards: Operating Systems: Data Speed: Upstream Ports: Downstream Ports: LEDs: Power: Storage Temperature: -10 C ~ 40 C Working Temperature: 0 C ~ 40 C Compliance: 7 Ports USB 1.1 and 2.0 Compatible Windows 98 SE, ME, 2000, XP or later Mac OS 9.X and above High: 480 Mbps Full: 12 Mbps Low: 1.5 Mbps Series A plug x 1... -
Page 18: Fcc Compliance Statement
FCC Compliance Statement This equipment has been tested and found to comply with the limits for a Class B digital device, pursuant to Part 15 of the FCC Rules. These limits are designed to provide reasonable protection against harmful interference in a residential installation. This equipment generates, uses and can radiate radio frequency energy and, if not installed or used in accordance with the instructions, may cause harmful interference to radio communications. -
Page 19: Warranty
XI. Warranty Jasco Products Company warrants this product to be free from manufacturing defects for a period of two years from the original date of consumer purchase. This warranty is limited to the repair or replacement of this product only and does not extend to consequential or incidental damage to other products that may be used with this unit.
Need help?
Do you have a question about the USB 2.0 7-Port Hub HO97916 and is the answer not in the manual?
Questions and answers