
Subscribe to Our Youtube Channel
Related Manuals for Metos M200


Summary of Contents for Metos M200
- Page 1 COFFEE MAKER M-Series TYPE: M200, M202, MT200, MT200V Installation and Operation Manual S/N: Rev.: 2.2...
- Page 3 Dear Customer, Congratulations on deciding to choose a Metos appliance for your kitchen activities. You made an excellent choice. We will do our best to make you a satisfied Metos customer like thousands of customers we have around the world.
- Page 4 8.5.2008 Rev. 2.2...
-
Page 5: Table Of Contents
8.5.2008 Rev. 1. General ......................1 1.1 Symbols used in the manual ..................1 1.2 Symbols used on the appliance ..................1 1.3 Checking the relation of the appliance and the manual ..........1 2. Safety instructions ..................2 2.1 General .......................... 2 2.1.1 Instructions for use .................... - Page 6 8.5.2008 Rev. 4.3.1 Removing coffee deposits from glass jug and filter ..........16 4.3.2 Removing coffee deposits from thermos jug ............16 4.3.3 Descaling ......................16 4.3.4 Switching-off the descale indicator light ............. 17 5. Installation ....................18 5.1 General ........................18 5.1.1 Unpacking ......................
-
Page 7: General
8.5.2008 Rev. 2.2 General 1. General Carefully read the instructions in this manual as they contain important information re- garding proper, efficient and safe installation, use and maintenance of the appliance. Keep this manual in a safe place for eventual use by other operators of the appliance. The installation of this appliance must be carried out in accordance with the manufactur- er’s instructions and following local regulations. -
Page 8: Safety Instructions
8.5.2008 Rev. 2.2 Safety instructions 2. Safety instructions 2.1 General This appliance meets the mandatory safety regulations. Inexpert use can result in personal injury and material damage. The following warnings and safety instructions must be ob- served before using the coffee maker. 2.1.1 Instructions for use Read these instructions for use carefully, before using this appliance. -
Page 9: Maintenance And Troubleshooting
8.5.2008 Rev. 2.2 Safety instructions 2.1.4 Maintenance and troubleshooting • Observe the descaling intervals indicated by the descaling indicator light. • Overdue maintenance to the heating system can result in high repair costs and an- nulment of the guarantee. • Always follow the manufacturer’s instructions when using the descaling agent. -
Page 10: Start/Stop Button (5.5)
8.5.2008 Rev. 2.2 Safety instructions 2.2.3 Start/stop button (5.5) The coffee making process can be interrupted at any point using the Start/stop button lo- cated on the control panel. 2.2.4 Jug detector (9) This appliance is fitted with a jug detector that operates the leak stop under the filter. This jug detector also ensures that the appliance only makes coffee if there is a jug under the filter. -
Page 11: Functional Description
8.5.2008 Rev. 2.2 Functional description 3. Functional description 3.1 Use of the appliance The sole use of this appliance is to make coffee and/or tea, and to warm water. 3.1.1 Other use The use of the appliance for other purposes is not permitted and may be hazardous. The manufacturer cannot be held liable for losses caused by using the appliance for purposes other than those indicated here or by incorrect use. -
Page 12: Construction
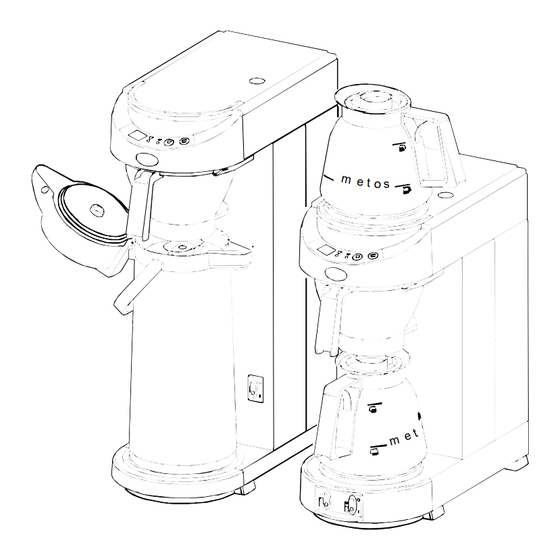
8.5.2008 Rev. 2.2 Functional description 3.2 Construction... -
Page 13: Control Panel
8.5.2008 Rev. 2.2 Functional description The most important parts (see pic.): Appliance on/off switch and bottom hot plate On/off switch for top hot plate Basket filter with leak stop device Basket filter paper Control panel (see below for details) Top hot plate Glass jug/thermos flask Descaling opening Jug detector... -
Page 14: Descale Indication Light
8.5.2008 Rev. 2.2 Functional description 3.3.2 Descale indication light The red indicator light will light up if the appliance needs to be descaled. The appliance will continue to work so that it can be descaled when it is not being used. 3.3.3 Brewing process indicator light The green indicator light lights up when the coffee passes through the system. -
Page 15: Selection Button
8.5.2008 Rev. 2.2 Functional description 3.3.5 Selection button The selection button is used to reduce the amount of coffee set in the display. When the lowest value is reached the display returns to the maximum amount. 3.3.6 Start/stop button The start/stop button is used to start and (emergency) stop the coffee making process. -
Page 16: Operation Instructions
8.5.2008 Rev. 2.2 Operation instructions 4. Operation instructions 4.1 First time use Ensure that the mains lead does not come into contact with the hot plates (if present). When used for the first time the appliance works according to the standard factory set- tings. -
Page 17: Daily Use
8.5.2008 Rev. 2.2 Operation instructions 4.1.1 Daily use Leak stop This appliance is fitted with a leak stop that ensures that no coffee drips out of the filter when you: • take away the jug after making coffee. • take the filter out of the appliance after making coffee to empty it. The leak stop can only work if the jug detector is pressed in sufficiently by the jug. -
Page 18: Operation Procedures
8.5.2008 Rev. 2.2 Operation instructions 4.2 Operation procedures 4.2.1 Making coffee • Place a sheet of basket filter paper containing the desired amount of coffee (fast filter type) in the basket filter. See the table above for the amount of coffee re- quired. -
Page 19: Settings
8.5.2008 Rev. 2.2 Operation instructions 4.2.3 Settings The jug will overflow if the set coffee quantity is too high. The manufacturer is unable to accept any liability for the consequences of altered settings. Setting of the amount of coffee Both the M and the MT models are supplied as standard set to make coffee using 1,8 litres of water (14 cups). - Page 20 8.5.2008 Rev. 2.2 Operation instructions...
-
Page 21: Cleaning Of The Appliance And Accessories
8.5.2008 Rev. 2.2 Operation instructions Setting of the display to show cups or litres The appliance is factory set to display the number of cups. If you want the display to show litres, you can adjust it as follows: • Press the selection button (5.4) and hold it in, the press the start/stop button (5.5) once. -
Page 22: Removing Coffee Deposits From Glass Jug And Filter
8.5.2008 Rev. 2.2 Operation instructions 4.3.1 Removing coffee deposits from glass jug and filter • Fill a tray with approx. 5 litres of warm water and dissolve a sachet (10 gr) of cof- fee fur remover in it. • Place the parts you want to clean in this solution and leave them to soak for 15 to 30 minutes. -
Page 23: Switching-Off The Descale Indicator Light
8.5.2008 Rev. 2.2 Operation instructions • Remove the funnel and replace the cap. • After descaling the appliance, flush the system by following the coffee brewing procedure twice but without using filter paper or coffee. Remember to empty the jug in the meantime. •... -
Page 24: Installation
8.5.2008 Rev. 2.2 Installation 5. Installation 5.1 General 5.1.1 Unpacking The machine has been carefully packed to prevent damage being caused to your new cof- fee maker. Remove the packing carefully without using sharp objects. Check if the appli- ance is complete. The appliance is delivered with the following accessories: M 200 M 202 MT 200... -
Page 25: Electrical Connections
8.5.2008 Rev. 2.2 Installation 5.2.2 Electrical connections Supply voltages and frequencies can differ between countries. Check if the appliance is suitable for connection to the local power mains. Check if the details on the type plate cor- respond. Connect the appliance to an earthed wall socket. 5.2.3 Connection to the water mains Connect the appliance using the water hose to an easily accessible cold water tap that can be quickly closed if problems arise. -
Page 26: Height Setting Model Mt200V
8.5.2008 Rev. 2.2 Installation 5.2.5 Height setting model MT200V The MT200V model is in height adjustable. Follow the steps below to optimally set the appliance to the height of the thermos flask being used. • Slide the basket filter (1) into the appliance. •... -
Page 27: Setting The Descale Indicator
8.5.2008 Rev. 2.2 Installation 5.2.6 Setting the descale indicator Scale deposits are left in the heating system when the appliance is used. The amount of scaling depends on the hardness of the water being used. The appliance is fitted with a descale light (5.2), which lights up when the heating system has processed a certain quan- tity of water and has to be descaled. -
Page 28: Troubleshooting
8.5.2008 Rev. 2.2 Troubleshooting 6. Troubleshooting Have all repairs to the electrical system performed by a qualified service technician. If your appliance is not functioning correctly, use the troubleshooting guide below to see whether you can resolve the problem yourself. If not, please contact your dealer. Symptom Possible cause Action... -
Page 29: Spare Parts
8.5.2008 Rev. 2.2 Spare parts 7. Spare parts General parts M200 ......27 General parts M202 ......29 General parts MT200......31 General parts MT200V ......33... - Page 30 8.5.2008 Rev. 2.2 Spare parts...
-
Page 31: Voltage Codes
3/PE∼380 50Hz 3/PE∼400V 50Hz 3/PE∼415V 50Hz 3/PE∼440V 60Hz 3/PE∼460V 60Hz 3/PE∼480V 60Hz 1/N/PE~220-240V 50Hz 2/PE~220-230V 60Hz 3/N/PE∼400/230V 50Hz 3/PE∼230V 60Hz 7.2 Product codes Product code Full name Model codes Type codes M200 M200 M202 M202 MT200 MT200 MT200V MT200V Accessory codes... - Page 32 8.5.2008 Rev. 2.2 Spare parts...
- Page 33 Switch 1P, orange 02267 M200 RC-network 02571 M200 Cable strain relief 02887 M200 Pc board M200 02889 M200 Pc board M200 keyboard 02929 M200 Dry-boil protection 02930 M200 Level sensor M 02938 M200 O-ring 92.75x2.62 EPDM 02947 M200 Solenoid M200 220-240V 50-60Hz...
- Page 34 8.5.2008 Rev. 2.2 Spare parts...
- Page 35 RC-network 02571 M202 Cable strain relief 02702 M202 Solenoid double 220-240V 50-60 02887 M202 Pc board M200 02889 M202 Pc board M200 keyboard 02929 M202 Dry-boil protection 02930 M202 Level sensor M 02938 M202 O-ring 92.75x2.62 EPDM 02949 M202 Flowmeter...
- Page 36 8.5.2008 Rev. 2.2 Spare parts...
- Page 37 Switch 1P, orange 02267 MT200 RC-network 02571 MT200 Cable strain relief 02887 MT200 Pc board M200 02889 MT200 Pc board M200 keyboard 02929 MT200 Dry-boil protection 02930 MT200 Level sensor M 02938 MT200 O-ring 92.75x2.62 EPDM 02947 MT200 Solenoid M200 220-240V 50-60Hz...
- Page 38 8.5.2008 Rev. 2.2 Spare parts...
- Page 39 02267 MT200V RC-network 1220 02571 MT200V Cable strain relief 1230 02887 MT200V Pc board M200 1240 02889 MT200V Pc board M200 keyboard 1250 02929 MT200V Dry-boil protection 1260 02930 MT200V Level sensor M 1270 02938 MT200V O-ring 92.75x2.62 EPDM 1280...
- Page 40 8.5.2008 Rev. 2.2 Spare parts...
-
Page 41: Technical Specifications
8.5.2008 Rev. 2.2 Technical specifications 8. Technical specifications Electrical diagram M200 Electrical diagram M202 Electrical diagram MT200 Electrical diagram MT200v Installation drawing M200, M202 Installation drawing MT200, MT200V... - Page 42 Electrical diagram M200...
- Page 43 Electrical diagram M202...
- Page 44 Electrical diagram MT200...
- Page 45 Electrical diagram MT200v...
- Page 46 E = Electric connection / Elanslutning / Sähköliitäntä W = Water connection / Vattenanslutning / Vesiliitäntä Installation drawing M200, M202...
- Page 47 E = Electric connection / Elanslutning / Sähköliitäntä W = Water connection / Vattenanslutning / Vesiliitäntä Installation drawing MT200, MT200V...
- Page 48 8.5.2008 Rev. 2.2 Technical specifications Item Type Specification Buffer stock coffee M200 3.6 l. / 28 cups Buffer stock coffee M202 7.2 l. / 56 cups Hourly coffee capacity M200,MT200,MT200V 18 l. / 144 cups Hourly coffee capacity M202 28 l. / 224 cups...
Need help?
Do you have a question about the M200 and is the answer not in the manual?
Questions and answers