Table of Contents
Advertisement
Quick Links
Advertisement
Table of Contents

Related Manuals for Beko CCB 5140 XA


Summary of Contents for Beko CCB 5140 XA
- Page 1 CCB 5140 XA Hood User Manual...
- Page 2 Please read this user manual first! Dear Customer, Thank you for prefering a Beko product. We hope that you get the best results from your product which has been manufactured with high quality and state-of-the-art technology. Therefore, please read this entire user manual and all other accompanying documents carefully before using the product and keep it as a reference for future use.
-
Page 3: Table Of Contents
TABLE OF CONTENTS 1 Recommendations and Suggestions 4 1 Recommendations and Suggestions 5 2 Characteristics 2.1 Components......6 2.2 Technical Specifications . -
Page 4: Recommendations And Suggestions
Recommendations and Suggestions • Do not route power cord close to hobs. Cord may Please review the following information. Failure to comply with these instructions may cause risk of melt and cause a fire. personal injury or material damage. Any warranty •... -
Page 5: Recommendations And Suggestions
Recommendations and Suggestions • Do not make connections to the flues connected • The exhaust air must not be discharged into a flue which is used for exhausting fumes from with stoves, exhaust shafts or flues with rising other appliances burning gas or other fuels. (Not flames. -
Page 6: Characteristics
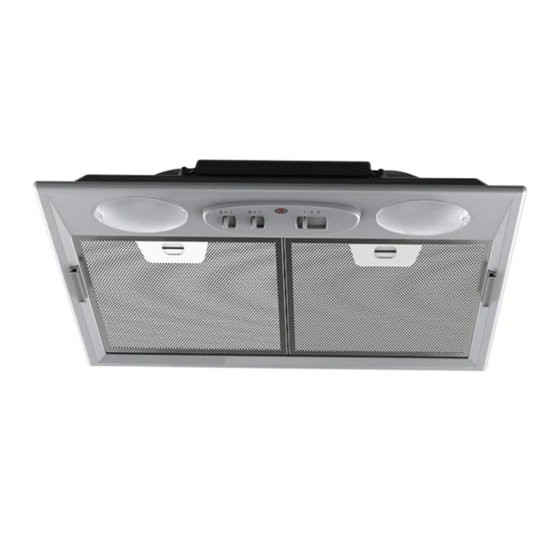
Characteristics 2.1 Components 1 Hood body 2 Aluminum filter 3 Aluminum filter lock 4 Light 5 Control panel 2.2 Technical Specifications Width (mm) Depth (mm) Height (mm) 220-240 V ~ 50 Hz Supply voltage Control 3 positions 420 m 3 /h Suction power Motor power 140 W... -
Page 7: Installation
Installation Caution: Note: Preparation of the installation place An omnipolar switch with a minimum and electric wiring is the responsibi- opening of 3mm between contacts, lity of the customer. in line with the electrical load and Note: local standards, must be placed The height between the lower surfa- between the appliance and the mains ce of the hood and upper surface of... -
Page 8: Installation
Installation 3.3 Connection with flue and carbon Fixing the frame with screws: Fix the hood to the cupboard, using the self- filter threading screws (No. 8) provided with the acces- Connection with flue: sories (fig. 2). The hood can be ducted to outdoor using either a rigid or a flexible 100 or 120 mm duct to be fixed with suitable clamps which are not not provided with the product (fig. -
Page 9: Use
Figure 4 4.1 Control panel Light button ( ) : Controls the top illumination. Motor button ( ) : Controls the motor power and the fan speed. Speed 1: Low speed. This should be selected when simmering or using only one pan; provides minimum noise level. -
Page 10: Maintenance
Maintenance 5.3 Cleaning the hood Note: • Hood must only be cleaned when it is Service your hood periodically! unplugged from mains outlet or when the fuse Service is also required to prevent is switched off! burning of oil filter besides obtaining better performance and better effi- •... -
Page 11: Troubleshooting Suggestions
Troubleshooting Suggestions Problem Explanation / Suggestion Turn off the hood with sliding switches and cut off electricity supply Hood operates incorrectly for a few seconds by removing the plug or closing the fuse. - Is the plug connected to mains outlet? Hood does not operate - Is the fuse in the household installation burnt off? - Did you press the fan buttons? - Page 12 “Recommended Solutions for the problems” The commencement date of this guarantee starts on the day of purchase and proof of purchase must be supplied to the Beko Service Centre prior to commencement of any guarantee work.
- Page 13 Terms and Conditions Beko Australia and New Zealand Pty Ltd guarantees to the original purchaser , r i which is not of ‘acceptable quality’ within two years of date of purchase. if the product fails more than 2 times during “No Lemon Guarantee”...
- Page 14 Any loss caused from extreme events of nature including but Use of non genuine/authorised parts m. Any repair or other work carried out on the Beko product other than by an Authorised Beko Service Personnel. 3. This Guarantee does not cover costs associated with replacing and...
- Page 15 Service under this Manufacturer’s Guarantee is provided by the Beko Aus- tralia and New Zealand Authorised Repairer. The Guarantee is provided by Beko Australia and New Zealand Pty Ltd (ABN: 49 152 055 162) of 55 Blanck Street, Ormeau, QLD Australia 4208, P O Box 354 Ormeau QLD Australia 4208.
Need help?
Do you have a question about the CCB 5140 XA and is the answer not in the manual?
Questions and answers