
Related Manuals for Digi-Sense 20250-01


Summary of Contents for Digi-Sense 20250-01
- Page 1 User Manual Thermocouple Thermometer with Single Type K/J Input with NIST-Traceable Calibration Model 20250-01 THE STANDARD IN PRECISION MEASUREMENT...
- Page 2 Introduction The Digi-Sense Thermocouple Thermometer with Single Type K/J Input (Model 20250-01) offers fast response and high accuracy. This thermometer works with one type K or J thermocouple sensor. Advanced features include relative time clock, offset compensation, data Hold, Max/Min/Avg readings, and automatic power-off.
-
Page 3: Key Features
Key Features • Large backlit display • Max, Min, and Avg readings • Relative time clock on Max/Min/Avg provides a time reference for major events • Electronic Offset function allows compensation of thermocouple errors to maximize overall accuracy • User-selectable readout in °C, °F, or Kelvin (K) •... -
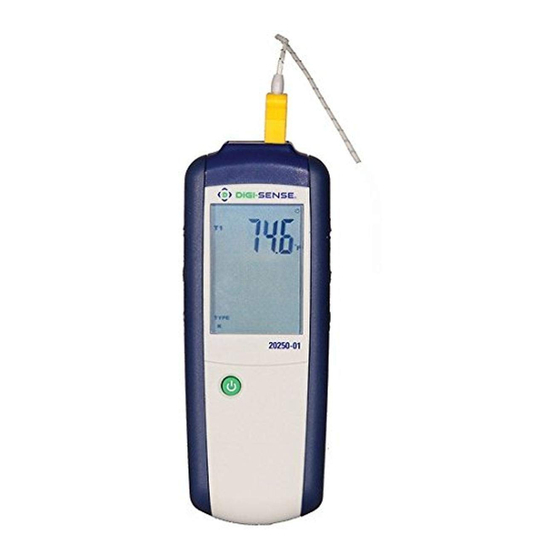
Page 4: Meter Description
Meter Description 1. Temperature sensor input 2. LCD 3. Power on/off button 4. Enter button 5. Set button 6. °C/°F/K button 7. (Up)/Hold button 8. Max/Min/(Down) button Backlight button... -
Page 5: Display Layout
Display Layout 1. Setup mode icon 7. Secondary display (Max, Min, Avg, or 2. Offset option offset) 3. Hold icon 8. MAX, MIN, AVG icons 4. Auto power-off icon 9. Time display 5. Primary temperature 10. Time icon (hour:min display or min:sec) 6. -
Page 6: Setup And Operation
Setup and Operation 1. Press Power on/off button to turn the unit on. 2. When thermometer is in Setup mode, press Enter button to enter a setup option and press Enter button again to store the displayed setting in memory. 3. -
Page 7: Setup Mode
Setup Mode Use Setup mode to change offset and sleep mode settings. The thermometer stores the settings in its memory. Option Menu item Settings Type TYPE K or J Offset OFFSET Offset range –9 to 9°F (–5 to 5°C) On (sleep mode on) Sleep mode Off (sleep mode off) Entering or Exiting Setup Mode... - Page 8 Setup Mode (continued) Offset Function The primary display shows the temperature plus the offset and the secondary display shows the offset. 1. When the thermometer is in Setup mode, the display shows the SETUP icon. 2. Press /Hold button or Max/Min/...
- Page 9 3. Allow the readings to stabilize. 4. In the Setup mode change the offset until the primary reading matches the calibration temperature. (See “Changing Setup Options" on page 7.) Auto Power-Off (APO) Mode The meter’s default mode is to automatically shut off after 20 minutes of non-use.
- Page 10 Measuring Temperatures 1. Plug the thermocouple into the T1 input connector. Make sure that the polarity is correct. 2. Press power on/off button to turn on the thermometer. After one second the thermometer displays the first reading. If no thermocouple is plugged into the selected input or the thermocouple is not connected properly, the display shows "- - - -".
-
Page 11: Specifications
Specifications Range Type K thermocouple –328 to 2501°F (–200 to 1372°C) Type J thermocouple –346 to 2012°F (–210 to 1100°C) Resolution Temperature display 0.1 below 1000 or 1 above 1000 Accuracy Temperature above –148°F (–100°C) ±[0.5% rdg + 1.8°F (1°C)] Temperature below –148°F (–100°C) ±[0.5% rdg + 3.6°F (2°C)] Auto power-off... - Page 12 Note: If you do not intend to use the meter for a long time, remove the batteries. It is recommended that Digi-Sense products are cali- brated annually to ensure proper function and accurate measurements; however, your quality system or regula- tory body may require more frequent calibrations.
Need help?
Do you have a question about the 20250-01 and is the answer not in the manual?
Questions and answers