Table of Contents
Advertisement
Quick Links
Advertisement
Table of Contents

Related Manuals for Digi-Sense 20250-25


Summary of Contents for Digi-Sense 20250-25
- Page 1 User Manual Professional Dual-Laser Infrared Thermometer with 50:1 Distance-to-Sight Ratio, Data Logging with Bluetooth Smart App, Single Type K Input, ® and Temperature Alarm with NIST-Traceable Calibration Model 20250-25 THE STANDARD IN PRECISION MEASUREMENT...
- Page 2 Introduction The Digi-Sense Professional Dual-Laser Infrared Thermometer with Bluetooth (Model 20250-25) with 50 to 1 distance-to-sight ratio offers fast ® response and high accuracy. This heavy-duty meter is ideal for a wide range of applications including food preparation, safety and fire inspection, plastic molding, marine, HVAC, and fleet maintenance.
-
Page 3: Key Features
Key Features • 50:1 Distance-to-sight ratio • 1% basic accuracy • Dual laser sighting • Bluetooth interface for transition to a smart device • Internal data logging up to 32K IR readings • Contact measurements via type K thermocouple input •... -
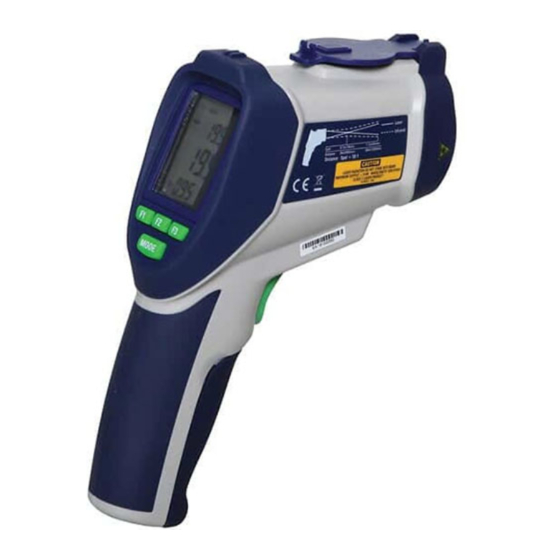
Page 4: Meter Description
Meter Description 1. IR sensor 2. Laser pointer beam 3. Type K thermocouple input 4. USB power port 5. Dot-matrix display 6. F1 / Down button 7. F2 button 8. F3 / Up button 9. MODE button 10. Lens cover with magnetic lock 11. -
Page 5: Display Layout
Display Layout 1. SCAN/HOLD measuring indicator 2. Laser pointer indicator 3. Bluetooth icon (transmit data) 4. Current time 5. Low-battery indicator 0.00 6. Emissivity or type K temperature readout 7. MAX or AVG icons 8. Current temperature readout 9. MIN or DIF icons 10. -
Page 6: How It Works
How it Works Infrared thermometers measure the surface temperature of an object. The unit’s optics sense emitted, reflected, and transmitted energy, which is collected and focused onto a detector. The unit’s electronics translate the information into a temperature reading which is displayed on the unit. The laser is used for aiming purposes only. -
Page 7: Emissivity Values
Emissivity Values Substance Thermal emissivity Substance Thermal emissivity Asphalt 0.90 to 0.98 Cloth (black) 0.98 Concrete 0.94 Human skin 0.98 Cement 0.96 Lather 0.75 to 0.80 Sand 0.90 Charcoal (powder) 0.96 Earth 0.92 to 0.96 Lacquer 0.80 to 0.95 Water 0.92 to 0.96 Lacquer (matte) 0.97... - Page 8 Mode / Menu Overview By pressing the MODE button, the user can access the devices setting. Each time the MODE button is pressed the setup menu advances to the next group- ing of features. The table below outlines the different Menu levels and the func- tions available via the corresponding F keys.
- Page 9 4. Press the F2 (Save) softkey to enter the Save menu. 5. Press the F1 (Yes) softkey to save the reading, or F3 (Esc) softkey to escape. The saved reading includes: Assigned record number IR temperature Emissivity Date/Time Avg (Average or Differential) This function allows the user to view the average (AVG) or differential (Dif) temperature each time a reading is taken.
- Page 10 Mem (Memory) This function allows the user to review or delete saved measurements. Saved data includes temperature, date/time, emissivity, and record numbers. 1. Pull the trigger to take a measurement. 2. Release the trigger to stop taking the measurement. 3. Press the MODE button until Mem appears. 4.
- Page 11 Mode / Menu Level 3 Trigger Lock This function allows the thermometer to be locked into continuous measurement mode. 1. Pull the trigger to take a measurement. 2. Release the trigger to stop taking the measurement. 3. Press the MODE button until appears.
- Page 12 Mode / Menu Level 4 Hi (alarm) This function allows the user to program the set point of when the out-of-range high temperature alarm will trigger. An alarm will sound, and the display will flash when the set point is reached. 1.
- Page 13 Time Function allows user to set and change the time on the thermometer. 1. Pull the trigger to take a measurement. 2. Release the trigger to stop taking the measurement. 3. Press the MODE button until Set appears. 4. Press the F3 (Set) softkey to enter the Set menu. 5.
- Page 14 Backlight In normal use, the backlight is on. This function will allow the user to turn the backlight on or off by adjusting the brightness level. Turning the backlight off conserves battery power. 1. Pull the trigger to take a measurement. 2.
- Page 15 5. Press the F1 () softkey to toggle down and F3 () softkey to toggle up to select Contrast. 6. Press the F2 (Set) softkey to enter contrast setting. 6.1. Press the F1 () softkey to toggle down and F3 () softkey to toggle up to adjust the contrast value from 30 to 99.
- Page 16 Enable - By selecting the Enable function to the ON position, the data logging function will be activated. The “D” symbol will display on the main screen to indicate when the data logging function is active. 6.2. Press the F2 (On/Off) softkey and select ON; the data log function will be turned on.
-
Page 17: Specifications
Thermocouple Probe Operation 1. Insert the thermocouple probe with mini connector into the thermocouple slot located under the front housing beneath the dust cover. 2. Once the thermocouple probe is plugged into the thermometer, the lower display which normally shows the minimum or differential IR temperature will now display “TK”... -
Page 18: Field Of View
Field of View The meter’s field of view is 50:1, meaning that if the unit is 50 inches from the target, the diameter of object under test must be at least 1 inch. Other distances are shown in the diagram at right. Make sure that the target is larger than the meter’s spot size. - Page 19 9V battery Open the battery cover It is recommended that Digi-Sense products are calibrated annually to ensure proper function and accurate measurements; however, your quality system or regulatory body may require more frequent calibrations. To schedule your recalibration, please contact InnoCal, an ISO 17025 calibration laboratory accredited by A2LA.
- Page 20 It is recommended that Digi-Sense products are calibrated annually to ensure proper function and accurate measurements; however, your quality system or regulatory body may require more frequent calibrations. To schedule your recalibration, please contact InnoCal, an ISO 17025 calibration laboratory accredited by A2LA.
Need help?
Do you have a question about the 20250-25 and is the answer not in the manual?
Questions and answers