Advertisement
Quick Links
Advertisement

Related Manuals for Drive Medical Ason Shower Commode


Summary of Contents for Drive Medical Ason Shower Commode
- Page 1 Aston Shower Commode Chair Owner’s Handbook...
- Page 2 Introduction – Aston Shower Commode Chair These instructions aid the user and/or carer about the safe and efficient use of this product, including assembly, cleaning and maintenance, and operation of the product. Ensure that you fully read these instructions before using this product. The product is a CE marked class 1 medical device.
-
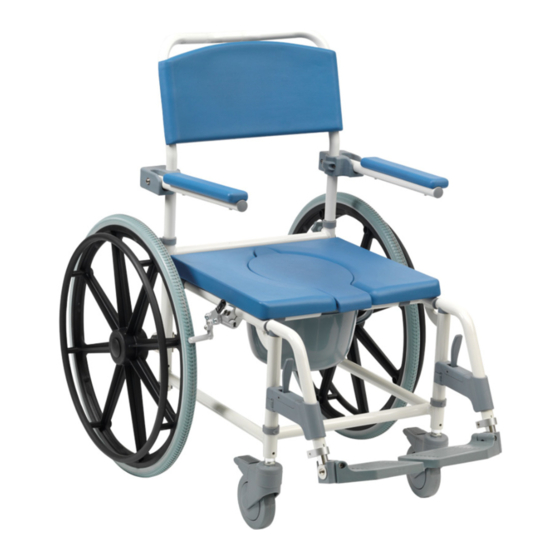
Page 3: Parts Description
Parts Description The model shown above is the standard Aston commode (without 24” wheels fitted). The following spare parts are available for the Aston: In addition, the following parts Z33301-16 Backrest knob are available for the 24” self- Z33302-16BL Armpad propel version: Z33303-16 Potty with Lid... - Page 4 Assembly Insert the backrest in to the receivers on the chair base (see photo) Secure by installing the backrest knobs (arrowed). Install by screwing the knobs in clockwise. Attach the footrest by placing the top bracket in to the receiver tube at the top of the frame, ensuring the footrest is swung back.
- Page 5 Footrest Operation and Adjustment Swinging Footrests In and Out The footrests can swing in and out if the user requires this. If required, first flip up the footplates. Then, press the lever to unlock the footrest whilst rotating the footrest in the required direction.
- Page 6 Castor Operation The castors can be locked so that the wheel cannot move forwards or reverse nor will the castor fork swivel. To lock the castor press down on the locking tab with a foot LOCK (as shown). To release press the other side of the locking tab with a foot.
- Page 7 Potty Installation and Removal The potty is installed and removed by sliding the potty in to the two rails mounted to the underneath of the seat. To install, slide the potty underneath the seat from the rear of the chair, ensuring the potty sits on both rails of the seat.
- Page 8 Arm Operation The arms can flip up to aid side transfer. Simply lift the front of the arms to flip up, and then push down to lower. The brakes should always be applied before transferring. 24” Rear Wheel Kit - Installation There is an optional kit available for the Aston commode which adds two 24”...
-
Page 9: Brake Operation
Brake Operation Push the brakes forward to lock LOCK LOCK the wheel. Pull the brakes back to release the brake. Ensure both brakes are applied when the chair is stationary and when the user is side transferring. Operation – 24” rear wheels When the 24”... - Page 10 Shower Commode Specification Commode Seat Length 87cm (34”) Depth 43cm (17”) Width 56cm (22”) Width 46cm (18”) Height 97 – 102cm (38-40”) Height 48 – 53cm (19-21”) Backrest 47cm (18.5”) Aperture 17 (W) x 27cm (D) Height from seat 7” (W) x 11” (D) Armrest 70 –...
- Page 11 Care and Maintenance Before each use of the chair, the brakes and tyres should be checked. The chair should be stored in a dry environment, away from direct sunlight. When in storage the chair should be kept clean and dust free.
- Page 12 Warranty Your Drive branded product is warranted to be free of defects in materials and workmanship for one year from date of purchase. This device was built to exacting standards and carefully inspected prior to shipment. This warranty is an expression of our confidence in the materials and workmanship of our products and our assurance to the customer.
Need help?
Do you have a question about the Ason Shower Commode and is the answer not in the manual?
Questions and answers