Table of Contents
Advertisement
MITSUBISHI DEHUMIDIFIER
MODEL
MJ-E22VX-A1
INSTRUCTION MANUAL
Features
●Drying inside
●Air Filter and Washable Photocatalytic
Filter
Protect our environment and enrich our lives by
saving energy
Table of Contents
depending on purpose .........................2
¡Frequently Asked Questions ...............3
¡Precautions............................................4
¡Warning ..................................................6
¡Tips on dehumidifying..........................6
¡Names and Functions of Parts ............7
Unit-Control Panel-LCD Panel
(Low Temperature/Defrost/High humidity)
¡Things to be aware of.........................10
¡Before using your dehumidifier.........10
¡Turning the Unit ON and OFF ............12
To turn ON/To turn OFF
Reading the humidity display/Tank full lamp
¡Easy Operation....................................13
¡Setting modes .....................................14
TEMP/AUTO/AIR PURIFIER
¡Swing louvre function ........................16
¡Drying inside .......................................17
¡Using the Timer ...................................18
OFF timer operation/ON timer operation
¡Using the Child Lock ..........................20
¡Carrying the Unit.................................20
¡Removing Water from the Tank..........21
¡Continuous Drainage..........................22
¡Maintenance ........................................23
¡Replacing the Filter and Cartridge..........25
¡Storage and Disposal .........................25
¡Troubleshooting ..................................26
¡Specifications .......................back cover
¡In order to ensure correct usage, please read
this instruction manual carefully and retain it for
future reference.
¡Before accepting the Warranty at the time of
purchase, please make sure that the date of
purchase, place of purchase and other items
are correctly filled in the form.
Printed on recycled paper.
page
Advertisement
Table of Contents

Related Manuals for Mitsubishi Electric MJ-E22VX-A1


Summary of Contents for Mitsubishi Electric MJ-E22VX-A1
-
Page 1: Table Of Contents
MITSUBISHI DEHUMIDIFIER MODEL MJ-E22VX-A1 INSTRUCTION MANUAL Table of Contents Features page ●Drying inside ¡Recommended ways of using the unit ●Air Filter and Washable Photocatalytic depending on purpose ......2 ¡Frequently Asked Questions ....3 Filter ¡Precautions..........4 ●Easy Dehumidifying · Laundry ¡Warning ..........6 ¡Tips on dehumidifying......6... -
Page 2: Recommended Ways Of Using The Unit Depending On Purpose
Recommended ways of using the unit depending Combine operating mode and swing louvre function to get optimum results. Drying Lowering room humidity Preventing mold/ laundry When you don’t When you don’t When you want to When To prevent want to hang the know what set the humidity condensation... -
Page 3: Frequently Asked Questions
on purpose Frequently Asked Questions Why does the dehumidifier seem to collect less water in winter? To clean condensation the air A.Are the temperature and humidity low? When the temperature and humidity are To keep the inside There is no need for low, the amount of water collected is of closets and dehumidification, but you... -
Page 4: Precautions
Precautions The following diagrams indicate circumstances where danger can result from Meanings of the graphic symbols used in this manual and mishandling the unit. on the unit are explained below. Always Do not WARNING CAUTION follow the Forbidden disassemble instructions Mishandling may Mishandling may result in Keep... - Page 5 CAUTION Do not cover the front or side air Do not drain water continuously if there intakes or the air outlet is a possibility that temperature around with cloth, curtain, etc. the hose could drop to freezing point. This results in poor ventilation and Water inside the hose may freeze and prevent may cause heat generation/fire.
-
Page 6: Warning
Precautions (cont.) Tips on dehumidifying CAUTION Drain the water tank before use After emptying the tank, Refrain from opening transport the unit by grasping the handle firmly. doors/windows during operation Losing your footing while carrying the unit may cause personal injury or Drying laundry indoors damage to the floor. -
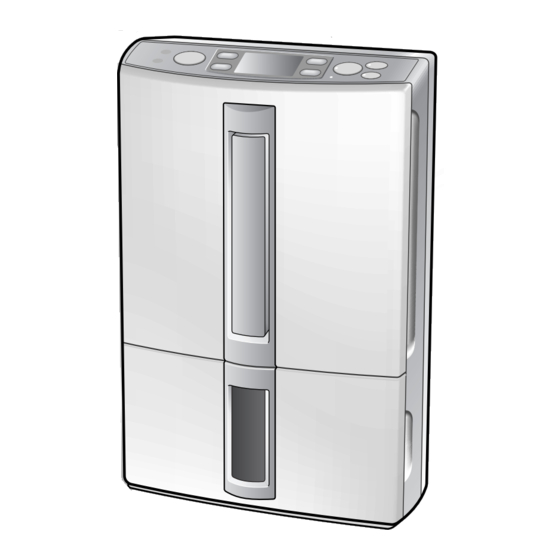
Page 7: Names And Functions Of Parts
Names and Functions of Parts Front Washable photocatalytic filter Control panel 24~25 (hereafter: photocatalytic filter) (see box below for discussion) Supplied with unit. Fit before use. Pre-filter Air filter performance testing facility Japan Spinners Inspecting Foundation (tested under JIS L 1902 standards). Front panel Front Air Intake Do not block. -
Page 8: Control Panel
Names and Functions of Parts (cont.) Control Panel ¡Mode button ¡Lamps ¡Swing louvre button For switching from one Current mode lights. Sets swing louvre direction or operating mode to ¡Selection button locks it into position. another Switches modes. ¡Humidity Selection This is used to set the target humidity 14~15... -
Page 9: Power Button
¡ Mildew guard elite lamp Flashes during drying inside operation. ¡ Mildew guard elite switch Activate/deactivates drying inside. ¡Air purifier lamp Lights during air purifier only operation. ¡Air purifier button Switches to air purifier only operation. ¡Power lamp Lights when unit is ON. ¡Power button Use this to switch the You can select from 8 operating modes... -
Page 10: Things To Be Aware Of
Things to be aware of Before using your Fitting the Room temperature may rise photocatalytic filter 2-4°C during operation The dehumidifier does not have a cooler function. Due to heat produced during operation, the room The photocatalytic filter is supplied with temperature may rise 2-4°C. -
Page 11: Tank Lid
dehumidifier Plug the power cord Inserting the water into the power socket tank correctly Tank lid Open the front door. Confirm that the lid Use a 230-240V AC is securely attached power socket only. to the water tank. Push the tank in. ¡The current humidity level is indicated. -
Page 12: Turning The Unit On And Off
Turning the Unit ON and OFF To turn ON Press ¡Power lamp lights. ¡The mode is displayed. ¡The louvre opens automatically. Reading the humidity display To start dehumidifying, select the desired mode. 13~15 CURRENT indicates the Example current humidity. The compressor does not activate for 3 minutes Current humidity range is when the unit is turned ON immediately after between 30-80%. -
Page 13: Easy Operation
Easy Operation The unit automatically monitors room temperature/humidity alleviating the necessity to make minor adjustments. Use EASY DEHUMIDIFYING for dehumidifying a room and LAUNDRY for drying clothes. Changes with every press Press ¡Selected mode lamp lights ¡ EASY DEHUMIDIFYING ¡ LAUNDRY The unit operates intermittently The unit operates for 12 hours and controlling the airflow to remove the... -
Page 14: Setting Modes
Setting modes HIGH, LOW, MILDEW GUARD and LOW TEMP To leave the unit operating continuously, use HIGH and LOW modes. To suppress mildew, use MILDEW GUARD mode. For preventing condensation or when the room temperature is low, use LOW TEMP mode. Changes with every press Press ¡Frame appears around selected mode. -
Page 15: Air Purifier
AUTO AIR PURIFIER When you want to set the humidity level. To operate only the air purifier. Press Press ¡Air purifier lamp lights ¡Frame appears around AUTO The MODE button can also be used to select To return to the previous mode, press the air AUTO. -
Page 16: Swing Louvre Function
Swing louvre function (how to read the swing monitor) The louvre can be made to swing. Select from the 4 possible settings to suit the purpose. Stop swing operation WIDE With each press of the button Press ¡ Starts swing operation. UPWARD ¡... -
Page 17: Drying Inside
Drying inside The inside of the unit can be dried to suppress mildew growth on the cooler. On days the dehumidifier is used, internal cleaning (drying the inside) is recommended. Automatic operation Manual operation To activate drying inside after every use. To activate drying inside by pressing a button. -
Page 18: Using The Timer
Using the Timer OFF timer operation The OFF timer can be set for 1 to 9 hours. Set the timer when the power is switched on. To set To cancel Switch the power on. <When you want to turn the unit off>... - Page 19 ON timer operation The ON timer can be set for 1 to 9 hours. Set the timer when the power is switched off. To set The following is an example of a display indicating AUTO dehumidifying (set to 60%), Switch the power off. swing set to WIDE and the ON timer set for 5 hours.
-
Page 20: Using The Child Lock
Using the Carrying the Child Lock Unit To Lock Pull the handle out, and grasp with a firm grip Press for 3 or more seconds. ¡ The child lock indicator The child lock is switched off when the power cord is unplugged. When the child lock is activated, the other switches are inoperable. -
Page 21: Removing Water From The Tank
Removing Water from the Tank The unit automatically shuts down and lights the Tank full lamp when the tank (approximately 4L) is full. Empty the tank. Remove the water tank. Remove the tank lid, and empty. Tank lid Open the front door. -
Page 22: Continuous Drainage
Continuous Drainage If a drain is available, the unit can continuously drain excess water by attaching a commercially available hose (internal diameter 15mm). The unit can be operated for extensive periods without the need to empty the water tank. ¡Commercially available hose (ID 15mm) CAUTION Long enough to reach the drain. -
Page 23: Maintenance
Maintenance Do not use detergents, cleaning agents for heat exchange equipment, abrasive powders, chemically treated dusters, gasoline, benzene, thinners or other solvents, as they can damage the unit or the water tank, which may result in leakage. Cleaning Once every two weeks Water tank ·... -
Page 24: Front Panel
Maintenance (Continued) Once every three months Photocatalytic filter Soaking the filter in water, and leaving it to dry in the sun renews the performance and prolongs service life. Perform this every three months. Remove the front panel and pre- Dry the photocatalytic filter. filter. -
Page 25: Replacing The Filter And Cartridge
Replacing the Air Storage and Purifying Filter Disposal Storage The photocatalytic filter becomes depleted over time. After switching the unit off, leave for one day until Replace them when necessary. any water inside has had time to run off, then carry out the following steps. -
Page 26: Troubleshooting
Troubleshooting ¡ For the symptoms listed below, refer to the remedies listed right. Symptom Cause/Remedy ¡ Dehumidified air passes through heating coils causing it to The unit blows warm air warm (this unit is not a cooler). This is not a malfunction. ¡... - Page 27 Symptom Cause/Remedy ¡ Check to see if the unit is on a slope or uneven surface. ➝ Move to a sturdy even surface. The operating ¡ Check to see if the pre-filter is clogged. → Clean according to the maintenance procedures. noise is loud/reverberates ¡...
-
Page 28: Specifications
Specifications Model MJ-E22VX-A1 Power supply Single phase 230-240V 50Hz Dehumidifying capacity 22 L/day Power consumption 365W Water tank capacity stops automatically at approx. 4.5L Weight 13.7kg Dimensions (h × w × d) 589mm × 384mm × 217mm ∞ The dehumidifying capacity is a value obtained when the dehumidifier is continuously run at a room temperature of 30°C and relative humidity of 80%.
Need help?
Do you have a question about the MJ-E22VX-A1 and is the answer not in the manual?
Questions and answers