
Related Manuals for Miele G 605


Summary of Contents for Miele G 605
-
Page 1: Operating Instructions
Operating instructions for the G 605 / G805 dishwasher ö To prevent accidents and reduce the risk of damaging the machine, read the Operating Manual before installing or using the machine. M.-Nr. 04 988 131... -
Page 3: Table Of Contents
Contents Contents Guide to the appliance..........5 View of the machine . - Page 4 Contents Cleaning and care ..........33 Cleaning the filters in the wash cabinet.
-
Page 5: Guide To The Appliance
Guide to the appliance Guide to the appliance Miele dishwashers are available in two versions: 1. Integrated (“i”) dishwashers “i”- dishwashers are designed for instal- lation under a continuous countertop. The control panel with its accessories is included with the “i”- dishwasher in a separate package for on-site installa- tion. -
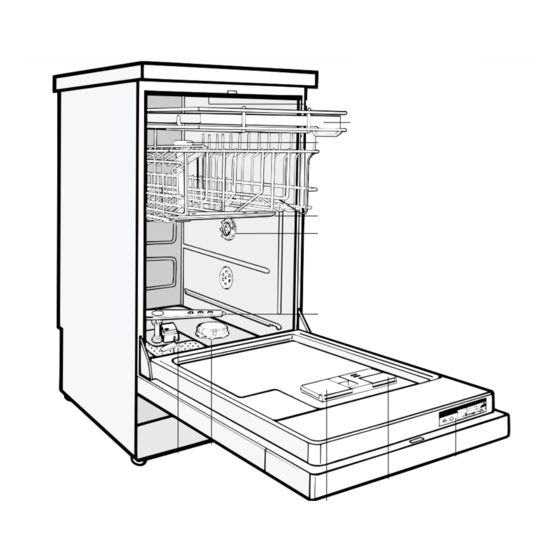
Page 6: View Of The Machine
Guide to the appliance View of the machine Control panel... - Page 7 Guide to the appliance 1. Upper spray arm (not visible) The models G 605 SC (i) and 2. Cutlery tray G 805 SC (i) are both described in these operating instructions. 3. Inlet funnel for middle spray arm 4. Upper basket You can find the model of your dish- washer on the data plate (13).
-
Page 8: Important Safety Instructions
IMPORTANT SAFETY INSTRUCTIONS WARNING Repairs should only be performed by qualified personnel. Disconnect the appliance from the power supply When using your dish- before servicing (pull out the plug or washer, follow all basic turn off the circuit breaker). safety precautions. If not purchased specifically as a This appliance conforms to “Freestanding”... -
Page 9: Save These Instructions
IMPORTANT SAFETY INSTRUCTIONS When loading items to be For dishwashers with visible heating washed: element – Load pointed items so that they are Do not touch the heating element not likely to damage the door seal. during or immediately after use. –... - Page 10 INSTRUCTIONS IMPORTANTES SUR LA SÉCURITÉ Les réparations doivent être effec- AVERTISSEMENT tuées uniquement par une per- sonne compétente. Débrancher l’ap- Au moment d’utiliser votre lave-vais- pareil de la prise de courant avant d’en selle, veuillez observer toutes les me- faire l’entretien (enlever la fiche de la sures de sécurité...
- Page 11 INSTRUCTIONS IMPORTANTES SUR LA SÉCURITÉ Ne pas modifier les Dans certaines conditions, un sys- commandes. tème d’eau chaude qui n’a pas été utilisé pendant plus de 2 semaines Ne pas boire l’eau du meuble de peut dégager de l’azote. lavage. L’AZOTE EST EXPLOSIF.
-
Page 12: Caring For The Environment
Caring for the environment Caring for the environment Disposal of the packing material. Energy saving washing. The cardboard box and packing ma- These dishwashers are exceptionally ef- terial protects the appliance during ficient in their use of water and elec- shipping. -
Page 13: Before Using For The First Time
Miele Service Department for advice. Miele Parts Department. The salt reservoir must only be filled Load the dishes correctly. -
Page 14: Opening And Closing The Door
Opening and closing the door Opening and closing the door To open the door. Child safety lock. Press the release catch inside the The child safety lock is designed to door grip. deter children from opening the dish- washer door. If the door is opened during operation, all functions will automatically be inter- Use the provided key to turn the... -
Page 15: Water Softener (Not Available In Us Models.)
Miele Parts Department. Note: If the water hardness in your area is under 7 gr/gal, it is not necessary to re- activate the softener with salt. -
Page 16: Filling The Salt Reservoir
Water softener (Not available in US models.) Filling the salt reservoir. The salt reservoir should be filled be- fore the first use and when the “Salt” in- dicator lamp is lit. Use water softener reactivation salt (1 - 4 mm grain size), as other salts may contain insol-uble additives which can impair the function- ing of the softener. -
Page 17: Salt Indicator
Water softener (Not available in US models.) Salt indicator. Bypassing the Salt indicator lamp. In order to bypass the salt indicator lamp, you will need a screwdriver and needle nose pliers. When the salt reservoir is empty, the “Salt” indicator lamp will light, notifying you that the reservoir should be refilled with reactivation salt. -
Page 18: Adding Rinse Aid
Adding rinse aid Adding rinse aid The use of Rinse Aid is recommended Adding rinse aid. to prevent spotting on dishes and glass- ware that normally occurs during the drying phase of automatic dishwashing. Inadvertently filling the rinse aid reservoir with detergent will always damage the reservoir. -
Page 19: Setting The Dosage
Adding rinse aid Setting the dosage. Pour liquid rinse aid into the storage The dosage selector comes factory set container until it is visible on the sur- to 3. It can be adjusted from 1 to 6, de- face of the screen. Do not refill until pending on your requirements. -
Page 20: Loading The Dishwasher
Loading the dishwasher Loading the dishwasher Load the dishes so that water can Some loading examples are shown on reach all surfaces. the following pages. Do not place dishes and cutlery in- side other pieces where they may be concealed. Hollow items such as cups and glasses should be inverted and placed in the upper basket. -
Page 21: Loading Examples
Loading the dishwasher Bottom basket. Loading examples. Upper basket. For larger and heavier items such as plates, serving platters and saucepans. Glasses should only be placed in the For small, lightweight, or delicate items bottom basket if the special glassware such as cups, saucers, glasses, des- insert is used. -
Page 22: Cutlery Tray
Loading the dishwasher Cutlery tray. The cutlery tray is removable (depend- ing on model). Dishwasher model G 605 SC (i) (see data plate for model number) The deeper part of the cutlery tray must be on the opposite side of the adjustable cup rack. -
Page 23: Adjustable Cup Racks
Loading the dishwasher Adjustable cup racks. Place the heads of cutlery with round or oval handles in the holders. This will To make room for tall glasses, raise the secure them during the wash cycle. rack upwards. Lower it to double stack Ensure that spoon heads are in contact smaller items. -
Page 24: Adjusting The Upper Basket
(depending on model) sions can be accommodated: The upper basket height is adjustable. Dishwasher model G 605 SC (i) If tall items of dishware are being (see data plate for model number) washed, more room can be obtained by raising or lowering the upper basket. -
Page 25: Items Not Suitable For Dishwashers
– Clouding may occur on glasses after frequent washing. Miele recommends: Wash delicate glassware using the ECONOMY program or the CHINA & CRYSTAL program with a tempera- ture of 45 °C/115 °F (if so equipped). -
Page 26: Adding Detergent
Adding detergent Adding detergent Generally, filling the dispenser with one Use only powder detergents formu- to two tablespoons of detergent will be lated for residential dishwashers. sufficient to ensure thorough cleaning. Do not use gels or liquid deter- If dishes are extra dirty, or if the soil has gents. -
Page 27: Choosing A Program
Choosing a program Choosing a program The wash program chosen should de- pend on the type of dishes and the de- gree of soiling. In most cases a NORMAL program will give excellent results. The available programs and some of their applications are listed in the Pro- gram Chart on the next two pages. -
Page 28: Program Chart
Program chart Program chart Program When to use Detergent containing chlorine chlorine free Compart- Compart- Compart- ment I ment II ment II (Pre (Main (Main wash) wash) wash) Program NORMAL This program is for normal everyday loads. 20 % 100 % 55 °C/130 °F NORMAL Same as NORMAL 55 °C/130 °F, but at a... - Page 29 20.5 / 5.4 0.75 12.3 / 3.2 0.06 4.1 / 1.1 4) For models without water softener 5) With half loads (4 place settings – G 605 SC (i) 5 place settings – G 805 SC (i)). X = cycle used...
-
Page 30: Operating The Dishwasher
When finished, the program will stop automatically. In order to protect your home, your Miele dishwasher is designed to shut off the water flow and drain the ma- chine in the rare event of a valve failure. In order for this function to be... -
Page 31: Program Sequence Indication
Operating the dishwasher Program sequence indication. Program interruption During the wash program, the program A program is interrupted as soon as the knob will move around the dial and door is opened. If the door is closed show which section of the wash cycle again, the program will proceed from has been reached. -
Page 32: Unloading The Dishwasher
Unloading the dishwasher Unloading the dishwasher Dishes tend to break and chip easier when they are hot. Allow the dishes to cool down until they are comfor- table enough to handle before un- loading them. If the door is opened at the end of the drying cycle, the dishes will cool much faster. -
Page 33: Cleaning And Care
Cleaning and care Cleaning and care Cleaning the filters in the wash cabinet. The combination filter in the base of the wash cabinet should be regu- larly inspected and cleaned as necessary. Any broken glass or dishware should be removed imme- diately upon discovery. - Page 34 Cleaning and care Turn the combination filter over and Replace the combination filter so open the coarse filter cover by pull- that it lies flat in the base of the wash ing back on the locking tab. cabinet. Secure it by turning the handle clockwise.
-
Page 35: Cleaning The Spray Arms
Cleaning and care Cleaning the spray arms. On rare occasions particles of food may get stuck in the spray arm jets. They can be easily cleaned as follows: Remove the lower basket and the cutlery tray (if so equipped). The cut- lery tray frame can be pushed back Unscrew and remove the upper spray arm. -
Page 36: Cleaning The Drain Pump And Non-Return Valve
Cleaning and care Cleaning the drain pump and non-return valve. Use caution when cleaning the fil- ters, non-return valve or drain pump, as glass or bone splinters may be caught in the bottom of the wash cabinet. If the water in the dishwasher is not completely drained at the end of a pro- gram, the drain pump or non-return valve may be blocked. -
Page 37: Cleaning The Water Inlet Filter
Cleaning and care Cleaning the water inlet filter. Cleaning the filter. Disconnect the dishwasher from the The water valve housing on the inlet electrical supply (unplug it or shut off hose contains electrical compo- the circuit breaker). nents and should not be immersed or sprayed with water. -
Page 38: Installing An In-Line Water Filter
These filters can be obtained from the Do not use abrasive, all purpose, or Miele Parts Department. glass cleaners, as their use may damage the plastic surfaces. Cleaning the wash cabinet Cleaning the door panel. -
Page 39: Checking The Water Level
Checking the water level Checking the water level Checking the water level. If the water pressure is less than 14.5 psi (1 bar), too little water may flow into the wash cabinet. To check the water level, open the water valve completely and run the RINSE &... -
Page 40: Increasing The Water Intake Time
Checking the water level Increasing the water intake time. Using a small screwdriver, turn the Position the program knob verti- adjusting slot on the right hand side cally, then pull it off. of the spindle carefully counterclock- wise until it clicks into position. = Counterclockwise turn (increases water intake to 2 min.) -
Page 41: Problem Solving Guide
With the aid of the following notes, – The opening in the center of the cut- minor problems can be corrected with- lery tray is covered, restricting the out contacting the Miele Service De- flow of the water to the middle spray partment. arm. -
Page 42: Accessories
Other accessories (e.g. special inserts for glasses or plates, etc.) are available through your Dealer or the Miele Parts Department. Glass insert for the bottom basket: provides the ability to safely wash glasses in the bottom basket. - Page 43 Installation instructions...
-
Page 44: Dishwasher Installation
Contents Contents Dishwasher installation ..........45 1. -
Page 45: Dishwasher Installation
Dishwasher installation Dishwasher installation Dishwasher model G 605 SC (i) (see data plate for model number) The “i” model dishwasher is designed Removing the leg extensions. for installation under a continuous The black leg extensions can be countertop. removed if necessary, to reduce the A panel can be custom made for instal- height of the machine to 32 1/4"... - Page 46 Dishwasher installation Dishwasher model G 805 SC (i) (see data plate for model number) The “i” model dishwasher is designed To ensure stability, these dish- for installation under a continuous washers should only be installed countertop. under a continuous countertop A panel can be custom made for instal- which is securely fastened to the lation on the front of the dishwasher, as-...
-
Page 47: Install The Steam Deflector
Dishwasher installation 1. Install the steam deflector – 2. Install the dishwasher under (if applicable). the countertop. A stainless steel plate is supplied to It is preferable to install the main water protect the underside of the countertop and electric supplies so that they can against steam rising from the dish- be accessed through an adjacent washer when the door is opened. - Page 48 Dishwasher installation Install the slides. Two slides are included and should be installed on the feet of the dishwasher before the machine is pushed under the countertop. This will allow the ma- chine to slide easier, protect the floor, and allow adjustment of the rear level- ing legs from the front of the machine.
- Page 49 Dishwasher installation Adjust the rear leveling legs to the re- Adjust the front leveling legs by quired height. pushing on the foot with a slotted screwdriver. To raise the machine - turn clockwise. Tipping the machine slightly, if possible, To lower the machine - turn counter- clockwise.
-
Page 50: Installing The Control Panel
Dishwasher installation 3. Installing the control panel. The control panel and hardware is packaged separately from the dishwasher. It should be installed using the following procedure. bolts from their slots. If a GDU decor kit is being used, (to Install the number of spacer bars convert an “i”... -
Page 51: Aligning The Control Panel With The Drawer Fronts
Dishwasher installation 4. Aligning the control panel 5. Installing the custom with the drawer fronts. door panel. The control panel can be aligned A custom door panel matching the kit- with the drawer fronts of the kitchen chen cabinetry can be installed on the cabinets by adjusting the spacer dishwasher by using the provided tem- bars. - Page 52 Dishwasher installation Place a template on each end of the Slide the mounting bracket up or bracket as shown, making sure the down until the oblong holes on the rule marks face the outside of the machine door align with the corre- brackets.
- Page 53 Dishwasher installation Measure the distance from the ad- jacent cabinet (or appliance) door bottom to the bottom of of the mount- ing bracket (X). Using measurement (X), draw a line on the rear of the door panel (X) in- ches up from the bottom. Remove the bracket from the ma- chine door and place it on the rear of the door panel.
- Page 54 Dishwasher installation Once the door panel is positioned cor- rectly : Open the dishwasher door. Tighten all the Torx screws on the edges of the dishwasher door. Use the provided caps to plug the locking screw access holes. Open the dishwasher door slightly. If the locking screws on the edge of the dishwasher door can not be reached, the dishwasher will have to be pulled...
-
Page 55: Adjusting The Door Springs
Dishwasher installation 6. Adjusting the door springs. 7. Securing the dishwasher to the countertop. The door springs are adjusted correctly when a half opened door remains in To ensure the stability of the dish- that position when released. washer, it must be attached to the countertop after it has been positioned. - Page 56 If in doubt how to secure Push the dishwasher back into its open- the dishwasher, please call the Miele Service Department. ing, align and fasten it to the adjacent cabinets using 2 screws for each bracket.
-
Page 57: Installing The Toekick
Dishwasher installation For openings 17 3/4" (45 cm) wide: 8. Installing the toekick. Open the dishwasher door and In kitchens utilizing one continuous remove the caps covering the mount- toekick ing holes on the outer edge of the wash chamber. To prevent damaging the front panel, and before installing the toe- kick, measurements must be taken... - Page 58 Dishwasher installation For kitchens utilizing a non-con- Dishwasher model G 605 SC (i) tinuous toekick (see data plate for model number) The included toekick will fit without The flange on the end of the mounting modification when: brackets must point towards the center –...
- Page 59 Dishwasher installation Trimming the toeckick The rear of the toekick has two cutting Carefully open the dishwasher door lines. until it hits the toekick. Using the front lower edge of the door panel as a guide, draw a line across the toekick. Unscrew and remove the toekick.
-
Page 60: Electrical Connection
Electrical connection Electrical connection Exercise care when pulling the dish- It is the responsibility and obligation washer in or out, so as not to dam- of the customer to ensure that the age the power cord or hoses. electrical and plumbing installation is carried out by a qualified installer GROUNDING INSTRUCTIONS. - Page 61 Electrical connection Permanent Connection (Hard Wiring). For hard wiring, the power cord must be disconnected from the terminal box located at the lower left front of the dish- washer, behind the toekick and service panel. Pass the permanent power sup- ply cable through the strain relief and secure it to the terminal box.
-
Page 62: Plumbing
Plumbing Plumbing Hot water connection. It is the responsibility and obligation of the customer to ensure that the New plumbing: electrical and plumbing installation is carried out by a qualified installer in compliance with national and local codes and ordinances. To help protect your home, all dish- washers that carry the following blue and white sticker are designed to shut... - Page 63 Plumbing Existing plumbing: If the standard 3/8" copper plumbing for a dishwasher already exists with a compression fitting and valve as pic- tured: Do not, under any circumstances, cut the intake hose. If the hose is cut, the dishwasher will not work, you will have a water leak and you could be injured.
- Page 64 Plumbing Drain system specifications: Drain connection: The machine comes equipped with: – A 5 ft. long (1.5 m) flexible drain hose with an internal diameter of 7/8" (22 mm). – A built-in swivel connector which allows the drain hose to be routed in any direction.
- Page 65 Venting the drainage system Additional note. Only if the dishwasher drain hose is Since all Miele dishwashers are connected to a floor drain or to a equipped with an odor trap and non-re- drain pipe that is below the level of...
-
Page 66: Technical Data
Technical Data Technical Data Dishwasher model * G 605 SC (i) G 805 SC (i) Height 32 1/4" (82 cm) 33 1/8" (84 cm) adjustable to adjustable to 34 7/8" (88.6 cm) 35" (89cm) Width 17 1/2" (44.8 cm) 17 1/2" (44.8 cm) Width of opening 17 3/4"... - Page 68 Alteration rights reserved (G605/G607/G805/G807) /000 2498 These instructions are printed on 100% recycled paper and are completely Biodegradable.
Need help?
Do you have a question about the G 605 and is the answer not in the manual?
Questions and answers